• Post Reply Bookmark Topic Watch Topic
  • New Topic
permaculture forums growies critters building homesteading energy monies kitchen purity ungarbage community wilderness fiber arts art permaculture artisans regional education skip experiences global resources cider press projects digital market permies.com pie forums private forums all forums
this forum made possible by our volunteer staff, including ...
master stewards:
  • Nancy Reading
  • Carla Burke
  • r ranson
  • John F Dean
  • paul wheaton
  • Pearl Sutton
stewards:
  • Jay Angler
  • Liv Smith
  • Leigh Tate
master gardeners:
  • Christopher Weeks
  • Timothy Norton
gardeners:
  • thomas rubino
  • Jeremy VanGelder
  • Maieshe Ljin

Restoring soil structure and simple farming in a wet climate

 
steward and tree herder
Posts: 8454
Location: Isle of Skye, Scotland. Nearly 70 inches rain a year
3998
4
transportation dog forest garden foraging trees books food preservation woodworking wood heat rocket stoves ungarbage
  • Likes 3
  • Mark post as helpful
  • send pies
    Number of slices to send:
    Optional 'thank-you' note:
  • Quote
  • Report post to moderator

Paul Fookes wrote:Our soil is compacted clay over a plough pan so nothing is going to get through that sucker.  Parts have zero organic matter in it.  We have had a lot of success with using worms to do our spade work.  Mow low as you have done and then cover with cardboard and meadow hay, grass clippings and any other compostible material.  Make sure each layer is wet (probably no issue for where you are?) seed with what you want, and give the worms time to do their work.  There is some good studies showing that some worms will take nutrients down a meter or two  and more (3 - 6 feet).  They increase water penetration 10 fold.


Ha ha! Yes we generally have no problem with lack of rain, although as I said, I think this area may suffer a little in the first part of the growing season with lack of penetration. I wish the worms had a chance to go down 3-6 feet! I suspect even at the deepest this area is less than 2 ft, and I don't consider it to be particularly shallow for me!
That you have had good success on clay gives me hope. As I said I'm going to use next year to try and get the soil in shape, so mulching over winter and spring with organic material (and as much biochar as I can reasonably generate) and sowing daikon in autumn looks like a reasonable plan.
 
pollinator
Posts: 1455
Location: BC Interior, Zone 6-7
511
forest garden tiny house books
  • Likes 8
  • Mark post as helpful
  • send pies
    Number of slices to send:
    Optional 'thank-you' note:
  • Quote
  • Report post to moderator

Nancy Reading wrote:
I've optimistically sowed some areas that I hadn't mown in the summer with annual rye and vetch. First I mowed the areas as close as I could, then raked off the loose grass and sowed the seed really thickly. There were three separate patches. One of them I managed to rake back over again, the others I didn't get a chance to get back down to. I could see the crows having a great time there, so wasn't expecting anything much to survive. This was the case for the two areas not raked; there is some seedling growth, but I'm having to look hard for it. In the area that was raked however, there does seem to be quite a bit of vetch and rye grass coming up. It looks rather patchy - one area will be thick with vetch, another thick with grass.

The idea is that the annual rye will outcompete the meadowgrass in the spring, but we'll see if there is any success with this.


I have a grassy area I've been trying to convert to some kind of mostly grain field. I started out trying to smother the grass, but I could only do a fairly small area at a time and it took too long.  

This fall, I bought a long handled homi, a Korean hoe with a blade shaped like a plough. I cut the existing grass as short as I could and raked it off like you did. Then I dragged the homi along in rows every 6-8" to make little furrows in the grass where seeds could touch soil. It was super easy. I did an 800 ft2 area with very little effort, but it did take some time. The furrows were half a centimeter to two inches deep, depending on how hard packed the soil was and how much grass I had to get through.

I planted a whole bunch of different kinds of grain to see which ones do best, and I only had a regular seed packet of each - 50-75 seeds kinda thing. So I was very careful about seed placement. I'd already planted my rye somewhere else so I didn't think of what I should have tried. I have a tonne of rye, so I should have tried broadcast seeding over part of the furrowed area to see how well the rye took in the mowed areas versus the bare soil in the furrows.

The grass in my grain field area is mostly some kind of clumping grass that wasn't too difficult to pull the homi through. The occasional patch of running grass was tougher and the homi felt a little lightweight for the job. A bigger diamond hoe would probably be better.

I'm just trying to see what does well and increase my seed this year, but in the future I'll mix peas, poppies, flax, mustard, etc. in with the grain.

So, I just wanted to mention that if you have trouble getting seeds to grow in the grass, hoeing little furrows like I did might help get things started. Sounds like a heavier weight hoe than I had would be better for your situation. Of course, we'll have to see how well things go next spring before I claim success 😁 but it seems promising.
 
Nancy Reading
steward and tree herder
Posts: 8454
Location: Isle of Skye, Scotland. Nearly 70 inches rain a year
3998
4
transportation dog forest garden foraging trees books food preservation woodworking wood heat rocket stoves ungarbage
  • Likes 3
  • Mark post as helpful
  • send pies
    Number of slices to send:
    Optional 'thank-you' note:
  • Quote
  • Report post to moderator
Jan,
Thanks for introducing my to the homi (I had to look it up ( Homi, ) It looks like a useful tool. It reminds me that I have a hand plough somewhere. I'll have to find it and see whether it may be of use for me in this area.
I've been reading some of  Dr Redhawk's soil threads as well, and am trying to get my head around soil biota, whilst trying to work out what to do about compaction, and I haven't even got on to managing my soil pH in a Permies way (I don't think importing tons of limestone is on somehow!). I suspect what I will do this year is try lots of things in different areas, and hope that in a few generations the surviving plants that breed will be better adapted to the pH as well.
 
gardener
Posts: 2111
Location: Gulgong, NSW, Australia (Cold Zone 9B, Hot Zone 6) UTC +10
1002
6
hugelkultur fungi chicken earthworks wofati food preservation cooking bee building solar rocket stoves
  • Likes 7
  • Mark post as helpful
  • send pies
    Number of slices to send:
    Optional 'thank-you' note:
  • Quote
  • Report post to moderator

Nancy Reading wrote:Jan, Thanks for introducing my to the homi (I had to look it up ( Homi, ) It looks like a useful tool. It reminds me that I have a hand plough somewhere. I'll have to find it and see whether it may be of use for me in this area.


The homi is the most valuable tool in my shed.  Attached is a photo and a starter link.  I got mine sent from Korea many years ago.  The main thing is that they have to be kept sharp.
Korean-Homi.png
Korean-Homi-information-diagrams
 
Nancy Reading
steward and tree herder
Posts: 8454
Location: Isle of Skye, Scotland. Nearly 70 inches rain a year
3998
4
transportation dog forest garden foraging trees books food preservation woodworking wood heat rocket stoves ungarbage
  • Likes 6
  • Mark post as helpful
  • send pies
    Number of slices to send:
    Optional 'thank-you' note:
  • Quote
  • Report post to moderator
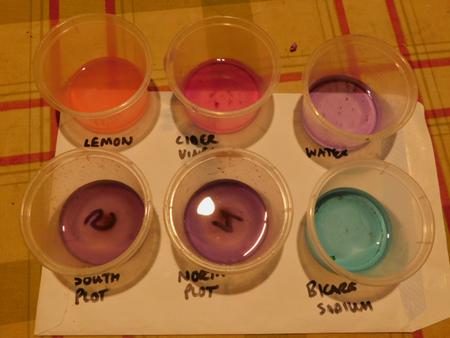
How not to do a soil pH test.

Just for fun, and because I had red cabbage to use up for dinner tonight I made a bit of red cabbage infusion to try pH testing of the soil samples I took a few weeks ago. I just chopped up the cabbage really finely and poured over boiling water to extract the red pigmentation.
I found a nice illustration of the pH scales on t'internet:

source

I made a rookie mistake though; I didn't bother to get distilled water to make my solutions with. As you can see, even the base solution with tap water is a bit acidic (maybe 5?). I'll have to do this again I guess with pure water, I don't think the soil samples were very much more acidic than the water. There is also still a bit of sediment in the samples which affects the coloration somewhat.
 
Nancy Reading
steward and tree herder
Posts: 8454
Location: Isle of Skye, Scotland. Nearly 70 inches rain a year
3998
4
transportation dog forest garden foraging trees books food preservation woodworking wood heat rocket stoves ungarbage
  • Likes 8
  • Mark post as helpful
  • send pies
    Number of slices to send:
    Optional 'thank-you' note:
  • Quote
  • Report post to moderator
Above one of our normal pedestrian access paths on my 'north plot' there is a section where I can make a growing plot about 4ft x 20ft. I'm preparing this section as a 'lazybed', or my version of those.  

I marked out the area with string temporarily. I had already brought down some woodash and seaweed gathered locally.

lazybed-marking-out-woodash-bags-emptied


I spread out the woodash and loosened the compacted soil a bit by digging the fork in and lifting, but not breaking the turf. I'm hoping the woodash will help the pH a bit, although since it has been sitting outside a while much of the KOH may have leached out already. Even if it doesn't help the pH much, there is a bit of charcoal, which may act as biochar in time. Much of it is also ash from paper and cardboard which my husband likes to burn in our other stove (not the range cooker). This leaves a residue of clay (from the coated paper) which I think will help my lighter soil too.

woodash-spreading-natural-farming-skye


I then emptied the first lot of seaweed bags out

seaweed-spreading-empty-bags-natural-farming-skye


and spread the seaweed out.

seaweed-spreading-natural-farming-skye


This is mainly kelp, which will rot down quite quickly. I'm thinking I want to get a bit more to spread over the plot before I turn the adjacent turf over to give the growing surface. I have more bags of seaweed (bladderwrack) which I'm going to spread over the final surface when I've done this to protect this a bit from the rain and further feed the soil organisms. Bladderwrack tends to break down more slowly.
The depression where the turf comes from will keep the lazy bed drained. I dithered a bit over whether I should make the beds N-S or across the slope, and I still don't know whether there is a best way. In the end I went for perpendicular to the wind, which is just off up-down slope and not quite N-S in orientation. Wind is my biggest problem, and I'm more worried that orienting with the slope or sun will make a bit of a wind tunnel, than lack or excess water.

This area will be a 'nursery area'. I have been collecting a variety of seeds to start my landraces, but obviously limited numbers of each. I'm hoping to increase my seeds by letting as much go to seed as possible, but with my borderline growing conditions, I'm thinking the plants can use as much help as I can give them, hence the soil improvements.

The rest of the area I won't dig. I'm hoping to generate enough deep rooting radish to seed it in summer next year to break up the soil. In the meantime I'm putting as much organic material as I can gather to knock back the grasses in the areas I have not sowed already with rye and vetch.
 
Nancy Reading
steward and tree herder
Posts: 8454
Location: Isle of Skye, Scotland. Nearly 70 inches rain a year
3998
4
transportation dog forest garden foraging trees books food preservation woodworking wood heat rocket stoves ungarbage
  • Likes 5
  • Mark post as helpful
  • send pies
    Number of slices to send:
    Optional 'thank-you' note:
  • Quote
  • Report post to moderator
One of the mulch materials I have in abundance at this time of year is small twiggy bits of branches from my coppice trees. They're a bit fiddly to be worth cutting up, and too green for use as kindling at present. My plan is to use some of these to help clear the grass from some of the area that I'm hoping to use in future.
In the past I have made little piles of the twigs when carrying out the coppicing. During the summer regrowth the twigs give some shelter and I can see the vegetation growing lusher adjacent to the twigs. (I think it is too soon to be significant additional nutrient effects). The grass under the twigs however, is partially shaded, so is actually knocked back a bit over the year. I took some pictures today to illustrate the effect:
First the pile of twigs. You can see the grass still green around them. I think these were common alder (Alnus glutinosa) cut last winter (although it is possible it was two years ago, I'm not sure)
mulching-Pile-of-twiggy-pruning-after-a-year
Pile of twiggy pruning after a year


I then pulled out the larger bits of twigs. These are easily broken by hand and once dried for a week or so in the shed and indoors make excellent kindling (no need for any splitting). The smallest twigs and buds get broken off when I do this and are left as a light mulch on the soil, which is apparently bare now. There will be roots still of persistent perennial weeds, like couch grass and docken, but basically the soil is pretty well cleared with no real additional effort from me.
mulching-clearing-grass-with-twigs-prunings
Cleared ground after removing twigs


I've just started to cut back some of the trees I intend to coppice this year. I will need to gather up the twigs and relocate them to my natural farming area. I'm going to pile some twigs up thickly to clear some of the area, and maybe also make some small brash hedges as described in this thread (amongst others). The areas I've already started working on (mulching, sown with rye and vetch, lazy bed) will get in the way of the windbreaks, but I can get a feeling for how effective they are, and whether I may be able to use the structure to support peas and beans in future....
 
Nancy Reading
steward and tree herder
Posts: 8454
Location: Isle of Skye, Scotland. Nearly 70 inches rain a year
3998
4
transportation dog forest garden foraging trees books food preservation woodworking wood heat rocket stoves ungarbage
  • Likes 2
  • Mark post as helpful
  • send pies
    Number of slices to send:
    Optional 'thank-you' note:
  • Quote
  • Report post to moderator
I tell you what - making a lazy bed is certainly not lazy gardening!

I managed to get some more bags of seaweed yesterday (in the teeth of a biting northerly gale with hail showers!). Unfortunately there was not much kelp yet - probably after this wind and a high tide there will be more come in. I compromised by getting a whole lot more bladderwrack and have used the previous bags of bladderwrack (which have gone lovely and slimy - yuck!) to top up the sandwich layer. I'll use the new ones as the surface mulch along with the few remaining original bags.

Lazy-bed-skye-seaweed-sandwich-natural-farming
Topping up seaweed - under puppy supervision


After spreading that, I had a go at lifting and inverting some of the turf. Ideally you want to fold the whole turf over like a carpet so as to have no holes for the grass to continue growing through. In practise I think i'm going to have to do this a different way. I used a spade and a mattock to try lifting a couple of strips of turf, but this is a) too heavy and b) too sticky for me to manage in a reasonable way. I think I made my bed far too wide for this technique to be practical - it is about 5 ft across.

turning-turf-lazy-bed-skye-natural-farming
Turning first turfs on lazy bed


I called it a day after turning three strips - one wide and two narrower. I had meant to turn over both sides like this, and then dig out the soil either side to cover it all thickly. What I'm going to do instead is cut small deep turfs (two spades by one spade probably) and cut a full spade depth of soil with each, and try and build the bed up by inverting these as close together as I can. I may get more grass regrowth this way, but I don't think in practice it will make much difference and will save going back over doing most of the second lot of digging. I'll just need to tidy the trenches a bit.

I'm finding quite a few pignuts (Conopodium majus) as I'm digging. The dogs quite like these raw, I prefer them cooked (my 'blog on pignuts) so have put some of the bigger ones to one side - not enough for a meal yet. Apparently they don't improve with domestication, I think the bigger ones I dig are decades old, but they are naturally here in the field, so if I can avoid routine digging in future they should stay reasonably happy.

 
gardener
Posts: 1871
Location: Japan, zone 9a/b, annual rainfall 2550mm, avg temp 1.5-32 C
930
2
kids home care trees cooking bike woodworking ungarbage
  • Likes 5
  • Mark post as helpful
  • send pies
    Number of slices to send:
    Optional 'thank-you' note:
  • Quote
  • Report post to moderator
I feel like getting the more natural stuff going is the hard part. Once it's established things get pretty lazy. At least that's what I'm hoping...
 
Nancy Reading
steward and tree herder
Posts: 8454
Location: Isle of Skye, Scotland. Nearly 70 inches rain a year
3998
4
transportation dog forest garden foraging trees books food preservation woodworking wood heat rocket stoves ungarbage
  • Likes 4
  • Mark post as helpful
  • send pies
    Number of slices to send:
    Optional 'thank-you' note:
  • Quote
  • Report post to moderator
Rather more than a week later and my (not very) lazy bed is starting to take shape. We've had a fair amount of 'Misty Isle' weather, which meant it was a bit damp for digging, but I managed to get a fair amount done over the last few days. Inverting the clods separately rather than trying to peel them over like a carpet has definitely made the job a whole lot easier. It is also exposing quite how compacted the soil is. Despite all the misty weather - a fine mizzle of low cloud that has meant the surface is quite claggy, especially where I walk often - handling the turfs has been relatively clean. The soil an inch or so down is actually - not dry exactly - but certainly not as wet as it deserves to be. The rain is not penetrating nearly as well as it should. I folded over the edges leaving the grass attached, and infilled the middle of the bed with loose turfs.

lazy-bed-turf-complete-skye


This leaves me with a muddy ditch either side which I need to find a good surface for. I'd prefer this to be a growing surface rather than an added material. I've made a bit of a ramp down at the top end so that I can wheel my barrow down easily. I could do with doing the same at the bottom end too so I don't end up with a pond there; this is not designed for water retention. We do have a dry spell most years in spring, but it generally only last a few weeks. I'm thinking something like white clover would be the obvious choice. Daisies would be good too, and self heal.

I'm finding the soil satisfactorily deep. Only at the very top end was I hitting rock at about a spade's depth, so since I am doubling the depth by putting turfs on top of the grass surface I should have a reasonable depth of soil to grow in. It wouldn't be true to say the soil is completely lifeless. I don't know about microscopic life, but there were a few pale earthworms, what I think may be clickbeetle larvae, and some weevil larvae. Not exactly teeming with life though. It is amazingly homogeneous in texture, just a fine silky silt brick, topped with grass and with pignuts throughout. This picture shows a turf that unusually had two small earthworms in. Most had none that i saw.

small-pale-earthworms


I still need to take a shovel down and level the 'path' areas, putting the loose soil onto the top of the bed to fill in the gaps in between the upturned turfs a bit. Then I'll cover the whole bed with the rest of the seaweed to protect the surface and let it mellow until the weather gets warm enough to sow. To recap, this area is going to be a trials and nursery bed this year to increase my seed stocks, whilst I prepare the rest of my growing area.

While the weather was a bit damper, I moved some of the side branches from my coppiced wood that I've been cutting (birch and alder) to the southern planting area. I've stuck some of the longer branches in a double row perpendicular to the wind in the centre of the area. The idea is to fill in between with smaller twiggy bits and make a bit of a wind break. Whether it will stand up to the wind much remains to be seen. I should have made holes first with a metal pole. I was finding it difficult to get the sticks in more then 4 or 5 inches, and that will not be enough even for a very small dead hedge. I haven't started backfilling yet, so I may have another go at this to see if I can make a better job of it.

starting-dead-hedging


Nancy Reading
steward and tree herder
Posts: 8454
Location: Isle of Skye, Scotland. Nearly 70 inches rain a year
3998
4
transportation dog forest garden foraging trees books food preservation woodworking wood heat rocket stoves ungarbage
  • Likes 6
  • Mark post as helpful
  • send pies
    Number of slices to send:
    Optional 'thank-you' note:
  • Quote
  • Report post to moderator
A nice afternoon off yesterday gave me the time to finish off my not-so-lazy-bed. First I skimmed the uneven soil off the paths, putting the extra soil on top of the bed. One of my access paths goes accross below the bed, so I had to take a bit more turf off so as not to end up with a puddle or a step there. I dug a little culvert to take any excess water into the bordering trees.


I did the same on the other side of the bed, which will still be needed for access. Then I topped the entire bed with seaweed. I didn't bother level the earth on the top of the bed, just tried to fill in the bigger cracks. I'm pretty sure the weather will soon break it up enough, and hopefully the larger pores will keep it aerated.


I needed more seaweed than I had initially thought to give a good layer, but I still have plenty of bags for the rest of the area.

The soil at the bottom end of the bed is shallower than at the top; the rock surface must be a bit uneven. I was finding bits of bedrock sticking up in the path a bit.

I think my main challenge in the planting areas will be the very compacted nature of the soil. There are no air pores in it at all. Hopefully the daikon radish will make some good holes to start off. I've also sprinkled some parsley seeds in, but am not confident they will compete with the grass very well. I'd like to be in a position to start broadscale growing in 2023, but if the daikon don't take well I may have to try some other biennials like hogweed which grows elsewhere in the field, but not really on this bit yet.  The alternative is more not- very-lazy-beds!
 
Nancy Reading
steward and tree herder
Posts: 8454
Location: Isle of Skye, Scotland. Nearly 70 inches rain a year
3998
4
transportation dog forest garden foraging trees books food preservation woodworking wood heat rocket stoves ungarbage
  • Mark post as helpful
  • send pies
    Number of slices to send:
    Optional 'thank-you' note:
  • Quote
  • Report post to moderator
I've created a 'blog post about the creation of my lazy bed using the last few posts here, and published it on my SkyeEnt 'blog
 
This looks like a job for .... legal tender! It says so right in this tiny ad:
GAMCOD 2025: 200 square feet; Zero degrees F or colder; calories cheap and easy
https://permies.com/wiki/270034/GAMCOD-square-feet-degrees-colder
reply
    Bookmark Topic Watch Topic
  • New Topic