|

|

|

|

|

|
|
|
|
|
|
|
|

|

|

|

|

|
 6
6


Invasive plants are Earth's way of insisting we notice her medicines. Stephen Herrod Buhner
Everyone learns what works by learning what doesn't work. Stephen Herrod Buhner


 5
5
Glenn Herbert wrote:Code even says that a masonry heater needs to be supported directly by masonry piers or foundation and not wood
Become extra-civilized!
 7
7
Glenn Herbert wrote:Heating rooms distant from the heater location could be tricky, and we can only advise usefully with a floor plan of some sort and/or good pictures.
6
Glenn Littman wrote:...What is holding you back?
5
Ian Graham wrote:As for no wood floor under a RMH that sets me back, not even with a sheetmetal barrier like I have under my woodstove?
8
6
John C Daley wrote:In Australia I am held back by lack of concrete information.
I habe been advised by members on this site about what type and size I need to build.
But detailed information about build plans are very hard to find.
I have ascertained from batchheater.eu what dimensions I need but that is all.
I would love detais for a 125mm [ 5 inch] batch rocket unit.
6
Avoiding power
7
7
Avoiding power
7
dalo franss wrote:- do you just stack the firebricks? or need some goop between them?
dalo franss wrote:- insulating the riser with rock wool or is that too low temp stuff?
dalo franss wrote:- the top insulating bricks that's that funny whatchamacallit white material right?
dalo franss wrote:Yes, evolve, my intention is to build one which can be "easily" disassembled and upgraded,
and builing the first one outside.
6
![[Thumbnail for RMH-Pipe-System.png]](/t/362328/a/282566/RMH-Pipe-System.png "Filename: RMH-Pipe-System.png
Description:") 4
4
. I need a little advise for this configuration considered before commencement of construction.Rocky Massengale wrote:I have drawn up a plan for one for our place in Arkansas Mountains, but have Not begun yet. I have a question about the Mass Heater portion of pipe. Does the pipe have to be perfectly horizontal, as I have it drawn with slight incline for each leg, which brings me to the 2nd question. I have approximately 32 feet before chimney entrance which is approximately 30' but have 3 180 deg turns as I have 4 runs drawn into the bench area, with chimney near combustion chamber barrel to help draw. Is this too much length. Please see illustration. Pipe is 6" w/ 1/8" wall
 4
4
You can see that center section is vertical whereas the feed section from combustion into it is slightly angled and discharge end is slightly angled to provide draw to chimney. Feasible ?Rocky Massengale wrote:
. I need a little advise for this configuration considered before commencement of construction.Rocky Massengale wrote:I have drawn up a plan for one for our place in Arkansas Mountains, but have Not begun yet. I have a question about the Mass Heater portion of pipe. Does the pipe have to be perfectly horizontal, as I have it drawn with slight incline for each leg, which brings me to the 2nd question. I have approximately 32 feet before chimney entrance which is approximately 30' but have 3 180 deg turns as I have 4 runs drawn into the bench area, with chimney near combustion chamber barrel to help draw. Is this too much length. Please see illustration. Pipe is 6" w/ 1/8" wall
6
I forgot to mention that cleanouts have been added at 180's to clean out Horizontal runs, and that Barrel is Schedule 20 SS 24" pipe 36" long will be building manifold as suggested with IFB-2600 Brick and wrapping with perlite to about 2 - 2 1/2" from the barrel cap at top.Rocky Massengale wrote:
You can see that center section is vertical whereas the feed section from combustion into it is slightly angled and discharge end is slightly angled to provide draw to chimney. Feasible ?Rocky Massengale wrote:
. I need a little advise for this configuration considered before commencement of construction.Rocky Massengale wrote:I have drawn up a plan for one for our place in Arkansas Mountains, but have Not begun yet. I have a question about the Mass Heater portion of pipe. Does the pipe have to be perfectly horizontal, as I have it drawn with slight incline for each leg, which brings me to the 2nd question. I have approximately 32 feet before chimney entrance which is approximately 30' but have 3 180 deg turns as I have 4 runs drawn into the bench area, with chimney near combustion chamber barrel to help draw. Is this too much length. Please see illustration. Pipe is 6" w/ 1/8" wall
Advise on design would be muchly appreciated


 8
3
3
12
8
4
6
2
8
3
3
12
8
4
6
2
")


 8
8
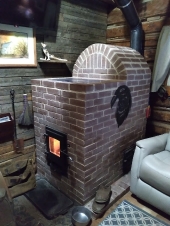
For all your Montana Masonry Heater parts (also known as) Rocket Mass heater parts.
Visit me at
dragontechrmh.com Once you go brick you will never go back!
7


 3
3
 9
2
9
2
![[Thumbnail for Cabin.png]](/t/362328/a/282856/Cabin.png "Filename: Cabin.png
Description:")
![[Thumbnail for Container-Configuration.png]](/t/362328/a/282857/Container-Configuration.png "Filename: Container-Configuration.png
Description:")
![[Thumbnail for Final-Bell-Dimensions.png]](/t/362328/a/282858/Final-Bell-Dimensions.png "Filename: Final-Bell-Dimensions.png
Description:") 2
7
7
7
7
9
9
2
7
7
7
7
9
9
Sophie Hatter wrote:Researching about RMH is how I found this site! I bought raw land, have cleared a small bit of it, and am working on house design now. Due to the terrain, I've been advised to build with a walk-out basement. My challenges re RMH include: if i put it on the main floor (the living area), what do I need to do to make sure the floor can support the weight? If I put it in the basement, how do i use the heat to heat the main floor? Is there a way to use that heat to make the main level floor like a radiant heat floor? Could i put one on both levels and have the basement chimney meet the main floor chimney to go outside?
I was planning to do the RMH that's the bench style, but after reading this thread and some other posts on here, I'm not committed to that style (the warm seating would be very nice, though).
A new-in-the-box traditional wood stove came into my life before I knew about RMH. Is there a way to utilize that as a component of a RMH?
I'm in no hurry to build this, but I need to decide what I'm going to do asap so I can incorporate it into the house plans (chimney placement re roof, support under main floor, etc). I'd like heat by winter 2026 but I've managed this past winter with wearing/sleeping under layers and heating my immediate space with candles/terracotta pots, so I'm sure I'll survive if i don't get it built before it gets cold. I want to KNOW what I'm doing before i get started on it, so i still have a lot of reading and video watching to do! And suggestions/guidance are VERY welcome!!!
12
Sophie Hatter wrote:Researching about RMH is how I found this site! I bought raw land, have cleared a small bit of it, and am working on house design now...
13
10
11

|
Bring me the box labeled "thinking cap" ... and then read this tiny ad:
building a better world rather than being angry at bad guys
https://wheaton-labs.com/bootcamp
|