Garden Mastery Academy - Module 1: Dare to Dream
will be released to subscribers in:
soon!

|

|

|

|

|


 7
7


It is a privilege to live, work and play in the traditional territory of the Salish People.
Now drop and give me 52... ~ Come Join the permies Shoecamp! ~ All about Permies, including Tutorials ---
Twenty bucks off the homesteading bundle for the next 72 hours!

Skill verified by Mike Haasl")

Skill verified by Leigh Tate")

Skill verified by jordan barton") 4
4


It is a privilege to live, work and play in the traditional territory of the Salish People.
Now drop and give me 52... ~ Come Join the permies Shoecamp! ~ All about Permies, including Tutorials ---
Twenty bucks off the homesteading bundle for the next 72 hours!
4
'Theoretically this level of creeping Orwellian dynamics should ramp up our awareness, but what happens instead is that each alert becomes less and less effective because we're incredibly stupid.' - Jerry Holkins
2
D Nikolls wrote:Neat, good to see the impact.
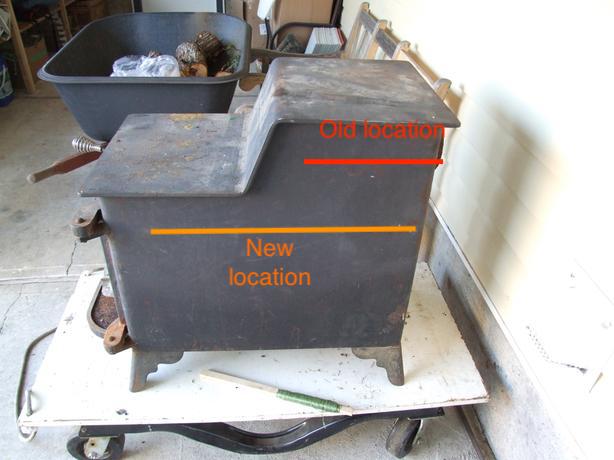
I have the impression that back-when, the baffle was thought of as 'slow down the escaping hot air', and now.it is thought of as 'let's make the combustion more complete'..
I wonder what you would see if you doubled up on baffles...
Have you thought about adding a secondary air intake?
It is a privilege to live, work and play in the traditional territory of the Salish People.
Now drop and give me 52... ~ Come Join the permies Shoecamp! ~ All about Permies, including Tutorials ---
Twenty bucks off the homesteading bundle for the next 72 hours!
3
“It’s said war—war never changes. Men do, through the roads they walk. And this road—has reached its end.”

Skill verified by gir bot") 3
3
3
3
Jordan Holland wrote:I have a Fisher Pappa Bear. I recall reading about them that they were designed not to need a gasket on the door. Mine did not seal as much as I wanted, so maybe the air leak was part of the design to add a little secondary air up higher than the dampers? The baffle was called an "ash fender," so my guess is it is designed to help prevent ashes from getting sucked into and blocking the horizontal area before the elbow. I've wondered about the possibility of making a small Walker-esque stove from it. Maybe some day...
3
D Nikolls wrote:Neat, good to see the impact.
I have the impression that back-when, the baffle was thought of as 'slow down the escaping hot air', and now.it is thought of as 'let's make the combustion more complete'..
I wonder what you would see if you doubled up on baffles...
Have you thought about adding a secondary air intake?
2
It is a privilege to live, work and play in the traditional territory of the Salish People.
Now drop and give me 52... ~ Come Join the permies Shoecamp! ~ All about Permies, including Tutorials ---
Twenty bucks off the homesteading bundle for the next 72 hours!
3
It is a privilege to live, work and play in the traditional territory of the Salish People.
Now drop and give me 52... ~ Come Join the permies Shoecamp! ~ All about Permies, including Tutorials ---
Twenty bucks off the homesteading bundle for the next 72 hours!
4

It is a privilege to live, work and play in the traditional territory of the Salish People.
Now drop and give me 52... ~ Come Join the permies Shoecamp! ~ All about Permies, including Tutorials ---
Twenty bucks off the homesteading bundle for the next 72 hours!
 4
4
For all your Montana Masonry Heater parts (also known as) Rocket Mass heater parts.
Visit me at
dragontechrmh.com Once you go brick you will never go back!
4
2
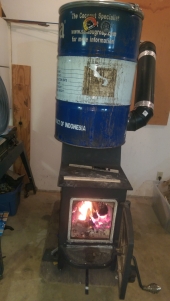
Ted Garriott wrote:I have a grandpa Fishers wood stove. It does not have any type of plate in the top. All my smoke and heat go straight up the pipe. My question is is there supposed to be a plate in the top of my stove to divert the smoke and Heat
5
Ted Garriott wrote:I have a grandpa Fishers wood stove. It does not have any type of plate in the top. All my smoke and heat go straight up the pipe. My question is is there supposed to be a plate in the top of my stove to divert the smoke and Heat
5
![[Thumbnail for IMG_1635.JPG]](/t/153565/a/190718/IMG_1635.JPG "Filename: IMG_1635.JPG
Description:")


It is a privilege to live, work and play in the traditional territory of the Salish People.
Now drop and give me 52... ~ Come Join the permies Shoecamp! ~ All about Permies, including Tutorials ---
Twenty bucks off the homesteading bundle for the next 72 hours!
2
For all your Montana Masonry Heater parts (also known as) Rocket Mass heater parts.
Visit me at
dragontechrmh.com Once you go brick you will never go back!
1
thomas rubino wrote:Hi Jordan;
Very cool idea, make what you have work better! Sort of like a run what you "Brung" at the race track!
So you dry stacked your firebricks and then spread clay /shale mortar over the whole thing to seal it.
I agree the majority will fall off but it is easy to reapply as needed.
Not being a rocket burner your angle across the roof should hold up.
Did you tack the angle into "tees" for added strength?
Is the outer shell cast iron? If so it should do fine.
A steel shell might warp once you get the firebricks up to temperature.
Great news that Peter has used Kiln shelves in his DSR stove,s with good results!
It is a privilege to live, work and play in the traditional territory of the Salish People.
Now drop and give me 52... ~ Come Join the permies Shoecamp! ~ All about Permies, including Tutorials ---
Twenty bucks off the homesteading bundle for the next 72 hours!
2

|
Roses are red, violets are blue. Some poems rhyme and some don't. And some poems are a tiny ad.
earth skills program
https://wheaton-labs.com/bootcamp
|