gift
Rocket Mass Heater Manual
will be released to subscribers in: soon!
  • Post Reply Bookmark Topic Watch Topic
  • New Topic
permaculture forums growies critters building homesteading energy monies kitchen purity ungarbage community wilderness fiber arts art permaculture artisans regional education skip experiences global resources cider press projects digital market permies.com pie forums private forums all forums
this forum made possible by our volunteer staff, including ...
master stewards:
  • Carla Burke
  • Nancy Reading
  • John F Dean
  • r ranson
  • Jay Angler
  • paul wheaton
stewards:
  • Pearl Sutton
  • Leigh Tate
  • Devaka Cooray
master gardeners:
  • Christopher Weeks
  • Timothy Norton
gardeners:
  • thomas rubino
  • Matt McSpadden
  • Jeremy VanGelder

The Bone and Eggshell Crusher

 
gardener
Posts: 461
Location: Northern Ontario, Canada
317
goat dog gear books bike building
  • Likes 15
  • Mark post as helpful
  • send pies
    Number of slices to send:
    Optional 'thank-you' note:
  • Quote
  • Report post to moderator
This tool has been a while in the making, but I'm just about done making it. The idea came from struggling to crush bones and eggshells in large quantities. An 8lb sledge was used originally, but it got tiring to keep a good grip on it. So I'm basically adding a handle to make things much easier to grip. I guess you could say it's one part of a giant mortar and pestle. It's all from scrap, so the first little while was spent hunting around the property for handle materials. Once I found a tube that would work, I cleaned it, measured, and cut it. I also cleaned the rust off the hammer head. In addition I ground down one end of the head down to bare steel to make sure I got a good connection for the welding. It takes some extra time, but makes the weld both easier to do and it ends up being stronger. Today I welded them together, succesfully I might add. I did several small beads to avoid burning through, and so I could rotate the tool. It was an awkward set up but it ended up working well.

Now to just add the rectangular cap to seal stuff in and it will be ready to get crushin'.
Crushing-hand-tool.jpg
First idea - wood handle and bolted.
welded.png
Second idea - metal handle welded on. This is what I went with.
head.gif
Hammer head cleaned up
cutting.jpg
Getting a clean end on the handle before cutting 10" off
handle_compress19.jpg
Handle cut and cleaned up
professional-welding.jpg
My set up on an old sink with my magnets and a wood shim
crusher-progress.jpg
[Thumbnail for crusher-progress.jpg]
welds.jpg
Not super pretty but strong
cap.jpg
Going to weld this on top to seal stuff up and to give something for your hand to catch
 
Cam Haslehurst
gardener
Posts: 461
Location: Northern Ontario, Canada
317
goat dog gear books bike building
  • Likes 10
  • Mark post as helpful
  • send pies
    Number of slices to send:
    Optional 'thank-you' note:
  • Quote
  • Report post to moderator
The crusher is complete. Got the little plate welded on and it is very easy to pick up and drop now. Does it work though? I say heck yeah it does. Take a look at the pics. Might I add that I am not at all tired out. It's because I don't need to use my muscles to push the hammer down into the bones, gravity does all that. All I need to do is to lift and drop it. I was doing it with one arm, but it can be done with two as the handle is long enough to accomodate two hands.

Now if we're going to go full-lazy, the next step would be to drill two holes in the top plate for a U-bolt to go through. Then tie a rope to the u-bolt, and get it into a pulley - maybe from an old clothesline. Attach the pulley to something sturdy, then use the rope and pulley to lift and drop the hammer while you maniulate the bowl with your feet to make sure the hammer isn't hitting the exact same spot every time. Voila - gorgeous bone meal without electricity and without strenuous effort!

bones.jpg
Bones quivering in fear as they await the Crusher
crushin.jpg
They don't stand a chance
squished.jpg
You could stop here - but I want fine bone meal
sift-not-necessary-but-satisfying.jpg
Sifting away...if you're doing this in an enclosed space I recommend a dust mask
damn-thats-fine.jpg
Final product!
Final product!
 
pollinator
Posts: 147
Location: Northern British Columbia Zone 3
75
gear hunting foraging books food preservation cooking
  • Likes 1
  • Mark post as helpful
  • send pies
    Number of slices to send:
    Optional 'thank-you' note:
  • Quote
  • Report post to moderator
Nice.  I like your design.  Are you using this for raw or cooked bones?
 
Cam Haslehurst
gardener
Posts: 461
Location: Northern Ontario, Canada
317
goat dog gear books bike building
  • Likes 4
  • Mark post as helpful
  • send pies
    Number of slices to send:
    Optional 'thank-you' note:
  • Quote
  • Report post to moderator
Thanks! And the bones are cooked. Heated on a fire outdoors for several hours I believe.
 
Cam Haslehurst
gardener
Posts: 461
Location: Northern Ontario, Canada
317
goat dog gear books bike building
  • Likes 9
  • Mark post as helpful
  • send pies
    Number of slices to send:
    Optional 'thank-you' note:
  • Quote
  • Report post to moderator
Two years later, it is time for a follow up. I wanted to make another crusher for at home use, and I never quite got around to it. One day I decided, "Let's do it!"

But I had no idea where the small sledge hammer head had gone. Months past, and life went on...

Until today when I was scrounging around my metal pile and found the head!


I was looking for a project, so I got right to it. I cleaned up the end of the head, and grabbed some 5/8" round bar that I got for free from the metal shop I used to work at. As the end I'm welding to is pointed, I needed to cut the end of the bar to fit it. Here is my highly precise and utterly professional marking of the area with soapstone.


And then I got out my grinder and sliced. It took a minute or two. Then I tested how it fit - not bad!


And the other side:


Then I got it set up on my fitting table as best I could.


Then I got my little welder up and running, in DC positive and at ~85 amps. I grabbed a 3/32" 6010 rod, and did a couple of zaps to tack it up. Here is where we are now:
DIY bonemeal crusher instructions

As the handle is about 4 feet long, I can use this one standing over the bucket. It's kind of fun actually, and it works great even with just the few tacks on there. I'll finish welding it up tomorrow. Let's get CRUSHIN'!!
 
pollinator
Posts: 5367
Location: Bendigo , Australia
485
plumbing earthworks bee building homestead greening the desert
  • Likes 2
  • Mark post as helpful
  • send pies
    Number of slices to send:
    Optional 'thank-you' note:
  • Quote
  • Report post to moderator
I assume the standing position with the long handle is more comfortable than the hand and arm system.
 
Cam Haslehurst
gardener
Posts: 461
Location: Northern Ontario, Canada
317
goat dog gear books bike building
  • Likes 1
  • Mark post as helpful
  • send pies
    Number of slices to send:
    Optional 'thank-you' note:
  • Quote
  • Report post to moderator

John C Daley wrote:I assume the standing position with the long handle is more comfortable than the hand and arm system.


Yes so far it is! I do need to add a handle at the top though so there's something for my hand to catch on.

This is by far the simplest tool I've made, but one of the most useful for crushing bones and egg shells!
 
John C Daley
pollinator
Posts: 5367
Location: Bendigo , Australia
485
plumbing earthworks bee building homestead greening the desert
  • Likes 1
  • Mark post as helpful
  • send pies
    Number of slices to send:
    Optional 'thank-you' note:
  • Quote
  • Report post to moderator
Would a simple knob at the top work, I have a road tamping tool with one and it helps.
 
Cam Haslehurst
gardener
Posts: 461
Location: Northern Ontario, Canada
317
goat dog gear books bike building
  • Likes 1
  • Mark post as helpful
  • send pies
    Number of slices to send:
    Optional 'thank-you' note:
  • Quote
  • Report post to moderator

John C Daley wrote:Would a simple knob at the top work, I have a road tamping tool with one and it helps.


That's most likely what I'll be going with John. Anything that stops my hand while still being comfortable works great! I could have some fun with that part, now that I think of it
 
gardener
Posts: 1811
Location: Zone 6b
1131
forest garden fungi books chicken fiber arts ungarbage
  • Likes 1
  • Mark post as helpful
  • send pies
    Number of slices to send:
    Optional 'thank-you' note:
  • Quote
  • Report post to moderator
How heavy is the sledge hammer? I use my sledge hammer for crushing stuffs too. It is heavy at 8 # so I put things on a 1 ft tall tree stump, sometimes with a cardboard box for containing. With this height, I am able tobstand straight up with both hands holding the handle and smash with a up and down motion. It's not hurting my back or wrist this way. I guess if the hammer is light enough with one hand, a knob will work. Otherwise, maybe weld a horizontal bar on top for both hands to hold?
 
Cam Haslehurst
gardener
Posts: 461
Location: Northern Ontario, Canada
317
goat dog gear books bike building
  • Likes 2
  • Mark post as helpful
  • send pies
    Number of slices to send:
    Optional 'thank-you' note:
  • Quote
  • Report post to moderator

May Lotito wrote:
How heavy is the sledge hammer? I use my sledge hammer for crushing stuffs too. It is heavy at 8 # so I put things on a 1 ft tall tree stump, sometimes with a cardboard box for containing. With this height, I am able tobstand straight up with both hands holding the handle and smash with a up and down motion. It's not hurting my back or wrist this way. I guess if the hammer is light enough with one hand, a knob will work. Otherwise, maybe weld a horizontal bar on top for both hands to hold?


The original one I made was definitely a larger head - I forget the exact weight. I don't know why I didn't think of a handle for both hands...excellent idea. I might do that for this one even though it's a smaller head. That way, it can be used one handed but also two handed to make it easier to do for extended periods.

Sorry I didn't reply earlier, I just saw this now!
 
gardener
Posts: 504
Location: Wabash, Indiana, Zone 6a
245
hugelkultur monies forest garden foraging trees books food preservation bike bee writing rocket stoves
  • Likes 1
  • Mark post as helpful
  • send pies
    Number of slices to send:
    Optional 'thank-you' note:
  • Quote
  • Report post to moderator
You made the analogy of a mortar and pestle. I think that is apt. What if you added a cylindrical steel pestle into which the mortar fit pretty snugly? Could even put a small sliding door at the bottom to clean out the finer contents at the bottom when you're done smashing. I think that the increased pressure per square inch might yield a smaller, finer output.

j

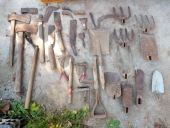
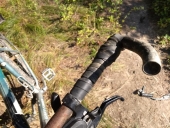
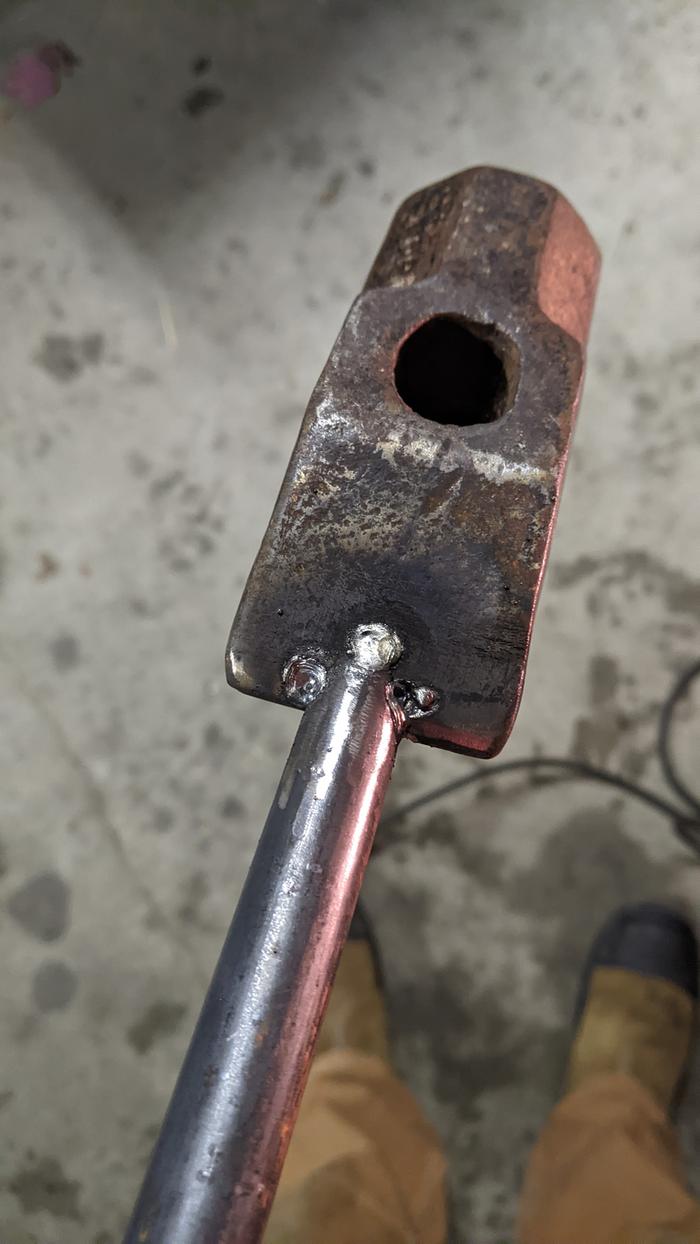
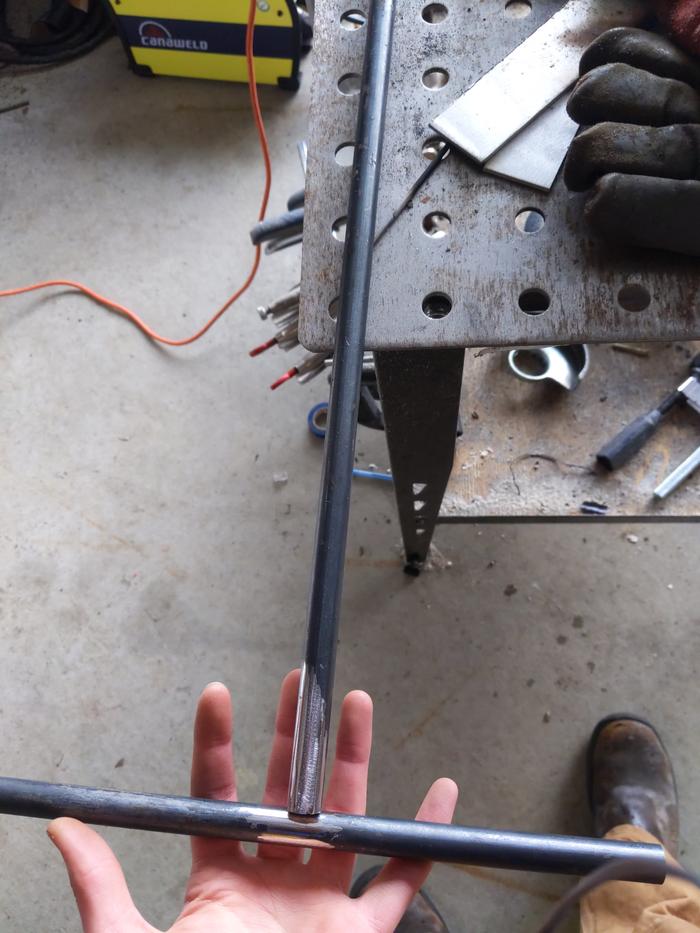
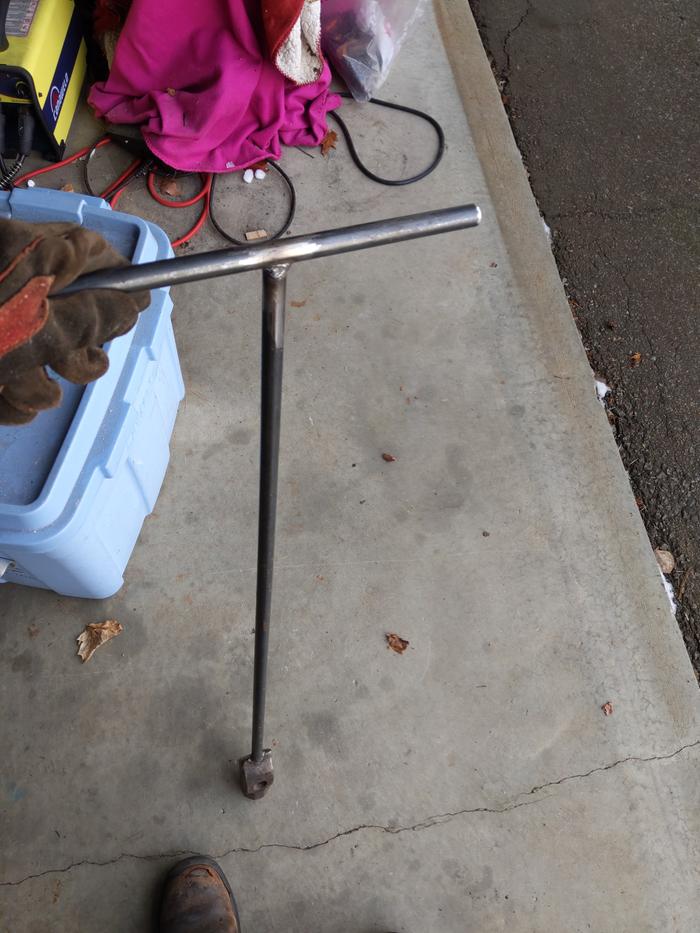
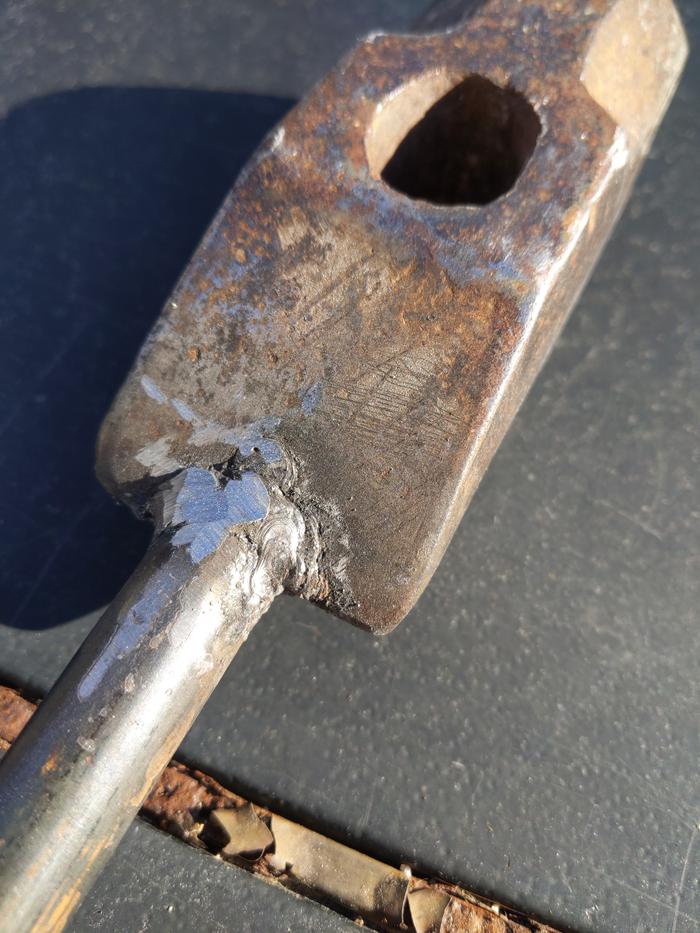
Cam Haslehurst wrote:This tool has been a while in the making, but I'm just about done making it. The idea came from struggling to crush bones and eggshells in large quantities. An 8lb sledge was used originally, but it got tiring to keep a good grip on it. So I'm basically adding a handle to make things much easier to grip. I guess you could say it's one part of a giant mortar and pestle. It's all from scrap, so the first little while was spent hunting around the property for handle materials. Once I found a tube that would work, I cleaned it, measured, and cut it. I also cleaned the rust off the hammer head. In addition I ground down one end of the head down to bare steel to make sure I got a good connection for the welding. It takes some extra time, but makes the weld both easier to do and it ends up being stronger. Today I welded them together, succesfully I might add. I did several small beads to avoid burning through, and so I could rotate the tool. It was an awkward set up but it ended up working well.

Now to just add the rectangular cap to seal stuff in and it will be ready to get crushin'.

 
Cam Haslehurst
gardener
Posts: 461
Location: Northern Ontario, Canada
317
goat dog gear books bike building
  • Likes 3
  • Mark post as helpful
  • send pies
    Number of slices to send:
    Optional 'thank-you' note:
  • Quote
  • Report post to moderator

Jim Garlits wrote:You made the analogy of a mortar and pestle. I think that is apt. What if you added a cylindrical steel pestle into which the mortar fit pretty snugly? Could even put a small sliding door at the bottom to clean out the finer contents at the bottom when you're done smashing. I think that the increased pressure per square inch might yield a smaller, finer output.


Excellent idea Jim. Potentially a properly dimensioned pipe welded or bolted to some flatbar that one could stand on to hold it steady.

________________

I completed the second crusher today. Thanks May for the inspiration - I ended up making a longer handle because of your suggestion!

First I started by cutting a clean end on the crusher rod. It had a slanted cut, from the welding shop I got it from (in the scrap pile, I love free metal ) Notice my very expensive "chop saw". This won't cut anything thicker than 3/4" thick or so, and it is very slow. But it was only $25, as opposed to $300+ for an actual chop saw. For my at-home messing about purposes it is perfect.


Once I had a clean end, I cleaned up the edges with a flap wheel. This killed two birds with one stone. First, it gave me a clean spot to clamp my ground when welding out the head. Then it gave me a clean area to weld to when I was putting the handle on.

Then I sliced more round bar to give myself a 12" handle. I cleaned up the center, where it would be welded to the rod. Here they are held in place.


Then tacked up.


I checked for square-ness. It was close enough for my liking, so I started welding. I used 3/32" 6010 rod, welding at 85 amps. 6010 is a fast freezing electrode with an interesting bead appearance compared to other welding rods. You'll see my welds further down. I welded one side, then the other. Then I "wrapped my corners". I put that in quote because this is a circle I was welding, with no corners 
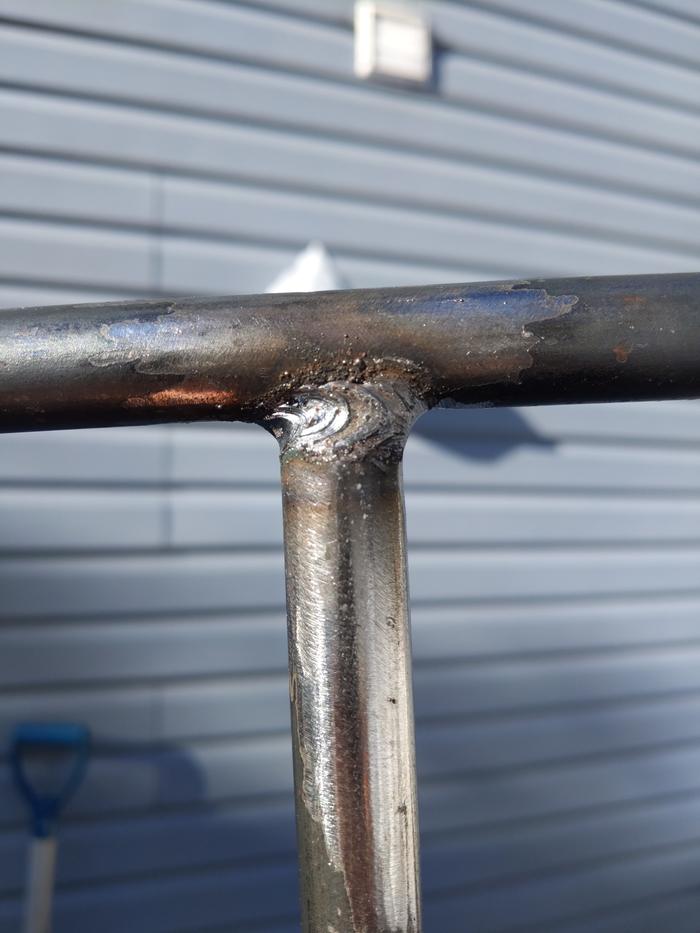
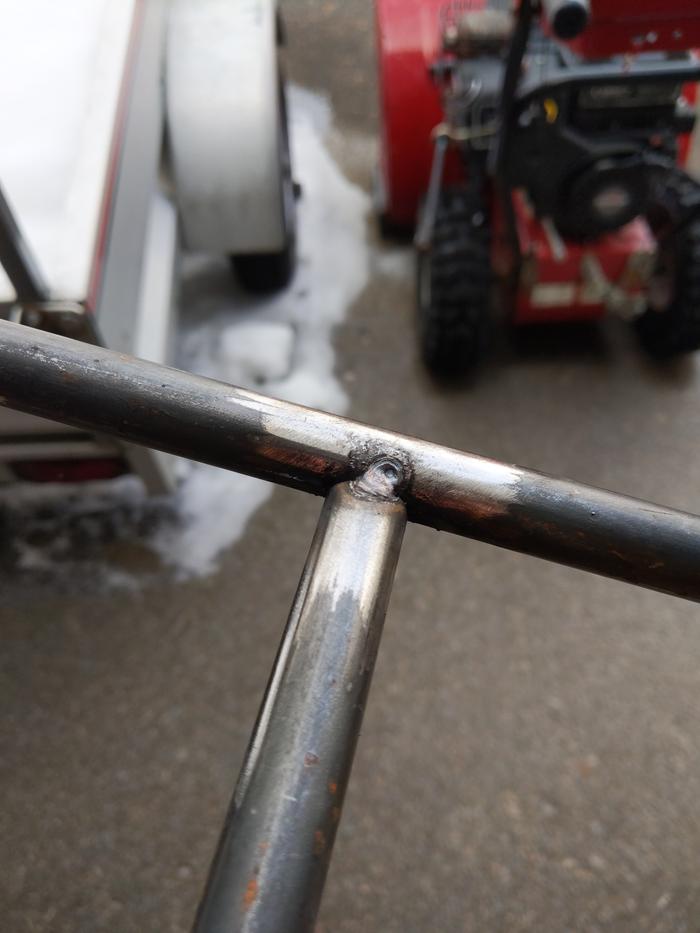
But it just means that after welding, I did a small weld on where my other welds ended. Often, a little divot is left at the end of a weld.

This is no big deal, when your weld won't be under much stress. But when it will be bearing a lot of weight, the divot can be a point of weakness. So I welded a small bead to cover up the divot, then ground the two beads flush. You'll see what I mean in the photos below. It looks a little ugly, but it makes it less likely that the weld will crack. None of this welding and grinding was necessary for this project, as the welds won't be pushed anywhere near their limits. But it's good practice, and I have all day so why not?

Here is the crusher beside a snow shovel for reference.


Here it is from above.


Here is one side of the handle.


And the other side.


Here is one side of the head.


And the aforementioned ground restart. Not as fun to look at as a weld, but it's better than having a big lump where my second weld started!


Let's get CRUSHIN!!

 
pollinator
Posts: 165
Location: Pennsylvania, USA
67
2
homeschooling kids homestead
  • Likes 2
  • Mark post as helpful
  • send pies
    Number of slices to send:
    Optional 'thank-you' note:
  • Quote
  • Report post to moderator
Seems to me a wok (steel or cast iron) might make a good crushing vessel for this tool to be used with. The heavier the better for less wobble, and would allow for easy manipulation of the material back to center, just a quick tap of the rim and things will mix and shift back under the tool.
 
Cam Haslehurst
gardener
Posts: 461
Location: Northern Ontario, Canada
317
goat dog gear books bike building
  • Likes 3
  • Mark post as helpful
  • send pies
    Number of slices to send:
    Optional 'thank-you' note:
  • Quote
  • Report post to moderator
Great idea Ezra. It's a similar concept to the stainless steel mixing bowl I was using with my original crusher. The only downside to the concave surface is that the bowl or wok is prone to flinging whatever you're crushing if you accidentally hit the side This happened a couple times to me when I was living on the homestead.

It works very well for small quantities, and for getting a truly fine powder. The mixture has no where to go but back to the center, where it will be pounded again.
 
gardener
Posts: 3132
2095
  • Likes 2
  • Mark post as helpful
  • send pies
    Number of slices to send:
    Optional 'thank-you' note:
  • Quote
  • Report post to moderator
Now, would you happen to have an old pogo stick lying around? Lol!
 
J Garlits
gardener
Posts: 504
Location: Wabash, Indiana, Zone 6a
245
hugelkultur monies forest garden foraging trees books food preservation bike bee writing rocket stoves
  • Mark post as helpful
  • send pies
    Number of slices to send:
    Optional 'thank-you' note:
  • Quote
  • Report post to moderator
That’s just awesome

Cam Haslehurst wrote:

Jim Garlits wrote:You made the analogy of a mortar and pestle. I think that is apt. What if you added a cylindrical steel pestle into which the mortar fit pretty snugly? Could even put a small sliding door at the bottom to clean out the finer contents at the bottom when you're done smashing. I think that the increased pressure per square inch might yield a smaller, finer output.


Excellent idea Jim. Potentially a properly dimensioned pipe welded or bolted to some flatbar that one could stand on to hold it steady.

 
All praise hypno-ad
GAMCOD 2025: 200 square feet; Zero degrees F or colder; calories cheap and easy
https://permies.com/wiki/270034/GAMCOD-square-feet-degrees-colder
reply
    Bookmark Topic Watch Topic
  • New Topic