|

|

|

|

|

|
|
|
|
|
|
|
|

|

|

|

|

|
 1
1


 1
1
"the qualities of these bacteria, like the heat of the sun, electricity, or the qualities of metals, are part of the storehouse of knowledge of all men. They are manifestations of the laws of nature, free to all men and reserved exclusively to none." SCOTUS, Funk Bros. Seed Co. v. Kale Inoculant Co.
Cracking gets much worse as hole diameter decreases, all else being equal.
Similarly, quenched steel shrinks as it is tempered, so interesting things can be done with piano wire.
1
"the qualities of these bacteria, like the heat of the sun, electricity, or the qualities of metals, are part of the storehouse of knowledge of all men. They are manifestations of the laws of nature, free to all men and reserved exclusively to none." SCOTUS, Funk Bros. Seed Co. v. Kale Inoculant Co.
"the qualities of these bacteria, like the heat of the sun, electricity, or the qualities of metals, are part of the storehouse of knowledge of all men. They are manifestations of the laws of nature, free to all men and reserved exclusively to none." SCOTUS, Funk Bros. Seed Co. v. Kale Inoculant Co.
www.thehappypermaculturalist.wordpress.com
2
 1
1
Charlie Rendall - http://www.returntotheforest.org
Bamboo Builder & Director of "Return to the Forest" courses, Lake Atitlán, Guatemala.
Living in the land of eternal spring: 1600m altitude; tropical highlands with warm rainy summers & warm dry winters; lots of corn, beans, sweet potatoes, avocado, coffee, hog plums, citrus, bananas and bamboo.
Try SightLeveler https://apple.co/2obGUJL, an optical level for your iphone.
SightLeveler can be used to plot contour lines in the landscape for building swales!
Sustainable Plantations and Agroforestry in Costa Rica
1
What we learn to do, we learn by doing.-Aristotle
John Merrifield wrote:In some timber frame construction I've done, I used dry, square, oak pegs in green wood holes. Pegs remained tight after green wood seasoned.
I generally ignore the government, they generally ignore me. (I ain't that important)
Walk lightly, our presence is known both by what we leave behind us and by that which we do not leave.
What we learn to do, we learn by doing.-Aristotle
jaime merritt wrote:hello, this is my first post here. ive done a bit of green wood working (rustic chairs, carved spoons, and lathe turned bowls). mostly spoon carving. green wood can be a real joy to work. i made a spoon carving video not too long ago, ill see if i can embed the first one here. cheers. Jaime.
hmm, couldnt figure it out. here's a link instead.
http://www.youtube.com/watch?v=-GmAHftCgDo&feature=player_detailpage
1
![[Thumbnail for next4.png]](/t/1879/a/15723/next4.png "Filename: next4.png
Description:")
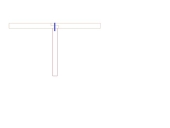
I will take that you mean "jointed" the post when you write "cut."In this picture you can see that I cut out the post
Well the "cross timber" is the "bent girt" or "bent beam" those between the different bents (primarily European modalities but also in Middle Eastern and Asian as well as in other timber framing cultures) are called "connecting girts" or "or connecting beams."where the cross timber seats to for a shelf of sorts.
That is neither traditional, nor good practice. The "bearing point" of the "housing" should take all the primary load that is subjected to the joint from gravity and all tectonic loads. That part you have correct. In in many designs, the peg is only there for getting the frame together, and could be remove latter, as it is not really needed at all. Better yet, do not design joints that need pegs, but instead relies on a "draw or compression" wedge, or gravity to make the joint work over time. "Draw pinning" is the method of keeping joints tight both in general format and to the beary surface and this is done by "offsetting" the "trunnel" or "peg" hole in the receiving (mortised) member, not by elongating the hole in the tenon which is not traditional or necessary. I would also not that oblique braces are often not peg at all (nor should they be as they work in compression load only,) nor is there enough "relish" in the long grain of the brace tenon to make the pegs functional, often making the joint weaker and failing as oblique braces do in general the smaller they get in length, as they react to tectonics within the frame making them a fulcrum on the nearest joint. Most (almost the majority) of timber frames built through history (other than in Europe and the last 400 years by Europeans in North America) do not use oblique bracing, but instead use "horizontal" bracing modalities. The Middle East through to Japan, has relied on "horizontal" bracing and tying systems more successful against tectonic load than anywhere else in the world, and still do. This is why they have the oldest frames and the oldest sustained timber framing cultures (other than some small pockets in the Swiss Alps and Carpathian mountains.)As a green timber dries it will shrink so if the peg hole in the tenon is a tight round fit ,the peg will end up bearing all the load . The shrinkage will lift the cross timber off the shelf.By elongating the tenon hole vertically the cross beam can settle back down on the shelf as it dries.
 ) you more than I have thus far.
1
) you more than I have thus far.
1
Jay C. White Cloud wrote:O.K. Paul, if you don't mind, I am going to "dissect" your post and see if I can break some of it down and perhaps alter a few points for clarity and correction.
I will take that you mean "jointed" the post when you write "cut."In this picture you can see that I cut out the post
Well the "cross timber" is the "bent girt" or "bent beam" those between the different bents (primarily European modalities but also in Middle Eastern and Asian as well as in other timber framing cultures) are called "connecting girts" or "or connecting beams."where the cross timber seats to for a shelf of sorts.
The "seat" that forms a "shelf" is the joints "bearing point" and is generally, in its entirety, called a "housing."
That is neither traditional, nor good practice. The "bearing point" of the "housing" should take all the primary load that is subjected to the joint from gravity and all tectonic loads. That part you have correct. In in many designs, the peg is only there for getting the frame together, and could be remove latter, as it is not really needed at all. Better yet, do not design joints that need pegs, but instead relies on a "draw or compression" wedge, or gravity to make the joint work over time. "Draw pinning" is the method of keeping joints tight both in general format and to the beary surface and this is done by "offsetting" the "trunnel" or "peg" hole in the receiving (mortised) member, not by elongating the hole in the tenon which is not traditional or necessary. I would also not that oblique braces are often not peg at all (nor should they be as they work in compression load only,) nor is there enough "relish" in the long grain of the brace tenon to make the pegs functional, often making the joint weaker and failing as oblique braces do in general the smaller they get in length, as they react to tectonics within the frame making them a fulcrum on the nearest joint. Most (almost the majority) of timber frames built through history (other than in Europe and the last 400 years by Europeans in North America) do not use oblique bracing, but instead use "horizontal" bracing modalities. The Middle East through to Japan, has relied on "horizontal" bracing and tying systems more successful against tectonic load than anywhere else in the world, and still do. This is why they have the oldest frames and the oldest sustained timber framing cultures (other than some small pockets in the Swiss Alps and Carpathian mountains.)As a green timber dries it will shrink so if the peg hole in the tenon is a tight round fit ,the peg will end up bearing all the load . The shrinkage will lift the cross timber off the shelf.By elongating the tenon hole vertically the cross beam can settle back down on the shelf as it dries.
Sorry that got long winded, but it was warranted. Thanks for making it possible and good luck with your timber faming. Let me know if I can help (or confuse
Regards,
j
Fred Morgan wrote:When dealing with wood, you want to make sure to seal the ends. Of course, if the ends are buried inside another piece, life is good. Wood splits often because the ends dry (more surface area) much quicker than the middle.
Also, when drying, the idea is slow and steady, and give it time to rest. Solar kilns often provide some of the best results because things cool down overnight. This allows the wood to equalize (the middle often is wetter than the surface during drying), reducing stress, and checking.
Dry to fast, you get what is called "case hardening" where the outside is dry, and sealed, but the inside is still wet.
Remember as well, when something is drying, it really doesn't shrink much on the length, but on the width. A given type of wood should dry pretty much the same, as long as you are using heart wood, or sapwood, i.e. similar densities.
Green woodworking is cool stuff, we have furniture from when my wife was a child in school made that way, and it is still sold. We have woods down here so hard that you almost can't work with them, except green.
1


 2
2
"Never doubt that a small group of thoughtful, committed citizens can change the world; indeed, it's the only thing that ever has."-Margaret Mead "The only thing worse than being blind, is having sight but no vision."-Helen Keller

|
what if we put solar panels on top of the semi truck trailer? That could power this tiny ad:
change the world (for the better) with hands on permaculture
https://wheaton-labs.com/bootcamp
|