• Post Reply Bookmark Topic Watch Topic
  • New Topic
permaculture forums growies critters building homesteading energy monies kitchen purity ungarbage community wilderness fiber arts art permaculture artisans regional education skip experiences global resources cider press projects digital market permies.com pie forums private forums all forums
this forum made possible by our volunteer staff, including ...
master stewards:
  • Nancy Reading
  • Carla Burke
  • r ranson
  • John F Dean
  • paul wheaton
  • Pearl Sutton
stewards:
  • Jay Angler
  • Liv Smith
  • Leigh Tate
master gardeners:
  • Christopher Weeks
  • Timothy Norton
gardeners:
  • thomas rubino
  • Jeremy VanGelder
  • Maieshe Ljin

Germinating shallow-planted seeds in an arid environment

 
Posts: 38
Location: Egnar, CO -- zone 5ish, semi-arid, high elevation
8
forest garden greening the desert homestead
  • Likes 3
  • Mark post as helpful
  • send pies
    Number of slices to send:
    Optional 'thank-you' note:
  • Quote
  • Report post to moderator
I'm finally starting my first garden, after years of reading about permaculture stuff while having no access to land. So I have a pretty good idea of my high-level strategy, but when it comes down to the smaller details of actually physically doing things, I'm sometimes feeling a bit clueless.

The biggest issue I have right now is with trying to germinate shallow-planted seeds. The packets for amaranth and lettuce say to plant just 1/4" deep, and to keep moist until germinated. I'm in a very dry, sunny, and sometimes windy place, so the top 1/4" of soil almost always dries out very quickly. I could solve that problem with some mulch, but then the seeds would be significantly more than 1/4" deep. Would that prevent them from germinating? Or do I really have to keep watering them every few hours? The amount of water I've gone through doing that over the past couple days, knowing that 99% of it is just evaporating, is offending my desert dweller sensibilities.

Any suggestions on alternate strategies here? Or am I just misunderstanding the instructions, and adding an inch or two of mulch is the answer?
 
pollinator
Posts: 528
Location: Finland, Scandinavia
402
trees
  • Likes 3
  • Mark post as helpful
  • send pies
    Number of slices to send:
    Optional 'thank-you' note:
  • Quote
  • Report post to moderator
Plant, water, press tightly. Then cover with hay, leaves, plastic, glass...
 
pollinator
Posts: 255
48
  • Likes 1
  • Mark post as helpful
  • send pies
    Number of slices to send:
    Optional 'thank-you' note:
  • Quote
  • Report post to moderator
Make transplants. Preferably with a small greenhosue (can also be one of those indoor greenhouses). Plant transplants in mulched beds.
Some plants may work as transplants in a specific context, some don't, it is try&error.
 
Josh Warfield
Posts: 38
Location: Egnar, CO -- zone 5ish, semi-arid, high elevation
8
forest garden greening the desert homestead
  • Mark post as helpful
  • send pies
    Number of slices to send:
    Optional 'thank-you' note:
  • Quote
  • Report post to moderator
Starting from transplants is something I will probably experiment with next year. As of now I don't have a greenhouse or much of any other indoor space, unless you count the dashboard of my van, haha.

For now, I went with Kaarina's advice and covered the planted area with some fine to medium bark bits right after watering. Still hesitant to go too deep with the mulch, at least until I see things growing and can start to mulch more around them rather than on top of them. But even the thin layer I have now should help quite a bit, I think.
 
master pollinator
Posts: 4988
Location: Canadian Prairies - Zone 3b
1351
  • Likes 15
  • Mark post as helpful
  • send pies
    Number of slices to send:
    Optional 'thank-you' note:
  • Quote
  • Report post to moderator
I use what I call "sprouting boards" for things like carrots.

These are scap 1/2 x 5" boards from an old cedar fence. I water the rows and set these on top ensuring there is an air space underneath. It holds the moisture and protects against wind/sun drying things out.

In our sand/silt soil, it works like a charm.
 
Josh Warfield
Posts: 38
Location: Egnar, CO -- zone 5ish, semi-arid, high elevation
8
forest garden greening the desert homestead
  • Likes 1
  • Mark post as helpful
  • send pies
    Number of slices to send:
    Optional 'thank-you' note:
  • Quote
  • Report post to moderator
Good tip! Approximately how much air space do you leave? Like do you put spacers under the boards, or just make sure it's not totally pressed down?
 
Kaarina Kreus
pollinator
Posts: 528
Location: Finland, Scandinavia
402
trees
  • Mark post as helpful
  • send pies
    Number of slices to send:
    Optional 'thank-you' note:
  • Quote
  • Report post to moderator
I am trying to post pics but nothing happens...
 
Kaarina Kreus
pollinator
Posts: 528
Location: Finland, Scandinavia
402
trees
  • Likes 1
  • Mark post as helpful
  • send pies
    Number of slices to send:
    Optional 'thank-you' note:
  • Quote
  • Report post to moderator
Here are some very exact pics.
You don't need to have X to read the story.

https://twitter.com/stop_fossil_fue/status/1792613903991496749?t=xPwTFjMgqtF9NmEF3oMsXw&s=19
 
Kaarina Kreus
pollinator
Posts: 528
Location: Finland, Scandinavia
402
trees
  • Mark post as helpful
  • send pies
    Number of slices to send:
    Optional 'thank-you' note:
  • Quote
  • Report post to moderator
https://twitter.com/stop_fossil_fue/status/1792616233403298276?t=KsZmOP3mprKoDnH7Yq6yIQ&s=19
 
Douglas Alpenstock
master pollinator
Posts: 4988
Location: Canadian Prairies - Zone 3b
1351
  • Likes 2
  • Mark post as helpful
  • send pies
    Number of slices to send:
    Optional 'thank-you' note:
  • Quote
  • Report post to moderator

Josh Warfield wrote:Good tip! Approximately how much air space do you leave? Like do you put spacers under the boards, or just make sure it's not totally pressed down?


It's variable, but roughly 1-inch-ish. I would put in a parallel twig as a spacer if needed. They don't form a perfect seal or anything -- that would encourage mold or rot the seeds. They just sit on the row walls, open at the ends, creating a protected space with a bit more humidity to get things going. It doesn't take long.
 
Posts: 557
Location: Sierra Nevada foothills, 350 m, USDA 8b, sunset zone 7
96
  • Likes 3
  • Mark post as helpful
  • send pies
    Number of slices to send:
    Optional 'thank-you' note:
  • Quote
  • Report post to moderator
Josh,

I have hot and dry growing conditions and high diurnal temperature swings (50/90 F or 55/95F this week).

Try to plant in partially shaded area.
Amend the soil with organic matter. It will help to retain the moisture.
Dig a small trench 10x10 cm (4x4") - it will help to protect the seeds from the wind, will collect the water used for watering and may collect morning dew (if present).
Use very fine mulch - I use woodchips from my thickness planer.
Water in the evenings, to prevent loss due to evaporation. Or early morning.

With this method I was able to germinate peppers - a plant that just hates my climate and I don't expect it to grow much or produce at all, but nonetheless I tried and it worked with 20% germination rate.
 
pollinator
Posts: 205
Location: Middle of South Dakota, 4a
54
hugelkultur fungi chicken
  • Likes 8
  • Mark post as helpful
  • send pies
    Number of slices to send:
    Optional 'thank-you' note:
  • Quote
  • Report post to moderator
Similiar windy and dry climate here. I've had great luck just scattering carrots under my other crops. Same with lettuce, bok choy, green onions, spinach.  I water in well and mulch lightly with grass clippings. Once the sprouts start to show add another bit of mulch. The shade and extra moisture helps.  

Make sure your soil has lots of organic matter, that helps hold moisture for longer periods. Add mycelium. My raspberries are on a trench we filled with chunks of old firewood, winecap mycelium and covered with soil. They're always damp beneath and one of the first things to show when the freeze ends.
 
gardener
Posts: 1744
Location: N. California
811
2
hugelkultur kids cat dog fungi trees books chicken cooking medical herbs ungarbage
  • Likes 8
  • Mark post as helpful
  • send pies
    Number of slices to send:
    Optional 'thank-you' note:
  • Quote
  • Report post to moderator
I also live in a hot dry climate.  
First try not to be to uptight about depths. I'm not saying ignore the recommendation, but don't worry if it's a little shallower, or deeper. The only exact ones are the ones that need light to germinate, they need to be on top of the soil.
If your worried about keeping the soil moist you can us vermiculite to cover the seeds.
An alternative to using the board previously suggested is to use cardboard. I cut strips of cardboard soak them in water and use a garden staple, or a brick, rock, or whatever on the ends to keep it from blowing away.  It's important to keep checking under, and remove board/cardboard as soon as the seedling emerge from the soil.  This method has been a game changer for me. I could never get carrots to grow. With this method (both a board, and cardboard seem to work equally as well) I get great germination.
Next make sure you are planting appropriate veggies/other at the right time of year.  For example I live in California. If I plant lettuce, peas, brassica's and other plants that don't like the heat now I would experience an epic fail.  So I recommend taking to local gardeners, or checking out sites in your area.  Good luck to you. As my father-in-law used to say don't sweat the small stuff.
 
gardener
Posts: 2514
Location: Ladakh, Indian Himalayas at 10,500 feet, zone 5
838
trees food preservation solar greening the desert
  • Likes 3
  • Mark post as helpful
  • send pies
    Number of slices to send:
    Optional 'thank-you' note:
  • Quote
  • Report post to moderator
Lots of good advice here. I've gardened in high desert a bit. The board over the sown seeds I've often done and it helps a lot but you want to check daily and remove it as soon as the first seeds come up.

One thing I'm not sure I saw mentioned here is to press down the soil before and after sowing the seeds. I actually level the soil and then step on it gently, with both feet and full weight if the soil is sandy and has good tilth, or standing on the side and pressing with one foot. I haven't gardened in badly clay soil so I might not do this in very clayey soil, idk. The slightly compacted soil will hold moisture longer and dry out slower than fluffed up soil. I'm going to mulch deeply later when the seedlings are big enough, and the soil always goes fluffy under deep mulch.

I sometimes scatter light mulch, such as twigs or straw, over the newly sown seeds, and that seems to help too. It casts a little shade to reduce scorching sun heat and dryness on the surface, but it's not a complete layer so when the seeds emerge they can find sun quickly. As the seedlings get bigger I add more mulch.
 
Josh Warfield
Posts: 38
Location: Egnar, CO -- zone 5ish, semi-arid, high elevation
8
forest garden greening the desert homestead
  • Likes 9
  • Mark post as helpful
  • send pies
    Number of slices to send:
    Optional 'thank-you' note:
  • Quote
  • Report post to moderator
I've got seedlings! Thanks everyone for the help. I started another bed and am doing a little side-by-side test using a scrap 2x4 piece. I like the cardboard idea too, will probably try that next time. Also starting to think that a drip watering system might be moving up the priority list. Or I might try out the buried olla system.

Pressing down the soil might not be a good idea for me, I've got enough clay that wet dirt turns into adobe brick pretty easily if I'm not careful.

The seeds are from a local grower and come with recommendations of when to plant, so I don't think I'm doing anything too crazy out of season. Most of my planting areas get afternoon shade, and I'm experimenting with different ways of adding organic matter.

Melanie, when you say "add mycelium" do you mean a commercial inoculant of some sort? I've been trying to encourage fungi however I can but so far haven't brought in anything from outside like that. Some of the mulch I'm using has bits of mycelium already growing on it, and I've also found some dry puffballs around (astraeus hygrometricus, I believe) and I tried dusting those spores onto a couple of beds. If you have more strategies for encouraging / speeding up that process, I'd love to hear them!
 
Jen Fulkerson
gardener
Posts: 1744
Location: N. California
811
2
hugelkultur kids cat dog fungi trees books chicken cooking medical herbs ungarbage
  • Likes 1
  • Mark post as helpful
  • send pies
    Number of slices to send:
    Optional 'thank-you' note:
  • Quote
  • Report post to moderator
Josh you can buy mycorrhiza. It helps to add to the hole when planting seeds and transplants.  It's kind of expensive though, and not a "necessity".
If you plant in a hugel style bed, you get a lot of mycelium.  It takes time though.
 
Posts: 240
Location: Manotick (Ottawa), Ontario
17
  • Likes 3
  • Mark post as helpful
  • send pies
    Number of slices to send:
    Optional 'thank-you' note:
  • Quote
  • Report post to moderator

Josh Warfield wrote:Pressing down the soil might not be a good idea for me, I've got enough clay that wet dirt turns into adobe brick pretty easily if I'm not careful.


I don't have heavy clay soil, but, unless or until a garden has a soil that approximates potting soil, shallow-sown seeds will really benefit from sowing into fine, water-holding soil. In that situation, I start the row with a shallow trench (less than two inches), then fill it at least halfway with soft organic-rich soil (store-bought if not otherwise available). Seeds can be firmed into that, and the unfilled part of the trench directs water to the seeds and provides air space under a board or other covering.
 
master pollinator
Posts: 319
Location: Southern Manitoba...bald(ish) prairie, zone 3ish
133
transportation hugelkultur monies forest garden urban books food preservation cooking writing woodworking
  • Likes 2
  • Mark post as helpful
  • send pies
    Number of slices to send:
    Optional 'thank-you' note:
  • Quote
  • Report post to moderator
I seeded amaranth this year as well (2 types).  They are such a fine seed that I mixed them with some sawdust and basically broadcast onto the prepared surface.  Then rake lightly to get into better contact with the soil.  One positive is that with the sawdust you get a visual of where you have scattered seed.

Of course, I can't speak yet to how well this works.  Red-rooted pigweed is an amaranth and it grows (too) well in this part of the world, so we'll see.
 
pollinator
Posts: 491
Location: Illinois
107
  • Likes 3
  • Mark post as helpful
  • send pies
    Number of slices to send:
    Optional 'thank-you' note:
  • Quote
  • Report post to moderator
Lettuce and amaranth don't actually need to be 'planted', that is, buried under dirt. They both sprout quite well (better I think) on top the soil.

First, water the soil before planting.
Sprinkle the seeds on top the soil.
Lay a loose mulch on top, straw works great.
Water on top the straw (or whatever you use). The mulch holds the seeds in place so they don't get washed away.
A few days later gently check under the straw. When you see sprouts, gently pull the straw away, leaving just enough space for the sprouts to get some sun.

The board method people above mentioned works great for holding moisture. I have not planted under boards, but I bet it works very well. I often lay boards, rotting wood, strips of bark alongside the plants. Prevents weeds, holds water, gives you a safe place to walk without compacting the soil.

Glad you have already had some success! Hope you post some pics as things grow up.
 
Posts: 5
  • Likes 5
  • Mark post as helpful
  • send pies
    Number of slices to send:
    Optional 'thank-you' note:
  • Quote
  • Report post to moderator
I have success here in the high desert by placing clear plastic or glass containers, sometimes cut water gallons, to create a mini green house. I place rocks on top to provide a little shade and keep the wind from stealing them. Also, clay pots work well if you remove them when the sun is lower. As a bonus it keeps critters from eating the tender young shoots. When the plants get too big for the contained, you have to harden them off just like you would from a normal greenhouse.

Also consider species that grow native in your area or other desert areas like tepary beans, Indian carrot (lomatium), Indian potato (sunchokes), sunflowers, Indian corn (Hopi, Navajo, etc.) Goji berry, salsify, seaberry, sorghum, teff, amaranth, hollyhock. Those are the ones that come to mind, just beware they can be invasive.
 
Melonie Corder
pollinator
Posts: 205
Location: Middle of South Dakota, 4a
54
hugelkultur fungi chicken
  • Likes 3
  • Mark post as helpful
  • send pies
    Number of slices to send:
    Optional 'thank-you' note:
  • Quote
  • Report post to moderator

Josh Warfield wrote:I've got seedlings! Thanks everyone for the help. I started another bed and am doing a little side-by-side test using a scrap 2x4 piece. I like the cardboard idea too, will probably try that next time. Also starting to think that a drip watering system might be moving up the priority list. Or I might try out the buried olla system.

Pressing down the soil might not be a good idea for me, I've got enough clay that wet dirt turns into adobe brick pretty easily if I'm not careful.

The seeds are from a local grower and come with recommendations of when to plant, so I don't think I'm doing anything too crazy out of season. Most of my planting areas get afternoon shade, and I'm experimenting with different ways of adding organic matter.

Melanie, when you say "add mycelium" do you mean a commercial inoculant of some sort? I've been trying to encourage fungi however I can but so far haven't brought in anything from outside like that. Some of the mulch I'm using has bits of mycelium already growing on it, and I've also found some dry puffballs around (astraeus hygrometricus, I believe) and I tried dusting those spores onto a couple of beds. If you have more strategies for encouraging / speeding up that process, I'd love to hear them!


I started with winecaps and burying wood to promote growth.  Because I grew quite a few different wood decomposers and they base went into the compost after, so they are ever present. I did buy innoculated bags to start those.

But probably most important is the mycelium that forms in the compost, those little brown and white/black mushrooms do amazing things. I like to make a compost slurry to pour in areas I'm starting to develop. Not sure if that is how it even works but there is plenty of mycelium in the soil I've regenerated.
 
gardener
Posts: 742
Location: 5,000' 35.24N zone 7b Albuquerque, NM
517
hugelkultur forest garden fungi foraging trees cooking food preservation building solar greening the desert homestead
  • Likes 4
  • Mark post as helpful
  • send pies
    Number of slices to send:
    Optional 'thank-you' note:
  • Quote
  • Report post to moderator
It sounds like Josh has some wonderful and practical solutions here! And what is permies, without a few outlier experiments so I’ll share mine….

Years ago, I read about the co-evolution of bison and grass/grain/legume forage. The hoof has two (cloven) halves that make up ~4” x 5” depression. When the winds blow the tiny seeds around, then the rains come, the compressed earthen container holds the wind-blown top soil, seeds rainwater and surrounding runoff. This gives the seeds a chance to germinate in side-by-side, little hoof-made nests surrounded by established prairie plants. I am in awe of this adaptation!

Practically applied to my one-acre laboratory, each half of the cloven hoof print looks very much like the side view of an old repurposed, 3 lb masonry maul head (5” long x 2” wide x 1 1/2” deep). By stepping on the maul head to a depth of ~3/4” (sometimes even pounding the maul head with a hammer) I get this nice half-hoof depression. That compressed oblong cup filled with enough light soil to cover the seed with 3x the seed width of light soil then covered to the edge with water has been especially ideal for little bunches (4-6 seeds) of beets in my desert alkaline soil. It also works for little seeds like mustard, vetch, native grasses, and amaranth (I haven’t tried lettuce). Half-hoof prints go anywhere that there is bare earth needing some coverage. By the time the monsoons come, the little seed-soil-water-filled receptacles green up.

I like to think about the bison when I’m planting and imagine how things must have been not so long ago out here in New Mexico and throughout the Great bison belt.
 
Thom Bri
pollinator
Posts: 491
Location: Illinois
107
  • Likes 3
  • Mark post as helpful
  • send pies
    Number of slices to send:
    Optional 'thank-you' note:
  • Quote
  • Report post to moderator

Amy Gardener wrote:

Years ago, I read about the co-evolution of bison and grass/grain/legume forage. The hoof has two (cloven) halves that make up ~4” x 5” depression. When the winds blow the tiny seeds around, then the rains come, the compressed earthen container holds the wind-blown top soil, seeds rainwater and surrounding runoff. This gives the seeds a chance to germinate in side-by-side, little hoof-made nests surrounded by established prairie plants. I am in awe of this adaptation!


Wow! I certainly have never tried hammering the earth to make a seedbed!

But I do have an experience or two that makes me think this must be a real thing. One, I used to plant common garden veggies in neat rows on top of raised ridges. Usually works Okay. If I have piles of seeds I have also scattered them along the sides of the ridge and even between the rows where I walk. One year I noticed that the plants, I think it was radishes, all sprouted and grew better on the compacted walkway than they did in that ever-so-carefully built up ridge.

A second experience, with tobacco. I have noticed that it sprouts and grows best if scattered onto hardpacked soil, even heavy clay, than in soft soil. Tractor ruts, for example. Now I don't bother to 'plant' tobacco. I just scatter the seeds all over the place and some always grow.
 
Josh Warfield
Posts: 38
Location: Egnar, CO -- zone 5ish, semi-arid, high elevation
8
forest garden greening the desert homestead
  • Likes 1
  • Mark post as helpful
  • send pies
    Number of slices to send:
    Optional 'thank-you' note:
  • Quote
  • Report post to moderator
Oh wow, this thread is still going, thanks everyone for all the helpful advice!

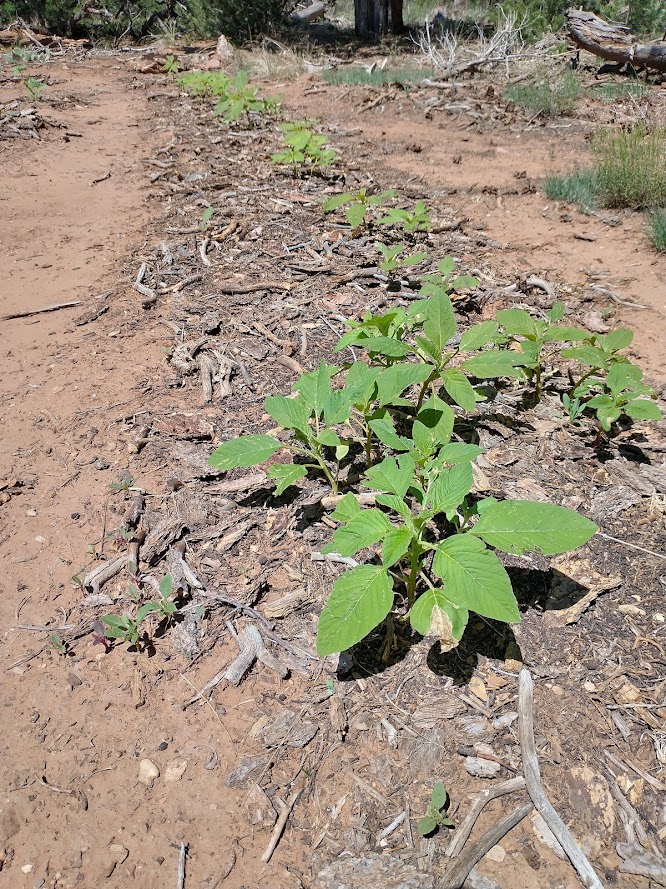
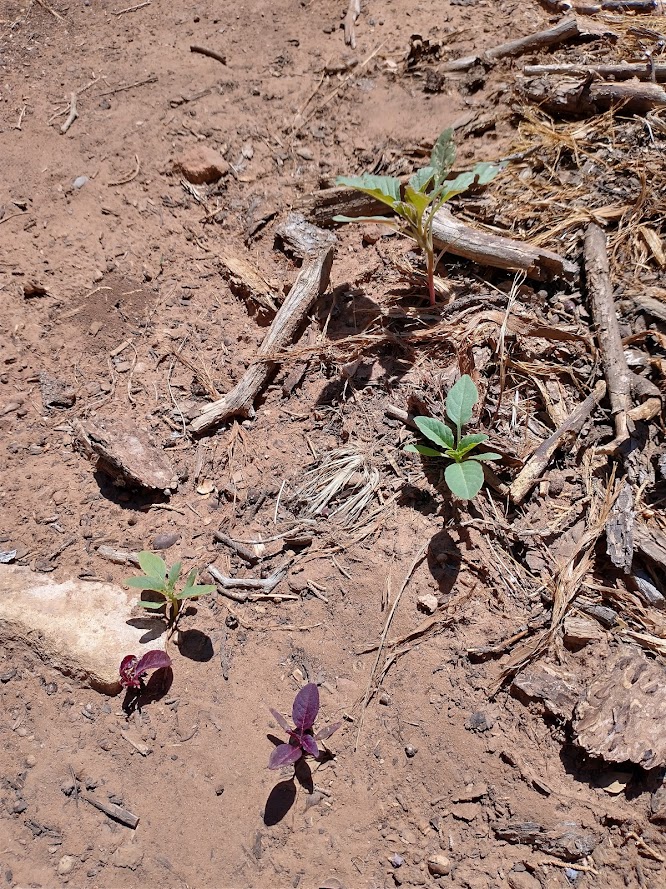
An interesting update -- a couple weeks ago, we got two huge flash-flood-inducing storms a week apart, so pretty much everywhere that gets any shade stayed damp for over a week straight. I now have amaranth growing all around the edges of mulched areas near where I planted it. These little guys seem perfectly happy there on bare dust, now that everything has fully dried out. I guess they got their roots deep enough fast enough and now they're good to go?

The tepary beans I had nearly forgotten I'd planted also came up. The packet said to "water in or plant before rain", but I guess I must not have watered them in quite enough; I wasn't sure what exactly I'd done wrong with those until now.
amaranth-and-little-siblings.jpg
new lil guys on the left next to the ones I got to germinate earlier (leaf damage is from hail)
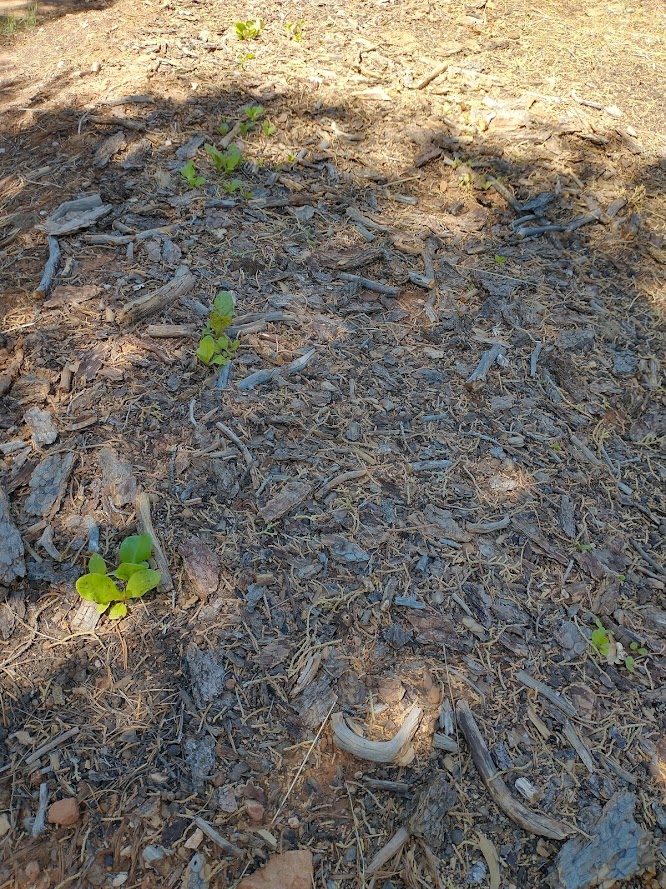
lettuce.jpg
not sure why the row on the left is so much bigger, they were planted the same day
lil-amaranth.jpg
haven't watered this spot in weeks
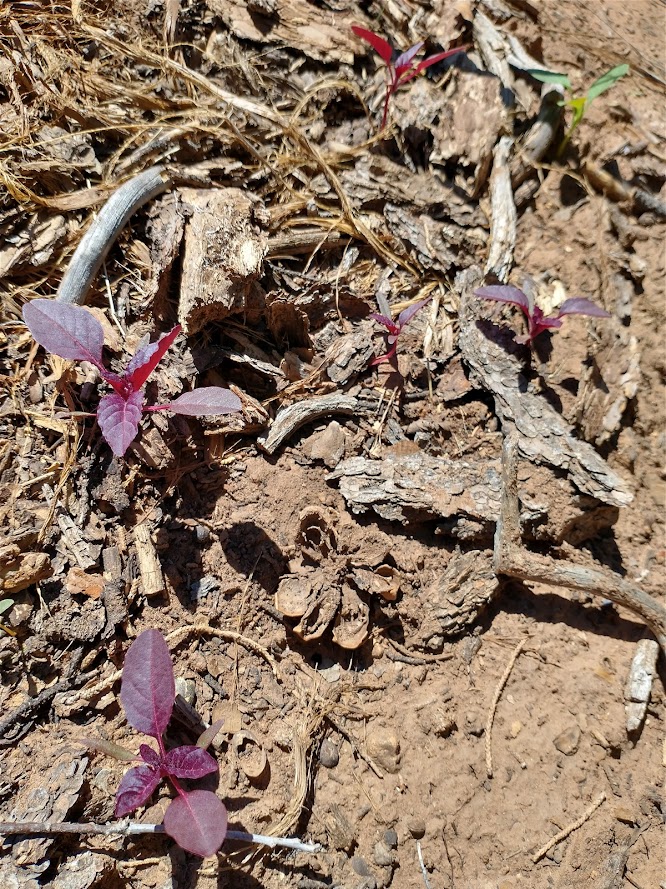
purple-amaranth.jpg
these seeds were from a failed germination experiment that got swept up to create this mulched area
 
pollinator
Posts: 1455
Location: BC Interior, Zone 6-7
511
forest garden tiny house books
  • Likes 4
  • Mark post as helpful
  • send pies
    Number of slices to send:
    Optional 'thank-you' note:
  • Quote
  • Report post to moderator
Another technique that I learned from one of Carol Deppe's books, is to mix your seeds in a jar with some moist, light soil. Shake it around and open the jar every day for airflow. When you see the seeds have germinated, spread the mixture where you want in your garden. I've used it with parsley, which is slow to germinate, to cut down on the amount of seed I have plant to make sure some of it makes it.
 
Gimmie! Gimmie dammit! Gimmie that tiny ad!
GAMCOD 2025: 200 square feet; Zero degrees F or colder; calories cheap and easy
https://permies.com/wiki/270034/GAMCOD-square-feet-degrees-colder
reply
    Bookmark Topic Watch Topic
  • New Topic