• Post Reply Bookmark Topic Watch Topic
  • New Topic
permaculture forums growies critters building homesteading energy monies kitchen purity ungarbage community wilderness fiber arts art permaculture artisans regional education skip experiences global resources cider press projects digital market permies.com pie forums private forums all forums
this forum made possible by our volunteer staff, including ...
master stewards:
  • r ranson
  • Anne Miller
  • paul wheaton
stewards:
  • Pearl Sutton
  • Nicole Alderman
  • Beau M. Davidson
master gardeners:
  • Carla Burke
  • John F Dean
  • Nancy Reading
  • Jay Angler
  • Christopher Weeks
gardeners:
  • Jeremy VanGelder
  • Andrés Bernal
  • Cat Knight

First Rocket stove heats water with pics

 
Posts: 616
Location: ontario, canada
14
transportation fungi tiny house
  • Mark post as helpful
  • send pies
    Number of slices to send:
    Optional 'thank-you' note:
  • Quote
  • Report post to moderator
I agree. I could draw up different designs all day and love doing it. I don't know how many hours I spent designing before my first "hands on".

That "heat stop" webpage looks like they have some great stuff! That's a good product, and thanks for sharing the web link. I checked it out quickly and looks like they have good hi-temp castable products and insulative stuff and everything I've dreamed of lol. I enjoy learning about products like this that I was un-aware of, because they could "make or break" a unit like mine, so to speak
 
Posts: 455
Location: climate zone 6b
3
  • Mark post as helpful
  • send pies
    Number of slices to send:
    Optional 'thank-you' note:
  • Quote
  • Report post to moderator
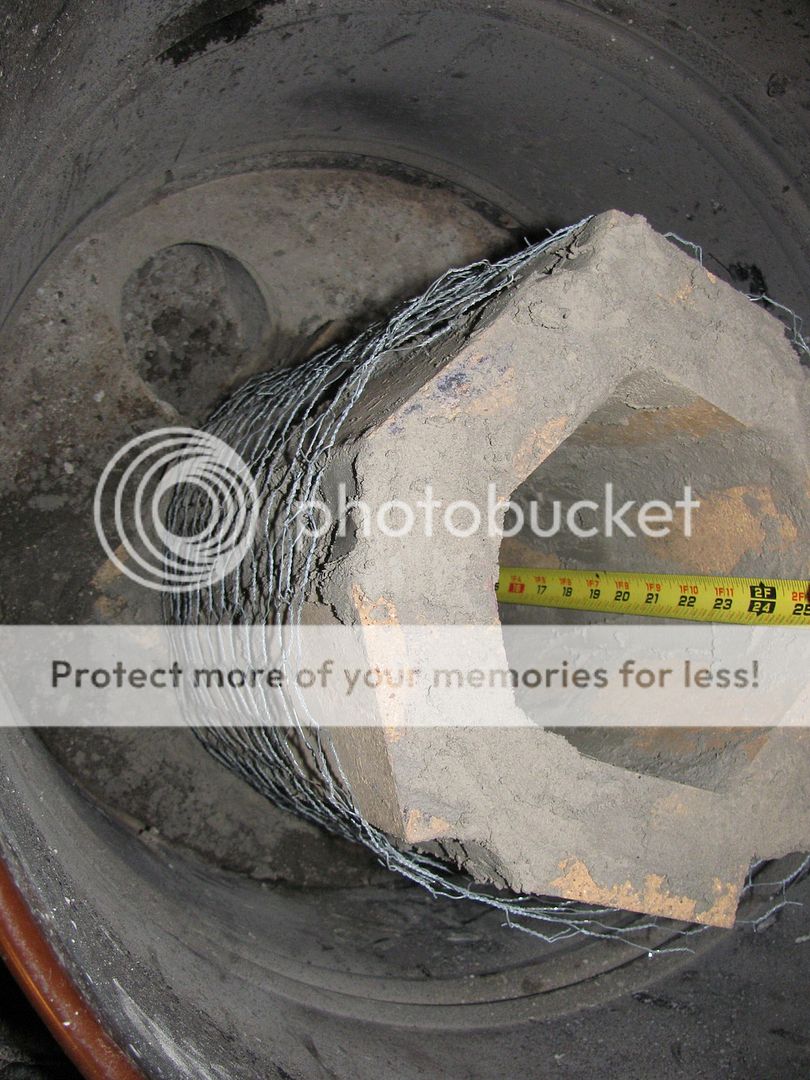
***UPDATE*** i have upgraded the insulation around the heat riser another 1'' for a total of 16'' circumference. i have completely maxed out my heat riser insulation size and cant go any larger or it will interfere with the manifold.
 
John McDoodle
Posts: 616
Location: ontario, canada
14
transportation fungi tiny house
  • Mark post as helpful
  • send pies
    Number of slices to send:
    Optional 'thank-you' note:
  • Quote
  • Report post to moderator
I checked out that heat-stop link you posted. Looks like a great line of hi-temp products. That kind of stuff could really help a system like mine. I also found out that glass fiber has "no true melting point" so this is great info to help upgrade my system also!
 
gardener
Posts: 3457
Location: Southern alps, on the French side of the french /italian border 5000ft elevation
188
  • Mark post as helpful
  • send pies
    Number of slices to send:
    Optional 'thank-you' note:
  • Quote
  • Report post to moderator

F Styles wrote:***UPDATE*** i have upgraded the insulation around the heat riser another 1'' for a total of 16'' circumference. i have completely maxed out my heat riser insulation size and cant go any larger or it will interfere with the manifold.


F Styles, actualy i wanted to ask, you only have this tiny looking hole as a "manifold"?

http://i1056.photobucket.com/albums/t380/SanctuaryCommunity/Rocket%20Mass%20Heater/IMG_0039_zpszxpkqcpn.jpg?t=1450759153

Usualy we tend to advise constant CSA for the "core" but at this very point, 1.5 to 3 times CSA, funneling back to system size or more, depending on the design; is thought to be good practice.
 
John McDoodle
Posts: 616
Location: ontario, canada
14
transportation fungi tiny house
  • Mark post as helpful
  • send pies
    Number of slices to send:
    Optional 'thank-you' note:
  • Quote
  • Report post to moderator
I have to agree with you again on the "addicting hot rod effect"

Sorry about my duplicate posts, sometimes I think it doesn't send proper, delays, or it went to a 2nd page and I didn't realize.
 
F Styles
Posts: 455
Location: climate zone 6b
3
  • Mark post as helpful
  • send pies
    Number of slices to send:
    Optional 'thank-you' note:
  • Quote
  • Report post to moderator
Zero to dragon in 30 seconds watch video of my RMH cold start. you can see the suction of the RMH at 30 seconds and i then start to put the vertical pieces in starting small and then after i stop the video i graduate a full load wood chamber to 8'' to 10''x18'' LOGS. it takes about 5 minutes or so to get it to a full wood chamber load and then i dont have to touch it for 8 hours and at that point i decide if i my needs require more wood for cooking or heating water.

 
F Styles
Posts: 455
Location: climate zone 6b
3
  • Mark post as helpful
  • send pies
    Number of slices to send:
    Optional 'thank-you' note:
  • Quote
  • Report post to moderator
with such high praises as having a design that "soo far, seems kind of all right ish. Nothing to brag about." ill take anything i can get. but im doing my best to increase the 30 second start ups but there is nothing i can do about the log sizes. ive just got it plum maxed out at 10'' x 18'' log. i wonder if getting 8 hour burns from a full wood chamber could be improved? im still trying to figure out if there is more i can use this system for since it only heats the house, cook on it and bake with it along with heats my water i guess its a crappy system... but its my crappy system. but hey, what do i know?
 
F Styles
Posts: 455
Location: climate zone 6b
3
  • Mark post as helpful
  • send pies
    Number of slices to send:
    Optional 'thank-you' note:
  • Quote
  • Report post to moderator
I use a draw knife to make wood shavings along with small kindling and not paper. it starts and immediately the RMH starts drawing with no smoke back at all. i get so much draw i can lift the lid and run my stove with the lid off and access port open with no smoke. only when i stuff it with extremely large 10" x 18'' logs so i get little puffs of smoke and need to close the lid.

since my system is said by some to be "all right ish. Nothing to brag about." i would like to know how i could get faster than 30 second start ups to 5 minute full loads? maybe others have ideas on how i can put larger logs in? maybe add another propane tank? do i need larger logs? do i need more than an 8 hour burn?
 
Posts: 14
  • Mark post as helpful
  • send pies
    Number of slices to send:
    Optional 'thank-you' note:
  • Quote
  • Report post to moderator
F Styles Do you think that water coil idea is going to work?
The coil which goes wrapped around the burn tunnel is packed with sand so it should free to expand and shrink.
The second coil on the heat riser is wrapped loose for the same reason and now has around it a rock-wool blanket and a cement-perlite insulation as in my previous photo.

water_coils.jpg
[Thumbnail for water_coils.jpg]
 
F Styles
Posts: 455
Location: climate zone 6b
3
  • Mark post as helpful
  • send pies
    Number of slices to send:
    Optional 'thank-you' note:
  • Quote
  • Report post to moderator

proteas vryssas wrote:F Styles Do you think that water coil idea is going to work?
The coil which goes wrapped around the burn tunnel is packed with sand so it should free to expand and shrink.
The second coil on the heat riser is wrapped loose for the same reason and now has around it a rock-wool blanket and a cement-perlite insulation as in my previous photo.


hey forum brother ! i love what you are trying. if you are asking me if it will work, gosh i dont know. i cant see how you have it all hooked up. i do know if you want it to circulate on its own with out a pump, you will have to have the water tank higher than the coil. i would not have coils installed on my system with out a very large water tank higher than the coils to dissipate the heated water for the heat exchange circulation to work. you wont hear ninnie talk from me but if was doing it i would make sure i got all the safety devices in place and be completely informed before i do the job. i dont do anything half rearend, i make sure i research alot before i do something. i can say keep up your good work my friend, document your steps and most of all be safe buddy. keep us informed on how it all works for you.
 
F Styles
Posts: 455
Location: climate zone 6b
3
  • Mark post as helpful
  • send pies
    Number of slices to send:
    Optional 'thank-you' note:
  • Quote
  • Report post to moderator

proteas vryssas wrote:F Styles Do you think that water coil idea is going to work?
The coil which goes wrapped around the burn tunnel is packed with sand so it should free to expand and shrink.
The second coil on the heat riser is wrapped loose for the same reason and now has around it a rock-wool blanket and a cement-perlite insulation as in my previous photo.


Proteas, do you have a water tank set up in this pic? if so where did you place it in your system? can you please post more pics.
 
proteas vryssas
Posts: 14
  • Mark post as helpful
  • send pies
    Number of slices to send:
    Optional 'thank-you' note:
  • Quote
  • Report post to moderator

F Styles wrote:Do you have a water tank set up in this pic? if so where did you place it in your system? can you please post more pics.


No, I don't have a water tank.
As a test, I submerge the coil in a bathtub full of hot water while I connect one side of the coil to the cold water domestic supply hose/valve. When I open the cold supply faucet, from the other end of the coil (which is outside the hot water bathtub) it came out hot water the same temperature as the hot water has inside the bathtub!
The length of the coil is 30m (98.4 foot or 1181 inch) but the diameter is only 1/4". I choose that small thickness to turn around the burn tunnel and heat riser with ease by hands.
In the end I cut the coil in half to double coil's volume output because the 1/4" thickness doesn't allow me to pull me enough hot water to make a shower. That's why you see two separate coils which, based on the test, they should produce enough hot water to make a shower mixed with some cold water at the shower faucet. Of course the hot water from both coils combined is less than the 1/2" supply hose because of high viscosity of the thin coil and the high number of coil's turns.

I don't have other photos from that system because it is so simple except the 1/2" hoses at the end of this 1/4" coil which is welded in a tricky way with copper blow torch and copper solder wire. This system is designed to work only if you have two valves for hot water or a triple way valve because at the summer, when the rocket stove is off, if you continue to send your hot water warmed up by other means (like a solar water heater) to the rocket stove coils, that water will return colder and you don't need that. The 30m copper coil cost me 60 euro and the 4 hoses (two hoses at each of 15m piece of coil) cost me 20 euro.
 
Posts: 20
4
  • Mark post as helpful
  • send pies
    Number of slices to send:
    Optional 'thank-you' note:
  • Quote
  • Report post to moderator
To those using or planning an open top hot water tank; what are you using to stop the water from growing bacteria?
 
F Styles
Posts: 455
Location: climate zone 6b
3
  • Mark post as helpful
  • send pies
    Number of slices to send:
    Optional 'thank-you' note:
  • Quote
  • Report post to moderator
To extinguish the concerns (pun intended) of smoke or flash back when opening my lid during a mid burn i have posted a video to show that when burning my RMH i get no smoke or "flash back" when i open my lid. i get so much draw and high temp from my original heat riser design that i can run my rocket stove with the 11.5 inch lid completely off and access port open. i have specially designed the bottom of my feed chamber with a "channel" that funnels the air in a direction under the wood to create the draw that keeps the smoke from rising up out of the extra large feed chamber. add the custom heat riser and i get 0 to dragon start ups in 30 seconds. here is the video of me lifting the lid mid burn.

 
F Styles
Posts: 455
Location: climate zone 6b
3
  • Likes 1
  • Mark post as helpful
  • send pies
    Number of slices to send:
    Optional 'thank-you' note:
  • Quote
  • Report post to moderator

Jason LaVoy wrote: To those using or planning an open top hot water tank; what are you using to stop the water from growing bacteria?


silver will keep it bacteria free. toss a pure .999 fine silver coin or two in the tank and you are good. the romans did the same thing.
 
F Styles
Posts: 455
Location: climate zone 6b
3
  • Likes 1
  • Mark post as helpful
  • send pies
    Number of slices to send:
    Optional 'thank-you' note:
  • Quote
  • Report post to moderator
***UPDATE***

NEW RECORD! I have now Officially stuffed a 10.5'' x 18'' Log into my Rocket Mass heater!

My Dragon has a wide deep throat and i plan to fill it completely. I am looking for the perfect log I may be able to stuff a 10 3/4 inch piece in next. stay tuned.

Here is the video:
 
F Styles
Posts: 455
Location: climate zone 6b
3
  • Mark post as helpful
  • send pies
    Number of slices to send:
    Optional 'thank-you' note:
  • Quote
  • Report post to moderator
This is how i loaded it. you can hear the side scraping on the way down in.


i just loaded it up for the night and ill post to let you know tomorrow how it burned.

ive been searching for the perfect round piece of wood to load and even though this piece is slightly elliptical its still 10.5'' at its largest diameter.

im still in search of the elusive 10 3/4'' round piece.
 
pollinator
Posts: 4154
Location: Northern New York Zone4-5 the OUTER 'RONDACs percip 36''
67
hugelkultur fungi books wofati solar woodworking
  • Mark post as helpful
  • send pies
    Number of slices to send:
    Optional 'thank-you' note:
  • Quote
  • Report post to moderator
F. Styles : I think we (mostly me) have been guilty of talking past each other, mea culpa ! The danger of Flashback occurs well after the first 15 minutes

of operation when the operator in an excess of caution decides to Cap off the feed tube of his rocket when that rocket is loaded with fuel and the internal

temperature of the Burn Tunnel (glowing Red) is clearly above 1000 ºF
.

When the Operator closes off the Feed Tube on a J-tube configured RMH without a secondary air supply The Wood fuel is baked by the freaky high temps

of the Combustion zone -and in that High Temperature, the entire (caped off ) Feed Tube, and Burn Tunnel quickly fill full of highly flammable hydrocarbons

in a low Oxigen environment. When these conditions are met the simple uncovering of the Feed Tube Supplies the Collected flammable gases with Oxygen

and an explosive Flashback event takes place that can remove facial hair -to include eye brows and eye lashes (or worse)


While this has never happened to me it is reported as a real world event by Ernie Wisner whose opinion I will Always respect !

For the Good of The Craft! Big AL !
 
F Styles
Posts: 455
Location: climate zone 6b
3
  • Likes 1
  • Mark post as helpful
  • send pies
    Number of slices to send:
    Optional 'thank-you' note:
  • Quote
  • Report post to moderator
it was still burning at 5am this morning
 
F Styles
Posts: 455
Location: climate zone 6b
3
  • Mark post as helpful
  • send pies
    Number of slices to send:
    Optional 'thank-you' note:
  • Quote
  • Report post to moderator
Al

Facts recorded in video.

1 Lid opened one hour seventeen minutes after log was loaded 3''+ burned down and fully burning on bottom

2 NO smoke when lid is lifted.

3 access port is opened and stays open during all operation.

4 system has a large amount of draw to siphon any smoke off wood and into burn tunnel.

video:
 
F Styles
Posts: 455
Location: climate zone 6b
3
  • Mark post as helpful
  • send pies
    Number of slices to send:
    Optional 'thank-you' note:
  • Quote
  • Report post to moderator
Al, regardless of what you or anyone thinks i feel that you have a bunch of experience and knowledge to share and i respect what you got more than you may think. regardless of where my comments go, just know i like what you do and feel you have the best intentions.

I understand the dangers of any fire and the capability that it has. fire is both a fearful master and an obedient servant and flash back is real in any system that does not allow air and its clear that my system must be understood that it has plenty of air flow built into its design.

i have documented through the different stages of my burns with many sizes of wood and this RMH has incredible draw. im not sure why it works in such a way but its as if my 6'' system has the draw of an 8 to 10'' system and makes my fire bricks red and im not sure if thats good or not but i tried to document that in the video what i can see with my naked eye.
 
F Styles
Posts: 455
Location: climate zone 6b
3
  • Mark post as helpful
  • send pies
    Number of slices to send:
    Optional 'thank-you' note:
  • Quote
  • Report post to moderator
i got up about 5am this morning. Here is a video of the 10.5'' log half burnt down, this morning after i got up opening lid and still no smoke.

i put the guide sticks on the sides of large logs to try and keep the large logs straight as they burn but every once in a while a guide stick may burn unevenly and allow the log to shift giving the system more air and causing the large log to turn to a huge glowing ember instead of the flame it so desires. if that happens the large log will eventually turn to charcoal and then collapse on itself and then finish out. this makes the burn a bit inefficient and increases the burn time. after putting in a few more guide sticks and shifting the large log back it got the correct air and its back to desired speed again.

 
F Styles
Posts: 455
Location: climate zone 6b
3
  • Mark post as helpful
  • send pies
    Number of slices to send:
    Optional 'thank-you' note:
  • Quote
  • Report post to moderator
in all seriousness as if i would be anything less... the 10'' + logs are only for testing and are not practical at all. even though the last 10'' log did not need any baby sitting i consider an 8'' log to be the maximum practical size usable in my RMH with out having to baby sit it for an entire burn unattended and get good efficient results. these videos seem a bit silly and i can understand that but i must see how far i can take this thing and report on how it does.

over the years of research i have noticed that same complaints repeated from the owners of rocket Stoves as follows:

1 less than easy [cold] start ups.

2 inconvenient maintenance and clean out.

3 baby sitting start ups and tedious short feeding intervals.

4 limited wood chunk sizes.

5 copious amounts smoke back.

6 once installed its difficult to move especially if you change your mind.

7 no restarts and short burn times.

8 unattended burn are out of the question.

9 limited work load [mostly just heat home].

this list is not all inclusive and may not be what every single rocket stove owners has or feels is an issue that needs to be addressed.

over the years i wrote down every one of these complaints i saw that people were saying and i sought out to address every single one of them to meet my needs and i am happy i feel i have met each of those goals as best i could.

 
F Styles
Posts: 455
Location: climate zone 6b
3
  • Mark post as helpful
  • send pies
    Number of slices to send:
    Optional 'thank-you' note:
  • Quote
  • Report post to moderator
Color and Temperature of my fire described: its hard to capture in a youtube video what the naked eye can see but the flame is very bright and dazzling with fine blue edges and you can see it at the end of this video when i get real close you can see im trying to focus in on the fire brick in the burn tunnel that is glowing orange/red.


The dominant color in a flame changes with temperature. The video of the fireplace fire is a good example of this variation. Near the logs, where most burning is occurring, the fire is white, the hottest color possible for organic material in general, or yellow. Above the yellow region, the color changes to orange, which is cooler, then red, which is cooler still. Above the red region, combustion no longer occurs, and the uncombusted carbon particles are visible as black smoke.

The temperature range from Red to White:

Red
Just visible: 525 °C (980 °F)
Dull: 700 °C (1,300 °F)
Cherry, dull: 800 °C (1,500 °F)
Cherry, full: 900 °C (1,700 °F)
Cherry, clear: 1,000 °C (1,800 °F)
Orange
Deep: 1,100 °C (2,000 °F)
Clear: 1,200 °C (2,200 °F)
White
Whitish: 1,300 °C (2,400 °F)
Bright: 1,400 °C (2,600 °F)
Dazzling: 1,500 °C (2,700 °F)

According to the info above (source: Wikipedia) the difference between red-hot and white-hot is about 1000 degrees. But what about blue-hot?

Anytime you see blue in a fire it is hotter than white. The range is between 2,600 and 3,000 degrees Fahrenheit and its the most oxygen-rich type of flame. A bunsen burner is a good example:

Bunsen burner flames:


1) air hole closed

2) air hole slightly open

3) air hole half open

4) air hole almost fully open (this is the roaring blue flame).

Bunsen burners use a mixture of gases. Gas burns hotter than organic materials such as wood and straw. Natural gas stove flames are blue. Propane flames are blue with yellow tips. The hottest fires are from oxyacetylene torches (about 3000 degrees Centigrade) that combine oxygen and gas to create pinpoint blue flames.
 
F Styles
Posts: 455
Location: climate zone 6b
3
  • Mark post as helpful
  • send pies
    Number of slices to send:
    Optional 'thank-you' note:
  • Quote
  • Report post to moderator
Thanks for the apple. im not quite sure how a post gets an apple?
 
steward
Posts: 1387
Location: Northwest Montana from Zone 3a to 4b (multiple properties)
213
10
hugelkultur forest garden hunting books chicken wofati
  • Likes 1
  • Mark post as helpful
  • send pies
    Number of slices to send:
    Optional 'thank-you' note:
  • Quote
  • Report post to moderator

F Styles wrote:Thanks for the apple. im not quite sure how a post gets an apple?


Check out this comprehensive list: How Permies Works

For the specifics of getting an apple - basically a quality, media rich post, like the one you made here. Also, providing helpful answers and the like. Check out that thread I gave a link to and peruse the topics - get familiar with the lay of the land and the way that Permies works.
 
Satamax Antone
gardener
Posts: 3457
Location: Southern alps, on the French side of the french /italian border 5000ft elevation
188
  • Mark post as helpful
  • send pies
    Number of slices to send:
    Optional 'thank-you' note:
  • Quote
  • Report post to moderator
F styles

Adiabatic flame of butane (blue flame) is 1970C° (3578F°)

https://en.wikipedia.org/wiki/Adiabatic_flame_temperature#Common_flame_temperatures

 
F Styles
Posts: 455
Location: climate zone 6b
3
  • Likes 1
  • Mark post as helpful
  • send pies
    Number of slices to send:
    Optional 'thank-you' note:
  • Quote
  • Report post to moderator
I have an idea to use a thermostat spring when fire is started it will expand and spin the flu to the open point where i put a stop that keeps it from going past full open, then when it cools it will wind back to the close stop point i made. this will ensure that the flu will only close after the fire is out and the system cools so that my RMH does not siphon the heat out of my home in the middle of the night after the fire burns out.

Here is the proof of concept video:

 
F Styles
Posts: 455
Location: climate zone 6b
3
  • Mark post as helpful
  • send pies
    Number of slices to send:
    Optional 'thank-you' note:
  • Quote
  • Report post to moderator

Satamax Antone wrote:F styles

Adiabatic flame of butane (blue flame) is 1970C° (3578F°)

https://en.wikipedia.org/wiki/Adiabatic_flame_temperature#Common_flame_temperatures


thank you for technical attention to detail and pointing out my typo. it would be nice to change it but unfortunately i am unable to correct it after i post another comment. i didnt need the butane info that i mentioned and in all seriousness digresses from my main observation and goal was to focus on Rocket stove solid organic burning temperature colors like wood and the butane was an after thought, just to show that proper air increases the temp and changes the color of fire. the range in butane temp you see i mentioned is because of the different amount of air provided to the fuel. i also mentioned this in another post where i stated i tested the air injection tube directly to the core inside of my burn chamber unfortunately the injection of air level i gave it was not successful in increasing in temp or draw. the Rocket stove systems ideally are designed to get the air it needs from the feeding area and is why we get the freaky high temps we do get. from the colors of the flames and the glowing of my bricks in my rocket stove i am pretty sure i am getting more than sufficient temperatures i need to be efficient.

those temp you mentioned are true but also dependent on the type of fuel used in a bunsen burner. Propane will generate a higher temp of 1980 c 3596 f.

The gas in a bunsen burner can be natural gas (which is mainly methane) or a liquefied petroleum gas, such as propane, butane, or a mixture of both.


i am still interested in hearing ideas on rocket stove water heating.
 
John McDoodle
Posts: 616
Location: ontario, canada
14
transportation fungi tiny house
  • Likes 1
  • Mark post as helpful
  • send pies
    Number of slices to send:
    Optional 'thank-you' note:
  • Quote
  • Report post to moderator
Just so you know, that fact that you are heating water, heating your oven as an integral component, heating a mass, and water as a mass, makes this one of the coolest integral concepts I've seen lately in a rocket style. I don't know if I told you yet or not, but combined all this is pretty epic awesome. I really like your new idea to thermally close the system when its not burning. Awesome innovations man.
 
gardener
Posts: 2828
Location: Fraser River Headwaters, Zone3, Lat: 53N, Altitude 2750', Boreal/Temperate Rainforest-transition
594
hugelkultur forest garden fungi trees books food preservation bike solar woodworking
  • Likes 1
  • Mark post as helpful
  • send pies
    Number of slices to send:
    Optional 'thank-you' note:
  • Quote
  • Report post to moderator
Cool system, F Styles !

Some interesting innovations/solutions.

It's great that you are posting these videos as well.

Where are you getting the fireclay from?

Did you draw up schematics of your system?

Can you describe in more detail how your rocket system and your oven are tied together?

 
F Styles
Posts: 455
Location: climate zone 6b
3
  • Mark post as helpful
  • send pies
    Number of slices to send:
    Optional 'thank-you' note:
  • Quote
  • Report post to moderator

Roberto pokachinni wrote:Cool system, F Styles !

Some interesting innovations/solutions.

It's great that you are posting these videos as well.

Where are you getting the fireclay from?

Did you draw up schematics of your system?

Can you describe in more detail how your rocket system and your oven are tied together?


the appreciation is humbling. i have been lurking in the shadows for a long time studying all the things i can do with a RMH. my first design i drew up was actually made of all metal but then it evolved into what it is today which is my very first build. being fully informed is key.

i got the fire clay, refractory cement and fire bricks at my local brick and mortar, brick and mortar store.

i have a very simple mechanical drawing of my system on the first page of this thread minus the heat riser upgrade although i did document the upgrade in more detail. If you are seriously interested in building something like my system then i can see if i can draw up a better mechanical drawing and instructions.

my rocket stove puts out 350 F + out of the exhaust and i run the RMH exhaust directly through an insulated hole in the middle of my stove with an expanded 6" to 8" adapter then back to 6". i can get close to 300f in my stove but plan to build either an exhaust sleeve box on the inside of my stove to increase it another 50f minimum or move my oven to the top of my RMH. i still have not yet decided.

i have my second water heater ready and stripped and i am currently working on ideas for a faster water heating solution.
 
F Styles
Posts: 455
Location: climate zone 6b
3
  • Likes 4
  • Mark post as helpful
  • send pies
    Number of slices to send:
    Optional 'thank-you' note:
  • Quote
  • Report post to moderator
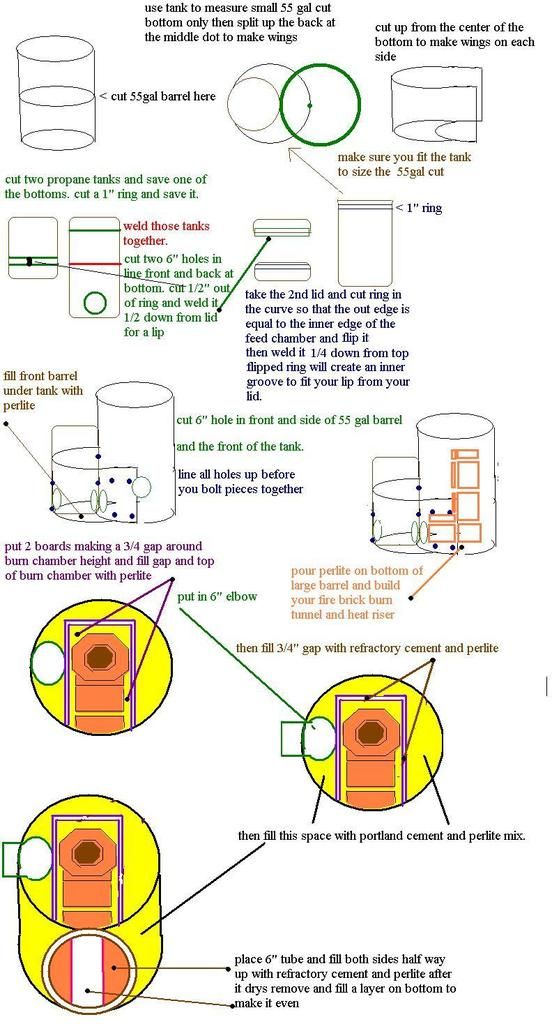
here are simple instructions on how to build my system. the instructions and pics on how i built my heat riser are on this thread some posts back.


i forgot to draw and extend the board lines down to meet the tank. i know you cant got through the 55 gal barrel to the tank but i did put a piece of board on the outside there and filled that triangle space between tank and barrel at the neck of the burn tunnel entrance filled with refractory cement for heat protection. after i filled that space i then filled the portland perlite mix and pulled the piece of board out.

if you are not good with welding you may be able to cut an extra thick ring with your angle grinder and cutting wheel and bolt both halves together and cut the lid ring and groove thicker also and drill holes and bolt them in. make sure you drill holes and place your bolts in for the wheels before you pour the cement.

also i used refractory cement and fire clay to point my fire bricks.
 
Danger, 10,000 volts, very electric .... tiny ad:
Boost Egg Nutrition With This Organic Algae Poultry Supplement
https://permies.com/t/153700/Organic-Astaxanthin-Algae-Poultry-Supplement
reply
    Bookmark Topic Watch Topic
  • New Topic