

|

|
|
|
|

|

|

|

|

|
 1
1


Rocket Mag evolution timeline: http://www.permies.com/t/52316/rocket-stoves/Rocket-stove-heats-water-pics
Rocket Mag Thread: http://www.permies.com/t/54074/rocket-stoves/Rocket-Mag-heater-Rocket-Mag
1
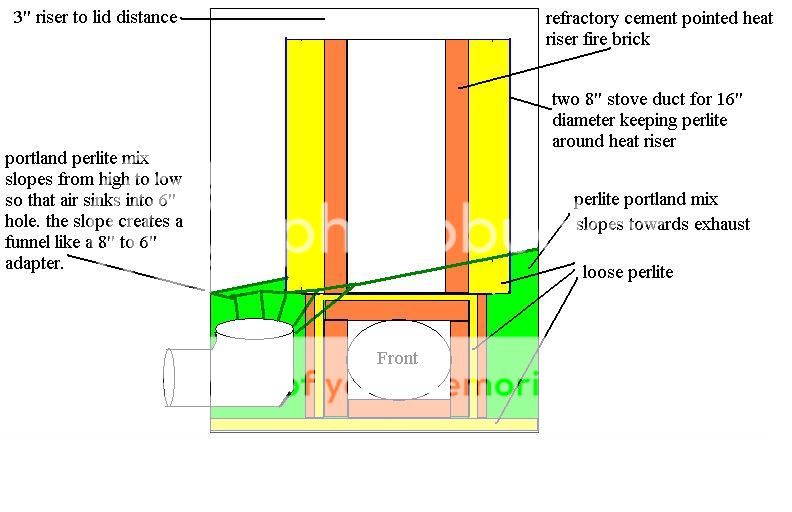
Glenn Herbert wrote:If your sketch is anywhere near to scale, you do have a good manifold transition to the 6" duct. And your burn tunnel/riser insulation is excellent.
Rocket Mag evolution timeline: http://www.permies.com/t/52316/rocket-stoves/Rocket-stove-heats-water-pics
Rocket Mag Thread: http://www.permies.com/t/54074/rocket-stoves/Rocket-Mag-heater-Rocket-Mag


"Never doubt that a small group of thoughtful, committed citizens can change the world; indeed, it's the only thing that ever has."-Margaret Mead "The only thing worse than being blind, is having sight but no vision."-Helen Keller
I do think so too. It looks like the sloping base (perlite/portland mix), and the focused slope (8' to 6' adapter type slope) directly into the exhaust would act to "drain" the vortex of heat out of your bell quite efficiently.the way the portland perlite mix is slopes may act to funnel it like a manifold.
"Never doubt that a small group of thoughtful, committed citizens can change the world; indeed, it's the only thing that ever has."-Margaret Mead "The only thing worse than being blind, is having sight but no vision."-Helen Keller
Roberto pokachinni wrote:Thanks for posting more details. Awesome. Still didn't see much in any of your drawings or vids about how the rocket and the conventional oven are connected.
Rocket Mag evolution timeline: http://www.permies.com/t/52316/rocket-stoves/Rocket-stove-heats-water-pics
Rocket Mag Thread: http://www.permies.com/t/54074/rocket-stoves/Rocket-Mag-heater-Rocket-Mag
Roberto pokachinni wrote:
I do think so too. It looks like the sloping base (perlite/portland mix), and the focused slope (8' to 6' adapter type slope) directly into the exhaust would act to "drain" the vortex of heat out of your bell quite efficiently.the way the portland perlite mix is slopes may act to funnel it like a manifold.
How did you join your two 8' stove ducts to contain your loose perlite in the heat riser?
Rocket Mag evolution timeline: http://www.permies.com/t/52316/rocket-stoves/Rocket-stove-heats-water-pics
Rocket Mag Thread: http://www.permies.com/t/54074/rocket-stoves/Rocket-Mag-heater-Rocket-Mag
1
God of procrastination https://www.youtube.com/watch?v=q1EoT9sedqY
Satamax Antone wrote:F Styles, you won't like my comment again. But carrefull with your non gasketed lid. I've had the problem lately, with a rocket soo powerfull, that it was creating overpresure on a regular basis. And the problem with this, is: You don't see any smoke. But the gases still go to inside the living space. I ended up with bad headaches a few times before understanding what was going on. You don't need much nasty gases to get you ill.

Rocket Mag evolution timeline: http://www.permies.com/t/52316/rocket-stoves/Rocket-stove-heats-water-pics
Rocket Mag Thread: http://www.permies.com/t/54074/rocket-stoves/Rocket-Mag-heater-Rocket-Mag
2
Rocket Mag evolution timeline: http://www.permies.com/t/52316/rocket-stoves/Rocket-stove-heats-water-pics
Rocket Mag Thread: http://www.permies.com/t/54074/rocket-stoves/Rocket-Mag-heater-Rocket-Mag
2

positively optimistic 🙂 https://www.youtube.com/@613Builds
2
"Never doubt that a small group of thoughtful, committed citizens can change the world; indeed, it's the only thing that ever has."-Margaret Mead "The only thing worse than being blind, is having sight but no vision."-Helen Keller
"Never doubt that a small group of thoughtful, committed citizens can change the world; indeed, it's the only thing that ever has."-Margaret Mead "The only thing worse than being blind, is having sight but no vision."-Helen Keller
God of procrastination https://www.youtube.com/watch?v=q1EoT9sedqY
Roberto pokachinni wrote:
Have you seen this one Styles? This guy is pretty funny. I like the glass viewer. I really like the air intake below the riser.
Rocket Mag evolution timeline: http://www.permies.com/t/52316/rocket-stoves/Rocket-stove-heats-water-pics
Rocket Mag Thread: http://www.permies.com/t/54074/rocket-stoves/Rocket-Mag-heater-Rocket-Mag
Roberto, his flame is low temp, red orange color gives the clue. The secondary air intage is most certainly cooling the fire too. So far, the best way i know to add secondary air to a J tube, is the P channel. J tubes run already pretty high on excess air. So adding a secondary air inlet is not necessary.
air off the outside very bottom of the bell and pipe it to the front access port creating more draw and increasing air intake temps for better and hotter burns. i still may do it but it may have to wait until spring. it will consist of wrapping a copper pipe around the very bottom of my bell on the outside near the exhaust manifold and then pipe it to the front of my access port. i will document with pics.
"Never doubt that a small group of thoughtful, committed citizens can change the world; indeed, it's the only thing that ever has."-Margaret Mead "The only thing worse than being blind, is having sight but no vision."-Helen Keller
Rocket Mag evolution timeline: http://www.permies.com/t/52316/rocket-stoves/Rocket-stove-heats-water-pics
Rocket Mag Thread: http://www.permies.com/t/54074/rocket-stoves/Rocket-Mag-heater-Rocket-Mag

Success has a Thousand Fathers , Failure is an Orphan
LOOK AT THE " SIMILAR THREADS " BELOW !
![[Thumbnail for bad-cap.jpg]](/t/52316/a/35338/bad-cap.jpg "Filename: bad-cap.jpg
Description:")
![[Thumbnail for Good-cap.jpg]](/t/52316/a/35339/Good-cap.jpg "Filename: Good-cap.jpg
Description:")
Rocket Mag evolution timeline: http://www.permies.com/t/52316/rocket-stoves/Rocket-stove-heats-water-pics
Rocket Mag Thread: http://www.permies.com/t/54074/rocket-stoves/Rocket-Mag-heater-Rocket-Mag
Bacon Lee wrote:
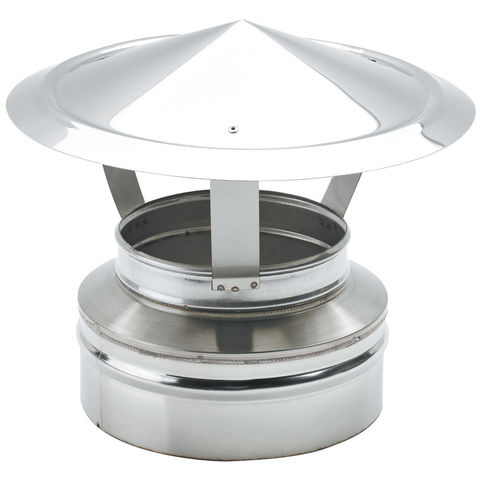
To increase draft/draw, I think the high chimney should be first priority.
The high chimney had chance to meet the free win blow by, and that definitely help increase draft/draw.
However, what is a standard static cowl? Excuse my English. I am not a native born, would you post a picture of the standard static cowl. I want to see in case I want to change my cap to a new one.
I have 2 ponds, 425 gal and 275 gal.
Rocket Mag evolution timeline: http://www.permies.com/t/52316/rocket-stoves/Rocket-stove-heats-water-pics
Rocket Mag Thread: http://www.permies.com/t/54074/rocket-stoves/Rocket-Mag-heater-Rocket-Mag
Rocket Mag evolution timeline: http://www.permies.com/t/52316/rocket-stoves/Rocket-stove-heats-water-pics
Rocket Mag Thread: http://www.permies.com/t/54074/rocket-stoves/Rocket-Mag-heater-Rocket-Mag
Rocket Mag evolution timeline: http://www.permies.com/t/52316/rocket-stoves/Rocket-stove-heats-water-pics
Rocket Mag Thread: http://www.permies.com/t/54074/rocket-stoves/Rocket-Mag-heater-Rocket-Mag
God of procrastination https://www.youtube.com/watch?v=q1EoT9sedqY
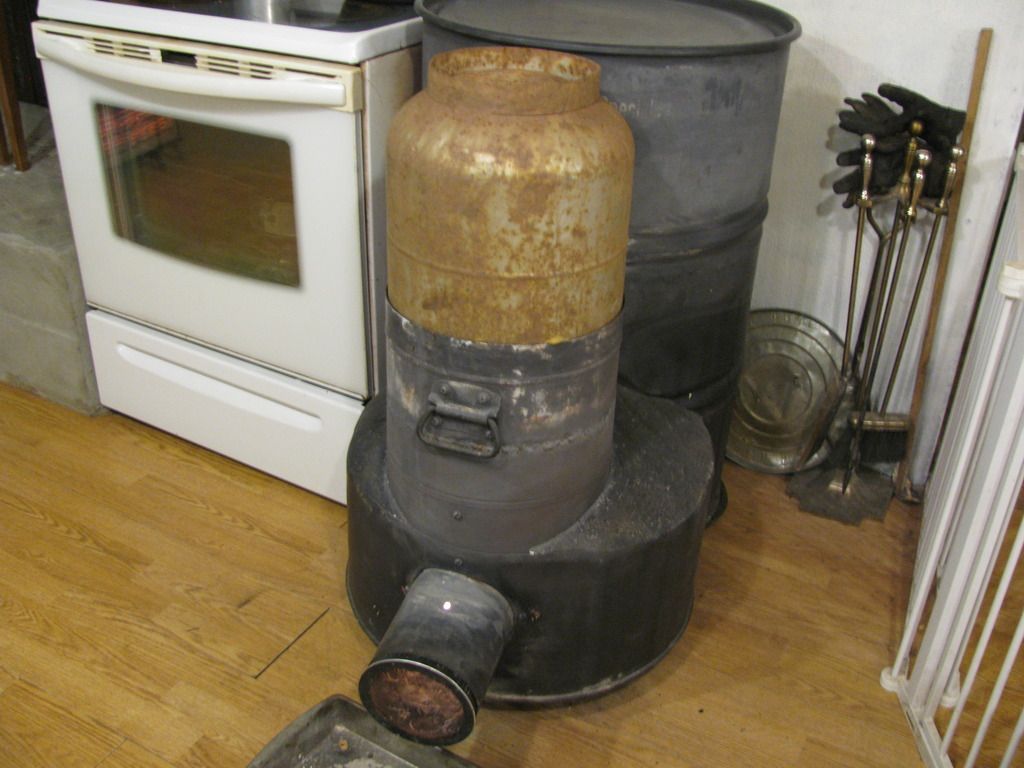
WHAT! she is purdy! be careful what you say around her. the last guy that said that got sucked into the burn chamber while she screamed "feed me". you know darn well beauty comes from the inside.Satamax Antone wrote:Intresting. Will you pretty the whole thing up?
Rocket Mag evolution timeline: http://www.permies.com/t/52316/rocket-stoves/Rocket-stove-heats-water-pics
Rocket Mag Thread: http://www.permies.com/t/54074/rocket-stoves/Rocket-Mag-heater-Rocket-Mag
God of procrastination https://www.youtube.com/watch?v=q1EoT9sedqY
positively optimistic 🙂 https://www.youtube.com/@613Builds
Rocket Mag evolution timeline: http://www.permies.com/t/52316/rocket-stoves/Rocket-stove-heats-water-pics
Rocket Mag Thread: http://www.permies.com/t/54074/rocket-stoves/Rocket-Mag-heater-Rocket-Mag
Satamax Antone wrote:Well, i have hard time even with my builds. And i don't use barrels anymore. i want to become a pro bricklayer; i mean having pro results; so i can build nice masonry stoves.
Your thing starts more and more to resemble the "vertical batch" that we're trying to invent with Indipendentenergy at Donkey's. He's a bit ahead of me. But i might give your burn tunnel below the firebox a shot one day. If the "flame developer" doesn't work.
Did the burn tunnel ever get blocked by embers?
And did the fire ever go out because the fuel didn't go down well enough?
Rocket Mag evolution timeline: http://www.permies.com/t/52316/rocket-stoves/Rocket-stove-heats-water-pics
Rocket Mag Thread: http://www.permies.com/t/54074/rocket-stoves/Rocket-Mag-heater-Rocket-Mag
1
F Styles wrote:it doesnt really burn like a batch box. the way i designed the bottom air flow it burns the wood at the bottom and can go through multiple levels of temperature and efficiency. i have seen the horizontal batch box design and they burn the entire batch.
God of procrastination https://www.youtube.com/watch?v=q1EoT9sedqY
Then it goes up, and the whole batch is set into flames by then. And it's violent.
Does the tunnel ever get clogged by embers?
Rocket Mag evolution timeline: http://www.permies.com/t/52316/rocket-stoves/Rocket-stove-heats-water-pics
Rocket Mag Thread: http://www.permies.com/t/54074/rocket-stoves/Rocket-Mag-heater-Rocket-Mag
Rocket Mag evolution timeline: http://www.permies.com/t/52316/rocket-stoves/Rocket-stove-heats-water-pics
Rocket Mag Thread: http://www.permies.com/t/54074/rocket-stoves/Rocket-Mag-heater-Rocket-Mag
God of procrastination https://www.youtube.com/watch?v=q1EoT9sedqY
Rocket Mag evolution timeline: http://www.permies.com/t/52316/rocket-stoves/Rocket-stove-heats-water-pics
Rocket Mag Thread: http://www.permies.com/t/54074/rocket-stoves/Rocket-Mag-heater-Rocket-Mag
God of procrastination https://www.youtube.com/watch?v=q1EoT9sedqY
Rocket Mag evolution timeline: http://www.permies.com/t/52316/rocket-stoves/Rocket-stove-heats-water-pics
Rocket Mag Thread: http://www.permies.com/t/54074/rocket-stoves/Rocket-Mag-heater-Rocket-Mag

Rocket Mag evolution timeline: http://www.permies.com/t/52316/rocket-stoves/Rocket-stove-heats-water-pics
Rocket Mag Thread: http://www.permies.com/t/54074/rocket-stoves/Rocket-Mag-heater-Rocket-Mag
Rocket Mag evolution timeline: http://www.permies.com/t/52316/rocket-stoves/Rocket-stove-heats-water-pics
Rocket Mag Thread: http://www.permies.com/t/54074/rocket-stoves/Rocket-Mag-heater-Rocket-Mag

|
This tiny ad cleans with warm water instead of toxic gick and gained 20 IQ points!
grow your own garden and build your own home, in Montana, for free-ish
https://wheaton-labs.com/bootcamp
|


