|

|
|
|
|

|

|

|

|

|
 1
1


Robert Hohulin wrote:Hi everyone! Have a question about a brick heat riser. Can I use ordinary brick or even pavers, using refractory mortar, then wrapped in rock wool? I was just reading the thread on using firebrick. I would prefer to use FB but my wife might kick me out of the house per the cost. I have access to regular bricks AND landscape pavers for free. Will these disintegrate?
God of procrastination https://www.youtube.com/watch?v=q1EoT9sedqY


 1
1
![[Thumbnail for RMH-rebuild_66.JPG]](/t/41560/a/23133/RMH-rebuild_66.JPG "Filename: RMH-rebuild_66.JPG
Description:")
![[Thumbnail for RMH-rebuild_108.JPG]](/t/41560/a/23134/RMH-rebuild_108.JPG "Filename: RMH-rebuild_108.JPG
Description:")
![[Thumbnail for RMH-rebuild_110.JPG]](/t/41560/a/23135/RMH-rebuild_110.JPG "Filename: RMH-rebuild_110.JPG
Description:")
For all your Montana Masonry Heater parts (also known as) Rocket Mass heater parts.
Visit me at
dragontechrmh.com Once you go brick you will never go back!
![[Thumbnail for image.jpg]](/t/41560/a/23140/image.jpg "Filename: image.jpg
Description:")
![[Thumbnail for image.jpg]](/t/41560/a/23141/image.jpg "Filename: image.jpg
Description:")
![[Thumbnail for image.jpg]](/t/41560/a/23142/image.jpg "Filename: image.jpg
Description:")
For all your Montana Masonry Heater parts (also known as) Rocket Mass heater parts.
Visit me at
dragontechrmh.com Once you go brick you will never go back!
![[Thumbnail for R-3.JPG]](/t/41560/a/23230/R-3.JPG "Filename: R-3.JPG
Description:")
![[Thumbnail for R6.JPG]](/t/41560/a/23231/R6.JPG "Filename: R6.JPG
Description:")
![[Thumbnail for RMH-rebuild_52.JPG]](/t/41560/a/23232/RMH-rebuild_52.JPG "Filename: RMH-rebuild_52.JPG
Description:")
For all your Montana Masonry Heater parts (also known as) Rocket Mass heater parts.
Visit me at
dragontechrmh.com Once you go brick you will never go back!
![[Thumbnail for image.jpg]](/t/41560/a/23372/image.jpg "Filename: image.jpg
Description:")
![[Thumbnail for image.jpg]](/t/41560/a/23373/image.jpg "Filename: image.jpg
Description:")
![[Thumbnail for image.jpg]](/t/41560/a/23374/image.jpg "Filename: image.jpg
Description:")
For all your Montana Masonry Heater parts (also known as) Rocket Mass heater parts.
Visit me at
dragontechrmh.com Once you go brick you will never go back!
![[Thumbnail for image.jpg]](/t/41560/a/23395/image.jpg "Filename: image.jpg
Description:")
![[Thumbnail for image.jpg]](/t/41560/a/23396/image.jpg "Filename: image.jpg
Description:")
![[Thumbnail for image.jpg]](/t/41560/a/23397/image.jpg "Filename: image.jpg
Description:")
![[Thumbnail for image.jpg]](/t/41560/a/26383/image.jpg "Filename: image.jpg
Description:")
![[Thumbnail for image.jpg]](/t/41560/a/26384/image.jpg "Filename: image.jpg
Description:")
![[Thumbnail for image.jpg]](/t/41560/a/26385/image.jpg "Filename: image.jpg
Description:")
Freakin' hippies and Squares, since 1986
1
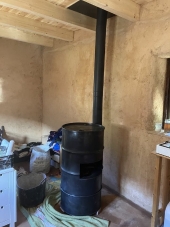
 Measure how much you'll need to cut out to fit over the core and for how much height you'll need. Mark it well on the barrel. Cut out the solid end of both barrels with a sawzall ( be very careful not cut through the outside of the barrels - I scrapped a couple doing that). Then take an angle grinder to smooth out what you couldn't get flush with the sawzall. You'll want a smooth drop for the hot gasses. Then cut out your markings. I would recommend having a second person steady it while you cut. In my case, I found that dismantling my chop saw and using it free hand with a masonry blade was much easier. Your cuts don't have to be super accurate because you can fill in any gaps with cob. Once you have the bottom barrel fitted, make your connection to the exhaust manifold. Make sure when you're measuring for height to allow for 2-3" of depth below the manifold to allow for a good ash pit. Seal the inner and outer barrel bottom with cob. Once that is securely in place, move on to the top barrel. Turn the top barrel upside down. Initially I used 1/2" fiberglass gasket rope w/incuded adhesive. Throw the adhesive away - it's worthless. It's rated at 1000* and after a few burns it hardened and flaked away leaving air leaks. I instead used high temp sealant caulk rated at 600* - it really seals well and remains pliable. Lay a thick bead on the rim that will meet up with the bottom barrel, lay out the rope gasket on the bead firmly, then cut the ends to size. I put a little extra sealant on the ends of the rope to make sure I had a good seal. Let it set up for a few hours. I also laid a bead of caulk on the rim of the bottom barrel too. Overkill maybe but I didn't want to do it again. Take the extra lid clamp ring and loosely place it over the bottom barrel. Once the caulk is set up, flip the barrel over and CAREFULLY lower it down over the riser, taking care not bump the riser. Once in place,adjust the alignment of the rims. It can tricky because the rope wants to roll. Install the clamp ring and tighten but don't overdo it. Then, when you're ready for the top lid, use the caulk to seal the bungs on the lid (if it has any) and lay a good bead of caulk under the lid rim(remove the rubber gasket that came on the lid first!) Lay out the rope firmly into the caulk just like you did on the barrel rims. Put the lid in place and tighten the clamp ring. You'll have very airtight barrel system. It's really easy to remove the lid to inspect, or to remove the top barrel for maintenance. I really hope that this helps. Let me know how it turns out!
Silence is Golden
For all your RMH needs:
dragontechrmh.com

|
if you are good, then when you die, you will get seasons 2-10 of firefly - tiny ad
It's a bit like "run away to the circus" but with gardening
https://wheaton-labs.com/bootcamp
|