• Post Reply Bookmark Topic Watch Topic
  • New Topic
permaculture forums growies critters building homesteading energy monies kitchen purity ungarbage community wilderness fiber arts art permaculture artisans regional education skip experiences global resources cider press projects digital market permies.com pie forums private forums all forums
this forum made possible by our volunteer staff, including ...
master stewards:
  • Nancy Reading
  • Carla Burke
  • r ranson
  • John F Dean
  • paul wheaton
  • Pearl Sutton
stewards:
  • Jay Angler
  • Liv Smith
  • Leigh Tate
master gardeners:
  • Christopher Weeks
  • Timothy Norton
gardeners:
  • thomas rubino
  • Jeremy VanGelder
  • Maieshe Ljin

T-bricks - the easy way to make an adobe home

 
Posts: 1502
Location: Chihuahua Desert
  • Likes 13
  • Mark post as helpful
  • send pies
    Number of slices to send:
    Optional 'thank-you' note:
  • Quote
  • Report post to moderator


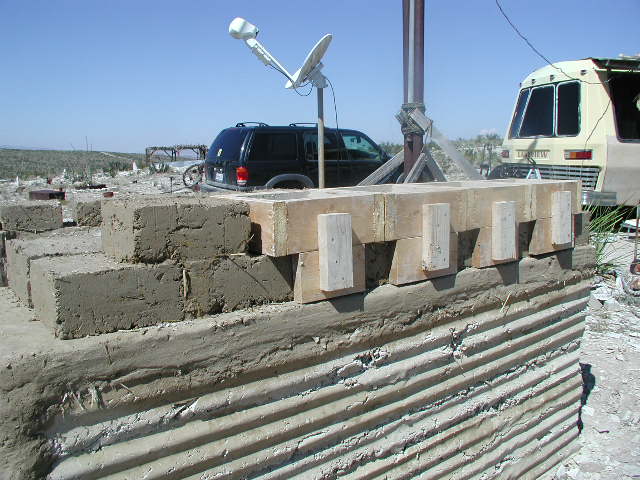
Here's an explanation of our adobe T-brick building method. It's simple, easy, and can be done by just about anyone:
http://www.naturalbuildingblog.com/cast-in-situ-adobe-t-bricks

The concept is simple. You make a T-form with scrap lumber or metal, and you pour the adobe bricks right in place on the wall. The form only need to be on the brick for about 5 minutes, then you pull it off, and move down the wall. If you set it up correctly, the forms walk down a wall like a caterpillar, with the end form jumping to the start of the line over and over.

Each course shifts half a brick, so that the space from the forms gets filled with the next course, creating an interlocking brick that's both easy and cheap to make.

We used stabilized adobe, but you could use just about any material for this.

For more photo and description of the method, check out our site: http://velacreations.com/howto/adobe-walls/


Posts: 221
Location: Zone 6a, Wahkiacus, WA
28
goat hugelkultur purity forest garden trees woodworking
  • Likes 1
  • Mark post as helpful
  • send pies
    Number of slices to send:
    Optional 'thank-you' note:
  • Quote
  • Report post to moderator
that looks like a pretty good system, and very strong as the T's interlock together. Thank you for passing this along.
 
Posts: 155
Location: Cornwall UK
15
dog forest garden tiny house books bike solar
  • Likes 1
  • Mark post as helpful
  • send pies
    Number of slices to send:
    Optional 'thank-you' note:
  • Quote
  • Report post to moderator
Ingenious. I love it.

paul
 
Posts: 224
Location: east and dfw texas
6
2
forest garden hunting trees chicken bee woodworking
  • Likes 1
  • Mark post as helpful
  • send pies
    Number of slices to send:
    Optional 'thank-you' note:
  • Quote
  • Report post to moderator
It's amazing how simple things can be and be so good
 
Posts: 144
Location: Sacramento, CA
8
  • Likes 1
  • Mark post as helpful
  • send pies
    Number of slices to send:
    Optional 'thank-you' note:
  • Quote
  • Report post to moderator
Not trying to be a smartass but how is this different/better/easier from a rammed earth wall since the adobe is not first dried before stacking, it goes into the wall wet? I like the fact that the mold is simple and the amount of earth moved is smaller increments.
 
Abe Connally
Posts: 1502
Location: Chihuahua Desert
  • Mark post as helpful
  • send pies
    Number of slices to send:
    Optional 'thank-you' note:
  • Quote
  • Report post to moderator

Michael Bushman wrote:Not trying to be a smartass but how is this different/better/easier from a rammed earth wall since the adobe is not first dried before stacking, it goes into the wall wet? I like the fact that the mold is simple and the amount of earth moved is smaller increments.


Well, for one thing, you don't have to ram it! Also, you can add stabilizers like lime, cement, or others and have a weather resistant wall almost instantly. Rammed earth need more substantial form work and additional labor for ramming and sealing.
 
pollinator
Posts: 1596
Location: Root, New York
318
forest garden foraging trees fiber arts building medical herbs
  • Likes 1
  • Mark post as helpful
  • send pies
    Number of slices to send:
    Optional 'thank-you' note:
  • Quote
  • Report post to moderator
this is very cool, i like =).

you could do something with stone work in the forms, for a variation.
or more fluffy slip straw or something similar with clay slip, for an interior wall...
 
master pollinator
Posts: 4967
Location: Due to winter mortality, I stubbornly state, zone 7a Tennessee
2124
6
forest garden foraging books food preservation cooking fiber arts bee medical herbs
  • Mark post as helpful
  • send pies
    Number of slices to send:
    Optional 'thank-you' note:
  • Quote
  • Report post to moderator
How old is your structure? Does it stand the test of time?
 
Abe Connally
Posts: 1502
Location: Chihuahua Desert
  • Mark post as helpful
  • send pies
    Number of slices to send:
    Optional 'thank-you' note:
  • Quote
  • Report post to moderator

Joylynn Hardesty wrote:How old is your structure? Does it stand the test of time?


This structure is now about 12 years old. We never plastered it, but should have, some of the finer sculptural features have eroded a bit, but other than that, the structure is great.
 
pollinator
Posts: 144
Location: Oklahoma Panhandle
29
  • Mark post as helpful
  • send pies
    Number of slices to send:
    Optional 'thank-you' note:
  • Quote
  • Report post to moderator
Abe, what are the approximate dimensions of your blocks? Both the T blocks and the blocks from the bolt together forms. I guess I'd also like to get your opinion on the maximum width of wall that is practical.

Bryan
 
gardener
Posts: 301
Location: Austin, Texas
136
8
tiny house building homestead
  • Likes 2
  • Mark post as helpful
  • send pies
    Number of slices to send:
    Optional 'thank-you' note:
  • Quote
  • Report post to moderator
Abe,

Thanks for your article. As a test project for building a home someday we started building a shed last September using T-brick forms. We finally got the roof on this weekend. I had some previous experience with cob and earthbag building from workshops but this was my first solo project. I really liked the T-Brick technique for how simple and how scalable it was. I could work pretty efficiently by myself or could easily accommodate a small crew. Quality control was just a matter of making sure the form you were packing was level. I put together some time lapse videos of our project thus far.


Posts: 129
Location: Sierra Blanca, TX
9
  • Likes 1
  • Mark post as helpful
  • send pies
    Number of slices to send:
    Optional 'thank-you' note:
  • Quote
  • Report post to moderator
Nice work Aaron. Just curious though, how long did it take you to put up the walls. just the block work?
 
Aaron Yarbrough
gardener
Posts: 301
Location: Austin, Texas
136
8
tiny house building homestead
  • Mark post as helpful
  • send pies
    Number of slices to send:
    Optional 'thank-you' note:
  • Quote
  • Report post to moderator

Joseph Johnson wrote:Nice work Aaron. Just curious though, how long did it take you to put up the walls. just the block work?


Hey Joseph,

There are around 232 total labor hours in the wall. That includes a lot of learning curve along with some child labor and elder labor. I worked on the wall roughly three days(4-10 hours a day) a month over the span of nine months. We could do 1 course (~40 linear foot, 5.5 inches rise) in about a day. By myself it would be a long day. With some helpers we could knock out a course in 6 hours or less. I kept pretty good notes on hours and costs. I'll tabulate them and make some nice graphs and tables.  
 
Joseph Johnson
Posts: 129
Location: Sierra Blanca, TX
9
  • Mark post as helpful
  • send pies
    Number of slices to send:
    Optional 'thank-you' note:
  • Quote
  • Report post to moderator
We did 5 test bricks 12"x14"x3-1/2" just to see if our soil was good for adobes. We did this at 9pm and the mold was pulled after 20 minutes. at 11am the following day I stood them up on end and couldnt resist taking one and doing a 4 ft drop test. It cracked across the middle but didnt break in half. At noon the next day I broke it in half and found it to be almost dry almost to the middle. at noon the next day I dropped another and it suffered only minor chipping on the edge that hit first. Now these were not stabilized and and the only thing we added to the soil was straw and water. the next day I took one and dropped it from 4ft twice and kinda tossed it out in front of me several feet with no damage. it wasnt until my sister flew into the driveway and ran it over with the car that it got any damage. I know we wont get it that dry and solid so quickly going directly on the wall but I am wondering if 5-6 day between courses would be enough?
 
Aaron Yarbrough
gardener
Posts: 301
Location: Austin, Texas
136
8
tiny house building homestead
  • Mark post as helpful
  • send pies
    Number of slices to send:
    Optional 'thank-you' note:
  • Quote
  • Report post to moderator

Joseph Johnson wrote:We did 5 test bricks 12"x14"x3-1/2" just to see if our soil was good for adobes. We did this at 9pm and the mold was pulled after 20 minutes. at 11am the following day I stood them up on end and couldnt resist taking one and doing a 4 ft drop test. It cracked across the middle but didnt break in half. At noon the next day I broke it in half and found it to be almost dry almost to the middle. at noon the next day I dropped another and it suffered only minor chipping on the edge that hit first. Now these were not stabilized and and the only thing we added to the soil was straw and water. the next day I took one and dropped it from 4ft twice and kinda tossed it out in front of me several feet with no damage. it wasnt until my sister flew into the driveway and ran it over with the car that it got any damage. I know we wont get it that dry and solid so quickly going directly on the wall but I am wondering if 5-6 day between courses would be enough?


I think 5-6 days would be plenty, especially in hot months and if you use a drier mix. I had the week of Christmas off and I was able to do a couple of courses on consecutive days. On the second day one of my lower blocks bulged a bit. I think that was primarily because I used a soupy mix on that particular block. The rest seemed fine though.    
 
Aaron Yarbrough
gardener
Posts: 301
Location: Austin, Texas
136
8
tiny house building homestead
  • Mark post as helpful
  • send pies
    Number of slices to send:
    Optional 'thank-you' note:
  • Quote
  • Report post to moderator
Here my variations on Abe's forms:


I used 2x6s. The interior of all the forms are 12" wide and either 12" or 18" long. I think 2x4s may work better to prevent the block from slumping and to make the forms easier to slip off. The corner form (3rd from the left) was fairly heavy.  

I extended the legs to the full length of the form. This was helpful when I couldn't center the form over the gap.

On the corners of the building I alternated using the first form from the left and the third form from the left.

For the door way and window openings I used the end cap form (far right). Every course I would alternate with a 12" end cap form (not pictured).

 
Joylynn Hardesty
master pollinator
Posts: 4967
Location: Due to winter mortality, I stubbornly state, zone 7a Tennessee
2124
6
forest garden foraging books food preservation cooking fiber arts bee medical herbs
  • Likes 4
  • Mark post as helpful
  • send pies
    Number of slices to send:
    Optional 'thank-you' note:
  • Quote
  • Report post to moderator
Hello Aaron. How is your shed doing, 7 years later? Do you remember the ratio of clay to straw that you used?
 
Aaron Yarbrough
gardener
Posts: 301
Location: Austin, Texas
136
8
tiny house building homestead
  • Likes 10
  • Mark post as helpful
  • send pies
    Number of slices to send:
    Optional 'thank-you' note:
  • Quote
  • Report post to moderator

Joylynn Hardesty wrote:Hello Aaron. How is your shed doing, 7 years later? Do you remember the ratio of clay to straw that you used?


I was just thinking I should give this thread a bump. Shed is doing great. For ratios roughly three parts sand, 1 part clay and 1 part straw or around 3-4 big handfuls of straw for a wheelbarrow load of cob.

Here is a blog post about some repairs I made in May 2022 and here is the YouTube video:

T-Brick-Shed-January-2024.jpg
T-B
T-Brick Shed January 2024
 
Posts: 14
  • Likes 4
  • Mark post as helpful
  • send pies
    Number of slices to send:
    Optional 'thank-you' note:
  • Quote
  • Report post to moderator
The pace was slow but maybe that was part of Abe's plan.  Meditation can occur in many types of purposeful manual labor.  Ever go to the gym and see some weight lifters going ballistic with rapid movement, loud clanging, and feral grunts of exertion?  Others gain endurance by slowing down the lifts and easing the weights down with barely a sound.  

Different strokes for different folks I reckon.  
 
Can you shoot lasers out of your eyes? Don't look at this tiny ad:
Heat your home with the twigs that naturally fall of the trees in your yard
http://woodheat.net
reply
    Bookmark Topic Watch Topic
  • New Topic