gift
Collection of 14 Permaculture/Homesteading Cheat-Sheets, Worksheets, and Guides
will be released to subscribers in: soon!
  • Post Reply Bookmark Topic Watch Topic
  • New Topic
permaculture forums growies critters building homesteading energy monies kitchen purity ungarbage community wilderness fiber arts art permaculture artisans regional education skip experiences global resources cider press projects digital market permies.com pie forums private forums all forums
this forum made possible by our volunteer staff, including ...
master stewards:
  • r ranson
  • Carla Burke
  • Nancy Reading
  • John F Dean
  • Jay Angler
  • paul wheaton
stewards:
  • Pearl Sutton
  • Burra Maluca
  • Joseph Lofthouse
master gardeners:
  • Timothy Norton
  • Christopher Weeks
gardeners:
  • Jeremy VanGelder
  • Maieshe Ljin
  • Nina Surya

Troubleshooting J design using firebricks

 
Posts: 11
2
  • Mark post as helpful
  • send pies
    Number of slices to send:
    Optional 'thank-you' note:
  • Quote
  • Report post to moderator
​I ma making a rocket stove J - using fire bricks.
This is for heating water for bathing in a pot
I am doing this in two steps​ -
First step (is where I am) we made the basic rocket stove stacking the fire bricks, test it, make any changes if required.
After rectification i will add Cob insulation around the firebricks and around the pot too. The heat riser will continue around the pot and then via a chimney the exhaust will be let out.

We built the rocket stove using 65 firebricks of 9x4.5x2 inches size
​Various dimensions are shown in pic below (all dimensions are internal). Pl note the pot and its insulation will have gap around it - to function a further heat riser.

See photos of our test construction and test fire here

QUESTIONS:
The heat we are generating feels less - what could be the reasons?
Fair amount of smoke comes out of the heat riser - its not smoke less - why?
The wood sticks do not keep going inside (gravity feed) - rather some of them just stopped burning after 30min or fell inside and stopped burning
We see fair amount of ash - what could be the reason for that?
Also we found it was not easy to start the fire - the fire kept coming out of the feed chamber only inside of going into the burn tunnel?
 
rocket scientist
Posts: 6578
Location: latitude 47 N.W. montana zone 6A
3463
cat pig rocket stoves
  • Likes 1
  • Mark post as helpful
  • send pies
    Number of slices to send:
    Optional 'thank-you' note:
  • Quote
  • Report post to moderator
Hi Welcome to Permies;  Too start with your not building a standard mass heater but more of  a rocket stove ,  much less complicated.  #1) Your  heavy firebricks are absorbing heat, only after they heat up will that stop. #2) I'm guessing here but : possibly sucking air thru non mortared bricks.  I would make the riser taller , possably shorten the burn tunnel and make up a clay mortar to glue the bricks together.   #3)  All those things are happening because the stove is sucking air and not heating up and drawing properly.   Mortar it together and try again.  (EDIT)  Just looked at your photos...  Your pot is blocking the riser ...  need to suspend it or raise it so as  not to block exhaust flow from the riser.  
 
out to pasture
Posts: 12647
Location: Portugal
3615
goat dog duck forest garden books wofati bee solar rocket stoves greening the desert
  • Mark post as helpful
  • send pies
    Number of slices to send:
    Optional 'thank-you' note:
  • Quote
  • Report post to moderator
Is there a brick missing in the riser?  
 
Ratnesh Mathur
Posts: 11
2
  • Mark post as helpful
  • send pies
    Number of slices to send:
    Optional 'thank-you' note:
  • Quote
  • Report post to moderator
Thanks Thomas
I like your suggestion of mortar with clay to close gaps and then try. Will do that tomorrow morning and update/
Also we did lift the pot up by placing two sticks between the bottom and the top brick
You said to shorten the burn tunnel - what ratios work best?
 
Ratnesh Mathur
Posts: 11
2
  • Mark post as helpful
  • send pies
    Number of slices to send:
    Optional 'thank-you' note:
  • Quote
  • Report post to moderator
Yes Burra Maluca in the pic one layer of brick is missing in riser - which we added after the photo was taken.
 
thomas rubino
rocket scientist
Posts: 6578
Location: latitude 47 N.W. montana zone 6A
3463
cat pig rocket stoves
  • Likes 1
  • Mark post as helpful
  • send pies
    Number of slices to send:
    Optional 'thank-you' note:
  • Quote
  • Report post to moderator
Rather than talk about ratio's,  I will tell you the dimensions of my 8" J tube.   My feed tube is 7.5" x 7.5" x 16" deep , My burn tunnel is 7.5" wide and 8.5" deep  ( this allows for 1" of fly ash sitting in the bottom ) roof length of burn tunnel is 12"  My riser is home made from fireclay / perlite  it is 51" tall.  I tried other configurations with a longer burn tunnel and a shorter riser ...   I was not happy with them.  My current build is starting its third season and is working flawlessly. The only improvements I would consider  would be using carbon fiber boards to make up the burn tunnel and a ceramic vacuum formed round riser ... they would cost me several hundred dollars ... Soooo for the time being ,I'll stay with clay / perlite and fire bricks.
 
Ratnesh Mathur
Posts: 11
2
  • Mark post as helpful
  • send pies
    Number of slices to send:
    Optional 'thank-you' note:
  • Quote
  • Report post to moderator
Thanks Thomas for sharing your dimensions - that would certainly help - only i am confused from where to where are you measuring. Just to be sure and clear - pl see the diagram below and clarify for me:

1) feed tube which is 16" deep is A1 or A2
2) Roof length of burn tunnel is 12"  is B1 or B2 or B3
3) Riser is 51" tall is R1 or R2
(All dimensions internal)
thanks
 
thomas rubino
rocket scientist
Posts: 6578
Location: latitude 47 N.W. montana zone 6A
3463
cat pig rocket stoves
  • Likes 1
  • Mark post as helpful
  • send pies
    Number of slices to send:
    Optional 'thank-you' note:
  • Quote
  • Report post to moderator
Feed tube is A-1     Roof of burn tunnel is  B-1    Riser is R-2     Hope that helps,   waiting to hear about your next burn.    Good Luck
 
Ratnesh Mathur
Posts: 11
2
  • Mark post as helpful
  • send pies
    Number of slices to send:
    Optional 'thank-you' note:
  • Quote
  • Report post to moderator
The dimensions i currently have
A1 - we have is 11 - i can easily increase it by another brick to 15.5 - though not sure longer feed tube will make any difference.
B1 in our case is also 12 - making B3 as 26 (adding 7+7 width of both feed + riser)
R2 in our case is 38 as compared to 51 of your setup. Let me increase this by two bricks (9") to 47 and see how it goes
Will clay mortar it tomorrow - and test fire it day after and let you know how it goes
thanks
 
thomas rubino
rocket scientist
Posts: 6578
Location: latitude 47 N.W. montana zone 6A
3463
cat pig rocket stoves
  • Likes 1
  • Mark post as helpful
  • send pies
    Number of slices to send:
    Optional 'thank-you' note:
  • Quote
  • Report post to moderator
Yes , you are correct that your feed tube depth will not have much bearing on your burn. After my post I  counted the bricks in your build ,realizing you already had a 12" B-1. I do recommend  increasing your riser height.   When mortaring your bricks you only want a very thin layer , just enough to fill any irregularity between each brick. With clay there is no need to wait for it to dry. As soon as I finish a repair I fire it off, helps the clay dry.  On a final assembly , after testing I recommend using A Fire clay & sand mix as mortar.  I realize that may not be an option at your location.  If that is the case, then what you have will work fine. Fire clay has a higher resistance to high heat than most clay.
 
Ratnesh Mathur
Posts: 11
2
  • Mark post as helpful
  • send pies
    Number of slices to send:
    Optional 'thank-you' note:
  • Quote
  • Report post to moderator
SO here is a tiny video of the test fire we did after plastering the fire bricks (not yet insulated them with cob).
https://www.youtube.com/watch?v=bd3q27AV9r8
The ISSUE that is still bothering us is that after some 15-20 min of good burn the fire goes off. The long stick remains unburnt - sticking out of the feed chamber. How do we ensure that fire keeps burning - and yes why is it getting turned off?
 
Rocket Scientist
Posts: 4606
Location: Upstate NY, zone 5
613
5
  • Mark post as helpful
  • send pies
    Number of slices to send:
    Optional 'thank-you' note:
  • Quote
  • Report post to moderator
I can't tell you why your fire goes out (unless the fuel is burned up 
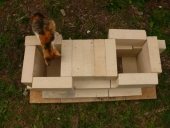
), but I see that the feed tube looks very long horizontally, so that the cross section is relatively large and the draft does not pull down strongly. The long stick leaning back will have enough friction that it will not slide down to the bottom where the coals are, so it will get too cool to keep burning. Part of the J-tube design is to have the sticks vertical so they fall by gravity into the fire. One stick by itself with space around it will not stay hot - you need a group of sticks. Cutting them to not much more than the depth of the feed tube makes the best feeding, and you want the feed tube to stay mostly full of fuel. When one burns all the way down, add another.

I would think that a simple J-tube like yours which does not have to send the exhaust down to a thermal mass would draw very strongly, much more than I see. What is the cross section of the space between top of riser and pot? If too small, the draft will be cut down. Can you experiment with adding a bit to the supports so there is more space?
 
Ratnesh Mathur
Posts: 11
2
  • Mark post as helpful
  • send pies
    Number of slices to send:
    Optional 'thank-you' note:
  • Quote
  • Report post to moderator
Thanks Glenn for the quick response. Based on your comments - this is what i will try tomorrow (its night time here in India) and update:
1) Reduce the length of feed tube
2) Make sticks in feed tube vertical
3) Cut sticks to size slightly longer than the feedtube (11inches in our case)
4) Keep feed tube filled up
5) Increase the space between top of riser and pot to about 2 inches (right now its about 1/2 inch)

One question - if the sticks are vertical - where exactly does the sticks burn (flame) below the opening of the feed tube or below the burn tunnel?
 
Glenn Herbert
Rocket Scientist
Posts: 4606
Location: Upstate NY, zone 5
613
5
  • Mark post as helpful
  • send pies
    Number of slices to send:
    Optional 'thank-you' note:
  • Quote
  • Report post to moderator
In general, the feed tube should be about the same dimensions as the burn tunnel - though I wouldn't make it any less than square. The video makes it look like 7" x 9 or 10", but the construction photos show 7" x 7" which should be good. What is the height (and width) of the burn tunnel? If much less than the feed and riser dimensions, it may be a choke point. A little less is fine.

15 1/2" is usually a good height for the feed tube in a system of your size (cross section of channels). With an open top, a 37" riser might be sufficient, though another row or two of bricks would probably work better.

The pot gap sounds like it's the big thing - 1/2" is tiny and may be choking the draft. I would first increase that, even to 1" or 1 1/2", and see what difference it makes, before changing anything else. Then I would try raising the feed and the riser (both at the same time as they are co-dependent), even if the fire is improved, as it will allow you to cut wood longer and a loading to last longer.
 
Glenn Herbert
Rocket Scientist
Posts: 4606
Location: Upstate NY, zone 5
613
5
  • Mark post as helpful
  • send pies
    Number of slices to send:
    Optional 'thank-you' note:
  • Quote
  • Report post to moderator
If the sticks are vertical and you have good strong draft, the fire will be pulled down to the level of the burn tunnel. If the draft is a bit less strong, the fire may travel up to the top of the sticks while still being pulled down (no smoke/flames going up out of the top), and if it is weak, the fire may burn straight up and reverse the draft.
 
Ratnesh Mathur
Posts: 11
2
  • Likes 1
  • Mark post as helpful
  • send pies
    Number of slices to send:
    Optional 'thank-you' note:
  • Quote
  • Report post to moderator
Glenn
So I implemented all the 5 suggestions - and the test fire was super success. The burn was awesome, no smoke, and wood sticks burning properly.
See video here https://www.youtube.com/watch?v=8fQk7A0KDdM
I think we are ready for doing the cob insulation.
Here are our current dimensions:
Feed Tube: Depth: 11", cross section - 7" sq
Burn Tunnel: Length 19": cross section - 7"sq
Heat riser (without pot) - 40" (with pot it will eventually go upto ~ 58")
 
If you’re going through hell, keep going. - Winston Churchill / tiny ad
Learn Permaculture through a little hard work
https://wheaton-labs.com/bootcamp
reply
    Bookmark Topic Watch Topic
  • New Topic