BEL #387
Here's another instructional/reference post for Boots:
how to "zerk the tractor." A
Zerk is a specific kind of fitting on metal joints that allows you to inject lubricating grease at high pressure so that the metal bits don't rub together so much. Over time, the grease squirts out of the joints, so you need to eventually add more grease as the equipment is used.
We're at the
Sepp Holzer Root Cellar site a lot these days, and the
tractor has seen a lot of use down there lately. As part of our periodic maintenance, I lubricated the front bucket assembly on the tractor so it continues to serve us well. Depending on its use, the front bucket assembly ought to be zerked a few times a year, usually round the change of the seasons. I'm no expert, but I suspect that lubrication at least twice a year during times of moderate use ought to be sufficient.
Here's the tractor. We're focusing on the front half of the vehicle today. This includes the bucket, the bucket arms, and the front wheels.

This is the lubrication gun, or "zerker," or "zerk gun." We have a few: this one, a nicer, newer backup one (currently stored in
Rex, the excavator), and an old-skool manual hand-pump model.
In all cases:
- always return the plastic cap on the end of the nozzle when not in use.
- always return the coil back to its holder when not in use.

The battery-operated zerk guns are both DeWalt tools, and use this kind of battery. Don't bother using the 20v version, as it runs out of power in the middle of the job. This goes double for when you're zerking Rex - which I'll detail in a future entry.

These are tubes full of lithium grease. One end has a cap, and one end has a "pull tab" canister lid. I'll detail replacing these tubes in a future entry. Try to have at least one of these available for change-out, particularly if you have less than about half a tube left in your zerk gun.

Before beginning, clean off the nozzle of the zerk gun. There should be no dirt, debris, or other gunk besides lubricant in there.
As time has gone on, we've used white, black, and now "rhubarb jam" coloured lubricants in there. Depending on what's on hand, this may look different.

This is what a Zerk fitting looks like. Imagine an extra-large ballpoint pen. The ball bearing at the end of the Zerk holds the grease in place inside the joint, while still being able to be moved out of the way when more grease is to be injected.
Always wipe these off with a shop cloth prior to attempting to zerk a fitting. You'd be amazed at the quantity of gunk that ends up slathered all over these things. Photos down below will provide convincing evidence.

Press the zerk gun's nozzle firmly onto the Zerk fitting.
You should feel a "snapping" sensation when there's a solid connection between the nozzle and the fitting.

Firmly hold the nozzle onto the fitting with one hand, and then press and hold the zerk gun's trigger with the other.
You'll feel the "pulsing" of the zerk gun as it's injecting grease into the joint.
You'll know the joint is full when grease begins oozing out from the joint. Let go of the trigger and detach the nozzle from the fitting.

If you have grease squirting out around the nozzle of the zerk gun, something is wrong. Grease should be going into the joint instead. Release the trigger and remove the nozzle from the fitting.
- Clean off the fitting and nozzle as best you can. Sometimes, caked-up, dried-up grease on the fitting can prevent new grease from going in.
- Try again, and maintain a firm pressure on the nozzle as it's connected to the fitting.

Some Zerks are on the ends of hydraulic pistons. These aren't joints as obvious as others. There's one like this on either side of the arm assembly.

Some fittings are underneath, and depending on the position of the bucket arms they may be out of reach. I'll show a couple of these tricky spots later. There are four Zerks (two on either side of the tractor) that are inaccessible if you have the bucket facing downward instead of upward. Fortunately this is an easy dilemma to address.
To sum it up: complete lubrication on all the Zerks you can reach. Start up the tractor and "flip the bucket" upright so the arm assembly is in a different position, then finally you should be able to reach the Zerk well enough. No special tools are necessary.

Each of the front wheels has a Zerk fitting right on the top of it, similar in appearance to the Zerks on the pistons.

Here's the first of the tight fits. This is the joint closest to the driver's seat. This one is on the right side of the vehicle.
When you "flip the bucket" and put it back down on the ground - even to the point of lifting the front wheels slightly off the ground - this Zerk should be accessible. Another thing that helps you access this Zerk is that it is angled up towards you. Once cleaned, this is obvious.
Put only the zerking gun nozzle in this spot.
Do not allow your hand and fingers to linger in there.

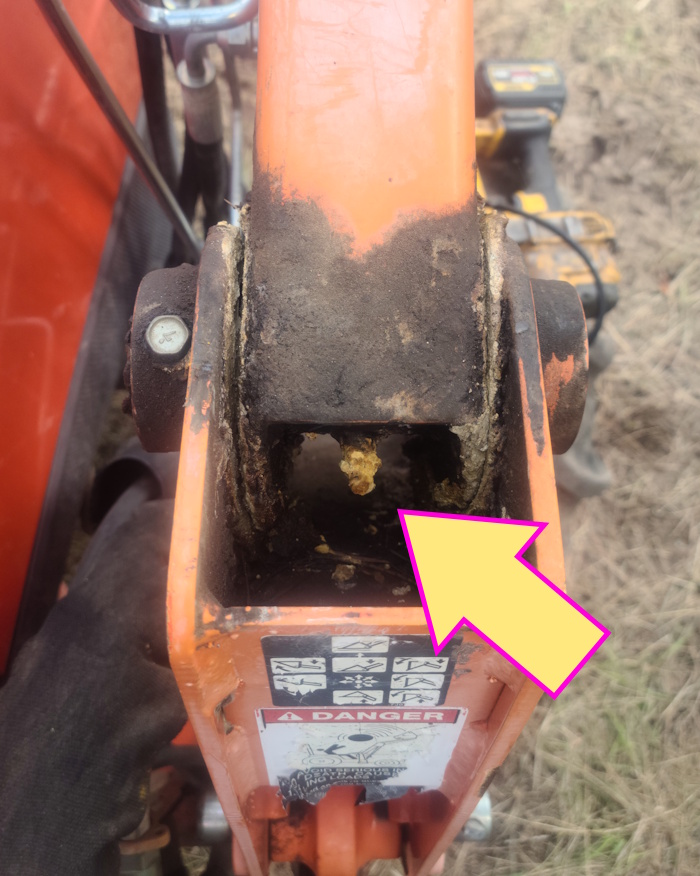
This one is underneath the arm assembly, near the "elbow." Be sure to clean it thoroughly. This photo shows just how gunked-up it can become over time.

When cleaned, we can see that this is also a Zerk angled downward towards us. It's still in a tricky spot, and in my experience it also might require a firmer pressure of the nozzle against the Zerk fitting to allow grease to enter properly.

Once you've cleaned it off, you can reach the Zerk without having to jam your hand up in there where it might become pinched.
Do not let your hands and fingers linger inside that area.
 ///
///
Troubleshooting An Airlock
///
A common problem - particularly after changing tubes of lubricant - is that the gun will stop squirting grease even as you pull the trigger. Another clue about this is that you won't feel the familiar "pulsing" sensation when grease would otherwise be squirting out.
This is called an airlock. Air has somehow worked its way inside the zerk gun, preventing it from pushing grease into the tube and through the nozzle.
To fix this issue, there's a
release valve. It works just like a typical screw.

Turn the top of the valve counter-clockwise (AKA "lefty-loosey"), just a little at a time. You might see a little "noodle" of grease squirt out, or hear the hiss of air escaping. Either of these is fine. You can even press the trigger of the zerk gun while you do this if there's a major airlock issue.
Once you've had air and/or grease voided from the valve, wipe it as clean as you're able, and turn it clockwise (AKA "righty-tighty") to close it again. Finger-tight is good enough, you don't need to use some kind of tool to close it.
Press the nozzle against a Zerk, press the trigger, and if you feel the "pulsing" things ought to be working as intended again.
If you're still having problems, then you might be out of grease...! Change out the tube. I'll detail this in a future post, but in general it works the same as a caulking gun. If you're familiar with that, then you should be able to figure out how to change out a tube with minimal guidance.

That's all for now. Thanks for reading, and enjoy your day...!


.png)
 12
12


Skill verified by gir bot")