• Post Reply Bookmark Topic Watch Topic
  • New Topic
permaculture forums growies critters building homesteading energy monies kitchen purity ungarbage community wilderness fiber arts art permaculture artisans regional education skip experiences global resources cider press projects digital market permies.com pie forums private forums all forums
this forum made possible by our volunteer staff, including ...
master stewards:
  • Nancy Reading
  • Carla Burke
  • r ranson
  • John F Dean
  • paul wheaton
  • Pearl Sutton
stewards:
  • Jay Angler
  • Liv Smith
  • Leigh Tate
master gardeners:
  • Christopher Weeks
  • Timothy Norton
gardeners:
  • thomas rubino
  • Jeremy VanGelder
  • Maieshe Ljin

Yet another (portable) RMH

 
pollinator
Posts: 1481
Location: Vancouver Island
60
  • Mark post as helpful
  • send pies
    Number of slices to send:
    Optional 'thank-you' note:
  • Quote
  • Report post to moderator
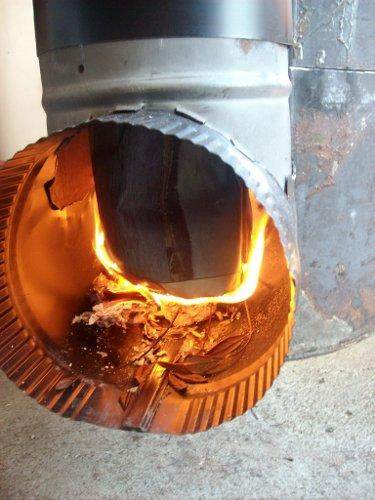
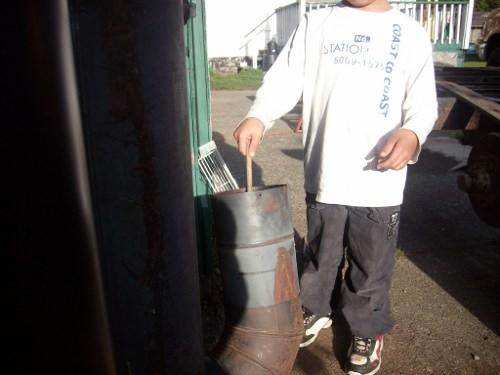
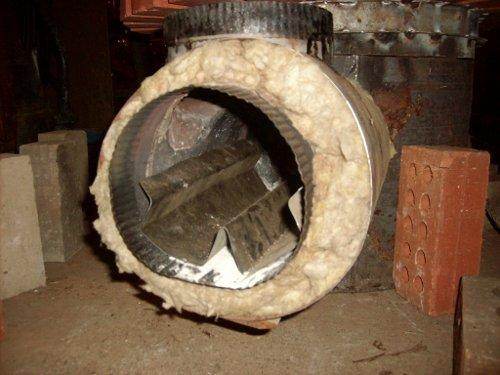
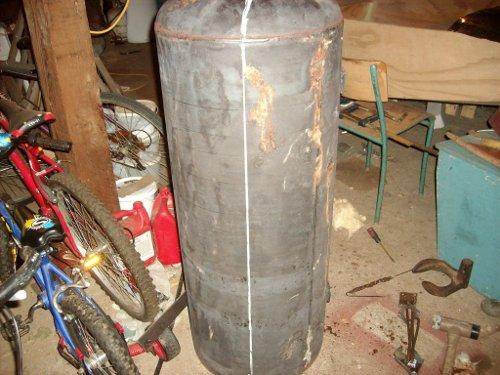
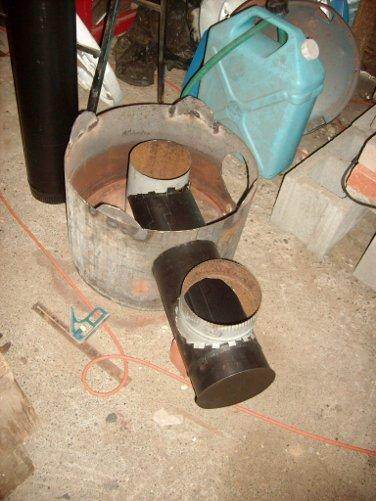
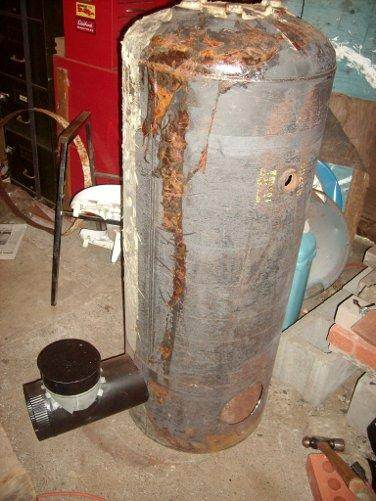
I have finally gotten around to start building a RMH. It is portable in the sense that Paul's was... that is, fill up a P/u truck and take an hour or so to set up or take down. Mine is not made to be fast for moving as Paul's is, but able to be moved from one place to another without ripping out a lot of cob. I use bricks... when I get that far.


Inside


And outside.

To see how far I am, check below.
http://www.ovenwerks.net/family/2011/RMH/
 
author and steward
Posts: 52431
Location: missoula, montana (zone 4)
hugelkultur trees chicken wofati bee woodworking
  • Mark post as helpful
  • send pies
    Number of slices to send:
    Optional 'thank-you' note:
  • Quote
  • Report post to moderator
More pics!

Video of it in action!

 
Len Ovens
pollinator
Posts: 1481
Location: Vancouver Island
60
  • Mark post as helpful
  • send pies
    Number of slices to send:
    Optional 'thank-you' note:
  • Quote
  • Report post to moderator

paul wheaton wrote:
More pics!

Video of it in action!


All of the pics and my progress till now are in the link listed above... and below:

http://www.ovenwerks.net/family/2011/RMH/

Would you like me to post all the pictures here as well?

There may be a delay in finishing (cash flow I need to get some more parts like plugs for all the holes.... I am not quite ready for a full length burn. I will try to do a video at that time. I am also hoping to make lots of temperature measurements so I can optimise mass placement and riser height. My feeling is, that the best mass placement gets as much of the surface temp the same as possible. Somewhere around 100 to 120F as around 130 to 140F gets to scalding. I guess parts too high or hard to reach could be a little higher. I know that it used to be law in Russia that a mass heater surface could never get hotter than about 200 to 250... I think I need to look that up again... not sure if it is F or C. I think the book I was reading was American so F (Iron stoves go around 200C or 450F). Anyway, I think that a burn is the amount of fuel (probably measured in weight) that raises the surface to design temperature... not just so it feels right just now. It may feel a bit warm at end of burn and a bit chilly just before.
 
gardener
Posts: 3471
Location: Southern alps, on the French side of the french /italian border 5000ft elevation
194
  • Mark post as helpful
  • send pies
    Number of slices to send:
    Optional 'thank-you' note:
  • Quote
  • Report post to moderator
Hey Len, nice'un!

I wish i could find a big water tank like this.
 
Len Ovens
pollinator
Posts: 1481
Location: Vancouver Island
60
  • Mark post as helpful
  • send pies
    Number of slices to send:
    Optional 'thank-you' note:
  • Quote
  • Report post to moderator

Satamax wrote:
Hey Len, nice'un!

I wish i could find a big water tank like this.


40 or 50 gal tanks are pretty common. 18 inches in diameter by 4 feet tall. I have a gas fired one too, but I have a different use for that (when I get to it). I got both leak free, but a leak would not have been a problem. It doesn't have to hold pressure so just a spot of weld would reseal it... even my welding

Check with plumbers in your area... these things have to be replaced about every ten years... the one in the pics was replaced because it was ten years old and the owner wanted it done before it leaked. I've seen more, just haven't decided to pick them up. What size is common in your area? Even the small ones I have seen are the same diameter... just shorter. Stack two or even three if need be. You probably weld better than I do, but I would weld three or four tabs on the inside of the bottom one to align and then weld all the way around. (my book says lots of small tacks and then join them to keep from warping things)
 
Satamax Antone
gardener
Posts: 3471
Location: Southern alps, on the French side of the french /italian border 5000ft elevation
194
  • Mark post as helpful
  • send pies
    Number of slices to send:
    Optional 'thank-you' note:
  • Quote
  • Report post to moderator
Hi Len.

Thanks for the reply.

Well, is this a normal electric one striped? I thought it was one from a boiler system.

Well, i thought about asking a friend to salvage me one, next time he does a boiler and radiators system.

Otherwise, electric ones are comon here and hold most of the time 200l and 500l (that's 52 and 135 gallons) But i don't jnow how they're made over here. I've never seen one open.

Thanks again. 55 gals drums i can have aplenty. But i don't think they look good. Tho it would be easy to weld two upright. And most certainly lighter than a water tank.
 
Len Ovens
pollinator
Posts: 1481
Location: Vancouver Island
60
  • Mark post as helpful
  • send pies
    Number of slices to send:
    Optional 'thank-you' note:
  • Quote
  • Report post to moderator
Another update... did some more playing and set up another web page.

http://www.ovenwerks.net/family/2011/RMH/page2.html

The flame goes the right way:
 
Posts: 12
2
  • Mark post as helpful
  • send pies
    Number of slices to send:
    Optional 'thank-you' note:
  • Quote
  • Report post to moderator
Hello. I am new to your forum and have been exploring the idea of a RMH for a while now. With winter fast approaching, I'd better get to it.

My question is not exactly about building a portable RMH, but building using a more lightweight mixture than traditional cob. This summer I built a small home (approx. 400 sq. ft) that looks like a houseboat/ark and it has a wooden floor. I intend to use the information from Ianto's book regarding if you are a renter, but am also trying to deal more easily with the weight issue.

I am therefore wondering if anyone has experimented with the Hypertufa mix: portland cement, peat moss and vermiculite. It is much lighter and apparently has excellent insulation qualities.

Would anyone kindly care to offer an opinion? I am a single mom in Nova Scotia, Canada, trying to figure this out on my own.
 
Len Ovens
pollinator
Posts: 1481
Location: Vancouver Island
60
  • Mark post as helpful
  • send pies
    Number of slices to send:
    Optional 'thank-you' note:
  • Quote
  • Report post to moderator

Holistic wrote:

My question is not exactly about building a portable RMH, but building using a more lightweight mixture than traditional cob. This summer I built a small home (approx. 400 sq. ft) that looks like a houseboat/ark and it has a wooden floor. I intend to use the information from Ianto's book regarding if you are a renter, but am also trying to deal more easily with the weight issue.


Mass or weight is what makes it work. It doesn't matter if it is cob or bricks,but it needs to have mass and it needs to conduct heat.


I am therefore wondering if anyone has experimented with the Hypertufa mix: portland cement, peat moss and vermiculite. It is much lighter and apparently has excellent insulation qualities.


Portland cement will crumble at the temperatures you want to be dealing with. A RMH needs to use refractory cement (clay based) or mortars to last. Insulation is not what is needed, mass is. If cob is too hard to work with or obtain, use bricks or go without any mass and do lots of short burns. It won't go over night without some mass to store the heat. Just think, a water tank full of water weighs 300lbs or more... so 300lbs of brick can safely be stacked around the barrel... preferably at the top where the greatest heat is generated. This is a lot less than the average mass heater at around 2000lbs, but it could be enough to keep warm through the night. Spreading the weight out with a bench also helps... a queen sized water bed at 7 foot by 5 and 10inches high weighs 1800 lbs, but most floors are fine with it because that weight is spread out. Any square foot of floor has less than 60lbs on it.


Would anyone kindly care to offer an opinion? I am a single mom in Nova Scotia, Canada, trying to figure this out on my own.


I remember being a single parent with my 4 year old in a 30ft RV for a year... working off shifts. Life is better (much) now. I wouldn't want to do it over again, but it did pass. That 4 year old is now doing his PHD at 25 and getting ready to be married next year.... and I have two more sons

Feel free to bounce design ideas off of people here... drawing would be helpful. Look for a thread about portable RMH (link below) where Paul uses gravel in a wooden box. I don't know how good it is at storing heat (Paul hasn't said... maybe not measured) but it may still give some alternate mass ideas. Watch this thread too, I will be using bricks... or trying them in some different ways that may be helpful to you. This basic design uses no cob and could be used as a no-mass Rocket heater at the point it is now... it stays hot about a half hour after the fire goes out I would like to get about 12 hours or more with mass. But it doesn't matter so long as it makes it to 10 hours or even 8 as the house is empty all day and even with no heat 12C is about as low as it gets inside... On Vancouver Island where really cold is -10C.

https://permies.com/permaculture-forums/2558_0/alternative-energy/portable-rocket-mass-heater
 
Barb Morris
Posts: 12
2
  • Mark post as helpful
  • send pies
    Number of slices to send:
    Optional 'thank-you' note:
  • Quote
  • Report post to moderator
Hi Len,

Thanks so much for the response. I have allowed space for a bench: cob or something that will do the trick, but lighter, as I definitely want the M part of the RMH. Perhaps I could do a quick test of vermiculite, peat moss and the refractory cement (I have everything but the cement already) and see how it holds together.

If I can work up the courage, I will be tackling this, this upcoming weekend. (Don't suppose anybody who has already built one of these things is planning a trip to Nova Scotia in the very near future? lol)

Will let you know.
 
Len Ovens
pollinator
Posts: 1481
Location: Vancouver Island
60
  • Mark post as helpful
  • send pies
    Number of slices to send:
    Optional 'thank-you' note:
  • Quote
  • Report post to moderator
Another update... nothing to show pictures of... more of the thought process though. In the last burn test I felt the fuel didn't burn that well. I felt at the time it was too loose and not dense enough and so was going to try different fuel.

However, While at work I was thinking about camp fires and such. How having a hot place was important to keep a good fire with less smoke. Then I thought about how my feed looks with some fuel in it and all that bare metal around it. All the heat must radiate real easy from there. Other people have built the feed of all metal like that... but most RMH have cob around there or brick. I am thinking I should insulate the feed right out under the cartridge. I think that keeping the heat in will help. I also think that my air intake may be too big. Donkey on another thread mentioned that he had used air intake that was 1/3 or even 1/4 of the system CSA. I had got a damper to put there to try and figure out what the best setting would be... but a legal damper in North America can only close 80%. This means I would be working with the damper almost all the way closed. So I have decided instead to use bricks to cover the air intake various amounts to look for least smoke, hottest burn, etc. I will make one more try with a similar fuel load just so I am comparing apples to apples, to see what these two changes do to help (or not).
 
Satamax Antone
gardener
Posts: 3471
Location: Southern alps, on the French side of the french /italian border 5000ft elevation
194
  • Mark post as helpful
  • send pies
    Number of slices to send:
    Optional 'thank-you' note:
  • Quote
  • Report post to moderator
Len, two or three things which come to mind.
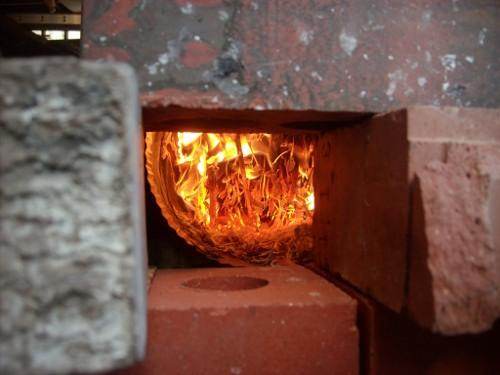
On mine, the burn tunel, inlet, well, the first part of the J tube is hydraulic tube, 10mm thick, and all insulated with vermiculite. It glows to dark red or cherry red when the stove if at the proper temp, and when you shove wood in there, it self ignites just from radiation. Having a bed of embers is helping a lot the good functioning of the stove, tho not too much, as it restricts the air flow. Imho, vertical feed and horizontal air intake isn't too good. But i like the design because i could put a window in front of the horizontal tube and open that for a cleanout. Th eair realy needs to be dragged down in the feed. I was also thinking, if i make a bigger one i will weld a smaller tube of the same lengh as the feed, in the feed, closest to the burn chamber, to always get air there where it's most needed. From the few burns that i've had, i noticed something, the more wood you chuck into the feed tube, the faster the air moves in it, up to a certain point you restrict the flow too much. I thgink you need to leave at least one quater of the surface open. Hence the idea of having another tube for the air intake which can't be blocked.
 
Len Ovens
pollinator
Posts: 1481
Location: Vancouver Island
60
  • Mark post as helpful
  • send pies
    Number of slices to send:
    Optional 'thank-you' note:
  • Quote
  • Report post to moderator

Satamax wrote:
Len, two or three things which come to mind.
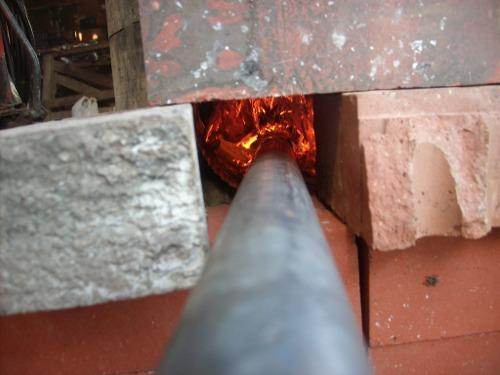


It's funny, but.... I actually did both (err... all three) on my next burn. See pictures at:

http://www.ovenwerks.net/family/2011/RMH/page3.html

Anyway, I insulated the burn tunnel and cut down the air supply to 1/4. More roar, less smoke and more heat on less fuel.


At one point the fuel blocked the air too much so I put a pipe through past the fuel almost to the riser.


(not the greatest picture but I think it shows) anyway... almost no smoke! As my son is pointing out.


I think Any RMH could benefit from a secondary air tube. The difference is that great. All the rocket stoves for cooking include an air tunnel and the RMH should too... It would best be L shaped in a J tube feed though. I don't think it needs to be much CSA compared to the flue.

The lazy way the exhaust comes out leads me to believe that I will be able to shrink my flue to 4inch pipe to fit with what is already there. I am ready to try adding mass now.
 
Len Ovens
pollinator
Posts: 1481
Location: Vancouver Island
60
  • Mark post as helpful
  • send pies
    Number of slices to send:
    Optional 'thank-you' note:
  • Quote
  • Report post to moderator
Update:

Trying to fix all the problems at once 

The feed is now capped on the other end so that the bottom fits in the right way. The cap seems much tighter too. This way the gunk from fumes will drain into the fire instead of down the outside.

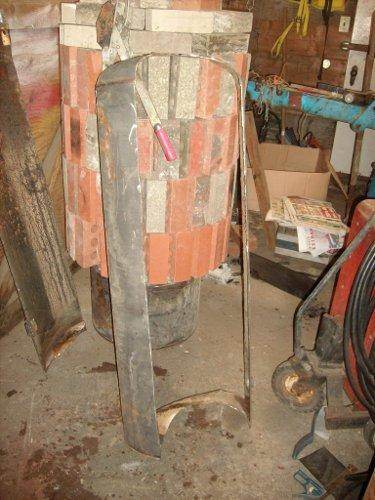
I have created a burn tunnel shield/secondary air supply/fuel spacer for the tunnel. I took a piece of tin about 12 inches by 13 inches (it was what I had) and put a ridge down the centre about an inch high. This will hold the fuel off the bottom a bit. Then it follows the curve of the bottom of the burn tunnel to an inch or so from half way up the sides where I put a hump all the way along to feed air past the fuel. The whole thing just slides out for easy cleaning.... just pull it out flat and dump the ashes in the bucket. The secondary air is added about 3 inches before the riser.

I have been working on the mass setup. What I had thought to do was stack bricks up all the way around starting on the ground. That seemed like a great idea before the intake and exhaust were in, but after when I tried it there is a problem bridging the two pipes. So I am thinking to put a small ledge around the core just above the join and start the mass there. I am thinking to put a second layer higher up if the outside brick temperature gets too hot or doesn't hold enough heat. I can always put a row of bricks under the ledge too if I think it needs it or would get enough heat to store. With this mass (not much... with the bricks starting at the bottom I was figuring 600lbs, but I have dropped from about 150 bricks to about 120 so less. However, that 600lbs did not include the core itself which feels over 50lbs. The ledge will also help give me a hand hold for lifting the core top. The foot print ends up being 25 inches in diameter at the outside of the bricks. The feed tube adds 7.5 inches to the front and the exhaust is 6 inches in diameter... 4 might be ok.

Just a quick note for those who like this idea but are thinking "I could do that but for the welding". This kind of RMH could be done with no welding. The most expensive tools would be an angle grinder (19.99 on sale) and a hand drill (similar price). Tin snips are nice too. I used welding mostly for speed and practice. I am trying to keep this in the original spirit of the RMH of being low cost and using as much "found material" (free in other words) as possible.... Besides, thats about the price I can afford. Also simple tools that don't require too much skill to use. Anywhere I have welded, a screw or two would have worked. It just means drilling holes and putting a screw through. Old cars have lots of self tapping body screws on them that are a bit stronger than the sheet metal screws and would be better for the thicker metal of the core.

I'll try to have more pictures of all this when I get the ledge installed and start adding mass.
 
Len Ovens
pollinator
Posts: 1481
Location: Vancouver Island
60
  • Mark post as helpful
  • send pies
    Number of slices to send:
    Optional 'thank-you' note:
  • Quote
  • Report post to moderator
More pictures... here is the tin secondary air supply. It also protects the bottom of the burn tunnel from damage of fuel falling. It also should make cleaning easier as I can remove the whole thing and dump it in the bucket.


Here it is with bricks for mass. I added a small ledge all the way around and then used steel wire to hold the bricks against the core. There is about 450lbs of brick there with 100 bricks and 4.5lb per brick.


I need to run a test fire to see how well the mass works and how long the brick hold their heat.

More pictures here:

http://www.ovenwerks.net/family/2011/RMH/page4.html

 
Satamax Antone
gardener
Posts: 3471
Location: Southern alps, on the French side of the french /italian border 5000ft elevation
194
  • Mark post as helpful
  • send pies
    Number of slices to send:
    Optional 'thank-you' note:
  • Quote
  • Report post to moderator
Hi Len,

Well, there's one thing which comes to mind straight away, heat differential. I mean the internal draft is suposed to work betted with a bigger heat differential between the heat riser and the radiator, and here you're kind of insulating the radiator.

So you're not cooling the exhaust gasses as fast as you used to.

I'm ready to bet your exhaust temp have gone up.

Sorry to be a pain.

But i think that's why the mass is added later, on the flue, so you cool the remaining heat in the fumes.
 
Len Ovens
pollinator
Posts: 1481
Location: Vancouver Island
60
  • Mark post as helpful
  • send pies
    Number of slices to send:
    Optional 'thank-you' note:
  • Quote
  • Report post to moderator

Satamax wrote:
Hi Len,

Well, there's one thing which comes to mind straight away, heat differential. I mean the internal draft is suposed to work betted with a bigger heat differential between the heat riser and the radiator, and here you're kind of insulating the radiator.

So you're not cooling the exhaust gasses as fast as you used to.

I'm ready to bet your exhaust temp have gone up.

Sorry to be a pain.

But i think that's why the mass is added later, on the flue, so you cool the remaining heat in the fumes.


I've thought about that actually... Brick is actually a better conductor than air and should cool the barrel more than air. If the exhaust temp goes up (I'm more worried it will not be hot enough) that would be great as I have a few external mass designs I want to try.

- another water heater core cut lengthwise using one half as a base and the other as the bench... with 24x24 patio slabs on top. The 6 inch flue goes in the top and 4inch comes out the bottom (I know backwards to other systems, but I learn by trying and used cores are free... and I picked up 30 cutting blades for the price of 2 )

- short water tank cores (or bigger ones cut in half)  with flue into half way up and exhaust from the bottom... brick surround... I was actually thinking to try these much higher than the main rocket... I am not sure I could get the exhaust to come back down or if I would have to then exhaust higher up. My place for my RMH is in the basement. There are two bedrooms above with easy access for a flue to go there if I could get this to work. This is the north end of the house.... I have solar plans for the living/dining room on the south end.... gotta work with what I have  Anyway, I think if I can get this to work I will put a window in the brickwork and drop an old laptop screen in there with a fireplace video loop
 
Satamax Antone
gardener
Posts: 3471
Location: Southern alps, on the French side of the french /italian border 5000ft elevation
194
  • Mark post as helpful
  • send pies
    Number of slices to send:
    Optional 'thank-you' note:
  • Quote
  • Report post to moderator
Len, two things, i bet you read about my idea of a flat flue5à to 1 meter wide, 2 meters high 5cm thick, one intake from the rocket flue, one exhaust going back to the chimney. Either bare or surounded by bricks .

Another wardrobey plan, you know thoses old steel grey lockers? Drill a hole in one side, one on top fit the exhaust pipe of the rocket in there, and fill with bricks They could be criss crossed so air can travell through them, pushed by a fan when hot air is needed. I picked up four from an army base in a nearby town. That's what gave me the idea. 
 
Len Ovens
pollinator
Posts: 1481
Location: Vancouver Island
60
  • Mark post as helpful
  • send pies
    Number of slices to send:
    Optional 'thank-you' note:
  • Quote
  • Report post to moderator

Satamax wrote:
Len, two things, i bet you read about my idea of a flat flue5à to 1 meter wide, 2 meters high 5cm thick, one intake from the rocket flue, one exhaust going back to the chimney. Either bare or surounded by bricks .


I wouldn't do that... 5 cm may give friction problems due to laminar flow.


Another wardrobey plan, you know thoses old steel grey lockers? Drill a hole in one side, one on top fit the exhaust pipe of the rocket in there, and fill with bricks They could be criss crossed so air can travell through them, pushed by a fan when hot air is needed. I picked up four from an army base in a nearby town. That's what gave me the idea. 


Got two of those from work when they were tossing them... but have another use for them.

Satamax wrote:
Well, there's one thing which comes to mind straight away, heat differential. I mean the internal draft is suposed to work betted with a bigger heat differential between the heat riser and the radiator, and here you're kind of insulating the radiator.


Tried a burn this afternoon with all those bricks. I used a 3 foot 4x4 about 10lbs. It needed to be split to keep burning and poked at too, kinda defeated the idea of self feed. No smoke back, exhaust temp about the same as with the barrel bare. Bricks never got over 200F even on top. Temperature ranged from 125F to just under 200F for all the bricks. Tried blocking half the exhaust (same as going to 4inch) with no problems... no noticeable difference. I'll see tomorrow morning if it is still warm... it's in a 30' by 25' uninsulated shop. nearest wall is 1/4 ply. Expected low is 4C (39F).

Things I found out:

- all the rows of brick needed to be wired in close contact to the barrel... even 1 mm space makes a difference I can feel with my hand.
- The wire did not suffer from expansion/contraction problems.
- one big lump of wood doesn't work well (at all). two pieces minimum with more better. Fire likes gaps to get really hot.
- my bottom plate (secondary air/burn tunnel protector) is the wrong shape... it tended to push my wood to one side or the other making the burn uneven... one side would run out of fuel while the other wasn't burned down enough to drop in more fuel... more smaller fuel sticks would have helped. Also the two air feeds on the side kept the fire from being able to get hot there and the burn was effected. W shape no good. M shape no good... try m shape. The line in the middle is only for support.
- two ten hole bricks make a nice air intake cover. They let in about the right amount of air as well as getting hot.
- The fuel cart does get hot. It acts like a bell. Doesn't leak any more though. It can help give that instant heat feel to the room.

From what I have seen... I think it is time to move the unit inside. I have found out as much as I am likely to outside. It performs as needed and doesn't seem to pose any safety problems. Gotta get a CO2 alarm/monitor.
 
Satamax Antone
gardener
Posts: 3471
Location: Southern alps, on the French side of the french /italian border 5000ft elevation
194
  • Mark post as helpful
  • send pies
    Number of slices to send:
    Optional 'thank-you' note:
  • Quote
  • Report post to moderator
Len, what i have noticed on my four incher, big wood (well!) burns better when i have embers at the bottom of the feed tube. I can burn up to 2.5x2.5 of very hard and dense ash. It carries on burning as long as the corner of the feed tube and burn tube isn't too cold. I think the secondary air intake in your case should be to the sides.Well, if ever you realy need it. I think first of all you could try putting fire bricks instead of roxul, just below the burn spot, to add heated mass, which would keep the embers, or fresh wood burning. In mine, if i have barely any embers, but it's still hot, hasn't cooled down from the draft, i chuck few little pieces of wood in there, it starts again, because the metal is thick and is above wood self ignition point.  Air intake on the bottom  cools down the steel imho. And the first air intake compared to the volume of wood to be burned is too big. My sense tels me to put a flange of about 1/4 of the diameter of your intake tube at the bottom, not to expose the wood to too much air, and create an air swirl through the embers and sticks. As well it would slow down the flow of air within the embers, keeping them hot.

The guys who invented this  did well, the J shape , with a short feed tube is the best  i think. May be a litle secondary air. Using fire bricks isn't daft, because it keeps the heat there for the burn.

I think J shape is not drafty enough to prevent smokeback when windy. Mind you, i haven't used a very tall heat riser yet.

And L shape as you have is too drafty for a very hot burn, without few mods.

By the way, don't think i criticise all the time. I envy you, having been able to source a nice water tank, doing nice welding. Using different ideas etc. It's just my feelings tells me that this horizontal  air intake is too big. That your mass under the burn spot is too small.


Well, carry on!
 
Len Ovens
pollinator
Posts: 1481
Location: Vancouver Island
60
  • Mark post as helpful
  • send pies
    Number of slices to send:
    Optional 'thank-you' note:
  • Quote
  • Report post to moderator

Satamax wrote:
Len, what i have noticed on my four incher, big wood (well!) burns better when i have embers at the bottom of the feed tube. I can burn up to 2.5x2.5 of very hard and dense ash. It carries on burning as long as the corner of the feed tube and burn tube isn't too cold. I think the secondary air intake in your case should be to the sides.


I am going to change the secondary air passage. I think part of my problem is with the fuel itself. It was very hard to get going in the first place and only burned well where there was a crack. The embers did help to keep it going, but I think I need to get rid of the air passages on the sides as this is the best burning area. The bottom keeps getting choked with ash. It did get real hot in there, but when I left it for an hour it had gone out. Even with the embers, when they were there, it did not burn near as hot as it did with the light fuel... the flame front was much smaller (6inches instead of 15inches plus) and not as bright.


Well, if ever you realy need it. I think first of all you could try putting fire bricks instead of roxul, just below the burn spot, to add heated mass, which would keep the embers, or fresh wood burning.


Not sure on this one. It burned well with better fuel and fire brick conducts heat quite well. I may put a split in there, but I suspect I will have to insulate under it and it will take longer to get to that glowing hot state. I will try different fuel and insert first, I think.


Air intake on the bottom  cools down the steel imho.


That is my guess.


And the first air intake compared to the volume of wood to be burned is too big. My sense tels me to put a flange of about 1/4 of the diameter of your intake tube at the bottom, not to expose the wood to too much air, and create an air swirl through the embers and sticks. As well it would slow down the flow of air within the embers, keeping them hot.


Actually, it already is 1/4 CSA. I used bricks with holes to cover it too so that they get hot and hold the heat in. I will have to calculate the actual air intake CSA... the holes are about 3/4 in. dia. but I have to count them too. An insulated cover may be better... things to try.


The guys who invented this  did well, the J shape , with a short feed tube is the best  i think. May be a litle secondary air. Using fire bricks isn't daft, because it keeps the heat there for the burn.


perhaps. fire brick goes cross purpose to my uses and idea of what I wish to accomplish. One of the things I want to do is see if I can come up with a design that is manufacturable and can be CSA/UL tested.... like the airtight stoves. The core could be sold for under 1k, be easy to get a permit for, etc. Even 1k is really cheap for a masonry heater where the cost starts over 10k. All the piping can be already tested and approved stuff. The mass would be up to the owner, but is all outside the flue envelope. I am not sure I would manufacture them, but I want to see if it can be done.


I think J shape is not drafty enough to prevent smokeback when windy. Mind you, i haven't used a very tall heat riser yet.


I think it would be fine if built right. The horizontal air allows for a shorter riser tube to work though. That is not why I used it... I used it to allow for the use of a fuel cartridge... If I am not always "playing" with the fire and most of it is enclosed... may kids will not be as likely to play with it.


By the way, don't think i criticise all the time. I envy you, having been able to source a nice water tank, doing nice welding. Using different ideas etc. It's just my feelings tells me that this horizontal  air intake is too big. That your mass under the burn spot is too small.


Not a problem. Most of what you have said have been things I have thought as well. It is good to have someone else confirm my thoughts. It is also good to get feed back of any form. You have not come across as critical at all. It is hard to know exactly what I have and am doing just from pictures. I find it hard to stop doing long enough to take even those pictures
 
Satamax Antone
gardener
Posts: 3471
Location: Southern alps, on the French side of the french /italian border 5000ft elevation
194
  • Mark post as helpful
  • send pies
    Number of slices to send:
    Optional 'thank-you' note:
  • Quote
  • Report post to moderator
Hey Len, i've thought about manufacturing stoves too

The problem is that i'm of the intuitive type, and, even if i'm not too dumb, i am way to lazy to take a scientific aproach. Like doing burn tests, to get the proper stochiometric mixture, calculating, and all the stuff which goes with it.

Well i'll get back to few points, in my four incher, i can get it to run unatended for an hour. I think that is because of the very thick steel i have gathered for the burn tube, it glows to dark red at least, and is insulated by all the vermiculite i've put around. But it has some mass. I just feel the thin steel tube you've used doesn't have enough mass, so it doesn't keep the heat at the burn spot, hence the idea of using fire bricks. Or any type of material which is refractory, to add a litle mass.

I was also saying about a litle bafle in front of where the embers should stay, this would create a swirl of air, but also keep them from cooling down too much. I think it's in Ianto's book, where he states don't use a round tube for teh J because there's isn't enough turbulence.  And i think he's right in some ways. I've somewhat bypassed that part, the first part of the J tube being is at something like 87° or something, due to bad cuting. But i had the advantage of having that expansion chamber with my first botle of gaz, and i also fed the burn tube into  the expansion chamber as a cyclone inlet with neutral vane. I don't realise how strong is the draft. But for having built cyclones before, i know i have some turbulence in there. Building it with a cone would have been better, but, that's good enough for me.

I was wondering does your fire goes up the sticks? Into your feed tube?
 
Len Ovens
pollinator
Posts: 1481
Location: Vancouver Island
60
  • Mark post as helpful
  • send pies
    Number of slices to send:
    Optional 'thank-you' note:
  • Quote
  • Report post to moderator

Satamax wrote:
Hey Len, i've thought about manufacturing stoves too

The problem is that i'm of the intuitive type, and, even if i'm not too dumb, i am way to lazy to take a scientific aproach. Like doing burn tests, to get the proper stochiometric mixture, calculating, and all the stuff which goes with it.


I don't think I will make them either. It is more of a proof of concept. Sort of a "See, it can be done". I am leaving it open for someone else to run with because I think there needs to be something like this out there or we will have no trees soon after the oil/gas runs out. (even then it may be too late and too little) I do not have the resources to test this for approval or to manufacture. If nothing else, it widens the choices a person has depending on what is around.


Well i'll get back to few points, in my four incher, i can get it to run unatended for an hour. I think that is because of the very thick steel i have gathered for the burn tube, it glows to dark red at least, and is insulated by all the vermiculite i've put around. But it has some mass. I just feel the thin steel tube you've used doesn't have enough mass, so it doesn't keep the heat at the burn spot, hence the idea of using fire bricks. Or any type of material which is refractory, to add a litle mass.


As I have started the bricks up so high, I was thinking of putting some brickwork to cover the bottom. So I could remove the insulation from the primary burn area and add some mass in there at that time. It would be nice to have the ability to burn single pieces of fuel if thats what there is. I would put insulation around the mass though.


I was also saying about a litle bafle in front of where the embers should stay, this would create a swirl of air, but also keep them from cooling down too much. I think it's in Ianto's book, where he states don't use a round tube for teh J because there's isn't enough turbulence.


Interesting. I will see what I can do with the tin plate on the bottom of the burn tunnel. I will be modifying it anyway. The flame front did seem to be spinning with the lighter fuel... not so much with the big chunk. Having secondary air just on one side, like I did with the pipe, could help... and angle it.


I was wondering does your fire goes up the sticks? Into your feed tube?


Only up as high as the leaks   I haven't get a good seal where the cartridge joins the burn tunnel... I was too keen on trying it with big wood and some mass   The top is sealed and so there is no oxygen. The flame all goes towards the riser. Other people have had an open feed as well as the open air intake on the front, but the feed has to be much shorter so as not to act as a chimney. Someone had the idea of putting a hoop higher up to hold fuel up while it burns... the only problem is with all that heat if the fuel starts burning above the feed tube at all there is a fire outside the heater. So I want to seal the fuel off from air till it gets to the primary burn area.

It's working pretty good actually... good enough to bring it inside. There is no smoke back and the output is slow enough to go into my 4inch flue.
 
Len Ovens
pollinator
Posts: 1481
Location: Vancouver Island
60
  • Mark post as helpful
  • send pies
    Number of slices to send:
    Optional 'thank-you' note:
  • Quote
  • Report post to moderator

Len wrote:
It's working pretty good actually... good enough to bring it inside. There is no smoke back and the output is slow enough to go into my 4inch flue.


Maybe there will be one more burn outside.... I will be picking up yet another old water tank this afternoon and maybe some 6inch pipe to go with it    So I can try out my portable mass bench idea first. I can see what the final flue gas temperature is before I bring it inside. I think I will get some of that flex aluminium drier vent for trying it out. I can see if the flue gas is warm enough for a vertical chimney flue.

I will be running stove pipe from the bottom of my barrel to the bench with out/45up/45straight/straight in to bench as high up as practical... about two feet through (about half way in on a four foot core). The exhaust will be from as low as I can get it to get the coolest flue gas in there. In the Masonry Heater world they call this a bell. I understand that this is contrary to what is normally thought of as best in the RMH world where the long pipe is supposed to gradually rise from one end to the other. But I am using a larger space where the gas is free to go where it wants and is not restricted to a 6in CSA.

My hope is that instead of the hottest gas going right down the centre of the pipe where there is less friction and not heating the walls of the pipe and therefore the mass, that the gas will stratify with the hottest gas on top against my mass and the coolest gas going out the exhaust. Because the hottest gas does not have to move, it can sit against the top of the bell/bench and heat four feet of mass as well as 20 feet of pipe running through cob.

I will be using 24x24inch patio pavers on top as the mass... the bottom may well be insulated and covered with wood. My thought is that it is wasteful to use lots of mass at the cooler part of things and in a portable setup I want what mass I do use to do the most work it can. If I had two water heaters I could make the bench 7 feet long so it could be used as a sleeping ledge... and perhaps even with what I have the mass could be lengthened to some effect.... Stuff to try.

It has been very exciting to finally try out all this stuff that has been running around in my head... there is still more, but it will be nice to replace some of our E-heat with wood. I would also like to try putting a bell on the next floor up in one (or two) of the bedrooms up there. Before that, I will probably try putting an oven on top of the barrel.... it may not get to 450 or 350 even, but solar cookers often cook with much less.
 
Satamax Antone
gardener
Posts: 3471
Location: Southern alps, on the French side of the french /italian border 5000ft elevation
194
  • Mark post as helpful
  • send pies
    Number of slices to send:
    Optional 'thank-you' note:
  • Quote
  • Report post to moderator
Hey Len, so you're plumbed in now?
 
Len Ovens
pollinator
Posts: 1481
Location: Vancouver Island
60
  • Mark post as helpful
  • send pies
    Number of slices to send:
    Optional 'thank-you' note:
  • Quote
  • Report post to moderator

Satamax wrote:
Hey Len, so you're plumbed in now?


No, other(c) responsibilities have kept me from getting anything done. I have stripped the new core and figured out where I want to cut it to make a bench/mass. I picked up some more pipe today... it is 5inch... so I will have to do a 6 to 5 some where... or buy some more 6 inch pipe. (the 5in is free) There is some deadfall I would like to cut up too.
 
Len Ovens
pollinator
Posts: 1481
Location: Vancouver Island
60
  • Mark post as helpful
  • send pies
    Number of slices to send:
    Optional 'thank-you' note:
  • Quote
  • Report post to moderator
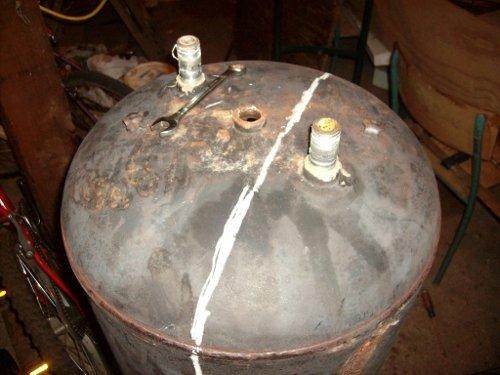
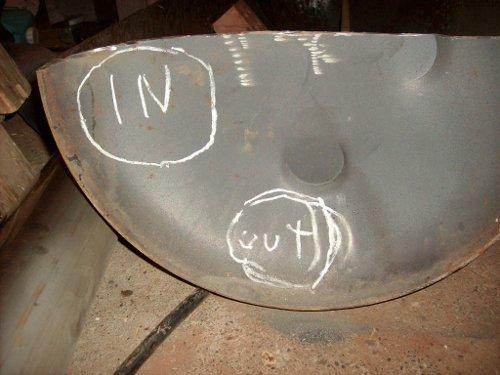
It has been a busy week. About all I have done is get some more parts. I have some 5inch pipe and another water heater. Finally got it marked out.


I am cutting it off center so I have more room for connections. The top will still be 18in wide though.


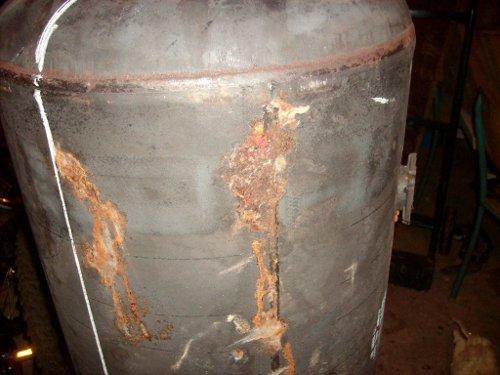
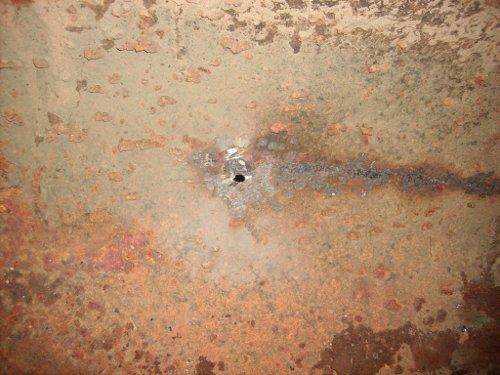
I am cutting to miss the leaks, and the heater holes.


And the drain hole. There are only the two holes on top to worry about and one of them may be cut out for either the entrance or the exit... or both if I manage


I have actually got it over half way cut since the pictures. The big half will be the top with the open side facing up. and the smaller piece will have some more cut out to act as the base with the open side down.  I will be covering the top with 24x24inch patio blocks. Depending on how fast it warms up I may add more than one layer of blocks... adding mass is easy. The idea is to insulate the bottom and the back so the heat doesn't go that way... I am not sure if that is best though. On a concrete floor... heating the floor might be a good thing.... all that mass to gather heat.

I want to balance the temperatures of the barrel mass with the bench mass... I can do this in a few ways. The most obvious is to simply add mass to the hot spots. This may not be possible ... I can only add so much mass at the top of the barrel without making it unstable. So insulation may be needed instead. As mentioned above, I can increase the heat the top of my bench gets by insulating the back and bottom. Also, the barrel can be warmer than the bench as there should be less personal contact there. I will let the top of the barrel get much hotter, but put an insulated box over top to keep the heat in and make an oven. This should keep the room from over heating before the bench and other mass gets warm enough. Insulating the outside of the mass so that the mass can get hotter is another idea... the hotter mass will take longer to cool if it is insulated and the temperature on the outside of the insulation will be low enough to touch still. I am thinking in the range of r1 or r2.... The pillows on top of the bench may be all that I need.

Anyway, that is my progress and my thoughts for the day.
 
Len Ovens
pollinator
Posts: 1481
Location: Vancouver Island
60
  • Mark post as helpful
  • send pies
    Number of slices to send:
    Optional 'thank-you' note:
  • Quote
  • Report post to moderator
I went through and shrunk all the pictures so they fit on my screen... It seems this new software lets them be whatever size. They should load faster too. I should have done this in the first place.

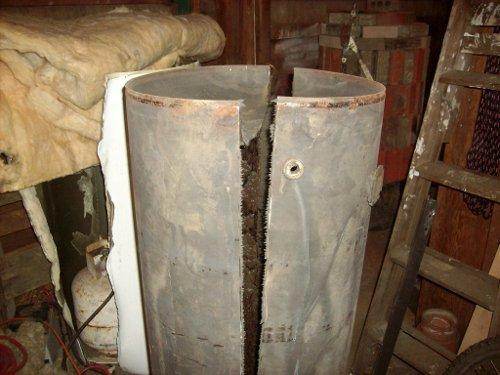
I have finished cutting the bench core:


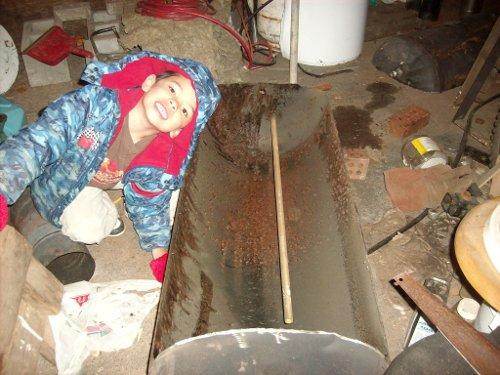
I am planning to set the big half this way (Tim smiles nicer when he is not posing):


With 24x24 inch patio slabs on top. I plan to have the intake and exit as shown below. I'll see how that works. I am mostly wondering if the exit air will be hot enough to make it up the flue


For more pictures see:
Len's Rocket - page 5
 
Len Ovens
pollinator
Posts: 1481
Location: Vancouver Island
60
  • Mark post as helpful
  • send pies
    Number of slices to send:
    Optional 'thank-you' note:
  • Quote
  • Report post to moderator
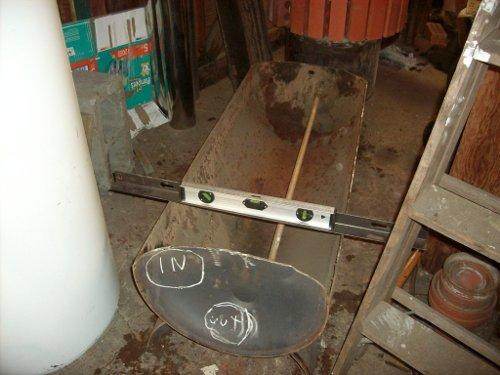
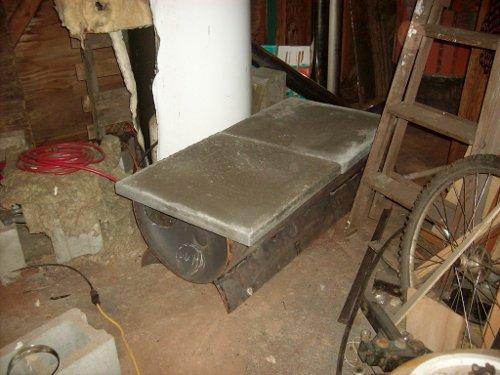
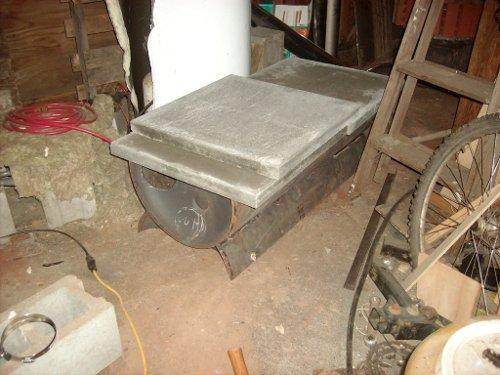
Did some more work. I cut the base out:


Welded it on.... not without mishap... I seem to have managed to poke a hole in it... All fix now though.


So here it is... bathtub? BBQ? Feed trough? Planter? Nope, it's Len's heater mass bench.


Thats all for now...
 
                            
Posts: 18
  • Mark post as helpful
  • send pies
    Number of slices to send:
    Optional 'thank-you' note:
  • Quote
  • Report post to moderator
Hey Len,
It may be a naive rookie question but how does the roxul hold up in the riser? I imagine well or we'd have heard about any problems and changes you made. I ask because I am at a point to insulate the riser(wish I had referred to your pics to see you used it on the burn tunnel too) and yours is the first I saw using insulation like that as opposed to clay /cob etc with maybe saw dust mixed in it.
 
Len Ovens
pollinator
Posts: 1481
Location: Vancouver Island
60
  • Mark post as helpful
  • send pies
    Number of slices to send:
    Optional 'thank-you' note:
  • Quote
  • Report post to moderator

Hoser Hatfield wrote:Hey Len,
It may be a naive rookie question but how does the roxul hold up in the riser? I imagine well or we'd have heard about any problems and changes you made. I ask because I am at a point to insulate the riser(wish I had referred to your pics to see you used it on the burn tunnel too) and yours is the first I saw using insulation like that as opposed to clay /cob etc with maybe saw dust mixed in it.


I haven't seen any problems. Roxul is supposed handle heat up to 2150F. The secondary burn is supposed to happen at around 1800F. However, one of the things I have seen over and over in messages and other writings is that:

a) 6inch is the smallest that works because of the gas friction on the side of the flue slows down the gases close to the side with most of the movement being right down the centre.

b) People who have measured temperatures, both of the outside surface of a metal flue pipe and the at the centre of the gas flow, have found that the temperature in the centre of the gas flow is a lot higher than close to the edges. (thanks to the people at the MHA web site who have done much more thorough testing than most of us can afford.) So I tend to take temperature measurements of surfaces as less than accurate.

So my feeling is that while the gas temp may be 1800F in the centre of the gas stream it is probably less at the pipe wall. This would explain why the risers in some of the older RMHs have lasted 20 or 30 years with no sign of wear.

I suspect the wear in the burn tunnel right where the fuel touches will wear more so I am including a sacrificial plate that can be replaced every year or two (or whatever). It also includes a small airspace to allow for secondary burn air. I am back at that waiting for parts place again (or money to buy some).
 
Len Ovens
pollinator
Posts: 1481
Location: Vancouver Island
60
  • Mark post as helpful
  • send pies
    Number of slices to send:
    Optional 'thank-you' note:
  • Quote
  • Report post to moderator
Got some mass for my bench today. Here is the minimum amount of mass about 200lbs ...


Each patio slab is about 2/3 of a cubic foot (24x24x2) and a cubic foot of concrete is about 150 lbs... so each slab is 100lbs or so.

Want more mass? Just add more layers of slabs or bricks or rocks or dirt even.... I will start with just the single layer... I have more for underneath and there is space for brick up the sides too. Someone with no extra foundation might stick with one layer or two. The amount of mass can be changed with trial and testing. If the seat gets too warm or doesn't hold the heat long enough... add more layers.


As can be seen, I still have another hole to cut out before I can test it. Then hopefully move it inside.
 
Posts: 71
Location: New Mexico high desert Zone 7a, alkaline soils. 9" average annual rainfall.
  • Mark post as helpful
  • send pies
    Number of slices to send:
    Optional 'thank-you' note:
  • Quote
  • Report post to moderator

Len Ovens wrote:

I am planning to set the big half this way (Tim smiles nicer when he is not posing):


Hi Len,

This has been such a helpful and informative thread. I just saw a free gas water heater posted on Craigslist, so that may be the way to go for me (or wait for an electric one).

How did you prep that water heater of yours? Did you burn the paint off of the outside of it?

Also, when I look at cut away diagrams of them, there's a layer of insulation between the outside and the inside of the tank. What did you do with that layer- it doesn't look like yours has that layer. Will that insulative/double layer be a problem?

 
Len Ovens
pollinator
Posts: 1481
Location: Vancouver Island
60
  • Mark post as helpful
  • send pies
    Number of slices to send:
    Optional 'thank-you' note:
  • Quote
  • Report post to moderator

Sandra Ellane wrote:
This has been such a helpful and informative thread. I just saw a free gas water heater posted on Craigslist, so that may be the way to go for me (or wait for an electric one).


Thankyou. Any of the plumbers I have talked to tell me they just throw the old ones in the bin... not recycle or anything. Should be easy to find. If you happen to be in home depot or a similar place and wander past the hot water tanks... if someone happens to be buying a new one, ask them for the old one... offer free pick up Think of how many houses you live by then divide that by ten and you get the number of tanks that get replaced every year... There are lots of them around. I have found them easier to find than barrels.


Also, when I look at cut away diagrams of them, there's a layer of insulation between the outside and the inside of the tank. What did you do with that layer- it doesn't look like yours has that layer. Will that insulative/double layer be a problem?


I stripped the outside stuff off. The white case comes off easily... the foam insulation is a bit of a mess, but one of mine was easy as it had fiberglass batt insulation that just lifted off. I scraped the foam off... the paint? not sure what that coating is, but it seems to handle lots of heat quite well. Remember it has to be designed not to start a fire even if it is empty and the power is applied. I was hoping the coating would burn off when I fired it outside, but it doesn't even seem to off gas.
 
Len Ovens
pollinator
Posts: 1481
Location: Vancouver Island
60
  • Mark post as helpful
  • send pies
    Number of slices to send:
    Optional 'thank-you' note:
  • Quote
  • Report post to moderator
Another update:
I was finally able to test my heat storage bench. There are some pictures above. Anyway, I did a short burn with four 1 to 2 inch by 3ft sticks for fuel. This lasted about two hours. Even after an hour, the pipe from the rocket chamber to the bench was too hot to feel (a quick touch was ok... but I can do that with a hot frypan too) but the exit pipe I could leave my hand on... Good. The bench was nice to sit on except the outside rim was still cool... note to self: three inches over hang is too much... also two layers may help. I would consider this a half burn, I think. Other things to note. The idea of the bell heat transfer method seems to work well. The flue gas flows just fine, instead of 15 or 20 feet of pipe, the flue path is about 8 feet with next to no resistance. The top of the bench where all the mass is, seems to be where the heat is. The steel just below the slabs (top most) was very hot, while the bottom was mildly warm. The concrete under it did not feel any warmer than the floor anywhere else.... Very good stratifying for gases.

The rocket still draws well even with a 6inch riser and a 4inch final flue size. The new flatter burn chamber protector plate works just fine too. I am still figuring out the best way to start it up... I don't play with fire often enough I guess.

A question for those who have built more RMHs than I have.... Flue gas against cold mass surface equals condensation. Has anyone pulled a freshly fired barrel off (say 24 hours later so it has cooled down)? Find any water? My assumption is that the bottom of the barrel chamber where the interface to the bench is, would be the lowest part of the flue path and any condensation would end up there. I ended up with about 3/4 inch water in my bench chamber after this short burn. As I intend to insulate under the chamber for a more permanent install and expect longer burns to get the mass up to temperature, I am hoping that even the bottom of this chamber will get hot enough to re-evaporate this water. However, this will be the bottom of the flue as well, so any water that condenses in the chimney will end here too. I would think this would be a problem with the cob chamber that directs flue gas from the barrel to the bench too.

Anyway, I may add a valve for emptying.

Next step... finishing edges and stuff. I have as yet not been too careful about sealing (and it still works). This is ok outside... but has to be taken care of before first inside firing. So I will be taking everything apart and adding a seal anywhere is needs it. Then I can reassemble it inside. Even with many leaks there has been no visible smoke from any of them. The main flue path seems to be easier to follow.

So I am generally happy with what I see, The system draws well and the mass setup seems to extract lots of heat from the flue gas. So far most of the accessible surfaces don't get too hot. Mass is at about 1200lbs plus so far. Another 600 lbs or more would not be hard to add and will be as I find more stray bricks and rocks. My idea is to have the area between the barrel and the bench covered as well. So the bench will be 6 ft long over all. The only pipe that will be visible will be the final one going to the flue.
 
Satamax Antone
gardener
Posts: 3471
Location: Southern alps, on the French side of the french /italian border 5000ft elevation
194
  • Mark post as helpful
  • send pies
    Number of slices to send:
    Optional 'thank-you' note:
  • Quote
  • Report post to moderator
Hi Len.

Daft question, are thoses insulated type wated heaters, or the old ones you used to find on boilers?
 
Len Ovens
pollinator
Posts: 1481
Location: Vancouver Island
60
  • Mark post as helpful
  • send pies
    Number of slices to send:
    Optional 'thank-you' note:
  • Quote
  • Report post to moderator

Satamax McCoy wrote:Hi Len.

Daft question, are thoses insulated type wated heaters, or the old ones you used to find on boilers?


They used to be insulated when I first got them, but I stripped it all off. All that is left is steel tanks... well not even that after I started cutting
 
Satamax Antone
gardener
Posts: 3471
Location: Southern alps, on the French side of the french /italian border 5000ft elevation
194
  • Mark post as helpful
  • send pies
    Number of slices to send:
    Optional 'thank-you' note:
  • Quote
  • Report post to moderator
Len, i'm on your tracks. Gotten myself a water heater yesterday. About 6ft tall.
 
Len Ovens
pollinator
Posts: 1481
Location: Vancouver Island
60
  • Mark post as helpful
  • send pies
    Number of slices to send:
    Optional 'thank-you' note:
  • Quote
  • Report post to moderator

Satamax McCoy wrote:Len, i'm on your tracks. Gotten myself a water heater yesterday. About 6ft tall.


Wow, thats big. All of ours seem to max out at 4ft (inside) The gas ones might be 5ft to make room for the burner.
 
Posts: 42
1
  • Mark post as helpful
  • send pies
    Number of slices to send:
    Optional 'thank-you' note:
  • Quote
  • Report post to moderator
Hi Lens,

In another post you said, "I have seen a picture of a rocket lamp that runs on twigs." Any chance you have a copy/link to that picture? I'd like to see it.

Thanks,
Michael Skowronski
 
Is that a spider in your hair? Here, threaten it with this tiny ad:
A rocket mass heater is the most sustainable way to heat a conventional home
http://woodheat.net
reply
    Bookmark Topic Watch Topic
  • New Topic