

|

|

|

|

|

|
|
|
|
|
|
|
|

|

|

|

|

|
 1
1


![[Thumbnail for 20181105_164136.jpg]](/t/102508/a/71830/20181105_164136.jpg "Filename: 20181105_164136.jpg
Description:")


For all your Montana Masonry Heater parts (also known as) Rocket Mass heater parts.
Visit me at
dragontechrmh.com Once you go brick you will never go back!
1
2

![[Thumbnail for DSCN0118.JPG]](/t/102508/a/71854/DSCN0118.JPG "Filename: DSCN0118.JPG
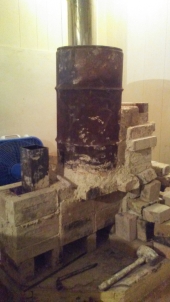
Description: Shop rmh with brick bell and steel barrel")
![[Thumbnail for R-54_01.JPG]](/t/102508/a/71855/R-54_01.JPG "Filename: R-54_01.JPG
Description: very early picture during initial construction")
For all your Montana Masonry Heater parts (also known as) Rocket Mass heater parts.
Visit me at
dragontechrmh.com Once you go brick you will never go back!

God of procrastination https://www.youtube.com/watch?v=q1EoT9sedqY
1
![[Thumbnail for 21.jpg]](/t/102508/a/84221/21.jpg "Filename: 21.jpg
Description:")
![[Thumbnail for RMH-a.jpg]](/t/102508/a/84226/RMH-a.jpg "Filename: RMH-a.jpg
Description:")
![[Thumbnail for RMH-b.jpg]](/t/102508/a/84227/RMH-b.jpg "Filename: RMH-b.jpg
Description:")
![[Thumbnail for RMH-c.jpg]](/t/102508/a/84228/RMH-c.jpg "Filename: RMH-c.jpg
Description:") 1
1
For all your Montana Masonry Heater parts (also known as) Rocket Mass heater parts.
Visit me at
dragontechrmh.com Once you go brick you will never go back!
1
1
 )
)
![[Thumbnail for Rsz1.jpg]](/t/102508/a/89203/Rsz1.jpg "Filename: Rsz1.jpg
Description:")
![[Thumbnail for Rsz2.jpg]](/t/102508/a/89204/Rsz2.jpg "Filename: Rsz2.jpg
Description:")
![[Thumbnail for Rsz3.jpg]](/t/102508/a/89205/Rsz3.jpg "Filename: Rsz3.jpg
Description:") 1
1
Silence is Golden
For all your RMH needs:
dragontechrmh.com
For all your Montana Masonry Heater parts (also known as) Rocket Mass heater parts.
Visit me at
dragontechrmh.com Once you go brick you will never go back!
3
2
1
![[Thumbnail for Rsz1.jpg]](/t/102508/a/89459/Rsz1.jpg "Filename: Rsz1.jpg
Description:")
![[Thumbnail for Rsz3.jpg]](/t/102508/a/89460/Rsz3.jpg "Filename: Rsz3.jpg
Description:")
![[Thumbnail for rsz4.jpg]](/t/102508/a/89461/rsz4.jpg "Filename: rsz4.jpg
Description:") 1
2
2
2
1
2
2
2
Silence is Golden
For all your RMH needs:
dragontechrmh.com
1
2
Sorry, but I don't have any experience with the Liberator stove so I can't make any claims to its performance. Once thing I can say for sure though that my name is not Ianto but Gerry.Hazel Brand wrote:Hello Ianto thanks for your reply! I appreciate your insight into the need for the height of the chimney. it sounds good. I'm just so confused - watching videos and reading comments on the Liberator - with no mass to radiate heat long after the burn and just a loud hissing 700 degree thing in my house. Do you have any comments on the Liberator from your wonderful expertise?
Silence is Golden
For all your RMH needs:
dragontechrmh.com
1

|
I am not young enough to know everything. - Oscar Wilde This tiny ad thinks it knows more than Oscar:
Experience months or even years of natural building and growing your own food
https://wheaton-labs.com/bootcamp
|


![[Download RMH-a.tif]](https://permies.com/templates/default/betaview/images/download-attachment.gif)


