• Post Reply Bookmark Topic Watch Topic
  • New Topic
permaculture forums growies critters building homesteading energy monies kitchen purity ungarbage community wilderness fiber arts art permaculture artisans regional education skip experiences global resources cider press projects digital market permies.com pie forums private forums all forums
this forum made possible by our volunteer staff, including ...
master stewards:
  • Nancy Reading
  • Carla Burke
  • r ranson
  • John F Dean
  • paul wheaton
  • Pearl Sutton
stewards:
  • Jay Angler
  • Liv Smith
  • Leigh Tate
master gardeners:
  • Christopher Weeks
  • Timothy Norton
gardeners:
  • thomas rubino
  • Jeremy VanGelder
  • Maieshe Ljin

What bricks to use for a simple rocket stove?

 
steward
Posts: 21554
Location: Pacific Northwest
12040
11
hugelkultur kids cat duck forest garden foraging fiber arts sheep wood heat homestead
  • Likes 14
  • Mark post as helpful
  • send pies
    Number of slices to send:
    Optional 'thank-you' note:
  • Quote
  • Report post to moderator
My son's been enjoying videos about brick rocket stoves, like this:


And, well, there's no school so now seems like a really great time to learn about fire science! And, it might make a nice back-up cooking source for summer use (we have a woodstove inside for cooking during the cooler months, but I sure wouldn't want to cook on that during the summer!).

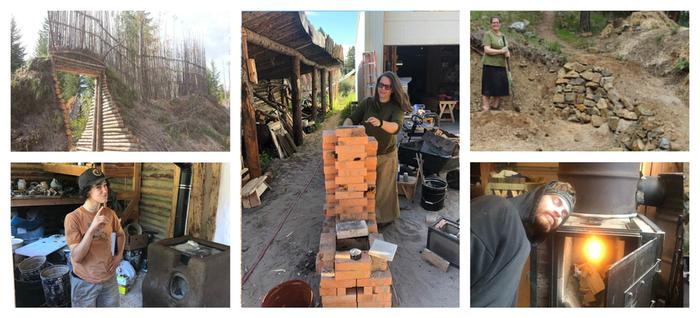
What bricks should I get? A lot of the rocket stove videos have short rocket stoves...I'm wondering if it should be taller like the one Jennifer is using at last years ATC (center picture. I don't remember where I saw the original, but don't really want to spend an hour searching for it!)


Thanks so much for your help!
 
Rocket Scientist
Posts: 1809
Location: Kaslo, BC
525
building solar woodworking rocket stoves wood heat greening the desert
  • Likes 11
  • Mark post as helpful
  • send pies
    Number of slices to send:
    Optional 'thank-you' note:
  • Quote
  • Report post to moderator
That's wonderful Nicole that your son has gotten infected by the rocket stove bug!

A lot of the rocket stoves on YouTube are made from cinder blocks or regular cement bricks that will work just fine for a beginner level experiment to see how one works. Its fast, cheap and you can take it all apart when your done if the fad wears out and use them somewhere else. Cement doesn't like high temperatures for long term use though (they will spall - basically break down and crumble apart)

A better brick though would be one made from clay. Home Depot often carries them. Sometimes if your lucky, they can also be found for free in the classifieds. The soft red clay bricks (you can use them like chalk on the sidewalk) would be the ones to look for. These were the original rocket stove bricks used by Ianto Evans that got a lot of the rocket stove information out there.

By the looks of it, the ones Jennifer is using in the photo are special refractory bricks made for wood stoves and kilns. Some are dense and heavy (perfect for holding heat in a pizza oven) while others are light and insulative to reflect the heat back to make the fire burn even hotter and very clean. These ones are much more expensive unless you can score a deal like Thomas & Paul did (from the same source).

If you really want to delve into the different kinds of bricks, I know Erica Wisner made a post a while back describing all the various bricks out there and a description of each. I'll include a link when I find it for you.   Happy building!

EDIT: Here it is. Probably more info about bricks than you never thought possible: Fake-fire-brick
 
pollinator
Posts: 671
513
solar wood heat
  • Likes 4
  • Mark post as helpful
  • send pies
    Number of slices to send:
    Optional 'thank-you' note:
  • Quote
  • Report post to moderator
Mutual Materials
18230 SW Boones Ferry Road
Durham, OR 97224

1 503 624 8860

take a beatup pickup truck and tell them you do firebrick projects using 4.5"x9" brick.....you'll get the cheapest firebrick in the Portland area I could find.....around $2 per brick if I remember correctly
 
Posts: 525
Location: Northern Germany (Zone 8a)
27
  • Likes 3
  • Mark post as helpful
  • send pies
    Number of slices to send:
    Optional 'thank-you' note:
  • Quote
  • Report post to moderator
if you have that kinda soil: you can make adobe bricks. Or you can make a form and create rammed earth blocks

Or you could build the whole thing from cob or from rammed earth. That would require protection from rain. But that would make a project with "stacked functions of learning" (I assume that you re doing this with children?).

As first experiment you could try to use 4"+ tin cans and throw some clay-rich-soil about it. See if it cracks. If yes, add chopped hay or straw and/or sand.

just experiment, it won t have to be perfect.
 
Nicole Alderman
steward
Posts: 21554
Location: Pacific Northwest
12040
11
hugelkultur kids cat duck forest garden foraging fiber arts sheep wood heat homestead
  • Likes 12
  • Mark post as helpful
  • send pies
    Number of slices to send:
    Optional 'thank-you' note:
  • Quote
  • Report post to moderator
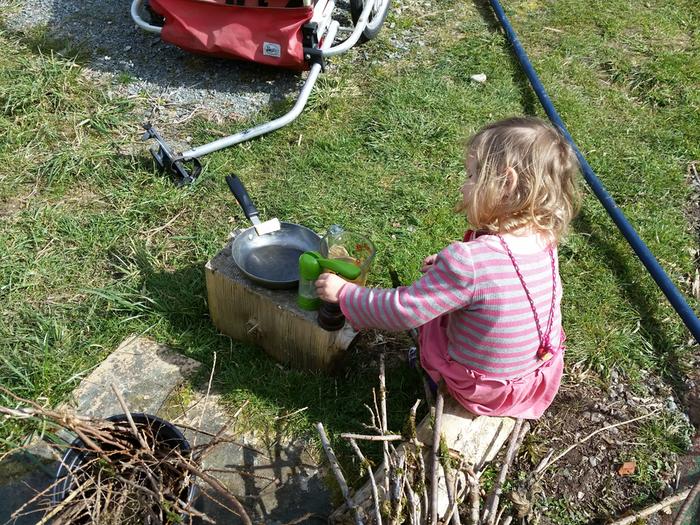
I finally got a chance to update this! My husband picked up 24 bricks, and we spent more time moving the bricks than we did assmbling it. It's a nice quick project! I do think that 28 or 32 would be better, especially if I could make a bigger entrance hole to get more airflow. The bricks were $0.33/brick, which made this cost about $16. That's pretty affordable! We used one of our woodstove trivits to elevate the pot. I'm sure a oven burner would have been better, but I had this lying around, and it worked!


Pile of sticks that cooked 4 eggs and boiled 4 cups of water.


Here's the cooked eggs.


My son enjoyed talking a video of the stove while we were boiling the water.


It seemed to have limited airflow. If the wind was blowing (like the next day, when my kids asked me to cook on it again), it smoked a lot and didn't burn as hot or efficiently.

Still, for about $16, this was a pretty affordable way to cook in a power outage!
 
Gerry Parent
Rocket Scientist
Posts: 1809
Location: Kaslo, BC
525
building solar woodworking rocket stoves wood heat greening the desert
  • Likes 3
  • Mark post as helpful
  • send pies
    Number of slices to send:
    Optional 'thank-you' note:
  • Quote
  • Report post to moderator
I was smiling the whole time watching your video. A young rocket scientist in the making.  A nice end to my day. Thank you.  ๐Ÿ’–
 
Posts: 46
Location: Kentucky
22
6
forest garden foraging cooking food preservation medical herbs rocket stoves wood heat homestead
  • Likes 7
  • Mark post as helpful
  • send pies
    Number of slices to send:
    Optional 'thank-you' note:
  • Quote
  • Report post to moderator
Great little project!

A suggestion, if you would like to try it: Make that opening for feeding the fire twice as high and put a grate half way up the opening to support your fuel. (the grate goes between the bottom and next layers of bricks) Only feed fuel above the grate.

This would ensure a dedicated airway flowing under and up through the ends of your burning sticks, let it run hotter, and should clean up your exhaust.
 
Nicole Alderman
steward
Posts: 21554
Location: Pacific Northwest
12040
11
hugelkultur kids cat duck forest garden foraging fiber arts sheep wood heat homestead
  • Likes 4
  • Mark post as helpful
  • send pies
    Number of slices to send:
    Optional 'thank-you' note:
  • Quote
  • Report post to moderator
In the end, that's actually what we did! We also made it a bit taller at the top. It works a whole lot better now!
 
Posts: 447
Location: Indiana
58
5
  • Likes 3
  • Mark post as helpful
  • send pies
    Number of slices to send:
    Optional 'thank-you' note:
  • Quote
  • Report post to moderator
I did one of these for a E.P. presentation at our local Senior Center a couple of years ago. I had a volunteer build the Rocket Stove from a sketch on paper. People were amazed that the stove would actually work. I showed them the blackened brick to show that I had it fired up at one time.

I also gleaned through all of the "thrift shops" and came up with an extra slim (in height) stove burner, a small grill for hotcakes, and a rail grill for hot dogs and hamburgers. Those worked great also.

And, yes, the extra height is much better and saves your back and eyebrows too. I just disassembled it and stacked everything, bricks, half-bricks, grills, tongs, and spatulas back in a corner out of the way so I always know exactly what is ready to go if needed.

It is a good idea also to fire this up in various kinds of weather too. Rainy weather? Does it, or rather will work under a tent - or will it catch the tent on fire or melt it from the heat? Something for YOU to find out for yourself.
 
Nicole Alderman
steward
Posts: 21554
Location: Pacific Northwest
12040
11
hugelkultur kids cat duck forest garden foraging fiber arts sheep wood heat homestead
  • Likes 7
  • Mark post as helpful
  • send pies
    Number of slices to send:
    Optional 'thank-you' note:
  • Quote
  • Report post to moderator
I figured it's been a year and a half since I made it, so I should post an update!

Like was suggested by  Joan Candalino, I made it taller and put a grate in it, and it works a lot better! My kids love cooking on it (we've cooking summer squash and eggs from our property on it a lot!). Since I didn't have enough bricks, I used a trick that--I think Greg Martin?--told me, which was to stand the bricks on their sides. I should just get more bricks to make it taller that way...but every time I get more bricks, my son takes them to build things with (who needs legos when there's bricks to build with!)
20210907_181203.jpg
I found the burner in our shed, left by the previous owner of the house. It was a gas burner, but works great for this (much better than the trivet!)
20210907_181240.jpg
View from the side. The sideways bricks look a bit silly, but hey, they work!
20210907_181310.jpg
A little bit of hardware cloth goes a long way to making this burn a lot nicer!
 
Posts: 2
  • Likes 1
  • Mark post as helpful
  • send pies
    Number of slices to send:
    Optional 'thank-you' note:
  • Quote
  • Report post to moderator
I also watched that video a while ago and it inspired me to build my own rocket stove that worked really well.

I think you might be missing a gap on one of the sides to allow air in which will cause the fire to burn hotter, but will burn up the sticks a bit faster so you might need a few more on hand.

HTH,
Suzi
 
master steward
Posts: 6979
Location: southern Illinois, USA
2542
goat cat dog chicken composting toilet food preservation pig bee solar wood heat homestead
  • Mark post as helpful
  • send pies
    Number of slices to send:
    Optional 'thank-you' note:
  • Quote
  • Report post to moderator
Hi Suzy,

Welcome to Permies.
 
Rocket Scientist
Posts: 4527
Location: Upstate NY, zone 5
575
5
  • Likes 5
  • Mark post as helpful
  • send pies
    Number of slices to send:
    Optional 'thank-you' note:
  • Quote
  • Report post to moderator
The rocket stove design wants all of the air to come past the sticks to pull heat in and keep the outer ends of the sticks from burning up. That is the best configuration, as has been tested innumerable times by many people. A rocket's usual issue is too much air diluting the heat, and the openings may have to be partially blocked to get the right amount of air for full combustion and maximum temperature.
 
Gerry Parent
Rocket Scientist
Posts: 1809
Location: Kaslo, BC
525
building solar woodworking rocket stoves wood heat greening the desert
  • Likes 3
  • Mark post as helpful
  • send pies
    Number of slices to send:
    Optional 'thank-you' note:
  • Quote
  • Report post to moderator
To further Glenn's response, a quick coat of mud plaster (any dirt with some clay in it) on the outside of the stove body will do it. Quick and 'dirty' but it works great to plug up all those cracks.
 
Jesse Glessner
Posts: 447
Location: Indiana
58
5
  • Likes 2
  • Mark post as helpful
  • send pies
    Number of slices to send:
    Optional 'thank-you' note:
  • Quote
  • Report post to moderator
KUDOS go to all of those parents who get their kids involved in experiments with basic Emergency Preparedness items like stove, lights, water, and sanitation to mention just a few.

This post reminded me to eMail a nephew to remind him to get his kids involved in building a brick Rocket Stove and to have each one to actually cook some on it like eggs, potatoes, and meat.

I also suggested that a 12 V Emergency Lighting system would be a good project for the kids to learn that there are ways to deal with problems in emergency situations.

Another item that would be good for kids to learn is how they are going to handle sanitation. Human waste in a toilet that won't flush can be extremely harsh on the health and well being of humans - SO, what do you need for an emergency toilet and how do you get rid of the waste? These are the things that kids DO NOT learn in school and usually DO NOT learn from their parents - so the parents learn along with the kids.
 
Nicole Alderman
steward
Posts: 21554
Location: Pacific Northwest
12040
11
hugelkultur kids cat duck forest garden foraging fiber arts sheep wood heat homestead
  • Mark post as helpful
  • send pies
    Number of slices to send:
    Optional 'thank-you' note:
  • Quote
  • Report post to moderator
Yeah, I'd love to cob over it to make it work a lot better. But I have no clay in my soil, and still haven't figured out where I can just go buy some clay for a relatively affordable price!
 
pollinator
Posts: 344
Location: New Zealand
28
3
  • Likes 1
  • Mark post as helpful
  • send pies
    Number of slices to send:
    Optional 'thank-you' note:
  • Quote
  • Report post to moderator
Here in NZ you can get bags of clay from farm supply stores. Might work?
 
Nicole Alderman
steward
Posts: 21554
Location: Pacific Northwest
12040
11
hugelkultur kids cat duck forest garden foraging fiber arts sheep wood heat homestead
 
Posts: 38
Location: Northeastern US
2
  • Mark post as helpful
  • send pies
    Number of slices to send:
    Optional 'thank-you' note:
  • Quote
  • Report post to moderator
They did not show how to build the darn thing! I want to know how many bricks and the complete layout. Although this is the nicest one I've ever seen and looks so easy to use!
 
Jesse Glessner
Posts: 447
Location: Indiana
58
5
  • Likes 4
  • Mark post as helpful
  • send pies
    Number of slices to send:
    Optional 'thank-you' note:
  • Quote
  • Report post to moderator
O.K., it is a bit tricky.

FIRST you have to have one brick cut in half. The instructions will explain where, and how you use these in the first two layers.

SECOND you need a good flat surface to place your bricks. Firing these things up on cement is NOT recommended. Either get two blocks of something like 9" X 12" OR one large block about 12" square of better yet 18" square. This gives you a good firm, flat base and you will see further where this comes in handy when feeding fuel into your stove.

SO, here you go! Not great graphics, however, during my presentation a volunteer built the stove from the same plan without questions and no help from others. Graphic is below.

Brick_Stove_Build_Instructions.png
[Thumbnail for Brick_Stove_Build_Instructions.png]
 
Posts: 119
Location: Chemung, NY
9
fungi trees medical herbs
  • Likes 2
  • Mark post as helpful
  • send pies
    Number of slices to send:
    Optional 'thank-you' note:
  • Quote
  • Report post to moderator

Nicole Alderman wrote:Yeah, I'd love to cob over it to make it work a lot better. But I have no clay in my soil, and still haven't figured out where I can just go buy some clay for a relatively affordable price!


Hey Nicole,
I'll trade you all the clay you need; under about 18" of good topsoil I have a solid impermeable layer of clay!
Now, all we need to do is find a string of Permies folks between the Southern Tier of NY to the PNW to hand it off across the country fireman style. ๐Ÿ˜œ

Seriously,  I found this thread searching for a "quick and dirty" build  for my first try at building a rocket stove out of clay brick outside to boil down maple sap,  no more than a couple of gallons of raw sap a day.  
I've read all the threads on sap evaporators but they are all too big, too complicated, or use metal. I guess I'll have to post a "new" question/request post.
 
pollinator
Posts: 165
Location: Pennsylvania, USA
67
2
homeschooling kids homestead
  • Likes 2
  • Mark post as helpful
  • send pies
    Number of slices to send:
    Optional 'thank-you' note:
  • Quote
  • Report post to moderator
Like so many homestead scale projects, it seems the best thing for you to do is invent the design you need around the equipment you want to use it with. Start super simple with a smaller version of the cinder block evaporator - two parallel walls spaced exactly enough so that the pans you are using span the gap, forming the ceiling. For the pot you are using, maybe you want it before the pans for more heat or after the pans for less heat, and use a mud sealed lorena style spot molded around that pot. Build the rockety part just before all this, and the chimney after all this.

Rockety wood feed -> pot lorena -> pan channel -> chimney

Keep in mind this will only work as long as the pot and pans are in place, but the rocket can be warmed up without them.
 
I met your mom on a Carribean cruise and she said you would help me and this tiny ad:
rocket mass heater risers: materials and design eBook
https://permies.com/w/risers-ebook
reply
    Bookmark Topic Watch Topic
  • New Topic