Hi All;
I have been working on my new outdoor kitchen for the better part of the summer.
Now I am working out of state again.
I had intended to wait until it was completely finished before posting the saga but...
It is apx 90% finished and other than the metal roof the rest may take until next spring to finish up.
It all started last Christmas when Liz bought me plans for a Walker BBQ black and white oven.
Here is a link to the oven build
https://permies.com/t/164923/rocket-ovens/Build-Black-White-Rocket-Oven
The spot I wanted to build in was a mess. My 1938 Hudson car was sitting directly in front of the build site.
After 20 years of no time or no money to work on it . I decided to let it go. Needless to say it sold as fast as I could put it up for sale.
Now I had the financing to buy needed supply's. First I concentrated on buying the materials for my Walker oven. Quickcrete for a pad, 300+ clay bricks, Luckily RMH supplies are plentiful here at Dragon Tech so ceramic blanket , doors , air supply tubes, fireclay, RA330 all were on site!
My original plan was to build a wooden building. Then the stupid crazy lumber prices hit... 2x4x 8' went from $2.50 each to $8.00 ! Plywood was over $70 a sheet...
Clay bricks however never changed, they were a whopping .48 each... #100 of Portland cement was $13, #100 sacks of clean builders sand were $11 , Lime was $5 a sack... These prices sounded something like a guy could build with without having to get a bank loan!
I had never built a brick building before but...
No reason I can't reach back thru time to my Italian ancestors and make myself into a modern day Italian Brick Layer!
I hand dug a footer and started pouring a foundation.
String lines were laid out in the hope I could build a square... yeah right...
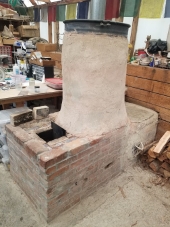
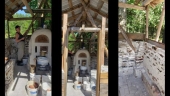
The walls slowly started rising. My "plan" called for 3' walls with 5' columns to support the roof.
I was building my oven and building walls at the same time.
The lowest section of my BBQ are Portland cemented. When I reached the bottom of the core I switched to all clay sand mortar for the BBQ.
The walls and columns of the shack are exposed to snow and rain so they are traditional Portland mortar all the way.
Let me tell you that working with clay mortar is SO nice.... smooth, good for your hands, rinses off easily...
Working with Portland mortar , I wore rubber gloves and long sleeves , your hands were chapped and dry...
No matter, as the result was way better looking than a plain old wooden shack and way cheaper to boot!
Out west this year it has been HOT. I would work on my brick smoke shack early in the morning, then find a roof to get under for the rest of the day.
Slowly things started rising out of the duff.
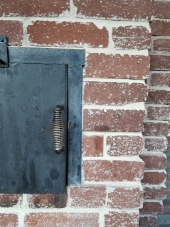
One day at the local landfill. I helped a guy unload some things from his trailer.
He then asked if I would help unload this brand new 30" pine door with full frame included from the back of his truck...
Oh did I want it he askes? He bought it for his new home but got the wrong size... Was taking it to the dump??? Some people have more money than sense!
Ah Yeah, we can load that in my truck directly. Thank You very much... My new brick smoke shack got its new door!
In the last month lumber prices have started returning to earth.
It is still higher than it was, but I could stomach $3.50 a 2x4 , a whole bunch better than $8.20 !
4x6 beams for the roof, 4x4 's for laterals and 2x4's for rafters.
Between the lumber and the yet to be bought metal roofing. The roof has cost more than my humble brick building!
I will admit the wood parts look as good as the brick ones do!
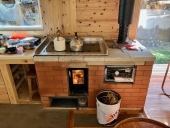
When it is finally finished. My original metal 1/2 barrel bbq/smoker will be inside.
Our 2 burner cast iron stove top will be inside as well.
Solar panels will supply lighting inside and solar motion detector lighting outside.
I'll throw down grass seed later this fall as the snow starts falling. Next spring it will green right up!
This project has been great FUN .
I hope my ancestor's are proud that I could continue in their footsteps!


 20
20


![[Thumbnail for 20210503_164706.jpg]](/t/166800/a/154479/20210503_164706.jpg "Filename: 20210503_164706.jpg
Description:")
![[Thumbnail for 20210505_105034.jpg]](/t/166800/a/154480/20210505_105034.jpg "Filename: 20210505_105034.jpg
Description:")
![[Thumbnail for 20210508_144006.jpg]](/t/166800/a/154481/20210508_144006.jpg "Filename: 20210508_144006.jpg
Description:")
![[Thumbnail for 20210510_123131.jpg]](/t/166800/a/154482/20210510_123131.jpg "Filename: 20210510_123131.jpg
Description:")
![[Thumbnail for 20210512_092314.jpg]](/t/166800/a/154483/20210512_092314.jpg "Filename: 20210512_092314.jpg
Description:")
![[Thumbnail for 20210514_192650.jpg]](/t/166800/a/154484/20210514_192650.jpg "Filename: 20210514_192650.jpg
Description:")
![[Thumbnail for 20210523_171618.jpg]](/t/166800/a/154485/20210523_171618.jpg "Filename: 20210523_171618.jpg
Description:")
![[Thumbnail for 20210524_164100.jpg]](/t/166800/a/154486/20210524_164100.jpg "Filename: 20210524_164100.jpg
Description:")
![[Thumbnail for 20210615_163919.jpg]](/t/166800/a/154487/20210615_163919.jpg "Filename: 20210615_163919.jpg
Description:")
![[Thumbnail for 20210703_073737-(1).jpg]](/t/166800/a/154488/20210703_073737-(1).jpg "Filename: 20210703_073737-(1).jpg
Description:")
![[Thumbnail for 20210703_073750.jpg]](/t/166800/a/154489/20210703_073750.jpg "Filename: 20210703_073750.jpg
Description:")
![[Thumbnail for 20210720_135554-(1).jpg]](/t/166800/a/154490/20210720_135554-(1).jpg "Filename: 20210720_135554-(1).jpg
Description:")
![[Thumbnail for 20210821_090559.jpg]](/t/166800/a/154491/20210821_090559.jpg "Filename: 20210821_090559.jpg
Description:")
![[Thumbnail for 20210906_102459.jpg]](/t/166800/a/154492/20210906_102459.jpg "Filename: 20210906_102459.jpg
Description:")
![[Thumbnail for 20210906_102519.jpg]](/t/166800/a/154493/20210906_102519.jpg "Filename: 20210906_102519.jpg
Description:")
![[Thumbnail for 20210906_102538.jpg]](/t/166800/a/154494/20210906_102538.jpg "Filename: 20210906_102538.jpg
Description:")
![[Thumbnail for 20210906_102549.jpg]](/t/166800/a/154495/20210906_102549.jpg "Filename: 20210906_102549.jpg
Description:")
![[Thumbnail for 20210906_102602.jpg]](/t/166800/a/154496/20210906_102602.jpg "Filename: 20210906_102602.jpg
Description:")


![[Thumbnail for 20210923_203413.jpg]](/t/166800/a/156271/20210923_203413.jpg "Filename: 20210923_203413.jpg
Description:")
![[Thumbnail for 20210923_203424.jpg]](/t/166800/a/156272/20210923_203424.jpg "Filename: 20210923_203424.jpg
Description:")
![[Thumbnail for 20210923_203438.jpg]](/t/166800/a/156273/20210923_203438.jpg "Filename: 20210923_203438.jpg
Description:")
![[Thumbnail for 20210923_203443.jpg]](/t/166800/a/156274/20210923_203443.jpg "Filename: 20210923_203443.jpg
Description:")

Skill verified by Ash Jackson")