

|

|
|
|
|

|

|

|

|

|
 2
2


 1
2
1
2
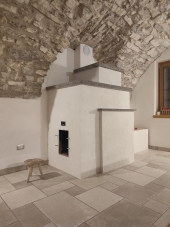
Cristobal Cristo wrote:Very interesting design.
What size will be your batch box, 4", 6"?
Will the oven be black (with fumes going through it) or white?
Have you made a prototype? I'm asking, because I think that if the oven in this configuration is white it will not reach baking temperatures. If it did it would be great.
Fox James wrote:
Hi Stephen,, welcome to the forum.
I have often thought a batch box pizza oven hybrid would be a good design but as Cristobal points out, you need a lot of BTUs to get a brick pizza oven up to temperature.
I would like to see your idea in more detail?
Perhaps a design where you can still light a fire inside the brick dome and utilise the rocket stove to maintain the temprature of a pre heated oven or, re heat the next morning for a day of slow cooking?
If your design is a white oven, the lower floor bricks, after a few hours of burning, may well reach the required 360- 400c but the upper dome bricks are unlikely to reach wood fired oven temratures. The top of the dome in a well built pizza oven will be 500c.
That is not to say the oven wont work as a more conventional oven at lower temratures.
Other folk have made rocket stove pizza ovens from metal drums using radiant heat rather than heat saturated bricks.
This style of oven can be found on the forum and the users are happy enough with the results but, honestly a conventional high mass pizza oven is a specialist piece of cooking equipment, designed to do the job and developed over hundreds of years.
You may be interested in Peters new designs where the riser is much shorter or even ‘no riser at all’
One of these riser less designs used as a black oven might be worth looking into.
It looks like you have molded you batchbox core in one piece, can you give a few more details about how you built it?
1
 2
2


 1
2
1
2
I hope you will not have to use plan C, because the beauty of your design is to have the cooking plate AND the oven.
Doing one at a time is totally doable, but both not so easy.
1
1
1
1
2
1
1
stephen wilson wrote:Following up on the heat issue, I've just done a quick back of a fag packet calculation.
The specific heat capacity of refractory brick is c. 1000 J/kg.C. If I have 60 bricks each weighing about 2kg. I’ll need 1000 x 180 Joules to raise the temperature of the brick by 1 degree = 180 kJ/°C.
If we needed to get this up to 400 °C, that’s 400 x 180 kJ = 72 MJ. Wood has roughly 15 MJ/kg. So even with zero energy loss and 100% efficiency I’m going to need 4.8 kg (72/15) kg of wood.
Hmmm... wish I’d done this calculation before!
If I can keep heat loss down to say 50% of the heat required... which I doubt, that’s 9.6kg of wood. A seasoned medium density wood is going to require 15 L of wood (that's roughly a bucket load for our imperial friends).
This is beginning to look like it's soggy toppings, without some blackness in the oven...
 3
3
 1
1
Scott Weinberg wrote:
stephen wilson wrote:Following up on the heat issue, I've just done a quick back of a fag packet calculation.
The specific heat capacity of refractory brick is c. 1000 J/kg.C. If I have 60 bricks each weighing about 2kg. I’ll need 1000 x 180 Joules to raise the temperature of the brick by 1 degree = 180 kJ/°C.
If we needed to get this up to 400 °C, that’s 400 x 180 kJ = 72 MJ. Wood has roughly 15 MJ/kg. So even with zero energy loss and 100% efficiency I’m going to need 4.8 kg (72/15) kg of wood.
Hmmm... wish I’d done this calculation before!
If I can keep heat loss down to say 50% of the heat required... which I doubt, that’s 9.6kg of wood. A seasoned medium density wood is going to require 15 L of wood (that's roughly a bucket load for our imperial friends).
This is beginning to look like it's soggy toppings, without some blackness in the oven...
I am not disputing your numbers at all, but would be interested in knowing ( perhaps someone has one) the amount of wood required to heat up the pizza oven that uses an internal fire, in the oven it self (such as the photo) I know this is different, your proposed white oven vs the picture black oven type. But curious none the less.
1
Fox James wrote:
My ovens are made from cast 2” thick refractory cement and use 4” of ceramic fibre insulation over the dome.
The floors are made from 3” thick fire brick and also have 4” of ceramic board underneath.
1
2

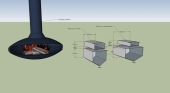
stephen wilson wrote:Here's a vertical section through the whole structure, facing the front.
...
2
 1
1
Scott Weinberg wrote:
Width of sides?
Height of dome?
Depth of dome? (front to back)
Cheers
Scott
![[Thumbnail for chamber_dimensions.png]](/t/223663/a/220253/chamber_dimensions.png "Filename: chamber_dimensions.png
Description:")
Fox James wrote:Not necessarily, my ovens are designed to hold heat for long periods and I do over spec the insulation!
You can join the halves with steel wire, my pizza ovens use 100mm long stainless staples to hold the segments together but allow for expansion.
I think you could just wrap some wire around, maybe 1.5-2mm stainless would do it and still expand ok.
Another alternative might be to build a box around the core and back fill with loose vermiculite, maybe even find a oversize metal tube to surround the riser and back fill with vermiculite. (Perlite might work)
Scott Weinberg wrote:
stephen wilson wrote:Here's a vertical section through the whole structure, facing the front.
...
Hello Stephen Wilson, I am smiling a bit, as I was told I could never make such a shape with Fire Brick, but it looks like you have, How did you cut the tapers in your fire brick to make such shapes.. I am liking it.
Width of sides?
Height of dome?
Depth of dome? (front to back)
Cheers
Scott
1
3
Stephen, how did this oven turn out?


|
I thought you said "pie." This is just a tiny ad
advertising for free (and not-free) on permies.com
https://permies.com/wiki/27826/advertising-free-free-permies
|


![[Download batch_rocket_1.pdf]](https://permies.com/templates/default/betaview/images/download-attachment.gif)


