|

|
|
|
|

|
-A.png)
|

|

|

|


 17
17


Rocket surgeon and soil builder... healthy plants are all about the soil.
- My 6" Batch Rocket specs and materials list: https://permies.com/t/248275/Batch-Rocket-Double-Skin-Bell
- Batch Rocket detailed build thread with Q&A: https://permies.com/t/238503/Batch-Rocket-Build
7


 3
3

How Permies works: https://permies.com/wiki/34193/permies-works-links-threads
My projects on Skye: The tree field, Growing and landracing, perennial polycultures, "Don't dream it - be it! "
4
Julian Adam wrote:Thank you Glenn for your feedback! I'm in the building process myself and your build process inspired me.
As I'm used to think in the metric system, I made a conversion for others:
I was surprised by your exterior wall temperatures (higher than expected), is this at the top of your bell? My TV will be very close to the left of my bell so I will have to see how I can protect it from the heat.
May I ask how you reload your batch? Do you wait for it to burn down to coals, ad some small wood to reignite it and then some large chunks to prevent it from overfuelling? These, I believe, are Peter's instructions.
Rocket surgeon and soil builder... healthy plants are all about the soil.
- My 6" Batch Rocket specs and materials list: https://permies.com/t/248275/Batch-Rocket-Double-Skin-Bell
- Batch Rocket detailed build thread with Q&A: https://permies.com/t/238503/Batch-Rocket-Build
3
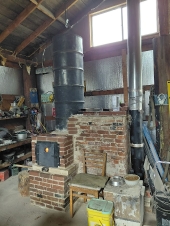
Nancy Reading wrote:Congratulations on your happy heater Glen!
I take it it is this one from your project thread?
Glen's build thread
Rocket surgeon and soil builder... healthy plants are all about the soil.
- My 6" Batch Rocket specs and materials list: https://permies.com/t/248275/Batch-Rocket-Double-Skin-Bell
- Batch Rocket detailed build thread with Q&A: https://permies.com/t/238503/Batch-Rocket-Build
5
Rocket surgeon and soil builder... healthy plants are all about the soil.
- My 6" Batch Rocket specs and materials list: https://permies.com/t/248275/Batch-Rocket-Double-Skin-Bell
- Batch Rocket detailed build thread with Q&A: https://permies.com/t/238503/Batch-Rocket-Build
4
Glenn Littman wrote:I
At the present time I keep my door cracked open about 2" (50mm) when I first light. I can then monitor my pyrometer for riser temperature and gradually close the door watching that the temperatures continue to climb. I'm currently thinking multiple air inlets with sliding apertures low in the door for greater air volume when wide open and more precision control as the fire takes off. This would also allow me to add a larger window to enjoy the flame.
Any thoughts from the community are absolutely welcome!
3
![[Thumbnail for Screenshot_20241105-180000.png]](/t/268842/a/252695/Screenshot_20241105-180000.png "Filename: Screenshot_20241105-180000.png
Description:") 2
2
Glenn Littman wrote:
Thank you for your metric conversion to make sense of my numbers to the metric community. Good reminder for me to make my numbers understandable to all.
Glenn Littman wrote:
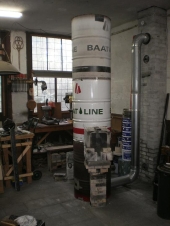
Regarding your question about exterior wall temperatures. The next post after your by Nancy Reading is the picture in my shop. Amusing to me is the fact that the hottest spot on the wall is centered about 16" (40cm) down from the top right at the nose of the deer bling I mounted on the wall. The nose gives me a perfect target to aim the IR gun.
Glenn Littman wrote:
You see our camper parked on the opposite side and it is 42" (107cm) from the heater wall. I measured the temperature of the wall of the camper yesterday as 100F (38C) when the exterior was at 185F (85C). Keep in mind the large area that I am heating. Depending on your situation you will likely not need to raise the temperature of your bell this high. Are you building a single or double skin bell? Note that Tom Rubino just finished his Shorty core masonry heater with single skin bell and in his pictures you can see one of his comfy chairs quite close. Perhaps he can chime in with his comments in this regard.
6
Julian Adam wrote:Glenn, could you elaborate specifically on how you changed your air inlet CSA-wise?
I did some calculations, and allround, I believe your air inlet CSA should be increased by about 30%.
 .
.
Rocket surgeon and soil builder... healthy plants are all about the soil.
- My 6" Batch Rocket specs and materials list: https://permies.com/t/248275/Batch-Rocket-Double-Skin-Bell
- Batch Rocket detailed build thread with Q&A: https://permies.com/t/238503/Batch-Rocket-Build
3
Julian Adam wrote:
Glenn Littman wrote:
Regarding your question about exterior wall temperatures. The next post after your by Nancy Reading is the picture in my shop. Amusing to me is the fact that the hottest spot on the wall is centered about 16" (40cm) down from the top right at the nose of the deer bling I mounted on the wall. The nose gives me a perfect target to aim the IR gun.
You got me thinking with this comment... It seemed unlogical that the highest point of your exterior wall would not be the hottest. But then I realized at the inside, this is probably the location where the hot flue gases exit the riser. These are probably the highest temperatures the inside skin 'sees' due to the high part of radiative heat transfer which is proportional to the 4th (!) power of the temperature. (contrary to convective heat transfer)
Rocket surgeon and soil builder... healthy plants are all about the soil.
- My 6" Batch Rocket specs and materials list: https://permies.com/t/248275/Batch-Rocket-Double-Skin-Bell
- Batch Rocket detailed build thread with Q&A: https://permies.com/t/238503/Batch-Rocket-Build
8
Glenn Littman wrote:A huge thank you to Peter van den Berg for his decade-plus efforts to develop, fine tune and publish batch rocket combustion core designs. For more information, visit his website at https://batchrocket.eu/en/.
regards, Peter
5
Peter van den Berg wrote:The question about how overfuelling can be spotted is easy to answer: thick black or dark grey smoke from the chimney. Not to be missed, I'd say.
My method of starting the heater: load it as you described and light it on top, in my case with a single barbecue lighter.
Rocket surgeon and soil builder... healthy plants are all about the soil.
- My 6" Batch Rocket specs and materials list: https://permies.com/t/248275/Batch-Rocket-Double-Skin-Bell
- Batch Rocket detailed build thread with Q&A: https://permies.com/t/238503/Batch-Rocket-Build

 14
14


For all your Montana Masonry Heater parts (also known as) Rocket Mass heater parts.
Visit me at
dragontechrmh.com Once you go brick you will never go back!


 7
7
thomas rubino wrote:My comfy chair is 8" away and is simply warm to the touch unlike before at 18" when it often became uncomfortably hot.
Become extra-civilized!
7
Glenn Littman wrote:This equates to roughly a 30% increase in CSA however it does not account for the frictional loss of forcing the 90 degree turn in air flow.
6
Peter van den Berg wrote:
The question about how overfuelling can be spotted is easy to answer: thick black or dark grey smoke from the chimney. Not to be missed, I'd say.
Peter van den Berg wrote:
Some of the temperature conversions are quite a bit off, sorry Julian.
5. 1000 °F = 537 °C might be 1000 ºF = 537 ºC ?
6. 175 °F = 79 °C might be 175 ºF = 79 ºC ?
7. 50 °F = 10 °C might be 50 ºF = 10 ºC ?
All the rest is correct as far as I can see. Maybe 5. ,6. and 7. are just numbers of a list?
9
thomas rubino wrote:...Now, I'm currently burning only ONE load of wood a day!
24 hours between loads.
No fire all day.
No fire all night and the external brick temps are still holding 85F each morning.
450 plus clay bricks at 85F makes for a warm home!
Admittedly, we have only been burning her for less than a month, and the outside temperatures are nowhere near mid-winter temps yet.
But OMG! This old house has never had such even temperatures!
Before my comfy chair would get too hot and three feet away on the couch, Liz would be cold.
The floor was always cold and slippers were a must.
The fire smoldered 24 - 7 from September through April-May, consuming apx 3 cords of dry Douglas fir and larch.
Now we are both warm, from our toes to the ceiling.
It is a balmy 72-73 F all day, and all night, even if we open the bedroom window for half the night!
Rocket surgeon and soil builder... healthy plants are all about the soil.
- My 6" Batch Rocket specs and materials list: https://permies.com/t/248275/Batch-Rocket-Double-Skin-Bell
- Batch Rocket detailed build thread with Q&A: https://permies.com/t/238503/Batch-Rocket-Build
9
Peter van den Berg wrote:...When lit, I keep the door open a generous crack, until the chimney pipe temperature rise to 110 ºC (230 ºF), after which I'll close the door in two steps in the course of, say, 10 minutes. Much like you are running your heater...
Rocket surgeon and soil builder... healthy plants are all about the soil.
- My 6" Batch Rocket specs and materials list: https://permies.com/t/248275/Batch-Rocket-Double-Skin-Bell
- Batch Rocket detailed build thread with Q&A: https://permies.com/t/238503/Batch-Rocket-Build
9
Julian Adam wrote:So in essence, even though there will inevitably some CO increase for a few minutes, as long as you see only white water vapour/no smoke and NOT black smoke, you are not overfuelling at the moment you reload the batch?
Julian Adam wrote:Could I ask which temperatures you are measuring on the outside skin of your red heater, Peter?
regards, Peter
6
Peter van den Berg wrote:
But... the finalized Shorty core is quite a bit different in this respect. It simply REFUSED to kick into overfuel mode, wharever I threw at it.
7
Julian Adam wrote:Thank you for your (objective!) input on how you operate your heater Peter. Together with Glenn and Thomas their input this gives a good indication on how hot my bell's outer skin will get.
It was something which I did not find alot about reading through the forums, so I believe it will be of value to others as well.
Julian Adam wrote:Burning pallet wood will also be my way to go. Environmentally, it just makes no sense here in Western Europe to burn beech or oak coming from Eastern Europe + pallets are often completely free if you're able/willing to do some cutting work. Good to have an indication on your consumption. My house will never be as well-insulated as yours, but I will only heat about 45 m2.


Rocket surgeon and soil builder... healthy plants are all about the soil.
- My 6" Batch Rocket specs and materials list: https://permies.com/t/248275/Batch-Rocket-Double-Skin-Bell
- Batch Rocket detailed build thread with Q&A: https://permies.com/t/238503/Batch-Rocket-Build
5
Glenn Littman wrote:
You are correct, there is not a lot of real user data and experience to draw from as a person makes the decision to build a batch rocket (or a more simple J tube). It is wonderful to see a growing interest and a growing user community of contributors to this topic.
Glenn Littman wrote:
The main guy said he was going to have to find someone to haul off the slabs and he would be thrilled to not deal with it, that I could have all I wanted for free. SCORE!
4
9
Julian Adam wrote:Did you just do the 'triangles in the corners' trick at the bottom facing the port, or did you make the full bottom octagonal.
![[Thumbnail for IMG_20240131_125207.jpg]](/t/268842/a/253343/IMG_20240131_125207.jpg "Filename: IMG_20240131_125207.jpg
Description:")
Rocket surgeon and soil builder... healthy plants are all about the soil.
- My 6" Batch Rocket specs and materials list: https://permies.com/t/248275/Batch-Rocket-Double-Skin-Bell
- Batch Rocket detailed build thread with Q&A: https://permies.com/t/238503/Batch-Rocket-Build
6
5
Julian Adam wrote:Thank you Glenn, I understand you continued the octagon shape to about the height of the top of the firebox? Will have to look for a few extra IFBs, I only took the triangles into account, but this seems superior.
Rocket surgeon and soil builder... healthy plants are all about the soil.
- My 6" Batch Rocket specs and materials list: https://permies.com/t/248275/Batch-Rocket-Double-Skin-Bell
- Batch Rocket detailed build thread with Q&A: https://permies.com/t/238503/Batch-Rocket-Build
7
![[Thumbnail for IMG_20240131_132818.jpg]](/t/268842/a/253498/IMG_20240131_132818.jpg "Filename: IMG_20240131_132818.jpg
Description:")
![[Thumbnail for IMG_20240131_161819.jpg]](/t/268842/a/253499/IMG_20240131_161819.jpg "Filename: IMG_20240131_161819.jpg
Description:")
Rocket surgeon and soil builder... healthy plants are all about the soil.
- My 6" Batch Rocket specs and materials list: https://permies.com/t/248275/Batch-Rocket-Double-Skin-Bell
- Batch Rocket detailed build thread with Q&A: https://permies.com/t/238503/Batch-Rocket-Build
5
Glenn Littman wrote:
Note that I used Sairset refractory mortar buttered between all of the bricks of the core to ensure no air gaps as well as added stability. I then used ITC 100 HT ceramic coating painted on all firebrick (not the IFB's) for additional thermal retention inside the core.
5
Julian Adam wrote:I have two more questions...
1. Why did you not coat the IFB? I was actually planning on doing the polar opposite: not coating the dense firebrick, but coating the IFB with a zircon coating. Do you have any idea on how the coating is holding up in your firebox so far?
Julian Adam wrote:2. I was going to make the entire riser with IFB. Could you explain your reasoning behind using dense bricks for the first few rows?
Thanks again for taking the time to respond to my questions!
Rocket surgeon and soil builder... healthy plants are all about the soil.
- My 6" Batch Rocket specs and materials list: https://permies.com/t/248275/Batch-Rocket-Double-Skin-Bell
- Batch Rocket detailed build thread with Q&A: https://permies.com/t/238503/Batch-Rocket-Build
6
6
6
Julian Adam wrote:
James, your wonderful video's on yt have given me an idea about using ceramic glass as a firebox liner. I can get it for free from reclaimed stove tops here. Its very low porosity should be beneficial to resist the slag formation/ash penetration in my opinion. .
6
![[Thumbnail for IMG950792.jpg]](/t/268842/a/253514/IMG950792.jpg "Filename: IMG950792.jpg
Description:")
![[Thumbnail for IMG950803.jpg]](/t/268842/a/253515/IMG950803.jpg "Filename: IMG950803.jpg
Description:")
![[Thumbnail for IMG950784.jpg]](/t/268842/a/253516/IMG950784.jpg "Filename: IMG950784.jpg
Description:") 5
5
Fox James wrote:If you want to know all about the pros and cons of coating refractory then you could read this ……
https://donkey32.proboards.com/thread/3909/firebricks-refractories-fail-silica-flux
Rocket surgeon and soil builder... healthy plants are all about the soil.
- My 6" Batch Rocket specs and materials list: https://permies.com/t/248275/Batch-Rocket-Double-Skin-Bell
- Batch Rocket detailed build thread with Q&A: https://permies.com/t/238503/Batch-Rocket-Build
5
Julian Adam wrote:Glenn, thanks for explaining your reasoning and motivation.
James, I have read through that thread a few months ago and refreshed my memory just now.
James, your wonderful video's on yt have given me an idea about using ceramic glass as a firebox liner. I can get it for free from reclaimed stove tops here. Its very low porosity should be beneficial to resist the slag formation/ash penetration in my opinion. Do you think this would work? I wouldn't mind recutting the liner say every 5 years.
5
Scott Weinberg wrote:
Julian, has it been wrote or discussed here that there is a problem with slag formation/ash penetration to fire brick? I have been running fire brick lined stoves for a lot of years, and have never seen such? Maybe I have been lucky? Just curious.
3
Scott Weinberg wrote:Thought with the discussion of risers, some photos of 7" If anyone is pondering that, utilizing the "cut corners" as a very good riser strength enhancer on the outside. Done like Glens for 6" or mine for 7" really boost the strength of the riser in my opinion. Like Glen, just as soon as I got above my fire box height, I went with IFB of very good quality. ( there is a big difference in quality)
While any riser is hard to inspect once a total brick bell is built, I do have ways to check mine, and it still looks great.
2
Julian Adam wrote:
3
Julian Adam wrote:Was your reasoning for using dense firebrick up to the firebox height the same as Glenn's - mainly a practical one?

|
When evil is afoot and you don't have any arms you gotta be hip and do the legwork, but always kick some ... tiny ad:
Edible Landscaping With A Permaculture Twist/ Second Edition - Kickstarter
https://permies.com/t/369458/Edible-Landscaping-Permaculture-Twist-Edition
|