• Post Reply Bookmark Topic Watch Topic
  • New Topic
permaculture forums growies critters building homesteading energy monies kitchen purity ungarbage community wilderness fiber arts art permaculture artisans regional education skip experiences global resources cider press projects digital market permies.com pie forums private forums all forums
this forum made possible by our volunteer staff, including ...
master stewards:
  • Carla Burke
  • Nancy Reading
  • r ranson
  • John F Dean
  • Timothy Norton
  • paul wheaton
  • Jay Angler
stewards:
  • Pearl Sutton
  • Anne Miller
  • Tereza Okava
master gardeners:
  • Christopher Weeks
gardeners:
  • M Ljin
  • Matt McSpadden
  • Megan Palmer

Batch Rocket - Build Question

 
rocket scientist
Posts: 179
Location: Sangre de Cristo Mountains, CO - Lat 38°14' - Zone 5b
136
hunting earthworks solar wood heat rocket stoves homestead
  • Likes 3
  • Mark post as helpful
  • send pies
    Number of slices to send:
    Optional 'thank-you' note:
  • Quote
  • Report post to moderator

Peter van den Berg wrote:...Hope this is clear.


Perfectly clear. Thank you Peter.

I'm perhaps a week away from completing the walls. I welded up the T profiles today, double checked my supply of Superwool gasket and 1" blanket, and have everything I need to install the bypass. So I'm now good to go for the roof as soon as the walls are complete.
 
Glenn Littman
rocket scientist
Posts: 179
Location: Sangre de Cristo Mountains, CO - Lat 38°14' - Zone 5b
136
hunting earthworks solar wood heat rocket stoves homestead
  • Likes 10
  • Mark post as helpful
  • send pies
    Number of slices to send:
    Optional 'thank-you' note:
  • Quote
  • Report post to moderator
The inner bell walls are now complete, achieving a height of 15” from the top of the riser to just below the ceiling. A few detail pictures show:

The thermocouple for the inner bell is now embedded in the mortar between the top course and next course down. Thermocouple circled in red before the top course was added.


The bypass is cut-in with a piece of 6” stove pipe, pop-riveted to a 6” blast gate on the outside and 3 pieces of scrap steel that I bent into spring clips to maintain a secure fit between the 2 wall skins. A wrap of Superwool around the stove pipe and mortar around that for a tight seal.


I’m expecting 3 more courses of clay brick on the outside skin to allow the refractory brick roof, Superwool layer and a final clay brick roof layer to sit inside of the top of the walls. That should be completed by the end of the week.
 
Posts: 352
Location: North East Iowa, USA
97
  • Likes 4
  • Mark post as helpful
  • send pies
    Number of slices to send:
    Optional 'thank-you' note:
  • Quote
  • Report post to moderator
Outstanding Glenn!   Wish I was doing another right along with you.  Your temp readings will be interesting too.
 
gardener
Posts: 1134
Location: +52° 1' 47.40", +4° 22' 57.80"
529
woodworking rocket stoves wood heat
  • Likes 4
  • Mark post as helpful
  • send pies
    Number of slices to send:
    Optional 'thank-you' note:
  • Quote
  • Report post to moderator
Glenn, sorry to say, there might be two mistakes in your build so far.
The first being the mortar between the firebricks: is that the same as between the red bricks? I fully suspect this mortar isn't of the refractory type and if it is, the seams are looking too voluminous to my eye. The mortar in this area could be clay/sand or refractory. Portland cement based mortar, being not heat resistant, would be vulnerable to cracking and wandering bricks as the net result.

The second suspected flaw is the position of the blast gate. It looks like it's above the level of the riser, this is a tricky position. The temperatures might be too high for the materials of the gate, possibly deforming it.
 
Glenn Littman
rocket scientist
Posts: 179
Location: Sangre de Cristo Mountains, CO - Lat 38°14' - Zone 5b
136
hunting earthworks solar wood heat rocket stoves homestead
  • Likes 4
  • Mark post as helpful
  • send pies
    Number of slices to send:
    Optional 'thank-you' note:
  • Quote
  • Report post to moderator

Peter van den Berg wrote:Glenn, sorry to say, there might be two mistakes in your build so far.
The first being the mortar between the firebricks: is that the same as between the red bricks? I fully suspect this mortar isn't of the refractory type and if it is, the seams are looking too voluminous to my eye. The mortar in this area could be clay/sand or refractory. Portland cement based mortar, being not heat resistant, would be vulnerable to cracking and wandering bricks as the net result.


Peter, my mortar in all cases is a 3:1 mixture of sand and fireclay. When I attach my chimney pipe to the system I'll do it in a way that it can be removed at the blast gate without too much effort so I can inspect the upper sections of the bell.

Peter van den Berg wrote:The second suspected flaw is the position of the blast gate. It looks like it's above the level of the riser, this is a tricky position. The temperatures might be too high for the materials of the gate, possibly deforming it.


Hmmm... I'll have to give this some thought. My initial reaction is to just leave it as is and see how it reacts. Since it is high in the bell and since I am using sand/fireclay which is pretty easy to remove and reuse, if a major problem develops it will become a future rebuild project to relocate it lower in the bell.

Alternatively, I'll be interested to see how well the system drafts on start-up not using the bypass. My current stoves tend to pull a start-up draft quite easily. Perhaps this has something to do with being at 8,000' and the outside air is consistently cool and low humidity. If the bypass proves to be not so necessary I can remove it if a problem develops.
 
Peter van den Berg
gardener
Posts: 1134
Location: +52° 1' 47.40", +4° 22' 57.80"
529
woodworking rocket stoves wood heat
  • Likes 3
  • Mark post as helpful
  • send pies
    Number of slices to send:
    Optional 'thank-you' note:
  • Quote
  • Report post to moderator

Glenn Littman wrote:Peter, my mortar in all cases is a 3:1 mixture of sand and fireclay. When I attach my chimney pipe to the system I'll do it in a way that it can be removed at the blast gate without too much effort so I can inspect the upper sections of the bell.


The mortar is OK then, I would have used thin seams for the firebricks, that's all. Maybe something to do with the sand: for thin seams mason's sand may be too coarse.

Regarding the position of the blast gate: you are right, in case of problems you will be able to take it out. As such, it could become part of the growing user experience.
 
Peter van den Berg
gardener
Posts: 1134
Location: +52° 1' 47.40", +4° 22' 57.80"
529
woodworking rocket stoves wood heat
  • Likes 3
  • Mark post as helpful
  • send pies
    Number of slices to send:
    Optional 'thank-you' note:
  • Quote
  • Report post to moderator
I forgot about the elevation. At that height, it would be best to have an enlarged air inlet. Not sure about the secondary channel, though.
 
Glenn Littman
rocket scientist
Posts: 179
Location: Sangre de Cristo Mountains, CO - Lat 38°14' - Zone 5b
136
hunting earthworks solar wood heat rocket stoves homestead
  • Likes 3
  • Mark post as helpful
  • send pies
    Number of slices to send:
    Optional 'thank-you' note:
  • Quote
  • Report post to moderator

Peter van den Berg wrote:The mortar is OK then, I would have used thin seams for the firebricks, that's all.


As the saying goes: "Repetition is the key to learning." In the case of masonry, this is so true considering I've never laid a single brick before this project.

As I am nearing the completion of the masonry work on this unit I am really beginning to feel comfortable with getting the proper consistency of hydration, trowel work and mortar amounts. The next build will be much better. With that in mind, what thickness of mortar joints do you try to achieve when setting firebricks?
 
Glenn Littman
rocket scientist
Posts: 179
Location: Sangre de Cristo Mountains, CO - Lat 38°14' - Zone 5b
136
hunting earthworks solar wood heat rocket stoves homestead
  • Likes 3
  • Mark post as helpful
  • send pies
    Number of slices to send:
    Optional 'thank-you' note:
  • Quote
  • Report post to moderator

Peter van den Berg wrote:I forgot about the elevation. At that height, it would be best to have an enlarged air inlet. Not sure about the secondary channel, though.


I haven't yet begun building the door. I'll be following the plans from Dragon Technology which provides a primary air CSA of just under 7 sq in. If my math is correct, your calculations are 20% of the riser CSA or 5.65 sq in. So my primary air is about 20% larger. My secondary CSA is 2.9 sq in which is quite a bit larger than your 5% of riser CSA.

In my test burns outdoors I thought the core ran well with these dimensions. There was no visible smoke, only some steam and the riser temperature was running 1,500 deg F. I suppose time will tell if I need to make adjustments.
 
Peter van den Berg
gardener
Posts: 1134
Location: +52° 1' 47.40", +4° 22' 57.80"
529
woodworking rocket stoves wood heat
  • Likes 4
  • Mark post as helpful
  • send pies
    Number of slices to send:
    Optional 'thank-you' note:
  • Quote
  • Report post to moderator

Glenn Littman wrote:The next build will be much better. With that in mind, what thickness of mortar joints do you try to achieve when setting firebricks?


Normally, 2 mm to 3 mm, equavalent to about 0.1". The Lincoln fire clay is good as it is, you probably need to sift the sand through a fine screen. In the past, I used fire clay and fine sand in a 1:1 proportion to build some of my experiments. Smearing the wet mortar with a small trowel to the brick and laying it down.
 
Scott Weinberg
Posts: 352
Location: North East Iowa, USA
97
  • Likes 3
  • Mark post as helpful
  • send pies
    Number of slices to send:
    Optional 'thank-you' note:
  • Quote
  • Report post to moderator

Glenn Littman wrote:

Peter van den Berg wrote:The mortar is OK then, I would have used thin seams for the firebricks, that's all.


As the saying goes: "Repetition is the key to learning." In the case of masonry, this is so true considering I've never laid a single brick before this project.

As I am nearing the completion of the masonry work on this unit I am really beginning to feel comfortable with getting the proper consistency of hydration, trowel work and mortar amounts. The next build will be much better. With that in mind, what thickness of mortar joints do you try to achieve when setting firebricks?


Hello Glenn, I think I noted that my fire brick mortar was in the 1/16" range- more like glue rather than an leveling product.  Looking at your build, I am guessing your spot on level already.   Gravity plays a very good role here in holding things in place.  

My backup plan if ever needed (and I don't think I ever will) was the fact I can get inside my entire bell anytime I would need to.  Not possible with a 6" size bell, but for mine I have a bit more room.  

yours is looking great.
 
Scott Weinberg
Posts: 352
Location: North East Iowa, USA
97
  • Likes 2
  • Mark post as helpful
  • send pies
    Number of slices to send:
    Optional 'thank-you' note:
  • Quote
  • Report post to moderator

Glenn Littman wrote:

Peter van den Berg wrote:I forgot about the elevation. At that height, it would be best to have an enlarged air inlet. Not sure about the secondary channel, though.


I haven't yet begun building the door. I'll be following the plans from Dragon Technology which provides a primary air CSA of just under 7 sq in. If my math is correct, your calculations are 20% of the riser CSA or 5.65 sq in. So my primary air is about 20% larger. My secondary CSA is 2.9 sq in which is quite a bit larger than your 5% of riser CSA.

In my test burns outdoors I thought the core ran well with these dimensions. There was no visible smoke, only some steam and the riser temperature was running 1,500 deg F. I suppose time will tell if I need to make adjustments.


Looking back, I guess I did not discuss these two sizes of openings and I went with the theory that I could make them  smaller easily but to make them larger would take a fair bit of work. As my openings are in my door. So I could close them by adding a sizing plate   What I meant was, I went with the larger sizes, based on Dragon techs suggestions. And it has worked very well.

That being said, I have also played with restricting the inlets for both primary and secondary air. and I am afraid only with the Testo, could I tell a difference.

If I was to make any changes or recommendations it would be to make these inlets EASY to block 100% of the air inlet when not burning. it is probably just me, but I have so much draft, that when my fire is done (approx 2 to 2 1/4 hrs) it bothers me to have air whistling through the batch box, then bell, then out the flue. When not burning.  Without closing the air inlets, I can easily have air drafting through the system, showing 125 degrees in the flue, 2-3 hours after the fire is done.  I figure that heat is mine, and I want to keep it.   :-)

Lastly with my glass seal costing nothing, and glass holding frame, just a touch over nothing,   I have never regretted having the largest glass I could fit in the door.  Seeing exactly what is going on with the fire, has be rewarding although it has worked so well, I have never changed how I burn each batch.   . As the saying goes, "this is what has worked for me, your results may work differently".
 
Glenn Littman
rocket scientist
Posts: 179
Location: Sangre de Cristo Mountains, CO - Lat 38°14' - Zone 5b
136
hunting earthworks solar wood heat rocket stoves homestead
  • Likes 4
  • Mark post as helpful
  • send pies
    Number of slices to send:
    Optional 'thank-you' note:
  • Quote
  • Report post to moderator
It may be worth noting at this point that I did not use fireclay/sand mortar on my core and riser. That was built with a very thin layer of Sairset refractory mortar. In those areas I only buttered the refractory bricks to seal any surface irregularities between the bricks.

For the bell, I was shooting for a 3/16" mortar joint with my fireclay/sand mortar. Inconsistencies in the hydration of my mortar mix along the way sometimes resulted in thicker joints. When I got to the inner skin refractory brick, I now realize that the larger size brick and the fact that the mortar joint was hidden from easy outside viewing, the mortar joints are on the large size. Lesson learned for Batch Rocket #2.
 
Glenn Littman
rocket scientist
Posts: 179
Location: Sangre de Cristo Mountains, CO - Lat 38°14' - Zone 5b
136
hunting earthworks solar wood heat rocket stoves homestead
  • Likes 7
  • Mark post as helpful
  • send pies
    Number of slices to send:
    Optional 'thank-you' note:
  • Quote
  • Report post to moderator
The inner roof went on easy enough. The steel supports have Superwool gasket on all surfaces that make brick contact. Waterglass was used to secure the gasket while installing the brick. Plenty of Superwool blanket around the perimeter, inside the gaps where the T profile steel separates the rows and a top blanket.

Connecting the chimney will be completed today and laying in the outer skin brick for the roof. Meanwhile, Mrs Rocket Boss is busy with a bristle brush cleaning up all of my mortar mess on the brick. A thankless job and very much appreciated, especially considering my early learning phase of masonry work.

Beginning to work on building the door then we're ready to fire up this dragon!

IMG_20240315_114518.jpg
[Thumbnail for IMG_20240315_114518.jpg]
IMG_20240315_135458.jpg
[Thumbnail for IMG_20240315_135458.jpg]
IMG_20240315_141326.jpg
[Thumbnail for IMG_20240315_141326.jpg]
IMG_20240318_072551.jpg
[Thumbnail for IMG_20240318_072551.jpg]
 
master rocket scientist
Posts: 6808
Location: latitude 47 N.W. montana zone 6A
3717
cat pig rocket stoves
  • Likes 4
  • Mark post as helpful
  • send pies
    Number of slices to send:
    Optional 'thank-you' note:
  • Quote
  • Report post to moderator
Outstanding Job, Journeyman Rocket Scientist!
Superb bristle work on the bricks by your lovely assistant!
You have surpassed your teacher with this build! His do not look nearly as refined... But they roar with equal ferocity!
Looking forward to the news reports when this  Dragon lifts off and starts patrolling your valley!

Also waiting to see your DT door!
Keep up the good work, remember you have 3-4 more to create!
dragon-name-generator.jpg
[Thumbnail for dragon-name-generator.jpg]
 
Scott Weinberg
Posts: 352
Location: North East Iowa, USA
97
  • Likes 4
  • Mark post as helpful
  • send pies
    Number of slices to send:
    Optional 'thank-you' note:
  • Quote
  • Report post to moderator

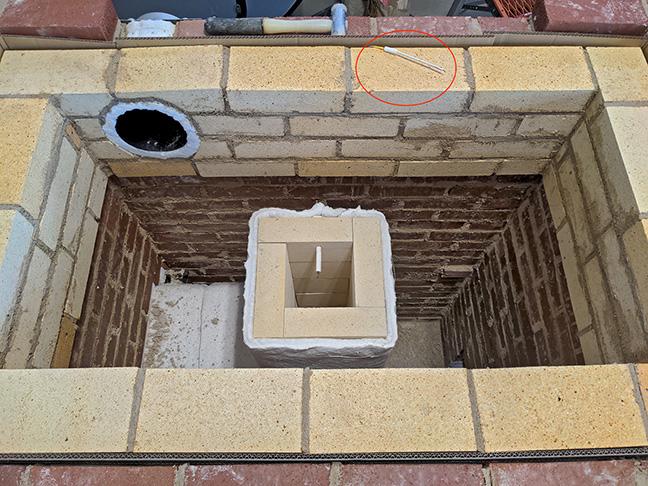
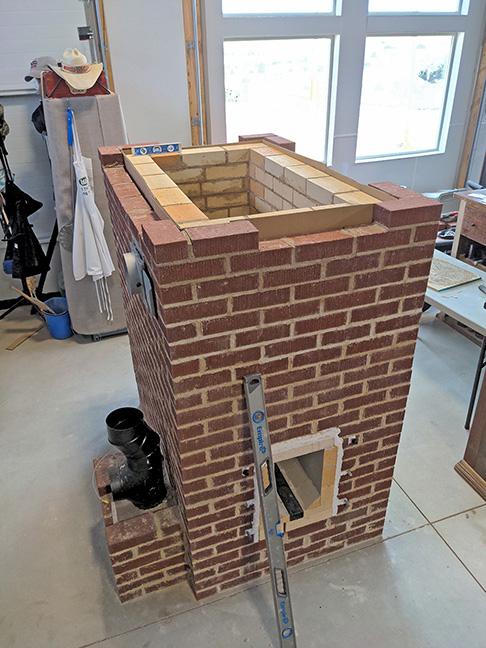
Glenn Littman wrote:The inner roof went on easy enough. The steel supports have Superwool gasket on all surfaces that make brick contact. Waterglass was used to secure the gasket while installing the brick. Plenty of Superwool blanket around the perimeter, inside the gaps where the T profile steel separates the rows and a top blanket.

Connecting the chimney will be completed today and laying in the outer skin brick for the roof. Meanwhile, Mrs Rocket Boss is busy with a bristle brush cleaning up all of my mortar mess on the brick. A thankless job and very much appreciated, especially considering my early learning phase of masonry work.

Beginning to work on building the door then we're ready to fire up this dragon!


That is a great looking build!  Well done Glen.  Was curious, your riser, was that standard fire brick, then wrapped with insulation? or IFB with a additional wrap.

Just for those interested, I used IFB with no extra insulation, and started this riser type at the fire box height.  (below was standard fire brick with the 2" mineral wool wrap- hopefully getting the toughest brick in the area most prone to super hot fire breathing dragon)  Pun intended, Tom!

We hit a new high last night with the top 2' of the bell at 265 degrees,  I generally stop at 225 to keep the exit flue below 150.  On my build, it starts becoming a trade off, going ever higher.   with the increasing bell temp.

Again, well done Glen.

ps- Window planned on the door?  Sure enjoy our window.

 
Glenn Littman
rocket scientist
Posts: 179
Location: Sangre de Cristo Mountains, CO - Lat 38°14' - Zone 5b
136
hunting earthworks solar wood heat rocket stoves homestead
  • Likes 3
  • Mark post as helpful
  • send pies
    Number of slices to send:
    Optional 'thank-you' note:
  • Quote
  • Report post to moderator

Scott Weinberg wrote:Was curious, your riser, was that standard fire brick, then wrapped with insulation? or IFB with a additional wrap

.
Thanks Scott

My riser is IFB. I know that it wasn't necessary to wrap it but I had a full roll of Superwool and decided to wrap it anyway for maximum fire-breathing dragon effect.

Scott Weinberg wrote:Window planned on the door?


It'll have a 3" round window that also serves as the primary air inlet. I'll be using the Dragon Technology door design by Dr. Thomas Rubino: https://permies.com/t/236820/AVALABLE-Detailed-Batchbox-Door-Construction
 
Rocket Scientist
Posts: 842
Location: Guernsey a small island near France.
339
  • Likes 2
  • Mark post as helpful
  • send pies
    Number of slices to send:
    Optional 'thank-you' note:
  • Quote
  • Report post to moderator
Looking really  good, I must say though, that I think your lovely work deserves a much bigger window that a 3” circle!
 
Glenn Littman
rocket scientist
Posts: 179
Location: Sangre de Cristo Mountains, CO - Lat 38°14' - Zone 5b
136
hunting earthworks solar wood heat rocket stoves homestead
  • Likes 2
  • Mark post as helpful
  • send pies
    Number of slices to send:
    Optional 'thank-you' note:
  • Quote
  • Report post to moderator

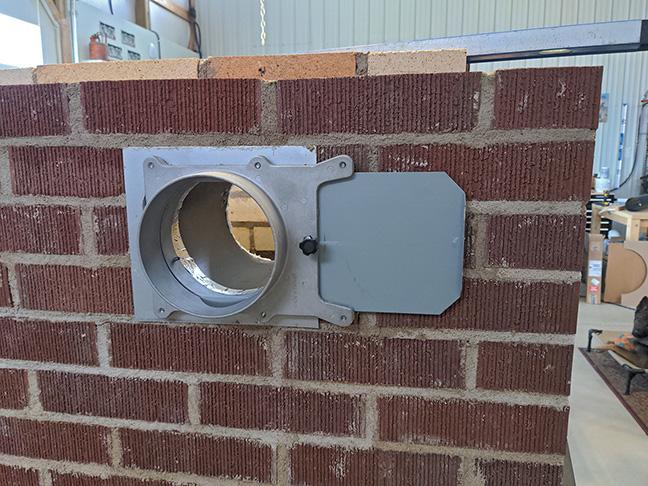
Fox James wrote:Looking really  good, I must say though, that I think your lovely work deserves a much bigger window that a 3” circle!


Thank you Fox.

Here's the long story on the window size. The RMH is in our shop/multi-use living space that we utilize every day. It is 2,000 sq ft (186 sq m) and has 14' high ceiling, so 28,000 cu ft (793 cubic m). We already had 2 wood stoves in the shop, both with 6" chimneys, I didn't want to install new chimneys and one 6" RMH is not sufficient to heat the space. So this is my learning build in preparation for building a 2nd RMH this summer. The next one will be in a location that includes a seating area and the door will be much more of a focal point. That one will have a nice large window, following Peter van den Berg's latest core and door design of his new shorty core. It will also be designed for more rapid heating using stainless steel barrels and a bell bench. If at some point in the future I decide this heater deserves a larger window I can always change it out.  
 
Glenn Littman
rocket scientist
Posts: 179
Location: Sangre de Cristo Mountains, CO - Lat 38°14' - Zone 5b
136
hunting earthworks solar wood heat rocket stoves homestead
  • Likes 6
  • Mark post as helpful
  • send pies
    Number of slices to send:
    Optional 'thank-you' note:
  • Quote
  • Report post to moderator
The masonry work is now complete and chimney tied-in. The last task is to build the door but I wasn't about to sit around and wonder how the system will work while I cut and weld up a door. So, I prepped the door frame, cut the secondary intake hole, the opening for the firebox and welded flat stock around the opening to reinforce and prevent warping. I cut an opening in firebox cut-out to the CSA of the primary air intake, tack welded a piece of angle iron to the inside top of the door frame and viola... instant temporary door.

Loaded up the firebox about 3/4 and with the help of my plumbers torch, the dragon took flight! As of this morning I'm now on my 4th burn. With the bypass open and the door off it lights right off. After about 10-15 minutes I close the bypass, place the door and sit back and listen to the low roar and watch the pyrometer temperature in the top of the riser as it goes up. The max riser temps have been around 1,200 deg. By the end of the burn the thermocouple in the ref brick of the inner skin is around 250 deg. Around 2 hours after the burn the outer skin is around 90 deg. Chimney pipe exit temps right where it connects to the exhaust port at the base of the heater has run only around 110 deg but I'm getting a good draft and no visible smoke or steam outside. I expect the chimney exit temps will be higher once I'm doing full load burns.

Super pleased so far... and more importantly Mrs Rocket Boss is really happy too! Again... a huge thanks to Tom Rubino and Peter van den Burg for all of their input and knowledge sharing, without which I don't see how this dragon would have gotten off the ground!

IMG_20240324_073245.jpg
[Thumbnail for IMG_20240324_073245.jpg]
IMG_20240324_064136.jpg
[Thumbnail for IMG_20240324_064136.jpg]
IMG_20240324_064325.jpg
[Thumbnail for IMG_20240324_064325.jpg]
 
Glenn Littman
rocket scientist
Posts: 179
Location: Sangre de Cristo Mountains, CO - Lat 38°14' - Zone 5b
136
hunting earthworks solar wood heat rocket stoves homestead
  • Likes 5
  • Mark post as helpful
  • send pies
    Number of slices to send:
    Optional 'thank-you' note:
  • Quote
  • Report post to moderator
I haven't posted a video before so we'll see if this works. It is the first burn...

 
Glenn Littman
rocket scientist
Posts: 179
Location: Sangre de Cristo Mountains, CO - Lat 38°14' - Zone 5b
136
hunting earthworks solar wood heat rocket stoves homestead
  • Likes 5
  • Mark post as helpful
  • send pies
    Number of slices to send:
    Optional 'thank-you' note:
  • Quote
  • Report post to moderator
I failed to mention the most important thing... the temperature first thing this morning was 55 deg. It has never been this warm at the start of the day time of year. Normally it's 50 and the RMH mass is only beginning to get warmed up. Fantastic!
 
Scott Weinberg
Posts: 352
Location: North East Iowa, USA
97
  • Likes 5
  • Mark post as helpful
  • send pies
    Number of slices to send:
    Optional 'thank-you' note:
  • Quote
  • Report post to moderator

Glenn Littman wrote:The masonry work is now complete and chimney tied-in.  

Loaded up the firebox about 3/4 and with the help of my plumbers torch, the dragon took flight! As of this morning I'm now on my 4th burn. With the bypass open and the door off it lights right off. After about 10-15 minutes I close the bypass, place the door and sit back and listen to the low roar and watch the pyrometer temperature in the top of the riser as it goes up. The max riser temps have been around 1,200 deg. By the end of the burn the thermocouple in the ref brick of the inner skin is around 250 deg. Around 2 hours after the burn the outer skin is around 90 deg. Chimney pipe exit temps right where it connects to the exhaust port at the base of the heater has run only around 110 deg but I'm getting a good draft and no visible smoke or steam outside. I expect the chimney exit temps will be higher once I'm doing full load burns.


Excellent Glen,  A few questions:

on mine, the by-pass is super hot after 5 minutes of burn,  have you checked at that time?  I figured if it was that hot at that time, (and it is)  the chimney must be good to go and hot.  So then shut it down for good.  But seldom do I use it, perhaps 3 times this season.  

So if I light mine and leave the door open, it is a very mild burn, and takes a while to get going. But if I light with a bit of kindling, and the second I close the door, the draft "speed" picks up, thus almost fanning the fire, everything goes much quicker if I close the door within a few seconds of lighting.  Was curious if you have tried that?  I know you only have a few burns.

your probe temp readings open all kinds of things to wonder about, I think they are great at helping what is happening. Maybe even guiding what works best in the stove.  Well done.   When I get my second skin on the outside to 250 I generally don't continue to burn.  Seldom do I go to that, as 175 degrees works well. for the evening.
 
Scott Weinberg
Posts: 352
Location: North East Iowa, USA
97
  • Likes 3
  • Mark post as helpful
  • send pies
    Number of slices to send:
    Optional 'thank-you' note:
  • Quote
  • Report post to moderator
Your video came out great, did you post to vimeo and then provide a link to that?
 
Glenn Littman
rocket scientist
Posts: 179
Location: Sangre de Cristo Mountains, CO - Lat 38°14' - Zone 5b
136
hunting earthworks solar wood heat rocket stoves homestead
  • Likes 6
  • Mark post as helpful
  • send pies
    Number of slices to send:
    Optional 'thank-you' note:
  • Quote
  • Report post to moderator

Scott Weinberg wrote:Excellent Glen,  A few questions:

on mine, the by-pass is super hot after 5 minutes of burn,  have you checked at that time?  I figured if it was that hot at that time, (and it is)  the chimney must be good to go and hot.  So then shut it down for good.  But seldom do I use it, perhaps 3 times this season.

 
My previous post was actually burn #1 on Saturday so the system was room temperature (50F) and the outside ambient was unusually warm at only 10 deg less than in the shop. It's now Monday morning, outside overnight temps ran in the teens and my typical shop temp before firing up the wood stove is 50 but this morning it is 57, wow!

I had 2 burns on Saturday and 3 burns yesterday. My riser, inner bell skin and outer skin are all seeing hotter temps with each burn. My guess is that there is a fair amount of evaporative cooling when first commissioning that decreases with each successive burn as the moisture is driven out. So, to your point Scott... I am now closing the damper and putting the temporary door in place within a minute or two of lighting and the flame and temp rise rapidly. One item of interest is that my chimney exit temperature at the exhaust box at the bottom of the bell has not gone above 110F and yet that is with a riser exit temperature of 1,380F, which is the highest I've seen so far and has been increasing with each burn. That is an amazing amount of heat being given up to the brick before the gases exit to the chimney. As you would imagine since the brick mass was 58 deg when first started on Saturday, the brick has been increasing in temp with each burn. So far I see no smoke or moisture coming out of the chimney. What I see currently is that it takes about 2 hours after a burn is done for the heat to make its way to the external skin. The external brick mass last night got to 102F. This morning it was 95. Today will be cold and heavy snow so no heating from the sun so it will be very interesting to see the room temp stability throughout the day with the warm mass.

I've never had the shop at 57F first thing in the morning this time of year. We are typically burning the wood stove at least into early May and some years to the beginning of June. I'm not sure how much less wood we burned yesterday to achieve the room temps that we did but my guess is perhaps 25 to 30% of our normal consumption and no need to continuously tend the fire. Super impressive!


Scott Weinberg wrote:your probe temp readings open all kinds of things to wonder about, I think they are great at helping what is happening. Maybe even guiding what works best in the stove.  Well done.   When I get my second skin on the outside to 250 I generally don't continue to burn.  Seldom do I go to that, as 175 degrees works well. for the evening.


I am really happy that I embedded the thermocouples and can monitor the riser and inner bell. The temp gauge included a small thermocouple that is probably 24 ga wire. I taped it to the stove pipe as it exits the exhaust box but I think it may be reading a little cold due to the cooling effect of the metal pipe. Today I'll drill a small hole at the lowest point of the stove pipe and insert the thermocouple so it is reading the gas stream.

Now that I have a few days experience with monitoring the temperatures I feel that I should have spent a bit more money for a unit that takes at least 2 inputs and has a logging function. A quick search on the interweb and I see that Testo makes exactly that... a dual input device with Bluetooth for connecting to a phone app and the ability to download a csv file to manipulate/graph in a spreadsheet. It is only about $60 more than the unit I bought so I'll figure out how to fit it into the budget. This will allow me to monitor the riser and inner bell which will be very interesting as I play around with variables, specifically different types of wood. Testo is the same manufacturer of the analyzer that Peter uses but that caries a pretty hefty price tag.

Mostly what we burn is cottonwood because it burns super clean in a typical wood stove, it's cheap and plentiful. Considering the combustion efficiency of the RMH I'll start burning piñon pine and gamble oak which are both in good supply as dead on our land. And with our very low humidity, even dead wood on the ground for several years hasn't started to rot. Being a bit of a geek it will be fun to have solid temperature data to determine what works best.
 
Glenn Littman
rocket scientist
Posts: 179
Location: Sangre de Cristo Mountains, CO - Lat 38°14' - Zone 5b
136
hunting earthworks solar wood heat rocket stoves homestead
  • Likes 2
  • Mark post as helpful
  • send pies
    Number of slices to send:
    Optional 'thank-you' note:
  • Quote
  • Report post to moderator

Scott Weinberg wrote:Your video came out great, did you post to vimeo and then provide a link to that?


Thanks Scott. Yes, I posted to Vimeo and simply pasted in the link using the Vimeo button in the composing window.
 
Peter van den Berg
gardener
Posts: 1134
Location: +52° 1' 47.40", +4° 22' 57.80"
529
woodworking rocket stoves wood heat
  • Likes 4
  • Mark post as helpful
  • send pies
    Number of slices to send:
    Optional 'thank-you' note:
  • Quote
  • Report post to moderator

Glenn Littman wrote:Super pleased so far... and more importantly Mrs Rocket Boss is really happy too! Again... a huge thanks to Tom Rubino and Peter van den Burg for all of their input and knowledge sharing, without which I don't see how this dragon would have gotten off the ground!

Well done Glenn, congrats! This is what you get when compromises are avoided, following the recipe to the letter. Keeping the dragon happy should be easy from now on.
 
pioneer
Posts: 337
34
chicken wood heat rocket stoves
  • Likes 3
  • Mark post as helpful
  • send pies
    Number of slices to send:
    Optional 'thank-you' note:
  • Quote
  • Report post to moderator
Outstanding build Glenn!

You have done us all a service with your excellent documentation.  Thanks for sharing your experience.
 
Glenn Littman
rocket scientist
Posts: 179
Location: Sangre de Cristo Mountains, CO - Lat 38°14' - Zone 5b
136
hunting earthworks solar wood heat rocket stoves homestead
  • Likes 2
  • Mark post as helpful
  • send pies
    Number of slices to send:
    Optional 'thank-you' note:
  • Quote
  • Report post to moderator

Thomas Tipton wrote:Outstanding build Glenn!

You have done us all a service with your excellent documentation.  Thanks for sharing your experience.


Thanks Thomas. It has been a really fun and challenging project with lots of skills learned and refined.

I'm compiling the details and will post the major material quantities required if someone wanted to build a similar 6" double skin bell batch rocket.
 
Glenn Littman
rocket scientist
Posts: 179
Location: Sangre de Cristo Mountains, CO - Lat 38°14' - Zone 5b
136
hunting earthworks solar wood heat rocket stoves homestead
  • Likes 2
  • Mark post as helpful
  • send pies
    Number of slices to send:
    Optional 'thank-you' note:
  • Quote
  • Report post to moderator
Door still to be built too.
 
Fox James
Rocket Scientist
Posts: 842
Location: Guernsey a small island near France.
339
  • Likes 2
  • Mark post as helpful
  • send pies
    Number of slices to send:
    Optional 'thank-you' note:
  • Quote
  • Report post to moderator
I agree with Peter, it is really refreshing to see such a neat and accurate ‘made to spec build’
 
Glenn Littman
rocket scientist
Posts: 179
Location: Sangre de Cristo Mountains, CO - Lat 38°14' - Zone 5b
136
hunting earthworks solar wood heat rocket stoves homestead
  • Likes 3
  • Mark post as helpful
  • send pies
    Number of slices to send:
    Optional 'thank-you' note:
  • Quote
  • Report post to moderator
For anyone interested, I just created a new post with the details of the system dimensions and materials used - https://permies.com/t/248275/Batch-Rocket-Double-Skin-Bell#2296330
 
Glenn Littman
rocket scientist
Posts: 179
Location: Sangre de Cristo Mountains, CO - Lat 38°14' - Zone 5b
136
hunting earthworks solar wood heat rocket stoves homestead
  • Likes 3
  • Mark post as helpful
  • send pies
    Number of slices to send:
    Optional 'thank-you' note:
  • Quote
  • Report post to moderator
Performance is way beyond expectations!

I did a single batch burn at 6:00 PM yesterday. The external bell temp was 119 deg just before bedtime. Outside temperature was 8 deg F this morning and the shop was 57 F!!! Never has the shop maintained this high of a temperature through the night when we are this cold outside, it would typically be in the upper 40's. Can you tell I'm excited.
 
Glenn Littman
rocket scientist
Posts: 179
Location: Sangre de Cristo Mountains, CO - Lat 38°14' - Zone 5b
136
hunting earthworks solar wood heat rocket stoves homestead
  • Likes 3
  • Mark post as helpful
  • send pies
    Number of slices to send:
    Optional 'thank-you' note:
  • Quote
  • Report post to moderator
The dragon is roaring and nothing but a little steam from the stack...

IMG_20240326_081114.jpg
[Thumbnail for IMG_20240326_081114.jpg]
 
Glenn Littman
rocket scientist
Posts: 179
Location: Sangre de Cristo Mountains, CO - Lat 38°14' - Zone 5b
136
hunting earthworks solar wood heat rocket stoves homestead
  • Likes 7
  • Mark post as helpful
  • send pies
    Number of slices to send:
    Optional 'thank-you' note:
  • Quote
  • Report post to moderator

Glenn Littman wrote:
I am really happy that I embedded the thermocouples and can monitor the riser and inner bell. The temp gauge included a small thermocouple that is probably 24 ga wire. I taped it to the stove pipe as it exits the exhaust box but I think it may be reading a little cold due to the cooling effect of the metal pipe. Today I'll drill a small hole at the lowest point of the stove pipe and insert the thermocouple so it is reading the gas stream.


As I suspected, the 24 ga wire thermocouple taped to the outside of the stove pipe was indeed reading quite low due to the ambient cooling of the pipe. After drilling a hole in the pipe and placing the thermocouple into the center of the gas stream I am now seeing temperatures in the 175 - 225 deg range.

I should have the door built, painted and mounted by early next week. I suspect my exhaust temps are running a little high because of gaps around the opening of my temporary door providing more primary air than needed.

Performance in general continues to be quite impressive for the space that is being heated (2,000 sq ft). For the past 4 days our overnight outside temps have been running in the single digits to low teens and the shop has not dropped below 57 deg to start the day.
 
Posts: 2
1
  • Likes 3
  • Mark post as helpful
  • send pies
    Number of slices to send:
    Optional 'thank-you' note:
  • Quote
  • Report post to moderator
Congrats Glenn!!

Looks awesome. All the best,

-firerob
 
Glenn Littman
rocket scientist
Posts: 179
Location: Sangre de Cristo Mountains, CO - Lat 38°14' - Zone 5b
136
hunting earthworks solar wood heat rocket stoves homestead
  • Likes 6
  • Mark post as helpful
  • send pies
    Number of slices to send:
    Optional 'thank-you' note:
  • Quote
  • Report post to moderator
The past few weeks have had a bunch of distraction as I turned my attention to fabricating the door so took a bit longer than expected. I am happy to declare the batch rocket now completed, including the addition of some bling for fun.

Thanks again to Tom and Peter for all of their great input, guidance and encouragement. I'm already gathering materials and beginning planning for the next build which will use Peter's new compact core, a stainless steel barrel for fast area heating and a bench for bun warming.
IMG_20240415_105022.jpg
[Thumbnail for IMG_20240415_105022.jpg]
IMG_20240415_105637.jpg
[Thumbnail for IMG_20240415_105637.jpg]
IMG_20240415_110027.jpg
[Thumbnail for IMG_20240415_110027.jpg]
IMG_20240415_114822.jpg
beautiful efficient wood heat
 
Glenn Littman
rocket scientist
Posts: 179
Location: Sangre de Cristo Mountains, CO - Lat 38°14' - Zone 5b
136
hunting earthworks solar wood heat rocket stoves homestead
  • Likes 5
  • Mark post as helpful
  • send pies
    Number of slices to send:
    Optional 'thank-you' note:
  • Quote
  • Report post to moderator
Oh, and I should have mentioned that the door construction would not have been possible without the help of the Dragon Technology door building book: https://permies.com/t/236820/AVALABLE-Detailed-Batchbox-Door-Construction
IMG_20240329_142718.jpg
[Thumbnail for IMG_20240329_142718.jpg]
 
Scott Weinberg
Posts: 352
Location: North East Iowa, USA
97
  • Likes 3
  • Mark post as helpful
  • send pies
    Number of slices to send:
    Optional 'thank-you' note:
  • Quote
  • Report post to moderator
Excellent Glen!  Bling is always good.

Good job.
 
thomas rubino
master rocket scientist
Posts: 6808
Location: latitude 47 N.W. montana zone 6A
3717
cat pig rocket stoves
  • Likes 5
  • Mark post as helpful
  • send pies
    Number of slices to send:
    Optional 'thank-you' note:
  • Quote
  • Report post to moderator
Congratulations Glenn on an outstanding job!
The brickwork came out clean and square!
The plasma-cut artwork is over the top and creates a finished functioning piece of art!
That is the finest example, of a Dragon Tech door that I have seen to date, and I have seen them all!

With this build, you are no longer an apprentice! You have become a Journeyman Rocket Scientist.
When you unveil your next build you can claim the title of Master Builder and seek an apprentice of your own to carry on the craft!
Students like you make teaching fun!
Keep up the good work!
images-(1).jpg
[Thumbnail for images-(1).jpg]
 
I child proofed my house but they still get in. Distract them with this tiny ad:
2024 Permaculture Adventure Bundle (now a special for october 2025)
https://permies.com/w/bundle
reply
    Bookmark Topic Watch Topic
  • New Topic