|

|

|

|

|

|
|
|
|
|
|
|
|

|

|

|

|

|
 15
15


All true wealth is biological.
Lois McMaster Bujold


 10
10
How Permies works: https://permies.com/wiki/34193/permies-works-links-threads
My projects on Skye: The tree field, Growing and landracing, perennial polycultures, "Don't dream it - be it! "
8
All true wealth is biological.
Lois McMaster Bujold


 12
12
Working toward a permaculture-strong retirement near sunny Sperling.
13
Visit Redhawk's soil series: https://permies.com/wiki/redhawk-soil
How permies.com works: https://permies.com/wiki/34193/permies-works-links-threads

Skill verified by Nicole Alderman")

Skill verified by Mike Haasl") 8
8
All true wealth is biological.
Lois McMaster Bujold
12


All true wealth is biological.
Lois McMaster Bujold
8
Working toward a permaculture-strong retirement near sunny Sperling.
11
9
All true wealth is biological.
Lois McMaster Bujold
2
17

All true wealth is biological.
Lois McMaster Bujold
12


All true wealth is biological.
Lois McMaster Bujold
9
Zone 6, 45 inches precipitation, hard clay soil

Skill verified by gir bot") 12
12


All true wealth is biological.
Lois McMaster Bujold
2
No man is an island.
9


All true wealth is biological.
Lois McMaster Bujold
7


All true wealth is biological.
Lois McMaster Bujold
8


All true wealth is biological.
Lois McMaster Bujold
6
How Permies works: https://permies.com/wiki/34193/permies-works-links-threads
My projects on Skye: The tree field, Growing and landracing, perennial polycultures, "Don't dream it - be it! "
7


All true wealth is biological.
Lois McMaster Bujold
9

--
"Whitewashed Hope: A Message from 10+ Indigenous Leaders and Organizations"
https://www.culturalsurvival.org/news/whitewashed-hope-message-10-indigenous-leaders-and-organizations
12

All true wealth is biological.
Lois McMaster Bujold
12


All true wealth is biological.
Lois McMaster Bujold
4
4
How Permies works: https://permies.com/wiki/34193/permies-works-links-threads
My projects on Skye: The tree field, Growing and landracing, perennial polycultures, "Don't dream it - be it! "
5
11
How Permies works: https://permies.com/wiki/34193/permies-works-links-threads
My projects on Skye: The tree field, Growing and landracing, perennial polycultures, "Don't dream it - be it! "


 3
3
Derek Thille wrote:Dian, are those scissors in the photo powered or something? That's the only thing I can figure with the wire. I was not aware of anything like that.
My biggest struggle with scissors, particularly those plastic moulded handles, is that their made for right hands and I'm a leftie. First world problems....
Country oriented nerd with primary interests in alternate energy in particular solar. Dabble in gardening, trees, cob, soil building and a host of others.
4
C. Letellier wrote:
Derek Thille wrote:Dian, are those scissors in the photo powered or something? That's the only thing I can figure with the wire. I was not aware of anything like that.
My biggest struggle with scissors, particularly those plastic moulded handles, is that their made for right hands and I'm a leftie. First world problems....
Go to amazon and search left handed sissors. They are readily available.
Working toward a permaculture-strong retirement near sunny Sperling.
6

How Permies works: https://permies.com/wiki/34193/permies-works-links-threads
My projects on Skye: The tree field, Growing and landracing, perennial polycultures, "Don't dream it - be it! "
13


How Permies works: https://permies.com/wiki/34193/permies-works-links-threads
My projects on Skye: The tree field, Growing and landracing, perennial polycultures, "Don't dream it - be it! "
3
Nancy Reading wrote:.
5
How Permies works: https://permies.com/wiki/34193/permies-works-links-threads
My projects on Skye: The tree field, Growing and landracing, perennial polycultures, "Don't dream it - be it! "
3
Nancy Reading wrote:Ela,
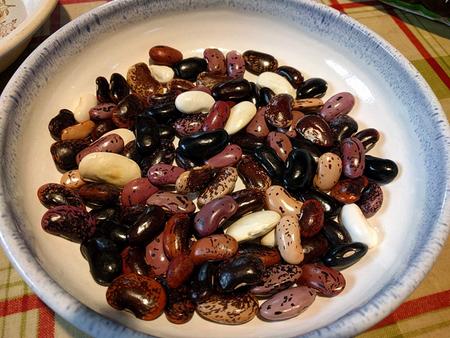
I'm not sure what you mean by brave? Foolhardy perhaps planting beans this late here! At least they are in the ground now, and plants do grow very well here in the summer due to our long daylight hours and rain, and certainly better than they do in the packets.
 Besides, just think how many people on permaculture site will benefit because of you!
5
Besides, just think how many people on permaculture site will benefit because of you!
5
William Bronson wrote:
I wonder if it would work with winter sowing?
Changing one thing, no matter how tiny, is still change
4
![[Thumbnail for Tomatoe-pepper-aubergine-snails.jpg]](/t/273363/a/283419/Tomatoe-pepper-aubergine-snails.jpg "Filename: Tomatoe-pepper-aubergine-snails.jpg
Description:")

![[Thumbnail for Overview-of-the-site.jpg]](/t/273363/a/283421/Overview-of-the-site.jpg "Filename: Overview-of-the-site.jpg
Description:")
Changing one thing, no matter how tiny, is still change
10
![[Thumbnail for brassicas.jpeg]](/t/273363/a/283579/brassicas.jpeg "Filename: brassicas.jpeg
Description:")
![[Thumbnail for cauliflower.jpeg]](/t/273363/a/283580/cauliflower.jpeg "Filename: cauliflower.jpeg
Description:")
![[Thumbnail for green-cabbage.jpeg]](/t/273363/a/283581/green-cabbage.jpeg "Filename: green-cabbage.jpeg
Description:")
![[Thumbnail for purple-cabbage.jpeg]](/t/273363/a/283582/purple-cabbage.jpeg "Filename: purple-cabbage.jpeg
Description:")
![[Thumbnail for broccoli.jpeg]](/t/273363/a/283583/broccoli.jpeg "Filename: broccoli.jpeg
Description:")
Changing one thing, no matter how tiny, is still change

|
Heroic work plunger man. Please allow me to introduce you to this tiny ad:
Quit your workee-job and live, year round, for free-ish in Montana
https://wheaton-labs.com/bootcamp
|