• Post Reply Bookmark Topic Watch Topic
  • New Topic
permaculture forums growies critters building homesteading energy monies kitchen purity ungarbage community wilderness fiber arts art permaculture artisans regional education skip experiences global resources cider press projects digital market permies.com pie forums private forums all forums
this forum made possible by our volunteer staff, including ...
master stewards:
  • r ranson
  • Carla Burke
  • Nancy Reading
  • John F Dean
  • Jay Angler
  • paul wheaton
stewards:
  • Pearl Sutton
  • Burra Maluca
  • Joseph Lofthouse
master gardeners:
  • Timothy Norton
  • Christopher Weeks
gardeners:
  • Jeremy VanGelder
  • Maieshe Ljin
  • Nina Surya

Huge batch box rocket stove

 
pollinator
Posts: 293
Location: US, East Tennessee
34
  • Likes 2
  • Mark post as helpful
  • send pies
    Number of slices to send:
    Optional 'thank-you' note:
  • Quote
  • Report post to moderator
Hi Eric, this (link below) greenhouse insulating system looks interesting. I wonder just how much R-value would be added with such a system, and how much it would reduce your heating energy requirements. Looks like something that you could probably fabricate yourself in the interest of saving money:

http://www.arcticgreenhouse.com

A true 10" to 12" system size batch-box can easily push a 75-ft. long "half-barrel" horizontal thermal mass bench. I picture one running straight down the center of your greenhouse, as the secondary (mass) heat exchanger following the "bell". Details of Matt Walker's half barrel bench can be found here:

https://www.permsteading.com/viewtopic.php?f=6&t=219&p=1820&hilit=NYC
 
Posts: 70
3
  • Likes 2
  • Mark post as helpful
  • send pies
    Number of slices to send:
    Optional 'thank-you' note:
  • Quote
  • Report post to moderator
Rocket furnace, I don't see any mass... other than the stacks of wood, so as designed it works. If it was me with 15,000 square feet of green houses under 7 covers I'd figure a way to manage the wood better labor wise, bringing it inside seems like a lot of additional work, taking up growing area. Create mass that would allow longer less frequent firings. To that end I would simple install a RMH outside next to each greenhouse at center running the flue under the ground the length of the greenhouse, split flues (A or B) running opposite directions to use the ground mass in providing a more stable and consistent air temperature. That way you can fire the heaters during the day to build heat that allows you to sleep at night. Having the RMH outside also eliminates any heat loss from air drawn from inside the greenhouse. Your stacks should be below 100F or your just loosing your effort up the stack. I have more thoughts but thats enough to digest for now.
 
Rocket Scientist
Posts: 4600
Location: Upstate NY, zone 5
611
5
  • Mark post as helpful
  • send pies
    Number of slices to send:
    Optional 'thank-you' note:
  • Quote
  • Report post to moderator
An RMH outside the greenhouse would still need an enclosure for weather protection, and an enclosure to keep the wood dry, plus the heat that radiates from the firebox would be lost. I don't see a real benefit to that. Putting a low room on the end of a greenhouse for wood storage might be a wise move, though I think a typical greenhouse is pretty economical per square foot to build, maybe less than a dedicated room.
 
Posts: 77
17
  • Likes 3
  • Mark post as helpful
  • send pies
    Number of slices to send:
    Optional 'thank-you' note:
  • Quote
  • Report post to moderator
Keep your thoughts coming guys. You have to remember until the rmhf I was heating that house with a classic outdoor stove. All the wood was in woodshed close to both stoves. Unfortunately the stove that heats this particular house is junk. I bought it used not knowing the  guy was burning tires in it.the steel got hot as I learned and rapid corrosion started and it leaks like a sive. I've had  welders work on it for a new leak will start somewhere else. This  rmhf was an experiment to start with. Thinking of putting a wood shed at the end of each greenhouse and turning wood shed into a growing greenhouse as I get going. Probably going to be a two or three year project. As far as the mass heating the greenhouse. Not sure if it's enough. I've got grower friends with radiant concrete floors and it's not enough.most of these guys are lucky enough to have natural gas. Up here no gas.they also have furnace or hanging gas fired modine heaters. This house were I put the rmhf is my starter house or head house. Also needs to be warmer than the other house's because that is where we grow our fascia and new Guinea impatiens and sun patien . Also replacement cost for one of these is  around 16,000-18,000 $$.I Also would like to get away from hot water heat.i like  forced air heat it's  hotter heat. The stove on left I purchased brand new in 2002.never ever ever seen a piece of plastic or anything else but wood. I put ph adjuster in it every year and it is still in great shape. Also with a little greenhouse wood shed at the end of each greenhouse would help dry the wood just like my big wood shed. Green wood in a sunny greenhouse drys fast and starts cracking within a week
20220217_130845.jpg
Classic stoves
Classic stoves
20170917_172515.jpg
What we grow here example two
20150714_170540.jpg
Example 2
Example 2
 
Eric Hroboni
Posts: 77
17
  • Mark post as helpful
  • send pies
    Number of slices to send:
    Optional 'thank-you' note:
  • Quote
  • Report post to moderator
Just put out another you tube video. Hroboni's greenhouse varieties. Loading huge rocket mass heater furnace.
 
steward
Posts: 15721
Location: Northern WI (zone 4)
4948
7
hunting trees books food preservation solar woodworking
  • Mark post as helpful
  • send pies
    Number of slices to send:
    Optional 'thank-you' note:
  • Quote
  • Report post to moderator
You can post a youtube video here by clicking the Youtube button just above where you type your message.  Then paste in the url from youtube.  
 
Rocket Scientist
Posts: 806
Location: Guernsey a small island near France.
305
  • Mark post as helpful
  • send pies
    Number of slices to send:
    Optional 'thank-you' note:
  • Quote
  • Report post to moderator
Wow you get a true perspective of the size of the firebox in that video, I am not sure exactly what you have built but it is truly huge!
 
Eric Hroboni
Posts: 77
17
  • Mark post as helpful
  • send pies
    Number of slices to send:
    Optional 'thank-you' note:
  • Quote
  • Report post to moderator
I just don't see the you tube button your talking about
 
Posts: 71
Location: North Alabama
7
  • Likes 2
  • Mark post as helpful
  • send pies
    Number of slices to send:
    Optional 'thank-you' note:
  • Quote
  • Report post to moderator
Here's the new video


Mike Haasl
steward
Posts: 15721
Location: Northern WI (zone 4)
4948
7
hunting trees books food preservation solar woodworking
  • Mark post as helpful
  • send pies
    Number of slices to send:
    Optional 'thank-you' note:
  • Quote
  • Report post to moderator

Eric Hroboni wrote:I just don't see the you tube button your talking about


It's just above the text entry box we type our messages in
youtube.png
[Thumbnail for youtube.png]
 
Eric Hroboni
Posts: 77
17
  • Mark post as helpful
  • send pies
    Number of slices to send:
    Optional 'thank-you' note:
  • Quote
  • Report post to moderator
My phone looks nothing like what your showing me. The  help is much appreciated.
Screenshot_20220221-140805_Samsung-Internet.jpg
Screen shot of my phone
 
Mike Haasl
steward
Posts: 15721
Location: Northern WI (zone 4)
4948
7
hunting trees books food preservation solar woodworking
  • Mark post as helpful
  • send pies
    Number of slices to send:
    Optional 'thank-you' note:
  • Quote
  • Report post to moderator
Oh, sorry, I'm not sure what it looks like on a phone :(

If you just paste the link into your post, we can click a button to embed it easily from there...
 
Fox James
Rocket Scientist
Posts: 806
Location: Guernsey a small island near France.
305
  • Mark post as helpful
  • send pies
    Number of slices to send:
    Optional 'thank-you' note:
  • Quote
  • Report post to moderator
Funny that my iPhone is slightly different too but does have the youtube option.
E6CA5708-D6D8-4635-B02D-42A439BBD394.png
[Thumbnail for E6CA5708-D6D8-4635-B02D-42A439BBD394.png]
 
Eric Hroboni
Posts: 77
17
  • Likes 1
  • Mark post as helpful
  • send pies
    Number of slices to send:
    Optional 'thank-you' note:
  • Quote
  • Report post to moderator
Darn it. I have an android
 
Eric Hroboni
Posts: 77
17
  • Mark post as helpful
  • send pies
    Number of slices to send:
    Optional 'thank-you' note:
  • Quote
  • Report post to moderator
Does anyone notice anything different.
20220224_173809.jpg
Rmhf
Rmhf
 
Mike Haasl
steward
Posts: 15721
Location: Northern WI (zone 4)
4948
7
hunting trees books food preservation solar woodworking
  • Likes 1
  • Mark post as helpful
  • send pies
    Number of slices to send:
    Optional 'thank-you' note:
  • Quote
  • Report post to moderator
Oh, I know!

- The ladder moved to the left
- The hanging piece of conduit moved
- There are pots on the table
- There's a new piece of ductwork
- The white squirt bottle is pointing a different direction
- You added an ear muff holder
- There's a small piece of firewood on the floor
- Probably other unrelated changes

So....  Why is the firewood piece on the floor???
 
Eric Hroboni
Posts: 77
17
  • Mark post as helpful
  • send pies
    Number of slices to send:
    Optional 'thank-you' note:
  • Quote
  • Report post to moderator
You got it.the duct. It actually made a big difference last night. Probably going to put two more.
 
Mike Haasl
steward
Posts: 15721
Location: Northern WI (zone 4)
4948
7
hunting trees books food preservation solar woodworking
  • Mark post as helpful
  • send pies
    Number of slices to send:
    Optional 'thank-you' note:
  • Quote
  • Report post to moderator
Hee hee, I kinda figured that was the part you were talking about.  I think I remember your greenhouse is pretty long.  Any thoughts about running a duct further down the length of it?  Or maybe the intakes come from the other end of the house?
 
Mike Haasl
steward
Posts: 15721
Location: Northern WI (zone 4)
4948
7
hunting trees books food preservation solar woodworking
  • Mark post as helpful
  • send pies
    Number of slices to send:
    Optional 'thank-you' note:
  • Quote
  • Report post to moderator
Is there a fan pushing air through them?
 
Eric Hroboni
Posts: 77
17
  • Likes 1
  • Mark post as helpful
  • send pies
    Number of slices to send:
    Optional 'thank-you' note:
  • Quote
  • Report post to moderator
I use this blower from an old oil furnace.
20220225_120918.jpg
Blower
Blower
 
Mike Haasl
steward
Posts: 15721
Location: Northern WI (zone 4)
4948
7
hunting trees books food preservation solar woodworking
  • Likes 1
  • Mark post as helpful
  • send pies
    Number of slices to send:
    Optional 'thank-you' note:
  • Quote
  • Report post to moderator
Cool, so you're sucking air and blowing it at the same end of the greenhouse.  That probably gives you a nice gradient of heat so it's warmer on that end and cooler on the other end of the greenhouse.  Running one of those ducts to the other end might even the gradient out (for better or worse)...
 
Duane Hylton
Posts: 71
Location: North Alabama
7
  • Mark post as helpful
  • send pies
    Number of slices to send:
    Optional 'thank-you' note:
  • Quote
  • Report post to moderator

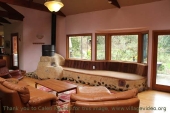
Mike Haasl wrote:Cool, so you're sucking air and blowing it at the same end of the greenhouse.  That probably gives you a nice gradient of heat so it's warmer on that end and cooler on the other end of the greenhouse.  Running one of those ducts to the other end might even the gradient out (for better or worse)...


Yeah, But this way he's preheating the combustion air. But you are right about a full run to the other end would probably help.
 
Eric Hroboni
Posts: 77
17
  • Mark post as helpful
  • send pies
    Number of slices to send:
    Optional 'thank-you' note:
  • Quote
  • Report post to moderator
Your right. But it's not much warmer at one end. If I run more duct over head I'm creating a shade spot. If I run it on the floor we have to walk around it.when I turn on the HAF fans it helps even out the heat from one end to the other.but it still a little warmer at the stove and that's where maybe a little brother to this stove at the other end would help.
 
Joe Danielek
Posts: 70
3
  • Likes 1
  • Mark post as helpful
  • send pies
    Number of slices to send:
    Optional 'thank-you' note:
  • Quote
  • Report post to moderator
Eric, adding round duct to the discharge end equal in length to 10 times the diameter of each duct will act as an air streem straightener to counter-correct turbulence from the 90° elbow(s), this will assist in throwing the air to the other end. Play with the duct discharge angles pointing them slightly up to try and hit the opposite wall so as to create a (push) path for air to flow along the ground back to your furnace.
 
Eric Hroboni
Posts: 77
17
  • Mark post as helpful
  • send pies
    Number of slices to send:
    Optional 'thank-you' note:
  • Quote
  • Report post to moderator
Thank you very much for that bit of advice
 
Eric Hroboni
Posts: 77
17
  • Mark post as helpful
  • send pies
    Number of slices to send:
    Optional 'thank-you' note:
  • Quote
  • Report post to moderator
Good Sunday morning. Just wondering how to figure out what this rmhf is actually putting out for  BTU's. Yes the extension made a difference. I've used every piece of duct on my property that I had here and there. Ultimately a guy gave me the idea for inline duct fan booster. Probably the direction I'm heading.
20220226_141436.jpg
Extended the duct pipe
 
Joe Danielek
Posts: 70
3
  • Mark post as helpful
  • send pies
    Number of slices to send:
    Optional 'thank-you' note:
  • Quote
  • Report post to moderator
That was quick... another idea. Your fan (backward inclined) will produce a reasonable amount of static pressure to throw air. Now that you have duct extensions installed the heated air travels further mixing with a larger volume of cooler air that is returning to the fan. The cooler the air is being blown around your bell (Delta T) the more btu's you exchange increasing efficiency.

If you would remount your fan at ground level discharging vertically up into the plenum (box) you would be moving the coolest air over the heat exchanger, increasing heat extraction. Mounting the fan vertically would also increase air scrubbing on the top of your bell by hitting the upper corner in the same manner the J-tube creates turbulence.

With the fan vertical moving cooler air at ground level with less backpressure you should realize a higher discharge velocity throwing air further mixing with more greenhouse air. Discharge air temperature is important as is throwing the air as far as possible for mixing. Visualize mixing of dye in a water current, air is the same at a different specific gravity.

With the fan discharging vertical you can weld viens at a near horizontal position, angled slightly up on your bell to direct air around the front and backsides to pick up more heat.

If the fan is reconfigured providing more static pressure and scrubbing it maybe possible to close one of your discharges' throwing the heated air further to mix with cooler air that is then returned along the floor to your blower.

Finite adjustments to your discharge duct angle up or down and or getting the air streams assisting one another are profound. Use the smoke trailing off stick incense to see the air flow patterns.
 
Joe Danielek
Posts: 70
3
  • Mark post as helpful
  • send pies
    Number of slices to send:
    Optional 'thank-you' note:
  • Quote
  • Report post to moderator
On figuring out your btu's... it takes a lot of instruments to measure total air flow, discharge air temperature vs inlet air T (D-T) where the variables are infinite.
 
Mike Haasl
steward
Posts: 15721
Location: Northern WI (zone 4)
4948
7
hunting trees books food preservation solar woodworking
  • Likes 2
  • Mark post as helpful
  • send pies
    Number of slices to send:
    Optional 'thank-you' note:
  • Quote
  • Report post to moderator
Correct me if I'm wrong but you could approximate your BTUs if you know the BTUs in the wood you're starting with (often based on dry weight) and if you can measure the heat loss out the chimney.  Everything else is ending up in the GH.  

I suspect a large area of remaining efficiency would come from burning dry wood instead of green.  That's a lot of water to boil out of the wood which, I think, is lost energy.
 
Eric Hroboni
Posts: 77
17
  • Likes 1
  • Mark post as helpful
  • send pies
    Number of slices to send:
    Optional 'thank-you' note:
  • Quote
  • Report post to moderator
I've made a few more upgrades. They are definitely making the greenhouse more evenly heated. I put a box around the blower to draw air lower to the  floor. And also put inline duct fans in .
20220302_124740.jpg
Blower box
Blower box
20220302_153617.jpg
Fans
Fans
 
Mike Haasl
steward
Posts: 15721
Location: Northern WI (zone 4)
4948
7
hunting trees books food preservation solar woodworking
  • Likes 1
  • Mark post as helpful
  • send pies
    Number of slices to send:
    Optional 'thank-you' note:
  • Quote
  • Report post to moderator
You're probably happy enough but if you want to tinker more.....

I think if you had a short section of duct after the fans it would help a bit more as well.  Duct exits are a point of airflow restriction (surprisingly) and having a fan right there might further induce losses.  I'm guessing 3-5' would be enough.

Likely even a bigger opportunity, sucking air into a sharp edged duct is the least efficient way to pull air into a duct (plain duct end).  Having a flare (Bellmouth) is the best.  90 degree flange is probably cheapest to replicate.  Air that has to whip around the edge is causing resistance.

 
Joe Danielek
Posts: 70
3
  • Mark post as helpful
  • send pies
    Number of slices to send:
    Optional 'thank-you' note:
  • Quote
  • Report post to moderator
Awesome Eric: air intake plenum pulling at the coolest point at the floor and the inline supply-discharge duct fans, outstanding... The greater the temperature difference along the path of your airflow over the bell the more heat you pick up. Put another way: your supply air contacts the coolest portion of the bell, as the air travels up and over picking up heat that heated air moves over a hotter portion of the bell maintain the maximum temperature difference along its path. The greater the temperature difference the higher exchange of BTU’s.  

Only real issue imaginable with the inline duct fans is a power drop during a burn interrupting their operation that may overheat them.  

Mike Haasl is spot on with adding a section of duct(s) to your discharges to act as an airstream straightener. As a general rule you want a duct length of 10 pipe diameters as a straightener. Me, I’m jealous just from the starting point you got a wood supply beyond my dreams.

Get ready I’m going to toss you a curve ball, food for thought.

As a grower your inputs of labor, material, and electricity factor into your bottom line. I see your electricity, labor and maintenance bills going up as you add more fans: supply and in-line duct. What if you suspend a high temperature centrifugal fan over the top of your plenum ducted to draw air through your heat exchanger? Air inlet over your bell would be the bottom perimeter of you plenum... HOOD up along all sides of your BELL: coolest air at the floor being pulled over the coolest part of the bell heating up on its path.

The centrifugal fan discharge (single duct) is then ducted (aimed) to thrown the air to the opposite end of the greenhouse. If you employ a standard fan assembly in all greenhouses you can have a drop-in replacement sitting on the shelf so you don’t lose inventory.

Putting the bell-plenum under negative pressure you can drill small thermometer holes in the skin to judge where you need to attach baffles to the bell to ensure even airflow (heat gain) over the bell. Also you can install a linear damper on the plenum along the loading door to draw air over the lid.

Size fan for needed CFM...

Edit 220305: 1412 (cute)
FAN-1.jpg
[Thumbnail for FAN-1.jpg]
 
gardener
Posts: 3471
Location: Southern alps, on the French side of the french /italian border 5000ft elevation
194
  • Mark post as helpful
  • send pies
    Number of slices to send:
    Optional 'thank-you' note:
  • Quote
  • Report post to moderator
Eric, you managed where i failed few years back. My attempts at top load weren't up to my expectations.


And if you want to see my workshop heater, in case it gives you ideas

https://permies.com/t/44806/Cobbling-workshop-heater-cooktop-oven

 
Joe Danielek
Posts: 70
3
  • Mark post as helpful
  • send pies
    Number of slices to send:
    Optional 'thank-you' note:
  • Quote
  • Report post to moderator

Eric Hroboni wrote:I've made a few more upgrades. They are definitely making the greenhouse more evenly heated. I put a box around the blower to draw air lower to the  floor. And also put inline duct fans in .


Eric, how you doing?
 
Eric Hroboni
Posts: 77
17
  • Likes 1
  • Mark post as helpful
  • send pies
    Number of slices to send:
    Optional 'thank-you' note:
  • Quote
  • Report post to moderator
Good morning Joe. Every thing is good. We were crazy busy with the flowers and life. Hopefully getting back on track soon and get back to building another rmhf. Thanks for checking. I  did build a fun project for my wife and I to enjoy this summer since vacation is out this year. Here's a few pics.thanks for checking in.
20220615_203601.jpg
Boat
Boat
20220615_203908.jpg
Boat
Boat
20220621_142323.jpg
Boat name
Boat name
20220629_141949.jpg
Pike
Pike
 
Eric Hroboni
Posts: 77
17
  • Likes 1
  • Mark post as helpful
  • send pies
    Number of slices to send:
    Optional 'thank-you' note:
  • Quote
  • Report post to moderator
Good morning permies. I've gotten started on fixing the rmhf. Honestly every thing is holding up well except for fire brick lining in fire box. Riser is perfect. Bell looks great. Just cut a hole in the side for wood loading. Top feed on unit this big very dangerous. To hot,to heavy and could fall on my head. Ouch. Here's some pics of what I've done so far while waiting for steel for door frame. P.S. watch for upcoming video on every thing that held up and didn't and how I'm fixing the problems.
20220823_181335.jpg
Inside of riser.
Inside of riser.
20220823_180935.jpg
Cleaned out ash 1st time
20220822_105618.jpg
I've drawn the line.
20220822_160436.jpg
No cracks from high heat.
20220822_165029.jpg
Ceramic fiber blanket looks great.
 
Eric Hroboni
Posts: 77
17
  • Likes 4
  • Mark post as helpful
  • send pies
    Number of slices to send:
    Optional 'thank-you' note:
  • Quote
  • Report post to moderator
Good morning permies. We almost got her put back together. Hopefully give it a  test run tomorrow.
20220920_140547.jpg
Put back together with new door.
 
Eric Hroboni
Posts: 77
17
  • Likes 1
  • Mark post as helpful
  • send pies
    Number of slices to send:
    Optional 'thank-you' note:
  • Quote
  • Report post to moderator
Good morning permies. I did a slow heat cure last night. My parging bubbled in a couple spots. Did I heat it to fast. It does have a lot of silicate in the mix I used. The brand is meekers  red devil. I used it the last time and thought it was a good quality product.
20220921_204539.jpg
Bubbles.
Bubbles.
 
Scaramouche. Scaramouche. A tiny ad dressed as a clown.
Learn Permaculture through a little hard work
https://wheaton-labs.com/bootcamp
reply
    Bookmark Topic Watch Topic
  • New Topic