• Post Reply Bookmark Topic Watch Topic
  • New Topic
permaculture forums growies critters building homesteading energy monies kitchen purity ungarbage community wilderness fiber arts art permaculture artisans regional education skip experiences global resources cider press projects digital market permies.com pie forums private forums all forums
this forum made possible by our volunteer staff, including ...
master stewards:
  • Carla Burke
  • Nancy Reading
  • John F Dean
  • r ranson
  • Jay Angler
  • paul wheaton
stewards:
  • Pearl Sutton
  • Liv Smith
  • Anne Miller
master gardeners:
  • Timothy Norton
  • Christopher Weeks
gardeners:
  • Andrés Bernal
  • Jeremy VanGelder
  • Matt McSpadden

How I Built A Stand-Alone Rainwater Catchment System

 
Posts: 20
Location: Hamtramck, Mi
5
  • Likes 26
  • Mark post as helpful
  • send pies
    Number of slices to send:
    Optional 'thank-you' note:
  • Quote
  • Report post to moderator


Any region in the world with a few inches of rainfall can capture that rain water, filter it, purify it, and put it to good use. My friend has an urban farm where she grows fruit, vegetables, and herbs. But there was no reliable source of water on her land and she had to have water hauled in. So I designed and built this simple structure on her land to capture, filter, and store rain water for agricultural irrigation. With additional filtration and sterilization, this system could also be used to provide safe drinking water.
Now I'm putting the plans and instructions online so that anybody around the world can build their own off-grid stand alone rainwater collection system. This particular structure is 128 square feet, measuring 8 feet wide, 16 feet long, and 8 feet 6 inches tall. We contacted the local building department and they told us that we don't need a permit for any structures less than 200 square feet.

Step 1: Posts

I used 10 foot long 4x4 posts buried 48 inches deep in the ground with concrete. The posts are spaced 8 feet apart from each other. The front posts are cut 7 feet 5 inches tall, and the back posts are cut 6 feet 5 inches tall.

Step 2: Beams and Braces

Beams are horizontal 8 foot boards that sit on the posts. Braces are the smaller 4 foot long boards at 45 degree angles that provide support.

Step 3: Rafters

The rafters are 10 foot long 2x6s with a 6 inch overhang on the low end, and about a foot of overhang on the high end

Step 4: Purlins

Purlins are long thin strips of wood that measure 1 1/2 x 1 1/2 inches and 8 feet long. They sit on top of the rafters spaced 1 foot apart. Purlins provide support for the roof pannels, as well as a surface to drive the roofing nails into.

Step 5: Roofing

I used corrugated asphalt roofing panels from a company called "Ondura" They measure 6.5 feet by 4 feet and they are very flexible and easy to cut and work with.

Step 6: Gutters, Pipes, Containers

The metal gutters are only needed on the low pitch of the roof. There is a filter in the gutter to keep leaves and debris out of the water. I attached a 3 inch PVC pipe to the downspout of the gutter using a two part epoxy called JB Weld. The PVC pipes direct the gutter water into three water containers. Once the water fills the first container, it will flow up into the pipe to the second container, etc... Each container can hold 255 gallons of water, so all three hold a total of 765 gallons of water. We could continue to add as many containers as we wanted.

Step 7: Collect Free Water

We will attach irrigation lines to the containers to water our crops this summer. This system could be cheaply and easily replicated anywhere in the world that has a few inches of rainfall, especially in places with no groundwater for a well, or in situations where the cost of drilling a well would be too cost prohibitive.

My SketchUp model is available for free for anybody to edit

I'm not sure if it is acceptable to link to outside websites on this forum, but for anybody who is interested in downloading and editing this 3D model as a SketchUp file you can Click Here to go to my website, scroll all the way to the bottom of the article and download the Sketchup file

Step 9: Optional: Enclose Walls to Make Greenhouse Nursery


In the future, we would like to enclose the walls. I build the high side facing south, so we could put big windows covering the whole wall to create a greenhouse using transparent plastic roofing panels. The north, east, and west walls can be framed using strong pallets, clad in painted plywood. The inside of the pallets can be stuffed with straw for insulation.
 
gardener
Posts: 1876
Location: Longbranch, WA Mild wet winter dry climate change now hot summer
450
3
goat tiny house rabbit wofati chicken solar
  • Likes 4
  • Mark post as helpful
  • send pies
    Number of slices to send:
    Optional 'thank-you' note:
  • Quote
  • Report post to moderator
Face the high side toward the sun and inclose it with clear roofing and you also have a greenhouse to start plants in in the spring.
 
Miles Rose
Posts: 20
Location: Hamtramck, Mi
5
  • Likes 1
  • Mark post as helpful
  • send pies
    Number of slices to send:
    Optional 'thank-you' note:
  • Quote
  • Report post to moderator

Hans Quistorff wrote:Face the high side toward the sun and inclose it with clear roofing and you also have a greenhouse to start plants in in the spring.


That would be easy since the high side is already facing south! I'm thinking about plastered straw bale walls for the north, east, and west side walls, and a glass/clear plastic wall for the south side.
 
Posts: 1
Location: Southern Arkansas
hunting solar
  • Likes 7
  • Mark post as helpful
  • send pies
    Number of slices to send:
    Optional 'thank-you' note:
  • Quote
  • Report post to moderator
From my experience, I would suggest placing the water tanks underneath the shed roof. When placed in the sun, the water stored will very rapidly grow algie which will turn it green and cause an odor. I paint the outside of mine to block sunlight, however it still happens. I am in the southern USA, so we do have summer temperatures in the upper 90's regularly.
I have two tanks that are under a roof cover, plus are painted, and I still have to treat them with a small amount of bleach from time to time to kill the algie under control.  
 
Posts: 20
Location: Campti, LA, Natchitoches Parish, Zone 8
hugelkultur forest garden books
  • Likes 1
  • Mark post as helpful
  • send pies
    Number of slices to send:
    Optional 'thank-you' note:
  • Quote
  • Report post to moderator
This is an awesome design!!  We've done something similar on our farm in Louisiana, using the roof of our goat nursery, which is the same size as your roof.  You'd be amazed at the amount of water you can collect.  WE even did a little chart that tell us how many gallons we collect for every 1/2 inch of rain.
 
pollinator
Posts: 244
Location: Kachemak Bay, Alaska (usda zone 6, ahs heat zone 1, lat 59 N, coastal, koppen Dfc)
35
2
  • Mark post as helpful
  • send pies
    Number of slices to send:
    Optional 'thank-you' note:
  • Quote
  • Report post to moderator
Looks great! Is it that you made watertight connections from the 3" pvc to the tanks so the water can back up and flow to the next one?
what is the general location of this project?
 
Corey Schmidt
pollinator
Posts: 244
Location: Kachemak Bay, Alaska (usda zone 6, ahs heat zone 1, lat 59 N, coastal, koppen Dfc)
35
2
  • Mark post as helpful
  • send pies
    Number of slices to send:
    Optional 'thank-you' note:
  • Quote
  • Report post to moderator
i often use these equations to calculate catchment:

roof area in square feet / 12= cubic feet of water per inch of rain

cubic feet of water x 7.48= gallons of water
 
Posts: 77
Location: Toronto, Ontario
8
10
  • Mark post as helpful
  • send pies
    Number of slices to send:
    Optional 'thank-you' note:
  • Quote
  • Report post to moderator

Corey Schmidt wrote:i often use these equations to calculate catchment:


Nice. I was wondering that from the other side of the equation. Please check my math but it needs 10 inches of rain to fill those 3 tanks.

Good for isolated areas with regular rain or expensive municipal water. Of course that depends on water usage and cost over the life of the structure.
 
Posts: 6
  • Likes 1
  • Mark post as helpful
  • send pies
    Number of slices to send:
    Optional 'thank-you' note:
  • Quote
  • Report post to moderator
great design! thanks for sharing. have you installed a sand filter or first flush diverter?
 
Miles Rose
Posts: 20
Location: Hamtramck, Mi
5
  • Mark post as helpful
  • send pies
    Number of slices to send:
    Optional 'thank-you' note:
  • Quote
  • Report post to moderator

Corey Schmidt wrote:Looks great! Is it that you made watertight connections from the 3" pvc to the tanks so the water can back up and flow to the next one?
what is the general location of this project?


Yes, I cut 3" circular holes in the plastic lids of the tanks. Then I used a 2 part epoxy called JB weld to seal 3" PVC pipes to the 3" holes in the lids. (not pictured) That way, when the first container fills up, the water will flow up the pipe, overflow into the second container, then the third.

This is built in southeast Michigan
 
Miles Rose
Posts: 20
Location: Hamtramck, Mi
5
  • Mark post as helpful
  • send pies
    Number of slices to send:
    Optional 'thank-you' note:
  • Quote
  • Report post to moderator

Sarah Gabriel wrote:great design! thanks for sharing. have you installed a sand filter or first flush diverter?


No not yet, I kept the piping very minimalist for this first design. But I'm looking up pictures of other first flush diverters online for inspiration. I only have a window screen as a gutter filter right now, but I want to upgrade this system soon as our budget allows.
 
Miles Rose
Posts: 20
Location: Hamtramck, Mi
5
  • Mark post as helpful
  • send pies
    Number of slices to send:
    Optional 'thank-you' note:
  • Quote
  • Report post to moderator

Wayne Conrad wrote:From my experience, I would suggest placing the water tanks underneath the shed roof. When placed in the sun, the water stored will very rapidly grow algie which will turn it green and cause an odor. I paint the outside of mine to block sunlight, however it still happens. I am in the southern USA, so we do have summer temperatures in the upper 90's regularly.
I have two tanks that are under a roof cover, plus are painted, and I still have to treat them with a small amount of bleach from time to time to kill the algie under control.  


That was our original plan. To have the containers under the roof. But we decided that we wanted the option having more space under the roof for when we enclose the walls one day. But algae is still a concern, so we are going to experiment with painting the exteriors of the containers and covering the containers in thick tarps to block sunlight and prevent algae. We might still have to use bleach like you anyway, to keep bacteria from growing.
 
Miles Rose
Posts: 20
Location: Hamtramck, Mi
5
  • Likes 1
  • Mark post as helpful
  • send pies
    Number of slices to send:
    Optional 'thank-you' note:
  • Quote
  • Report post to moderator

Rudy Valvano wrote:

Corey Schmidt wrote:i often use these equations to calculate catchment:


Nice. I was wondering that from the other side of the equation. Please check my math but it needs 10 inches of rain to fill those 3 tanks.

Good for isolated areas with regular rain or expensive municipal water. Of course that depends on water usage and cost over the life of the structure.


I'm still not sure how to post with quotes. I'll get it some day.


We already have one container almost full in just a few days! This isn't an isolated area, but nobody actually lives on this farm so municipal water wasn't available as an option, unless we used our neighbor's water :/

 
Rudy Valvano
Posts: 77
Location: Toronto, Ontario
8
10
  • Mark post as helpful
  • send pies
    Number of slices to send:
    Optional 'thank-you' note:
  • Quote
  • Report post to moderator

miles rose wrote:
We already have one container almost full in just a few days! This isn't an isolated area, but nobody actually lives on this farm so municipal water wasn't available as an option, unless we used our neighbor's water :/


That's good news. I learn a lot from results like this.
I should have said "Stand-Alone" instead of "Isolated". Hope I didn't come across as too negative.
 
Posts: 15
Location: Sale Creek, TN
1
2
  • Mark post as helpful
  • send pies
    Number of slices to send:
    Optional 'thank-you' note:
  • Quote
  • Report post to moderator
I'm really glad you posted this. I have undeveloped land down south that I need to start thinking about developing. I've been thinking about what to do about water. I can connect to a county water main, but looking at other ideas as well. Your post gives me some ideas.
 
Dan Robinson
Posts: 15
Location: Sale Creek, TN
1
2
  • Mark post as helpful
  • send pies
    Number of slices to send:
    Optional 'thank-you' note:
  • Quote
  • Report post to moderator
How do you handle overflow when there's lots of rain and the tanks are all full?
 
Miles Rose
Posts: 20
Location: Hamtramck, Mi
5
  • Likes 1
  • Mark post as helpful
  • send pies
    Number of slices to send:
    Optional 'thank-you' note:
  • Quote
  • Report post to moderator

Dan Robinson wrote:How do you handle overflow when there's lots of rain and the tanks are all full?


The way it is right now, if the tanks fill up the water would just overflow on the ground around the third tank. Ideally, I would want to divert extra overflow a few yards over to our fruit trees.
 
Miles Rose
Posts: 20
Location: Hamtramck, Mi
5
  • Mark post as helpful
  • send pies
    Number of slices to send:
    Optional 'thank-you' note:
  • Quote
  • Report post to moderator

Rudy Valvano wrote:

miles rose wrote:
We already have one container almost full in just a few days! This isn't an isolated area, but nobody actually lives on this farm so municipal water wasn't available as an option, unless we used our neighbor's water :/


That's good news. I learn a lot from results like this.
I should have said "Stand-Alone" instead of "Isolated". Hope I didn't come across as too negative.


No you didn't sound negative at all I call it "stand alone" simply because it isn't integrated with any other structure on the property, so it could be built anywhere we needed it to be (close to thirsty crops and fruit trees)
 
  • Likes 4
  • Mark post as helpful
  • send pies
    Number of slices to send:
    Optional 'thank-you' note:
  • Quote
  • Report post to moderator
Man your's is nice. I want to grow watermelons and need more water, so may build one just like it!

If you're real, REAL cheap like me, you build it out of pallets
I did buy some wood for the top, but a little curb shopping in suburbia could have also yielded some free lumber to use for the roof, I'm sure.
I converted the inside of mine to a shed to store gardening tools resources...but I'm really liking the greenhouse idea too.


IMG_1210.JPG
I did put some tinted plexi glass I found in the trash on front. Wish it was clear
IMG_1227.JPG
Here it is finished with some more trash screwed onto the side for siding.
 
pollinator
Posts: 632
Location: South West France
254
  • Likes 6
  • Mark post as helpful
  • send pies
    Number of slices to send:
    Optional 'thank-you' note:
  • Quote
  • Report post to moderator
This is a great design, I like it a lot.  As for the algae mentioned above, maybe growing a climbing plant or two over the containers might do the trick?   It did work well for us, we have covered ours with a kiwi plant, makes great shade in the summer and in the winter, when the leaves fall off, it is no longer an issue, the winter sun does not provide that much heat.  Anyway, it was just an idea. By the way, last year, we did manage to harvest 20kg of kiwis from that plant alone!
20160707_174112.jpg
[Thumbnail for 20160707_174112.jpg]
 
Miles Rose
Posts: 20
Location: Hamtramck, Mi
5
  • Mark post as helpful
  • send pies
    Number of slices to send:
    Optional 'thank-you' note:
  • Quote
  • Report post to moderator

Vincent Shelberry wrote:Man your's is nice. I want to grow watermelons and need more water, so may build one just like it!

If you're real, REAL cheap like me, you build it out of pallets
I did buy some wood for the top, but a little curb shopping in suburbia could have also yielded some free lumber to use for the roof, I'm sure.
I converted the inside of mine to a shed to store gardening tools resources...but I'm really liking the greenhouse idea too.


You're very resourceful with found materials! I bet having the water cubes stacked like that makes for good water pressure too. I am also planning on eventually using pallets to enclose some of the walls, clad in plywood. I'm wondering if simply filling pallets with straw as insulation, and having a south facing greenhouse wall would be enough to have comfortably warm temperatures  during Michigan's 0 degree winters?  
 
Miles Rose
Posts: 20
Location: Hamtramck, Mi
5
  • Likes 1
  • Mark post as helpful
  • send pies
    Number of slices to send:
    Optional 'thank-you' note:
  • Quote
  • Report post to moderator

Olga Booker wrote:This is a great design, I like it a lot.  As for the algae mentioned above, maybe growing a climbing plant or two over the containers might do the trick?   It did work well for us, we have covered ours with a kiwi plant, makes great shade in the summer and in the winter, when the leaves fall off, it is no longer an issue, the winter sun does not provide that much heat.  Anyway, it was just an idea. By the way, last year, we did manage to harvest 20kg of kiwis from that plant alone!


That is a very beautiful little garden! I like the idea of growing a climbing crop around the water container. It's efficient since any overflow or spillage would be utilized by the kiwi plant! I might try this
 
Olga Booker
pollinator
Posts: 632
Location: South West France
254
  • Likes 1
  • Mark post as helpful
  • send pies
    Number of slices to send:
    Optional 'thank-you' note:
  • Quote
  • Report post to moderator
Hey, Miles,

Glad you like it.  We do indeed use the overflow to water the plants around.  The picture is pretty bad (I'm crap at taking pictures) so it's hard to tell but the container is slightly inclined backwards so that the overflow also waters under the container and runs down the gentle slope of the garden bed.  We even managed to grow shade loving plants under it like Siberian Purslane and even some wild garlic. Around it there are day lilies, an amelanchier, borage, wormwood, nasturtiums, walking onions, swiss chard, and even a self seeded mullein.  There is some echinecea,  Great Solomon Seal and red vein sorrel in there somewhere also and behind the container in the drier part there is a bay tree.  I never water that bed and it thrives, the picture is a few years old so there is much more going on in there now and the kiwi is much bigger  Anyway, well done with your design!
 
gardener
Posts: 5093
Location: Cincinnati, Ohio,Price Hill 45205
974
forest garden trees urban
  • Likes 1
  • Mark post as helpful
  • send pies
    Number of slices to send:
    Optional 'thank-you' note:
  • Quote
  • Report post to moderator
Cool design!
I would love to build one with the totes doubling as the walls of the building.
The totes can be stacked three high when full, so two high plus a roof would be no problem,weight wise.
I imagine painting the totes black 4 the winter and wrapping  them with mylar bubble wrap in the summer. Lots of thermal mass or at least big empty air spaces could make 4 A comfortable workspace or animal housing.
 
Posts: 1
  • Likes 3
  • Mark post as helpful
  • send pies
    Number of slices to send:
    Optional 'thank-you' note:
  • Quote
  • Report post to moderator
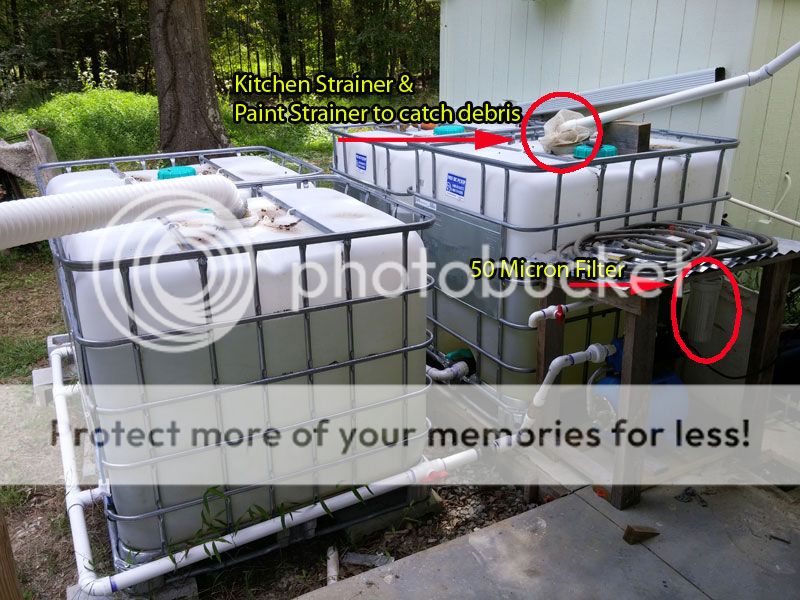
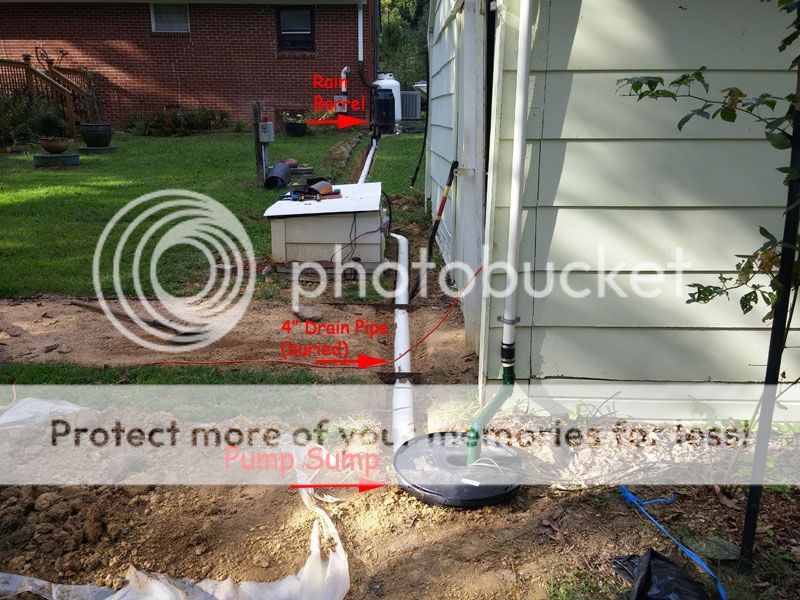
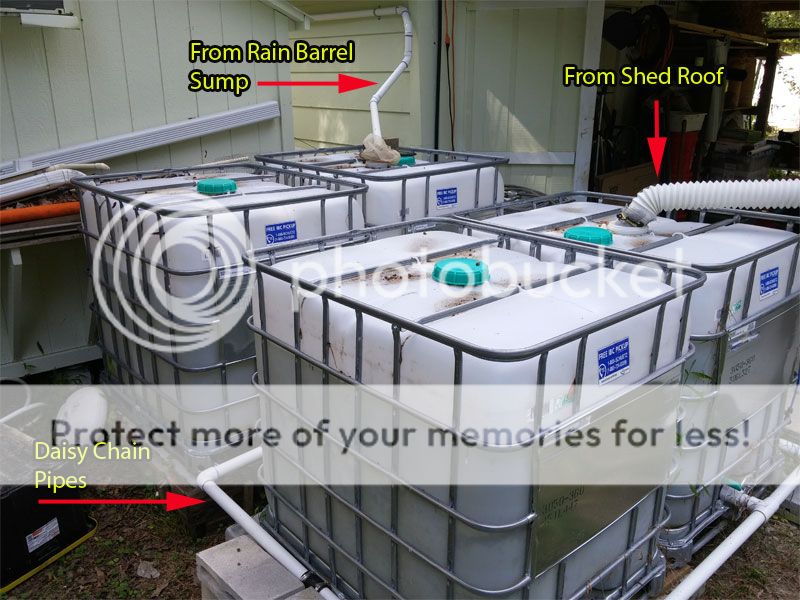
Here's one I built two years ago to irrigate garden and a few small fruit trees. Algae is starting to build up on the inside of the tanks so I do need to clear that and paint the tanks. Basically I catch rain off 1/2 front slope of the roof and 1/2 back slope of the roof. Runoff goes into two rain barrels, drains into a 4" pipe buried underground, goes to a small pump sump and is then pumped behind the workshop into a 4-tank IBC setup. The rain barrels are just buffers so that, if a hard rain dumps more water than the sump pump can handle, it temporarily fills the barrels instead of overflowing onto the ground.

The four tanks hold a total of 1100 gallons and I capture 600 gallons for each inch of rainfall. So two inches will fill the tanks from bone dry. The four tanks are daisy chained together with 1-1/2 pvc, which allows them to fill equally. The pipes have to be drained in the winter or a freeze will crack them.

Debris is filtered from the pipes by dropping them through a kitchen strainer and a paint strainer, before entering the tanks, and the irrigation pump pushes water through a 50-micron filter so that no debris will clog the drip tubes and emitters that water the plants. Been working great for two grow seasons. I plan to add at least two more tanks this year because there were a couple of times last year that I ran them dry and had to irrigate from our well water. If you use a pump instead of gravity-feed the irrigation, you have to add a check valve on the inlet side of the pump, otherwise the pump will create back pressure and blow bubbles in the tanks or blow out a pipe. Found that out the hard way.


Posts: 161
Location: NE ARIZONA, Zone 5B, 7K feet, 24" rain
3
4
  • Likes 2
  • Mark post as helpful
  • send pies
    Number of slices to send:
    Optional 'thank-you' note:
  • Quote
  • Report post to moderator

Wayne Conrad wrote: I have two tanks that are under a roof cover, plus are painted, and I still have to treat them with a small amount of bleach from time to time to kill the algie under control.  


I learned from the internet that algae can be killed by peroxide... it is germs and pathogens that can be killed by bleach, so I add both.  Do not mix them together before you add them.  This causes foaming... lots and lots of foam.
 
Posts: 6
1
  • Likes 2
  • Mark post as helpful
  • send pies
    Number of slices to send:
    Optional 'thank-you' note:
  • Quote
  • Report post to moderator
I believe that peroxide also kills pathogens.  A local RO system maintenance company here was using it to sanitize.  It doesn't leave 'chloro...' compounds behind.
 
Kathleen Corum
Posts: 6
1
  • Mark post as helpful
  • send pies
    Number of slices to send:
    Optional 'thank-you' note:
  • Quote
  • Report post to moderator

Gary Lee wrote:Here's one I built two years ago to irrigate garden and a few small fruit trees. Algae is starting to build up on the inside of the tanks so I do need to clear that and paint the tanks. Basically I catch rain off 1/2 front slope of the roof and 1/2 back slope of the roof. Runoff goes into two rain barrels, drains into a 4" pipe buried underground, goes to a small pump sump and is then pumped behind the workshop into a 4-tank IBC setup. The rain barrels are just buffers so that, if a hard rain dumps more water than the sump pump can handle, it temporarily fills the barrels instead of overflowing onto the ground.

The four tanks hold a total of 1100 gallons and I capture 600 gallons for each inch of rainfall. So two inches will fill the tanks from bone dry. The four tanks are daisy chained together with 1-1/2 pvc, which allows them to fill equally. The pipes have to be drained in the winter or a freeze will crack them.

Debris is filtered from the pipes by dropping them through a kitchen strainer and a paint strainer, before entering the tanks, and the irrigation pump pushes water through a 50-micron filter so that no debris will clog the drip tubes and emitters that water the plants. Been working great for two grow seasons. I plan to add at least two more tanks this year because there were a couple of times last year that I ran them dry and had to irrigate from our well water. If you use a pump instead of gravity-feed the irrigation, you have to add a check valve on the inlet side of the pump, otherwise the pump will create back pressure and blow bubbles in the tanks or blow out a pipe. Found that out the hard way.


I couldn't access the middle photo... said to update to enable third party hosting.

Your system has elements which could solve my problems.  My property is too close to flat so gravity doesn't 'work' all that well for my drip system.  I have 8 (90 gal) rainbarrels installed in 4 locations due to various pitches on the roof.  They share the drip system with a previously installed city water system which is fully automated and balanced.  Using gravity the elevations result in some of the drippers getting very low flow, and it is completely manual.  In fact it's complicated to use the water.  I think I need to add a pump somewhere, somehow.  I haven't gotten that figured out.  
 
pollinator
Posts: 5270
Location: Bendigo , Australia
462
plumbing earthworks bee building homestead greening the desert
  • Likes 3
  • Mark post as helpful
  • send pies
    Number of slices to send:
    Optional 'thank-you' note:
  • Quote
  • Report post to moderator
The link in my signature takes you to a detailed distillation of the Benefits of rainfall collection.
In Australia I have IBC,s collecting water which I pump across to a 20,000L tank.
It sits in full sunlight and has never had algae.
From memory algae needs nutrients to establish and grow, so what source of nutrients would be around if you have algae?
bird poo is one.
I always run a first flush filter and I wonder if that is why I dont have a problem?
 
Posts: 72
32
2
  • Likes 1
  • Mark post as helpful
  • send pies
    Number of slices to send:
    Optional 'thank-you' note:
  • Quote
  • Report post to moderator
Love it.  I am planning on a harvesting system for year-round use.  Would containing the tanks in the shelter provide protection from freezing during winter without a heat source?  How would I keep the water lines to the house from the tanks (gravity system) from freezing?

Thanks
 
pollinator
Posts: 119
Location: Portugal
24
monies tiny house books composting toilet rocket stoves homestead
  • Mark post as helpful
  • send pies
    Number of slices to send:
    Optional 'thank-you' note:
  • Quote
  • Report post to moderator

John C Daley wrote:The link in my signature takes you to a detailed distillation of the Benefits of rainfall collection.
In Australia I have IBC,s collecting water which I pump across to a 20,000L tank.
It sits in full sunlight and has never had algae.
From memory algae needs nutrients to establish and grow, so what source of nutrients would be around if you have algae?
bird poo is one.
I always run a first flush filter and I wonder if that is why I dont have a problem?


@John I looked but can't find your footer.  Could you share the link?
 
pollinator
Posts: 1315
Location: zone 4b, sandy, Continental D
376
  • Mark post as helpful
  • send pies
    Number of slices to send:
    Optional 'thank-you' note:
  • Quote
  • Report post to moderator
My dream system would be to get rainwater for a few ducks right in their orchard without moving hoses while giving them cover [We have a couple of eagles as well as red tailed hawks]
So when I saw your idea, I immediately thought of the old Roman pluvium. Essentially, it was a central feature of the richer Romans that would catch rain water and guide it eventually in a cistern. The water would converge from the 4 roofs of the pluvium and fall in a shallow pool/ pond in the center then disappear in a cistern underground that could be pumped [manually] for the household. They used clay tiles to cover those 4 roofs, so the water was pretty clean [and they did not have such a phobia of microbes we have here anyway]..
I would modify it for my purpose by making it low enough that I could just  get under [4-5ft high?]: Ducks are a lot lower to the ground, so I could save a lot of $$$ with much shorter pillars], and the little pond would be the "cistern". I could empty the pond from time to time and give the enriched water to the trees in the orchard. [My meat ducks patrol the orchard].
Here is a good visual:
https://en.wikipedia.org/wiki/Impluvium
 
steward
Posts: 15608
Location: USDA Zone 8a
4215
dog hunting food preservation cooking bee greening the desert
  • Likes 1
  • Mark post as helpful
  • send pies
    Number of slices to send:
    Optional 'thank-you' note:
  • Quote
  • Report post to moderator
The Texas Parks and Wildlife biologists, have numerous  highly successful, water catchments also called guzzler systems for the
wildlife.

I have discussed these in several threads.

They are easy to make. Some folks have come up with unique ideas for them.


source


source


Posts: 2
  • Mark post as helpful
  • send pies
    Number of slices to send:
    Optional 'thank-you' note:
  • Quote
  • Report post to moderator
What are the essential components and materials needed to construct a stand-alone rainwater catchment system, and how do they work together to collect and store rainwater?
 
Today's lesson is that you can't wear a jetpack AND a cape. I should have read this tiny ad:
turnkey permaculture paradise for zero monies
https://permies.com/t/267198/turnkey-permaculture-paradise-monies
reply
    Bookmark Topic Watch Topic
  • New Topic