• Post Reply Bookmark Topic Watch Topic
  • New Topic
permaculture forums growies critters building homesteading energy monies kitchen purity ungarbage community wilderness fiber arts art permaculture artisans regional education skip experiences global resources cider press projects digital market permies.com pie forums private forums all forums
this forum made possible by our volunteer staff, including ...
master stewards:
  • Nancy Reading
  • Carla Burke
  • r ranson
  • John F Dean
  • paul wheaton
  • Pearl Sutton
stewards:
  • Jay Angler
  • Liv Smith
  • Leigh Tate
master gardeners:
  • Christopher Weeks
  • Timothy Norton
gardeners:
  • thomas rubino
  • Jeremy VanGelder
  • Maieshe Ljin

How I'm filling my 8' X 4' raised beds.

 
Posts: 672
Location: St. George, UT. Zone 8a Dry/arid. 8" of rain in a good year.
207
trees bike greening the desert
  • Likes 8
  • Mark post as helpful
  • send pies
    Number of slices to send:
    Optional 'thank-you' note:
  • Quote
  • Report post to moderator
Kind of hugulkulture, kind of ghetto, kind of my own system.  

Wood chips being the main component.  The beds are 30" tall.  
The bottom is filled with pallets, a bunch of my tree trimmings (mainly desert willow tree cuttings), and then year old wood chips to fill all the voids.  A good portion of the wood chips had lots of white of fungi/mycellium in them.
I sifted the wood chips through 1/4" mesh hardware cloth before putting them in the bottom (I saved the fine shavings for the bottom layer of growing medium).
So the bottom 24" of the planter is the pallets, tree trimmings, and wood chips.

On top of all that was placed two layers of cardboard.  (My thought being the cardboard would prevent the finer compost from seeping into the wood chips and lowering the level too drastically over the first season.  I know the wood chips will settle and compress pretty quickly.)
On top of the cardboard, was placed the sifted wood chip compost with the fungi.  Maybe an inch thick or so.
On top of that, was placed a mixture of more of the wood chip compost, along with a large bag of peat moss, along with turkey manure/compost from a local source here in UT, along with a tiny amount of my native clay soil.  That filled up to about the last inch of space in the bed.
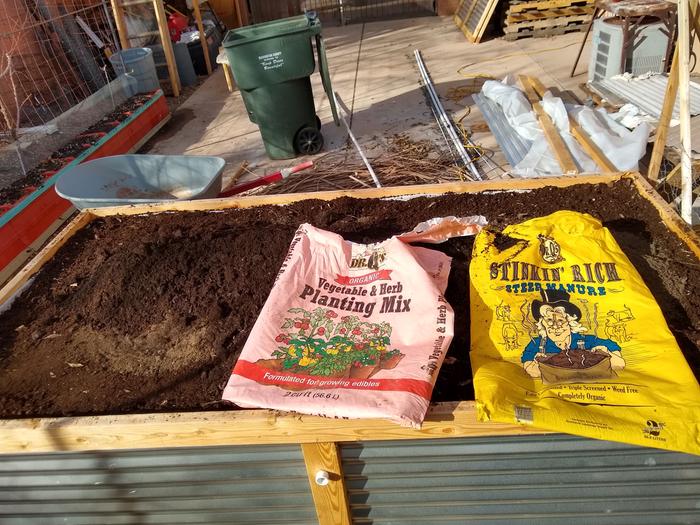
On top of that was placed a bag of steer manure, and a bag of vegetable planting compost.  Which probably accounted for 1/4", if that.
On top of that was placed a few more inches (now the bed is overflowing by a couple of inches) of my deep litter chicken compost that I get from directly under the birds roost.  

Now I'm taking a break....

On top of all of that I'll place another inch or so of the pure turkey compost mentioned before.

I'm over filling the beds, because I know they'll settle a few inches when they get watered in, and will continue to settle for a long while.  Hopefully by the end of the summer they'll not have dropped more than six inches below the top of the beds.

IMG_20200125_102014835.jpg
Sifting the mycellium compost from the unbroken down wood chips, and filling the bottom of the beds with them.
IMG_20200125_101941054_HDR.jpg
Fungi???? I'm guessing it is, but it's hard to tell since the light washed most of the white out.
IMG_20200125_135533895.jpg
Another bad picture of the fungi. These chips have been sitting for about a year or so. I'm shoveling them up and hauling them back to the planter.
IMG_20200125_102025013_HDR.jpg
Sifted fungi rich wood chip mulch.
IMG_20200126_085829183.jpg
The bottom of the bed now filled and leveled.
IMG_20200126_093342497_HDR.jpg
Two layers of cardboard. Bonus points for me using boxes that poinsettias came in!
IMG_20200126_095239053_HDR.jpg
A layer of the sifted wood chip fungal compost.
IMG_20200126_101957123_HDR.jpg
Turkey compost, mixed with peat moss, and more of my fungi rich wood chip compost, the topped with the two store bought bags of compost. (I actually get the torn open bags for free at work, so they didn't cost anything).
IMG_20200126_103717041_HDR.jpg
Now a different source of wood chips coming from my deep litter chicken coop/in ground swimming pool. Not as much fungi in these chips, but there is some. I'm guessing they're more bacteria based since there's a lot of chicken manure in them.
IMG_20200126_104012970_HDR.jpg
More labor than it's worth. It's a good work out if nothing else.
IMG_20200126_104209244_HDR.jpg
My 1/4 hardware cloth sifter. I mainly push as much through as I can by hand, and then use an old deck brush to sweep the wood chips into the wheelbarrow.
IMG_20200126_104721430_HDR.jpg
Brushing them into the wheelbarrow.
IMG_20200126_111325897_HDR.jpg
The chicken litter wood chips go back to the perennial garden beds.
IMG_20200126_113550597_HDR.jpg
Three 3/4 full trash cans sifted onto the beds that are now overflowing.
 
gardener
Posts: 5436
Location: Southern Illinois
1487
transportation cat dog fungi trees building writing rocket stoves woodworking
  • Likes 1
  • Mark post as helpful
  • send pies
    Number of slices to send:
    Optional 'thank-you' note:
  • Quote
  • Report post to moderator
S Tenorman,

That is a very nice looking setup you have there.  I am also looking to expand my raised beds and your method looks like one of the better ones I have seen.

I will say that you are looking at having far more depth of chips than me.  At the moment I am looking at getting about 12” of composted chips.

Good Luck and I would love to see how this works out for you.

Eric
 
pollinator
Posts: 3827
Location: Massachusetts, Zone:6/7 AHS:4 GDD:3000 Rainfall:48in even Soil:SandyLoam pH6 Flat
555
2
forest garden solar
  • Likes 2
  • Mark post as helpful
  • send pies
    Number of slices to send:
    Optional 'thank-you' note:
  • Quote
  • Report post to moderator
The mushroom 'roots' are better than the plant roots and so as the mushroom breaks down the carbon, hording all the nitrogen, calcium, and other mineral. Don't be too surprised if your plants don't do too well the 1st year. But in the years after they will do great.
 
Joshua Bertram
Posts: 672
Location: St. George, UT. Zone 8a Dry/arid. 8" of rain in a good year.
207
trees bike greening the desert
  • Likes 3
  • Mark post as helpful
  • send pies
    Number of slices to send:
    Optional 'thank-you' note:
  • Quote
  • Report post to moderator
Thanks Eric!  I really try to do it the way I've read about mostly on here (my comprehension isn't too good) and of course the youtube videos I've spent countless hours watching.  I really should be an expert for as much time as I've spent "learning"......but I have a lot of failures.  It's all good.  I'll definitely update this post good or bad.  Good luck on your expansion.  

S Benji, thanks for the advice.  Last year I did shallower raised beds with unsifted wood chips just from the chicken coop.  I'll post some pictures of last years results.  I was very pleased.  I'm sure I used a good amount of cheap organic fertilizer on the beds.
Also, as you'll see in the next set of pictures, I put an entire 2lb bag of organic raised bed fertilizer on top of the final layer of turkey compost.  Hopefully that'll boost the entire thing even more.   I go to Home Depot every fall/winter and search out their closeouts.  Last year and this year I scored tons of bags for between $1.25 per bag to $1.75 per bag (normally they're $8 bucks per bag).  The bag recommends refreshing a 4' X 4' raised bed with the entire contents, so I'm only using it 1/2 strength.
I believe the bag is a 10-2-8.  I plan on planting shallow root crops of lettuce and broccoli since this bed is the shallowest of the three I've made so far.  The other two were about 10" to 12" deep to start with.

5 more beds to go, I have the building materials for two more on site, along with one yard of the turkey compost left.  An almost unlimited supply of wood chips.......it's just the motivation to sift for two days per bed....ugh.
IMG_20200126_143701809_HDR.jpg
Turkey compost on top with a bag of the organic fert.
IMG_20200126_143712382_HDR.jpg
Overfull by a couple of inches or so.
IMG_20200126_144940499_HDR.jpg
Everything watered in well, and showing the babies their future home. (probably a couple of more weeks away)
IMG_20200126_144836755_HDR.jpg
First bed I made. No pallets, just some logs, wood trimmings and wood chips for the bottom. I got all the plants as starts a few months ago.
IMG_20200126_144827451_HDR.jpg
2nd bed. 200 cloves of garlic (saved from last year) on 1/2, and I just planted a ton of beet seeds in the other half last week.
 
Joshua Bertram
Posts: 672
Location: St. George, UT. Zone 8a Dry/arid. 8" of rain in a good year.
207
trees bike greening the desert
  • Likes 2
  • Mark post as helpful
  • send pies
    Number of slices to send:
    Optional 'thank-you' note:
  • Quote
  • Report post to moderator
This is why I have high hopes that the new raised beds will be even better than last years!  These beds were a rough mix of mainly unsifted wood chips from the coop.  I did sift the top inch or so if I remember right, but most of it was really course because at the time they were too wet to really get through the screen.

I have a thread on in  below ground hugels about the garlic bed I made last year.


20190302_103129.jpg
So here are the shallower beds with the mostly wood chips I made last year.
20190302_103112.jpg
the other half of the same beds.
IMG_20190627_062450366.jpg
Here they are at their best, around June or so.
IMG_20190627_062458354.jpg
another angle at their best.
20190326_074012.jpg
Same thing for this hugel type in ground bed. Mainly just unsifted wood chips except for the very top few inches.
20190519_084818.jpg
The garlic I harvested from that bed.....and the source of my garlic cloves in the new bed this year.
 
Joshua Bertram
Posts: 672
Location: St. George, UT. Zone 8a Dry/arid. 8" of rain in a good year.
207
trees bike greening the desert
  • Likes 1
  • Mark post as helpful
  • send pies
    Number of slices to send:
    Optional 'thank-you' note:
  • Quote
  • Report post to moderator
Finally built  another bed yesterday, I'll probably spend a good part of today sifting to fill it.  Got a good picture of some of the fungi? in the wood yesterday when I started sifting.  If it's not fungi, and just some kind of a mold let me know.  I doctored the picture up to make the whites pop.  These chips were never inoculated, just allowed to sit for about a year on top of the native soil.  A few times over the last few years a couple of mushrooms will pop up, but mostly I get yellow slime mold "puddles" if we get a period of moisture........which we have had almost none since June.  1" of rain in the last EIGHT MONTHS!!! TOTAL.  Gulp.  I've got to move away from here.  

Also planted the kale and lettuce in the bed I filled in the beginning of this post (I planted them in that bed about a week ago).  They look like they're starting to grow a bit.  Nothing special growth wise, but here's what they looked like yesterday afternoon.  It got down to 19F one morning, so I covered them with some blankets the night before.  That's why the wire remesh is over them.


IMG_20200210_170541921.jpg
Fungi?
Fungi?
IMG_20200210_155938365.jpg
Hard to see, but about 60 red lettuce and 60 kale in there. I'll thin them when they get bigger.
 
Eric Hanson
gardener
Posts: 5436
Location: Southern Illinois
1487
transportation cat dog fungi trees building writing rocket stoves woodworking
  • Likes 1
  • Mark post as helpful
  • send pies
    Number of slices to send:
    Optional 'thank-you' note:
  • Quote
  • Report post to moderator
S,

Nice work there!

The yellow puddles are almost certainly dog vomit mold and is harmless (aside from the name).  The mold growing might very well be beneficial, but if you are really concerned you could add in a desired fungi (oyster mushrooms and wine caps come to mind).

By the way, nice job on retouching the photo to make the white pop.  I have tried to upload pictures of white strands but they don’t show up well.  I am curious, what software did you use and what exactly did you do to alter the photo.  I really want to try this in the future.

Eric
 
Joshua Bertram
Posts: 672
Location: St. George, UT. Zone 8a Dry/arid. 8" of rain in a good year.
207
trees bike greening the desert
  • Mark post as helpful
  • send pies
    Number of slices to send:
    Optional 'thank-you' note:
  • Quote
  • Report post to moderator
Eric, thanks.

I've been propagating the yellow slime mold by spraying it down with a high pressure hose and releasing all of its spores into a grey cloud of madness when its dry enough.  I can't tell that it does any harm, and only figure it's what nature thinks is best for the wood chips.  lol  
There hasn't been any this year because it's been so dry, but I expect it will pop up in even greater colonies/puddles then next time the top layer of wood chips are moist for an extended period of time.  Hopefully in spring.
Of course I took pictures of it the last time it was here which was March of last year.  Yeah, dog vomit is what it looks like.  I made a video about it a long time ago and posted it on here........but I made the video private.  It's much too silly.

As for the "software" for the pictures, just the basic enhancements pretty much any cell phone camera or laptop already has on it.  In this particular case I'm using a $100 chromebook with whatever editing stuff comes off the cloud, or is built into it.  I'll take a screenshot right now.
20190404_121336.jpg
Yellow slime mold. This stuff is super smart. Google it.
20190404_121345.jpg
Some is reddish orange.
20190404_121350.jpg
Some is chunky yellow.
IMG_20200210_170535737.jpg
Before edited.
Before edited.
Screenshot-2020-02-11-at-7.59.14-AM.png
after edit.
after edit.
 
Eric Hanson
gardener
Posts: 5436
Location: Southern Illinois
1487
transportation cat dog fungi trees building writing rocket stoves woodworking
  • Likes 3
  • Mark post as helpful
  • send pies
    Number of slices to send:
    Optional 'thank-you' note:
  • Quote
  • Report post to moderator
S,

Nice job propagating the yellow blobs.  Some wine cap mushrooms or oyster mushrooms would go really well with that if you are so inclined, but you definitely have some good fungi growing in those beds as the (nicely enhanced) pictures show.

I think you will have some nice decomposition in those beds!

Eric
 
pollinator
Posts: 331
177
  • Likes 3
  • Mark post as helpful
  • send pies
    Number of slices to send:
    Optional 'thank-you' note:
  • Quote
  • Report post to moderator
I've done more or less the same (mix of partially moldy leaves + small branches, cardboard, the organic compost and good quality purchased soil) in my raised beds, and I'm getting very good results.

I call it my "1/3 hugelkultur, 1/3 lasagna gardening, 1/3 I'm just too cheap to buy soil" recipe

This was in April 2017, and I've had good yields, and not too much volume loss. I add compost every year, so the effective level remains pretty much constant.

I really should dig down some day, for the sake of science, to see how much decomposition takes place (it looks like the bed is on  concrete tiles, but I've actually removed the ones underneath. It is very compacted ground with mostly filler rocks and clay)


Joshua Bertram
Posts: 672
Location: St. George, UT. Zone 8a Dry/arid. 8" of rain in a good year.
207
trees bike greening the desert
  • Likes 1
  • Mark post as helpful
  • send pies
    Number of slices to send:
    Optional 'thank-you' note:
  • Quote
  • Report post to moderator
Kena,

Good to hear about your success.  Yeah, lasagna.  I love lasagna.  lol
Your beds look way better built than mine.  If mine last three years without major reinforcement, I'll be pretty much shocked, but after a few months since the first one got built, it looks like it's not buckling too bad.
You should totally dig down and see what's in there.  I think it's medicine, screw the science.  :)
Did your fertilize with anything? organic or otherwise?   Just the compost?

Well, fourth bed is built, over filled, and will settle for at least a few days or a week before I plant about half of it out in different spinach and maybe the other side will be beets/swiss chard (that I have as starts already germinating) or I might direct seed the other half with carrots.  I made the level a little deeper with this fourth bed, so it probably makes sense to put the carrots in it.  Yeah, it'll probably be carrots.

Happy gardening.

Oh, I'll add this picture.  The first bed, and I don't know why I wasn't thinking when I built it has no cross supports.  I think I got excited and started filling it up as soon as the frame was built, lol.
The second bed I used threaded rod (a really long bolt that looks like the pvc in the picture, but is steel) for support.
Then, and full credit to a neighbor (and I'm totally going to blame him if it fails!  lol) the third and last beds got built using pvc pipe with glued on ends (that I still need to drill a hole through and put something like a cotter pin through to save them if the glue fails).  The thinking being that the pvc will not rust yet still be strong enough and relatively inexpensive/easy to work with.

IMG_20200211_145748312_HDR.jpg
pvc with glued ends, total of four
 
Eric Hanson
gardener
Posts: 5436
Location: Southern Illinois
1487
transportation cat dog fungi trees building writing rocket stoves woodworking
  • Likes 2
  • Mark post as helpful
  • send pies
    Number of slices to send:
    Optional 'thank-you' note:
  • Quote
  • Report post to moderator
Joshua,

Thanks for the screenshot and especially thanks for the before and after shots.  I love playing with photo editors so I am not exactly certain why I didn’t think of using one before I posted pictures—palm to face!

About a year ago I uploaded a bunch of pictures of mycelium in the woodchips, but they did not turn out very well.  If only I had considered using a simple photo editor!

BTW, when I took pictures of mycelium, I found it difficult to focus.  It seems that my camera was recognizing too many different layers to focus on all, so it only focused on one plane and anything outside that zone was blurry.

But again, great pictures and I might well emulate your style in the future.

Eric
 
Joshua Bertram
Posts: 672
Location: St. George, UT. Zone 8a Dry/arid. 8" of rain in a good year.
207
trees bike greening the desert
  • Likes 3
  • Mark post as helpful
  • send pies
    Number of slices to send:
    Optional 'thank-you' note:
  • Quote
  • Report post to moderator
More of the same, but I've changed things up a bit for the next two beds (which would be #5, and #6).

First, some pictures of how I'm filling the bottom up.  Before I put wood chips all over my yard, there were landscape rocks everywhere.  So I shoveled all the rocks to the front yard in a big long pile.  Well, I've had a TON of round river rock sitting in my front yard for almost a few years now.  To get rid of it, I've been filling the bottom 6" or so of each bed with them.  All the beds have them, I just never took pictures of them before.

I also lined each bed with plastic.  Not sure if I'll regret it later on once it starts flaking, but hopefully it'll give the wood a little relief from the moisture inside the beds.

Also, on top of the rock, each bed got a lining of palm fronds.  Just so I could get rid of them.  I tried burying them in the yard years ago......but they are slow to break down, so I figured this was a good spot.

Then I called the tree trimmer to drop off a load of chips for "free".  I always give the driver $10 for his time/trouble.  Well worth it in my opinion.  These two beds are the first beds I've used fresh wood chips as the filler around the pallets.  I didn't have too much leftover tree trimmings for these beds, so most of the filling is wood chips.  (This truck load was Mulberry, Live Oak, and a fig tree.)
As a side note, multiple neighbors are now having wood chips dropped off in their yards.  I TAKE FULL CREDIT.  People always follow my lead.  Bwahahahahaha  J/K.  It certainly makes me happy to see people utilizing the resource.

Some pictures showing how I'm laying/filling the chips in on top of the pallets.  I use a rake to try to push as many chips into the voids of the pallets as possible.  It's difficult, and I'm sure some empty air space is still left in spots.


IMG_20200217_135406679_HDR.jpg
Raw framed beds. Nothing but concrete on the bottom.
IMG_20200217_171408113.jpg
Pvc pipe, and plastic before adding rocks/pallets/wood chips.
IMG_20200217_171413609_HDR.jpg
Getting to double shovel rock. Meh.
IMG_20200218_095814003.jpg
Both beds filled with about 6 of rock.
IMG_20200218_112634503_HDR.jpg
Palm fronds on top of rock.
IMG_20200218_132558344_HDR.jpg
A layer of fresh wood chips, then two pallets on top (one has to be cut down to fit).
IMG_20200218_133344308_HDR.jpg
Filling the voids of the pallets with wood chips (as best as possible). I also jump on top of them to help them settle.
IMG_20200218_133427652_HDR.jpg
Wood chips dropped off today/feb 18th.
IMG_20200218_133520506.jpg
How I'm moving them. Wheeled garbage can makes it easier to lift over the edge of the bed.
IMG_20200218_133700125_HDR.jpg
Dumping the chips in the bed.
IMG_20200218_134213013_HDR.jpg
Total of four pallets per bed. About 10 of space left for cardboard, and then lasagna soil/compost. (not done yet)
 
Joshua Bertram
Posts: 672
Location: St. George, UT. Zone 8a Dry/arid. 8" of rain in a good year.
207
trees bike greening the desert
  • Likes 2
  • Mark post as helpful
  • send pies
    Number of slices to send:
    Optional 'thank-you' note:
  • Quote
  • Report post to moderator
Oh yeah, this is for Eric, or anyone who can answer.

A few days ago I went down to Harmon's (a local (very nice/high end) grocery store) and bought some fresh oyster mushrooms.

I put them in a blender with some water, and blended them up for a few seconds.

I then put the "slurry" over the compost/soil/broken down wood chip pile (the pyramid black pile in the last set of pictures I posted).  

Should I also do this again and pour it on top of the raw wood chips in the beds?  or is it good enough that I "inoculated the compost?

Thanks.

Pictures, of course.

IMG_20200215_094135466.jpg
Fresh oyster mushrooms in blender.
IMG_20200215_094001631.jpg
About that full of mushrooms. About $2 worth.
IMG_20200215_094535880.jpg
Blended in water, and then poured on compost pile (I also put a little bit on top of the other already built beds).
 
Eric Hanson
gardener
Posts: 5436
Location: Southern Illinois
1487
transportation cat dog fungi trees building writing rocket stoves woodworking
  • Likes 1
  • Mark post as helpful
  • send pies
    Number of slices to send:
    Optional 'thank-you' note:
  • Quote
  • Report post to moderator
Joshua,

The only thing I don't like about these last couple of posts is that it reminds me about how far behind I am at the moment!  Seriously though, you have a great start and I am very curious as to how well your project will work out.

Just as a thought for you,  It looks like you might be able to fill your beds completely with woodchips and such.  This will make amazing compost eventually, but is kinda hard to seed into.  I have utilized a technique called the fertile hole.  I go ahead and fill up with woodchips, then excavate holes about 1' around and deep.  I back fill those holes with the best topsoil, garden bedding, manure or whatever you want to actually seed into or plant into.  You can make a fertile trench for row crop veggies.  Around those holes I sow mushrooms (though you already have a lot of fungal strands) so that I can both grow mushrooms and veggies.  The next year you will still have fertile holes and trenches and those can be used again (the mushrooms will do wonders for "fertilizing" the veggies the second year.  By the 3rd year, you should be able to direct seed anywhere in the bed and might actually need more woodchips etc.

One advantage of having the fertile holes as opposed to a covering layer of soil is that you will have a better/easier time getting fungi growing.  Food for thought.

I am including a link HERE:

https://permies.com/t/82798/composting-wood-chips-chicken-litter

This shows what I have done with woodchips in raised beds and mushrooms.  I will say that your beds are far deeper than mine and your beds are much better than mine so I congratulate you there.  This thread shows me going from a complete neophyte to having a basic degree of competency.  I am keeping it updated so as to help anyone else trying something similar.  This thread might help you, but I have to say that you have a better start now than I had when I started.

You have a great start, and I am downright jealous of your bed edges.  BTW, where did you get the corrugated steel?  It looks great!

Good luck,

Eric

 
Eric Hanson
gardener
Posts: 5436
Location: Southern Illinois
1487
transportation cat dog fungi trees building writing rocket stoves woodworking
  • Likes 1
  • Mark post as helpful
  • send pies
    Number of slices to send:
    Optional 'thank-you' note:
  • Quote
  • Report post to moderator
Joshua,

Sorry, I was responding to an earlier post when this one came up.

Regarding your question, I would really try to get as much of the spores into the wood as possible, so I say whir up another batch and pour directly over the woodchips.

Great workings you have going there.  I hope my earlier post and the link can be of some help.

Eric
 
Joshua Bertram
Posts: 672
Location: St. George, UT. Zone 8a Dry/arid. 8" of rain in a good year.
207
trees bike greening the desert
  • Likes 2
  • Mark post as helpful
  • send pies
    Number of slices to send:
    Optional 'thank-you' note:
  • Quote
  • Report post to moderator
ERIC!   Thanks brother!  You're fast, and I haven't even looked at the next post you made.....which I'm guessing is about the mushrooms.  I'll address that later.

Well, I like the idea of just using the wood chips.  It'd be easier, for sure.  The only problem is that it is dry here.  Like I haven't seen rain in the last few months kind of dry.....  I just don't think that the hole in the wood chips filled with soil would work without constant watering.  I almost think the wood chips would wick the moisture away from the compost/soil in the hole.   Not to mention in the summer it's hotter and even more dry.  It's really tough here, it's completely unsustainable (it almost seems like it's getting more unsustainable with the climate change, not that Iv'e been here long enough to say).
That's the reason I want to sell, and move in the next few years.  I'd like to live in an area more conducive to year round sustainable gardening/homesteading.  

I super appreciate your compliments!  but wow, there's nothing special about the beds (especially the way they're constructed).  If I had more funds, I'd have made them different.  I'm just using cheap sheets of corrugated roofing material (from Home Depot, an 8' X 24" sheet is just under $20, and I'm using 3 per bed + 8, 8' 2" X 4" s' @ less than $3 per stick, + screws + plastic + pvc pipe + pvc glue.  They're just under $100 per bed approximately.  The reason I'm using the pallets inside is to keep the weight from pushing the corrugated metal from bowing out.  I have a feeling that it wouldn't be strong enough to support the weight of soil without completely bowing out after a while.
If money weren't an option, I'd do it with the thicker sheets of roofing tin available at about twice the cost,
or even better, if I had logs, and trees at my disposal, I'd love to do a totally natural raised/hugel style  bed on top of soil.  Unfortunately that is not the case due to my location.  It certainly isn't impossible to do those things here, I just think it's not practical.

Here is a satellite view of the property.  The reason I'm using the long concrete driveway for the beds is because it goes from due east, to due west.  It's the perfect location for a garden.  It pretty much gets full sun from sunrise to sunset during the growing season.  Even in winter, in gets a ton of sun, although there are some thick deciduous trees that block some light.

THANK YOU SO MUCH FOR YOUR QUICK REPLY!!!
You're awesome, and I'll look at your link later tonight.  
Screenshot-2020-02-18-at-3.56.08-PM.png
Raised beds are all on the long concrete drive that extends to back yard. Drive goes east to west.
 
gardener
Posts: 887
Location: Southern Germany
525
kids books urban chicken cooking food preservation fiber arts bee
  • Likes 3
  • Mark post as helpful
  • send pies
    Number of slices to send:
    Optional 'thank-you' note:
  • Quote
  • Report post to moderator
Great work, Joshua, thanks for sharing.

I have one raised bed running and one in the making.

Last weekend we had a warm spell and we filled the bottom of the new one with all cuttings, rose prunings and material we needed to get rid of.
We also got several huge buckets of horse manure mixed with straw from the local stable. We will also add the accumulated kitchen scraps of the last weeks, chicken beddings etc.
The idea is to have a hybrid of compost/raised bed.
We will have to wait for planting it (last frost day is mid May).

We have used pallets as side walls so there is no need for support in the middle (the other raised bed was a set offered by a local carpenter and we have black insulation foil on the inner walls and a metal rod for stabilization).

The pallets in your picture look like the ones we have here. I am not paranoic when using them as walls, but as you put them inside your bed I wonder if there are different categories in the US as well? Here we get either temperature treated or chemically treated pallets, and for our bed we picked four pallets that were temperature treated.
They show "HT" like in this pic: https://www.logismarket.de/ip/schenker-deutschland-ag-europac-gmbh-ippc-holz-palette-ippc-holz-palette-640647-FGR.jpg

Joshua Bertram wrote:
On top of that, was placed a mixture of more of the wood chip compost, along with a large bag of peat moss, along with turkey manure/compost from a local source here in UT, along with a tiny amount of my native clay soil.  


I have to comment on the peat moss though.
It is a rare resource (not in the garden centers, alas) because to build one mm of peat moss it takes a full year. Peat bogs are being depleted worldwide inspite of being unique habitats for many plants and wildlife. In addition, they are great carbon sinks.
For further reading, here are two links (there are more if you google a bit):
https://greenerpods.com/2018/05/28/peat-bogs-important-stop-using/
https://www.life.ca/naturallife/0712/asknlpeat.html

Here in Germany you can even get signs to put on your fence where you can indicate that your garden is peat moss-free:


We need to raise awareness among gardeners that we should work sustainably without peat moss.
 
Eric Hanson
gardener
Posts: 5436
Location: Southern Illinois
1487
transportation cat dog fungi trees building writing rocket stoves woodworking
  • Likes 1
  • Mark post as helpful
  • send pies
    Number of slices to send:
    Optional 'thank-you' note:
  • Quote
  • Report post to moderator
Anita,

You have a fair point about peat moss found in garden centers.  Growing up and extending into my late 20s I just thought peat moss was just a normal, natural part of gardening, just as I had similar thoughts about tilling.

My thoughts changed gradually over time.  The major agent for change regarding peat moss was simply that I got tired of buying more.  Also I had a never-ending supply of leaves that served much the same purpose.

It is sad that some of the worlds peat bogs are literally being dug up and shipped off to the point of exhaustion.  I know Canada still has some pretty huge supplies of peat left, as does Siberia.  But why destroy those resources when we have better options instead (leaves, woodchips, etc.)?

At any rate, I am always curious to hear about how other people work wood/compost into their garden beds.  I like the fact that you put in clippings as that can give some good nitrogen in the base of the bed that can slowly release into the surrounding, absorbent materials.  Even better, the nitrogen will aid in the decomposition of any wood you have in there.

Thanks for chiming in.  It is nice to hear a fresh perspective.

Eric  
 
Joshua Bertram
Posts: 672
Location: St. George, UT. Zone 8a Dry/arid. 8" of rain in a good year.
207
trees bike greening the desert
  • Mark post as helpful
  • send pies
    Number of slices to send:
    Optional 'thank-you' note:
  • Quote
  • Report post to moderator

Eric Hanson wrote:Joshua,

Sorry, I was responding to an earlier post when this one came up.

Regarding your question, I would really try to get as much of the spores into the wood as possible, so I say whir up another batch and pour directly over the woodchips.

Great workings you have going there.  I hope my earlier post and the link can be of some help.

Eric


No need to be sorry.  So thankful for your replies.

I just went through and read your composting wood chips thread.  I'll have to go back and read it again, and again, to get some things to sink in.

One thing I'm really lacking as far as my beds go is the soil contact.  Your beds are infinitely deeper than mine in that regard.  After having read through your thread, it sounds like it's a pretty important part of the equation.  I can say from what I've seen with my own eyes is that 12" of wood chips on my clay soil gets a lot of the fungal strands, whereas the pool can have twice the depth of chips, and not have much (if any) fungal life in it at all.  The chips are still breaking down into a lovely looking black compost, but not too much fungal activity.  
It makes me think that I should have placed the beds back another couple of feet to the north so that 2' of the 8' long beds would have been sitting directly on top of soil.  So at least there'd have been some contact.
Well, if these beds fall apart (errr, when) I can do that!  :)

Thanks again!
 
Joshua Bertram
Posts: 672
Location: St. George, UT. Zone 8a Dry/arid. 8" of rain in a good year.
207
trees bike greening the desert
  • Likes 2
  • Mark post as helpful
  • send pies
    Number of slices to send:
    Optional 'thank-you' note:
  • Quote
  • Report post to moderator

Anita Martini wrote:Great work, Joshua, thanks for sharing.

I have one raised bed running and one in the making.

Last weekend we had a warm spell and we filled the bottom of the new one with all cuttings, rose prunings and material we needed to get rid of.
We also got several huge buckets of horse manure mixed with straw from the local stable. We will also add the accumulated kitchen scraps of the last weeks, chicken beddings etc.
The idea is to have a hybrid of compost/raised bed.
We will have to wait for planting it (last frost day is mid May).

We have used pallets as side walls so there is no need for support in the middle (the other raised bed was a set offered by a local carpenter and we have black insulation foil on the inner walls and a metal rod for stabilization).

The pallets in your picture look like the ones we have here. I am not paranoic when using them as walls, but as you put them inside your bed I wonder if there are different categories in the US as well? Here we get either temperature treated or chemically treated pallets, and for our bed we picked four pallets that were temperature treated.
They show "HT" like in this pic: https://www.logismarket.de/ip/schenker-deutschland-ag-europac-gmbh-ippc-holz-palette-ippc-holz-palette-640647-FGR.jpg

Joshua Bertram wrote:
On top of that, was placed a mixture of more of the wood chip compost, along with a large bag of peat moss, along with turkey manure/compost from a local source here in UT, along with a tiny amount of my native clay soil.  


I have to comment on the peat moss though.
It is a rare resource (not in the garden centers, alas) because to build one mm of peat moss it takes a full year. Peat bogs are being depleted worldwide inspite of being unique habitats for many plants and wildlife. In addition, they are great carbon sinks.
For further reading, here are two links (there are more if you google a bit):
https://greenerpods.com/2018/05/28/peat-bogs-important-stop-using/
https://www.life.ca/naturallife/0712/asknlpeat.html

Here in Germany you can even get signs to put on your fence where you can indicate that your garden is peat moss-free:


We need to raise awareness among gardeners that we should work sustainably without peat moss.


Anita, you're right, I know.  

From here on out I won't use it anymore.  I was even hesitant to say that I used any, because I am aware that it's not something that's popular to use on this site due to it's non sustainability.  I was just being honest.
I didn't think I'd have the time to sift through all of my wood chips to get the broken down compost from them, so I supplemented with the turkey compost, and peat moss.  Now that I quit my job, I have nothing but time on my hands to sift through the massive quantity on hand.

It's to the point now, that I have enough to have an almost closed loop as far as composting/fertilizing go (I think/hope).  I'll still bring in wood chips from the tree trimmer since they're easy/cheap/good resource, but hopefully after this year, that's the only input I'll have to bring in.  The chickens, microbes, fungi, and bacteria (nature) will hopefully take care of the rest.  That's when I'll probably endi up moving, and starting over from zero!  LOL!


As for the pallets, there's actually a thread (a couple) on this site that explain that using the pallets marked "HT" seem to be okay for use.  I got all my pallets from a plant nursery (used mainly to move plants around), and they are all stamped/marked with the "HT" on them.  Thank you for bringing it up, because I don't think I ever said that they were.

It sounds like your beds are coming along nicely, and the way you're filling them seems like it would be ideal.  Charles Dowding does some videos on using a really high compost pile out of pallets with fairly fresh manure, and getting an early start on planting things because of the bottom heat generated by the active composting.

Thanks again!

 
Joshua Bertram
Posts: 672
Location: St. George, UT. Zone 8a Dry/arid. 8" of rain in a good year.
207
trees bike greening the desert
  • Mark post as helpful
  • send pies
    Number of slices to send:
    Optional 'thank-you' note:
  • Quote
  • Report post to moderator
Here's a link to another thread I started about composting wood chips in an in ground swimming pool with chickens.  My version of Paul G's "Back to Eden" style of composting with chickens.

https://permies.com/t/134433/Composting-wood-chips-pool-water
 
Eric Hanson
gardener
Posts: 5436
Location: Southern Illinois
1487
transportation cat dog fungi trees building writing rocket stoves woodworking
  • Likes 1
  • Mark post as helpful
  • send pies
    Number of slices to send:
    Optional 'thank-you' note:
  • Quote
  • Report post to moderator
Joshua,

Maybe I missed this earlier, but from the sounds of things, I gather that you are growing on top of cement or other solid, impermeable surface?  If so, I certainly understand your concerns.

When I first started this project, I had chipped up a bunch of brush and let them sit in a trailer (with wooden sides and bottom!) for a year.  I thought the greenwood would be safe, but the slowly rotting chips actually did some damage to the trailer.  I should have just put them on the ground where they belonged all along.

Since I can just dump onto soil, the soil biota work their way into the woodchips and the decomposers in the woodchips work their way into the soil beneath.  I had previously been under the misconception that the wood would deprive the soil of nitrogen.  I couldn’t be more wrong. The soil under a woodchip pile is made more—not less—fertile by the woodchips by the expanded biological activity.  Whenever I chip now, I put it on the ground immediately, sometimes just chipping right onto the soil itself (other times chipping into a trailer and then dumping immediately).  I occasionally let the pile just sit there to age before spreading.  I do this in order to encourage a little bacterial decomposition which helps the fungi later on.

Joshua, if you cannot get to soil contact, the fertile holes can help.  I occasionally add my own urine in advance to encourage a little bacterial development.  I do this by getting a cat litter container, peeing into it until it is 1/2 full or so, then fill the rest with water and pour.  The cat litter containers are about 2.5 gallons and have a wide cap (perfect for peeing, and for storage).  This can help out with the bacteria when you don’t have soil contact.  Also, once you spread, a fertile hole with simulate some soil and also help.

These are just my thoughts and take or leave them as you see fit.

Eric
 
steward
Posts: 12420
Location: Pacific Wet Coast
6991
duck books chicken cooking food preservation ungarbage
  • Likes 1
  • Mark post as helpful
  • send pies
    Number of slices to send:
    Optional 'thank-you' note:
  • Quote
  • Report post to moderator

Joshua Bertram wrote:
From here on out I won't use it anymore.  I was even hesitant to say that I used any, because I am aware that it's not something that's popular to use on this site due to it's non sustainability.  I was just being honest.

Honesty is a good policy and we're all on a road to more sustainable living. I bought a bale of peat moss about 20 years ago. Then I learned all the downsides so it sat there. Then I planted blueberries bushes. They *really* like peat moss. I soak a little every spring for them and I figure my bag will last at least another 5 years. After that I'll have to learn some other technique to help maintain the acid level they like. I've heard pine needles are good, but I'd have to plant a pine tree (or find someone local who has one.) If I struggle with an alternative when the time comes, I know exactly where to come to get help!
 
Joshua Bertram
Posts: 672
Location: St. George, UT. Zone 8a Dry/arid. 8" of rain in a good year.
207
trees bike greening the desert
  • Mark post as helpful
  • send pies
    Number of slices to send:
    Optional 'thank-you' note:
  • Quote
  • Report post to moderator

Eric Hanson wrote:Joshua,

Maybe I missed this earlier, but from the sounds of things, I gather that you are growing on top of cement or other solid, impermeable surface?  If so, I certainly understand your concerns.

When I first started this project, I had chipped up a bunch of brush and let them sit in a trailer (with wooden sides and bottom!) for a year.  I thought the greenwood would be safe, but the slowly rotting chips actually did some damage to the trailer.  I should have just put them on the ground where they belonged all along.

Since I can just dump onto soil, the soil biota work their way into the woodchips and the decomposers in the woodchips work their way into the soil beneath.  I had previously been under the misconception that the wood would deprive the soil of nitrogen.  I couldn’t be more wrong. The soil under a woodchip pile is made more—not less—fertile by the woodchips by the expanded biological activity.  Whenever I chip now, I put it on the ground immediately, sometimes just chipping right onto the soil itself (other times chipping into a trailer and then dumping immediately).  I occasionally let the pile just sit there to age before spreading.  I do this in order to encourage a little bacterial decomposition which helps the fungi later on.

Joshua, if you cannot get to soil contact, the fertile holes can help.  I occasionally add my own urine in advance to encourage a little bacterial development.  I do this by getting a cat litter container, peeing into it until it is 1/2 full or so, then fill the rest with water and pour.  The cat litter containers are about 2.5 gallons and have a wide cap (perfect for peeing, and for storage).  This can help out with the bacteria when you don’t have soil contact.  Also, once you spread, a fertile hole with simulate some soil and also help.

These are just my thoughts and take or leave them as you see fit.
Eric


Thanks again for the informative post, Eric.

Yes, the new raised beds are on a solid concrete driveway.  
Unfortunately my back yard is probably comprised of 40% solid concrete.  There is an in ground pool (now used as my chicken coop/deep litter compost) surrounded by a concrete walk with just a bit of earth outside of it.  There is also the very long driveway that goes up to the back shed that is also concrete (this is where the new raised beds are placed).  I've planted over 50 fruit and nut trees mostly around the perimeter of the yard where there is soil (unfortunately a lot of them died because of a build up of salt due to our incredibly hard high ph water, and our naturally high ph clay soil).  I've been putting wood chips around the yard for the last three years which is when I planted the fruit trees.  The very top of my soil has turned to a beautiful black life filled wonderland, but it's only an inch or so deep before it goes back to the clay.  I've read that in my type of climate, it takes at least five years for the chips to really start showing benefits, as opposed to a more moist climate where it might only take a couple of years.  I see improvements for sure, and they'll only get better with time.

The reason I was trying to get two different wood chips to fill the bed is because I could see the difference soil contact made vs. where it was not.  The chips with the fungal strands came from on top of the clay soil here.  The chips that came out of the chicken coop (which is a plastered concrete in ground swimming pool) have almost no visible strands of fungi.  There is some, but not like the chips actually touching the soil.  Again, this is why I was trying to have both types.  One for the fungi, and one for the nitrogen.  I can't imagine how awesome this set up would be if the swimming pool were just a dirt hole in the ground!  I bet it would just be "swimming" with fungi!  

So having read your thread, the fertile holes are just holes that you put some cow manure in?  I'm not familiar with the term fertile hole.

EDIT:  Direct quote from Eric I just went back and read, "Just as a thought for you,  It looks like you might be able to fill your beds completely with woodchips and such.  This will make amazing compost eventually, but is kinda hard to seed into.  I have utilized a technique called the fertile hole.  I go ahead and fill up with woodchips, then excavate holes about 1' around and deep.  I back fill those holes with the best topsoil, garden bedding, manure or whatever you want to actually seed into or plant into. ".

I actually have about 30 or so 3lb bags of organic compost I picked up from home depot on clearance for $1.50 each or so.  I am using one 3lb bag for each bed.  I think it's a 10-5-5 (blood/feather/bone meal pellet mix).  I'm also side dressing with a bit of pure blood meal, because those bags were also on clearance (along with pure bone meal).  I also have a jug of fish fertilizer......
Anyhow, again, in the future I'd not like to have to use any of this added input, but considering how inexpensive it was, it would be foolish not to use it in my opinion.  
Given that I'm using the supplemental fertilizer would a fertile hole still be something to consider?

Oh yeah, I pee all over my piles of wood chips!  Been doing it for years now, lol.  It pains me when I do use a toilet and flush it down the drain (when I'm not at home).  I've read only good things about using it in the garden (even though it probably isn't helping the high salt build up already in the soil).  I generally use the chicken coop as my potty (just urine, I'm not so hard core as to be using #2 for anything.....yet).  When I'm not near the coop, I have an old coffee can in the garage just for it.  I definitely dilute it, and make sure not to go over the same areas too often.  

Thanks for the replies, Eric.  Much appreciated.


Joshua Bertram
Posts: 672
Location: St. George, UT. Zone 8a Dry/arid. 8" of rain in a good year.
207
trees bike greening the desert
  • Mark post as helpful
  • send pies
    Number of slices to send:
    Optional 'thank-you' note:
  • Quote
  • Report post to moderator

Jay Angler wrote:

Joshua Bertram wrote:
From here on out I won't use it anymore.  I was even hesitant to say that I used any, because I am aware that it's not something that's popular to use on this site due to it's non sustainability.  I was just being honest.

Honesty is a good policy and we're all on a road to more sustainable living. I bought a bale of peat moss about 20 years ago. Then I learned all the downsides so it sat there. Then I planted blueberries bushes. They *really* like peat moss. I soak a little every spring for them and I figure my bag will last at least another 5 years. After that I'll have to learn some other technique to help maintain the acid level they like. I've heard pine needles are good, but I'd have to plant a pine tree (or find someone local who has one.) If I struggle with an alternative when the time comes, I know exactly where to come to get help!


Thanks for the reply, Jay.

What are the thoughts on using elemental sulfur?  For the last two years I've bought 50lb bags of it to help lower the high ph soil we have here.  I know it's considered organic, but I never heard anyone mention it was a no/no like peat moss.  Obviously you didn't mention using it for the blueberry, and I'm sure you know it's available.  

Just curious.  I put a whole lot of it on my newly made strawberry bed for the same reason.

Thanks!
 
Jay Angler
steward
Posts: 12420
Location: Pacific Wet Coast
6991
duck books chicken cooking food preservation ungarbage
  • Likes 4
  • Mark post as helpful
  • send pies
    Number of slices to send:
    Optional 'thank-you' note:
  • Quote
  • Report post to moderator
Joshua Bertram wrote:

What are the thoughts on using elemental sulfur?  For the last two years I've bought 50lb bags of it to help lower the high ph soil we have here.  I know it's considered organic, but I never heard anyone mention it was a no/no like peat moss.  Obviously you didn't mention using it for the blueberry, and I'm sure you know it's available.

No, I have never used elemental sulfur. Generally, my soil is acid enough (low pH) that my growies are happy, particularly as I've tried to improve the soil enough that I only have to water them once or twice deeply during our summer drought. Our well water is high pH, and I don't yet have an efficient system for storing the amount of winter rain that I'd love to be able to hang on to. My limiting factor is sunlight due to tall trees. Thus my blueberries are in half barrels on top of a graveled parking area - so I *totally* get what you're dealing with! The blueberries have to be watered during the drought, and they would be much happier being watered with rain water, but giving them some extra peat is enough that they haven't died, although they certainly haven't thrived either.

As a general guiding rule, permies try to avoid any commercially produced input due to its high embodied energy, risk of environmental damage during the production of it, risk of it having contaminants we don't want, and the fact that buying it often supports a "world level" system that we're trying to shrink to "community level". But we'd also prefer that someone grow their own veggies using as organic as possible methods, than be buying all their food. So it all comes down to compromise. You are already trying to "grow your own inputs" by raising chickens and making compost. If the only way, this year, you can get your soil pH low enough to grow some veggies, I will certainly support any organic compromise you try, but I will also support you asking and educating yourself about finding alternatives that you know are produced locally, safely, organically and sustainably.

I think the point Eric Hanson was trying to make is that rather than mixing your wood chips with all your compost, you might do better to fill your beds with just the wood chips, then dig holes exactly where you want to plant something, and fill just that part of the bed with the best soil/compost mix you can. In other words, concentrate the good stuff, rather than dispersing it. The plant roots will reach out into the wood chips, but they'll start from a position of strength. One way I've done that in a new bed is to stick a "tube" (usually a used plant pot) in the spots I want plants, and filled the bed around them. Then I fill the tube with good soil, slide the tube out, and stick the plant in. That way all the wood chips don't just collapse into the space.

Have you met ola pots (sometimes olla)? I use a faked up home-made version to help with my drought, but there are some ecosystems where they seem to be very effective. https://permies.com/t/127998/Desert-market-garden#1009245
Actually, a really quick scan of that thread suggests other parts of the thread might be useful to you.
Either way, keep doing the best you can do! Keep learning and observing and building soil and hopefully things will only get better as the microbes and fungal strands multiply and do their thing.
 
Eric Hanson
gardener
Posts: 5436
Location: Southern Illinois
1487
transportation cat dog fungi trees building writing rocket stoves woodworking
  • Likes 1
  • Mark post as helpful
  • send pies
    Number of slices to send:
    Optional 'thank-you' note:
  • Quote
  • Report post to moderator
Jay,

Good post.  Specifically on two points you made.  

First, I am pleased with your mention of compromise.  It is nice to be “pure”, but sometimes perfect is the enemy of good enough.  My personal thoughts on the elemental sulfur is that if you need an amendment that your soil can’t produce on its own, then a one time application is appropriate so long that it is not an herbicide/chemical fertilizer, etc.  I treat this as a one time soil amendment.  If there is a better way to lower ph, I am all ears.


Secondly, you were exactly correct about the fertile holes.  Actually I like your tube idea.

Eric
 
Joshua Bertram
Posts: 672
Location: St. George, UT. Zone 8a Dry/arid. 8" of rain in a good year.
207
trees bike greening the desert
  • Likes 1
  • Mark post as helpful
  • send pies
    Number of slices to send:
    Optional 'thank-you' note:
  • Quote
  • Report post to moderator
Jay Angler wrote:

As a general guiding rule, permies try to avoid any commercially produced input due to its high embodied energy, risk of environmental damage during the production of it, risk of it having contaminants we don't want, and the fact that buying it often supports a "world level" system that we're trying to shrink to "community level". But we'd also prefer that someone grow their own veggies using as organic as possible methods, than be buying all their food. So it all comes down to compromise. You are already trying to "grow your own inputs" by raising chickens and making compost. If the only way, this year, you can get your soil pH low enough to grow some veggies, I will certainly support any organic compromise you try, but I will also support you asking and educating yourself about finding alternatives that you know are produced locally, safely, organically and sustainably.


     Yes, that makes sense.  I am hoping that the wood chips will eventually "buffer" (as I've heard that it will eventually do) the high ph soil enough that I don't have nutrient lock out from it being out of range.  I have covered both my front and back yard in deep layers of wood chips over the last three years, and it's gone from red clay, to a mostly black soil like consistency (very thin, but it's getting better/deeper).  
I'm only using the sulfur around the fruit trees, and perennials planted directly in the soil.  Of the seven beds I did sprinkle a bit on the two that are growing onions and garlic since I had it, and I had read that alliums  like a bit of sulfur.  


Jay Angler wrote:


I think the point Eric Hanson was trying to make is that rather than mixing your wood chips with all your compost, you might do better to fill your beds with just the wood chips, then dig holes exactly where you want to plant something, and fill just that part of the bed with the best soil/compost mix you can. In other words, concentrate the good stuff, rather than dispersing it. The plant roots will reach out into the wood chips, but they'll start from a position of strength. One way I've done that in a new bed is to stick a "tube" (usually a used plant pot) in the spots I want plants, and filled the bed around them. Then I fill the tube with good soil, slide the tube out, and stick the plant in. That way all the wood chips don't just collapse into the space.


     So, I have tons (literally) of compost in the chicken coop this year.  I am actually shocked at how much is left after filling the beds up with it.  I'm not really mixing the wood chips with the compost, I put in a layer of cardboard (which is very temporary) to keep the two from mixing too soon.  Eventually the compost I put on top of the cardboard/wood chips will fall down and mix into the chips below (which I think will be a good thing) and then I'll have to add a significant amount more of new compost the next time I plant the beds out either this fall or for sure next spring?  This is a guess on my part.
      I am guessing that in my extremely dry and hot climate, that using all wood chips then filling in with compost would not work.  The wood chips get bone dry here in summer, and I'M GUESSING that using that technique would require more watering than plants potted in plastic pots would need (my 5 gallon pots need watering twice a day here from July-September).  I should try it if I build another bed.  Ironically I just watched a video basically saying to do the same thing (but the guy is in Maryland).  
  He's using "double shredded hardwood" rather than wood chips, but I think it's the same basic principal.


When I get some terra cotta pots I will totally try to do the diy ola pot thing!  I've seen the commercially available pots, and have heard good things about them, but I didn't know of a diy way to make them.
Thanks for the link!  I considered trying to make a couple of the raised beds a sip style, but it was a bit of a cost issue.

I actually had a crazy idea to put in a bunch of five gallon buckets in one of the beds have each one with a filler tube go above the compost level, and then have a rag of some sort wick the water back out into the compost.  I obviously never got around to that......  I'd have had to buy a bunch of buckets, and I wasn't sure it would even work.

Thank you for the detailed reply, and sorry it took me so long to acknowledge it.

Josh
 
Joshua Bertram
Posts: 672
Location: St. George, UT. Zone 8a Dry/arid. 8" of rain in a good year.
207
trees bike greening the desert
  • Mark post as helpful
  • send pies
    Number of slices to send:
    Optional 'thank-you' note:
  • Quote
  • Report post to moderator
Okay I've finished all of my beds!  I decided to only do seven instead of eight.  I might add an eighth in the future, but it seems like seven is more than enough for now.

The last bed got filled differently than all of the others.  I ran out of the mixed compost I was using, and we got a rain here so it wasn't practical to sift more of the chips due to their being too wet.  So the bottom few inches got the premixed compost I already had, and then I put pure chicken litter wood chips (unsifted) on top of that.  It's at least six inches deep, and very woody.  It still has a lot of finer broken down compost, but it is definitely chunky style.

I am going to plant tomatoes in two beds.  One set in the chunky style, and one set in the smooth style.  Just to see if there's a difference.  There is a lot of chicken manure in the chunky bed.

So, I'm going to try to single stem them too, which I've never done before.  There will be 32 tomatoes in each 8' X 4' bed!  Probably way too many, and yeah, I'll regret it, but maybe I can make it work.  Still need to build some type of trellis to string them up to.

Here's a picture of all the beds so far (as of two days ago).  I planted one bed of tomatoes out two days ago, which again I may very well regret since our last average frost date is still two weeks away.  I have 101 tomatoes started, so if I lose 32 of them it'll be sad, but I have plenty more if I need to replant the bed out.  The other beds have mainly leafy greens/beets that will get replaced with peppers, egg plant, cucumbers, etc.  

IMG_20200305_164947782_HDR.jpg
#1 Lettuce and broccoli planted about a month or so ago from small starts.
IMG_20200305_164956215_HDR.jpg
#2 Spinaches mixed with some other leafy stuff, seeded carrots in the back half (just started sprouting).
IMG_20200305_165005924_HDR.jpg
#3 Swiss chard mixed with beets, all from small starts.
IMG_20200305_165014097_HDR.jpg
#4 Tomatoes laid out for planting. Too many, too soon, but why not try.
IMG_20200305_165026124.jpg
#5 Last bed filled, chunky style compost, will also have tomatoes like bed #4
IMG_20200305_165034765_HDR.jpg
#6 half of bed garlic, the other half beets started from seed that are just now sprouting.
IMG_20200305_165054787.jpg
#7 half the bed bulb onions the middle row is green onions, then mixed broccoli/leafy stuff on the other half.
IMG_20200305_171712770_HDR.jpg
putting a sprinkle of Epsom salt, and a little more organic fertilizer in the bottom of each hole. Bed #4
IMG_20200305_165942998.jpg
Finally! A good way to label here. Every time I use a marker, the sun bleaches it out. Now it's digitized for eternity!
 
Eric Hanson
gardener
Posts: 5436
Location: Southern Illinois
1487
transportation cat dog fungi trees building writing rocket stoves woodworking
  • Likes 1
  • Mark post as helpful
  • send pies
    Number of slices to send:
    Optional 'thank-you' note:
  • Quote
  • Report post to moderator
Joshua,

Your beds look amazing!  Being nice and tall, you won’t have to stoop, something that is pretty tough for me given all the chipping I did yesterday.

32 tomatoes in a single bed might be a little dense, but go ahead and find out how they do.  You can fine tune as you go.

BTW, I am glad that I am not the only one who likes a 4x8’ bed.  I hear lots of talk about 4’ wide beds and 6’ is usually the max width I hear.  But I have long arms and I can reach about 4’ in without too much trouble.  And that extra 2’ over a 6’ bed makes s big difference and makes for a lot of extra space for planting.

Nice work,

Eric
 
master steward
Posts: 6968
Location: southern Illinois, USA
2536
goat cat dog chicken composting toilet food preservation pig bee solar wood heat homestead
  • Likes 1
  • Mark post as helpful
  • send pies
    Number of slices to send:
    Optional 'thank-you' note:
  • Quote
  • Report post to moderator
Your beds certainly look better than mine.  Most of mine are 2ft deep.  The ones I use for Corn and Sunflowers are 1 ft deep.  I fill mine with composted straw and hay from the goats and chickens ....as well as lawn waste.
 
John F Dean
master steward
Posts: 6968
Location: southern Illinois, USA
2536
goat cat dog chicken composting toilet food preservation pig bee solar wood heat homestead
  • Likes 1
  • Mark post as helpful
  • send pies
    Number of slices to send:
    Optional 'thank-you' note:
  • Quote
  • Report post to moderator
Hi Eric,

I agree.  I have learned to limit my 4x8 beds to 12 tomato plants. More will grow and produce, but the law of dimishing returns seems to set in.
 
Joshua Bertram
Posts: 672
Location: St. George, UT. Zone 8a Dry/arid. 8" of rain in a good year.
207
trees bike greening the desert
  • Mark post as helpful
  • send pies
    Number of slices to send:
    Optional 'thank-you' note:
  • Quote
  • Report post to moderator
Eric, John, thanks.

No doubt you're both right about there being too many in the bed.  I figure on thinning when/if things get out of hand, or if they aren't producing anything.  In my dreams, though, this will be a garden of thousands of tomatoes!!!

Eric, that's A LOT of wood chips!   Good job, hopefully your back is feeling better soon.  :)  Thanks for all the advice along the way, and I enjoy reading your ongoing thread about the composting the wood chips.
 
Eric Hanson
gardener
Posts: 5436
Location: Southern Illinois
1487
transportation cat dog fungi trees building writing rocket stoves woodworking
  • Likes 1
  • Mark post as helpful
  • send pies
    Number of slices to send:
    Optional 'thank-you' note:
  • Quote
  • Report post to moderator
Joshua,

Glad that you are planning to thin.  I really think you will get more tomatoes that way.  My back is healing up.  The deal with yesterday is a tad complex.  My neighbor helped me a LOT, and without his help, I don’t know how I could have done 1/10 what we did.  However, he has a heart condition so he operated the tractor.  That’s fine.  That way he can really help move some huge loads (we use pallet forks for these projects), and I certainly don’t want him to have a heart emergency!

The flip side is that I stood, bent down and lifted & manipulated the wood.  My back was giving out but he was rearing to keep going.  We did finally get the job done, but my posts pretty much sum up how I felt—I hurt everywhere, but especially in my back!

The most awkward part was not the big, heavy logs.  It was the small, vine like, and thin sticks.  They had to get cleaned up, but the only way to get them was to bend over (that hurts!), somehow jam them into the chipper at which point they make hardly any chips at all.  I was giving serious consideration to raking them into my tractor bucket and hauling them off to the burn pile.  I would have lost nothing in the way of chips and saved my back.

Don’t get me wrong, I was thrilled for all the help I got, but he was (totally justifiably) sitting and I was standing, bending, lifting, etc.  My back will clear up in a couple of days, and the pain was worth it.

Eric
 
Eric Hanson
gardener
Posts: 5436
Location: Southern Illinois
1487
transportation cat dog fungi trees building writing rocket stoves woodworking
  • Likes 1
  • Mark post as helpful
  • send pies
    Number of slices to send:
    Optional 'thank-you' note:
  • Quote
  • Report post to moderator
Joshua,

Really, I am really pleased that you get something from this thread.  I was really hoping that I was writing just for myself.  If you are getting something useful, great!  That was the whole point after the first 6 months or so.

Make no mistake, I am still very much a learner, but I was thinking that if someone else could glean something from my own learning process then this thread is worth it.

Thanks for the reaffirmation,

Eric
 
Joshua Bertram
Posts: 672
Location: St. George, UT. Zone 8a Dry/arid. 8" of rain in a good year.
207
trees bike greening the desert
  • Likes 4
  • Mark post as helpful
  • send pies
    Number of slices to send:
    Optional 'thank-you' note:
  • Quote
  • Report post to moderator
It looks like I picked a good year to go crazy on growing a bunch of my own food!  So pleased with the results so far.

My ten chickens get about a half of a five gallon bucket full of greens every day.  Amazingly I got nine eggs today from ten chickens.  Normally it's about five or seven.  This year they're getting more greens then ever.  The average age of my chicks is probably around four years old.

I'm eating tons leafy greens all day long, both from grazing during the day, and cooking it up with dinner.  Also eating tons of garlic/onion greens with dinner.  


Planning on putting peppers in along with some squash soon too.  It's getting hotter, and the lettuce isn't going to last much longer.


IMG_20200402_164831227.jpg
Seven new raised beds.
IMG_20200402_164913722_HDR.jpg
Bed one, lettuce with kale and broccoli.
IMG_20200402_164927184_HDR.jpg
Bed two mustard greens with carrots/onions in the back.
IMG_20200402_164936364_HDR.jpg
Bed three, chard and beets.
IMG_20200402_164944342_HDR.jpg
Bed four, 32 tomatoes, 32 plants in 32 square feet.
IMG_20200402_164952369_HDR.jpg
Bed five, more tomatoes, another 32 plants in 32 square feet.
IMG_20200402_164959847_HDR.jpg
Bed six, half beets, and half garlic (200+ heads in 16 square feet).
IMG_20200402_165010564_HDR.jpg
Bed seven, Onions, and mixed greens.
 
Eric Hanson
gardener
Posts: 5436
Location: Southern Illinois
1487
transportation cat dog fungi trees building writing rocket stoves woodworking
  • Likes 2
  • Mark post as helpful
  • send pies
    Number of slices to send:
    Optional 'thank-you' note:
  • Quote
  • Report post to moderator
Nice garden Joshua!

I love the raised bed and it certainly seems to be paying off for you.  BTW, I see nothing ghetto about your beds—I think it is kinda ingenious.  And what a bounty!  Looks like you are having a great start to the growing season.  

Please keep us updated,

Eric
 
pollinator
Posts: 478
Location: NE Ohio / USDA Zone 5b
77
3
monies forest garden trees writing wood heat homestead
  • Likes 1
  • Mark post as helpful
  • send pies
    Number of slices to send:
    Optional 'thank-you' note:
  • Quote
  • Report post to moderator
These look nice and give me some ideas for a kitchen garden at my parents house!
 
Joshua Bertram
Posts: 672
Location: St. George, UT. Zone 8a Dry/arid. 8" of rain in a good year.
207
trees bike greening the desert
  • Likes 1
  • Mark post as helpful
  • send pies
    Number of slices to send:
    Optional 'thank-you' note:
  • Quote
  • Report post to moderator
I'm having a good year with this garden!  Fun, and productivity.  I couldn't be happier so far.

I built a single stem, "lean and lower" trellis for the two tomato beds.  It's a high intensity greenhouse method for growing tomatoes closer than normal.  I seriously doubt I'll be able to pull it off.  64 tomato plants in 64 square feet.  I've never seen anyone attempt it, so it's likely to fail, but I'll probably get more tomatoes than I've got in the past trying it this way.  I considered using jute twine, or plastic twine, but the uv rays here will destroy them by the middle of summer.  I went with bailing/rebar tie wire instead.  Not sure how well it will or will not work.  
I'm not ignoring the good advice I've got on this post, I'm just going to try and see what happens.  No big deal whatever happens.  Just a learning experience at worst.

I had to take a break from all of the "gardening" today.  I've put in new spigots for the raised beds, got all the drip lines routed and plumbed, built the tomato trellis system, installed a lixit dog watering station, weeded, planted, maintained, single stemmed the tomatoes, etc........  I was kind of burnt out.

So today I built a rocket stove, or at least a super simple version of one from brick.  I know there are  a lot more efficient ways to build them, but I went with simple.  It only cost me $11 total (morally I went off track today, kind of.  I told the lady at Home Depot I had 28 bricks....she confirmed that there were 20.....and then I restated 28 bricks....and she charged me for 20......I wasn't going to beg for her to charge me more!  $0.53 per brick.).  I had all the steel laying around.  I put it on a stand so that it would be easier to work with.  I'm super impressed with how well it works.  So impressed, in fact,  that I had to go to the local market and buy some peppers to roast for my leftover pasta from last night.  I also sauteed a bunch of kale, chard, spinach, garlic greens, and green onions from the garden.  Absolutely delicious!  So pleased.  
I just used old sunflower stalks, and small branches from pruned trees to feed the stove.  I made the mistake of firing it up, and then preparing the food, which meant the fire went out about a half a dozen times, so I had to keep restarting it.  Now I know to prepare all the food, and then fire it up so I can keep fueling the fire.  SUPER FUN!  :)
I first cooked up some eggs for the dogs on a skillet I'd never used before.  It worked great!  I need to get some bacon in the future.  My meal was on a cast iron skillet.  It worked great, and it even started pouring rain with lots of wind right after I started cooking it.

More pictures of everything.  

IMG_20200408_155712224_HDR.jpg
Lower and lean trellis for tomatoes.
IMG_20200408_155753948_HDR.jpg
Opposite view of lower and lean of two beds.
IMG_20200408_155728091.jpg
Tomatoes! All the plants took a beating from some hail a few weeks ago. New growth looking good, lot of blooms.
IMG_20200408_124008697_HDR.jpg
Scrap metal stand for stove.
IMG_20200408_140247124.jpg
Tried drilling holes for air in the bottom, but ash blocked airflow, so I went with two opening on opposite sides.
IMG_20200408_151134405_HDR.jpg
Eggs!
Eggs!
IMG_20200408_153006475_HDR.jpg
Roasted jalapenos on a piece of scrap expanded metal.
IMG_20200408_155910681.jpg
Two pieces of angle iron to lift a pot/skillet/whatever off the brick.
IMG_20200408_172011982.jpg
My outdoor prep/kitchen area. Lots of leafy greens for dinner.
IMG_20200408_172304107.jpg
Chopped and ready for the skillet.
IMG_20200408_172458462.jpg
So fun to be cooking right next to the garden!
IMG_20200408_174432578.jpg
MMMMMMM!!!!
MMMMMMM!!!!
IMG_20200408_175028726.jpg
Leftover pasta added.
IMG_20200408_180402207.jpg
Fire roasted jalapenos, and red bell pepper added. Good A.F. :)
 
After three months of being pooless the hair and skin on this tiny ad is glorious!
A PDC for cold climate homesteaders
http://permaculture-design-course.com
reply
    Bookmark Topic Watch Topic
  • New Topic