• Post Reply Bookmark Topic Watch Topic
  • New Topic
permaculture forums growies critters building homesteading energy monies kitchen purity ungarbage community wilderness fiber arts art permaculture artisans regional education skip experiences global resources cider press projects digital market permies.com pie forums private forums all forums
this forum made possible by our volunteer staff, including ...
master stewards:
  • Carla Burke
  • Nancy Reading
  • John F Dean
  • r ranson
  • Jay Angler
  • paul wheaton
stewards:
  • Pearl Sutton
  • Leigh Tate
  • Devaka Cooray
master gardeners:
  • Christopher Weeks
  • Timothy Norton
gardeners:
  • thomas rubino
  • Matt McSpadden
  • Jeremy VanGelder

Making goatskin and sheepskin rugs, shoes, and clothes

 
gardener & author
Posts: 3110
Location: Tasmania
1858
7
homeschooling goat forest garden fungi foraging trees cooking food preservation pig wood heat homestead
  • Likes 7
  • Mark post as helpful
  • send pies
    Number of slices to send:
    Optional 'thank-you' note:
  • Quote
  • Report post to moderator
I thought I was a few months away from researching this, but it turns out that a sheep butchered for us ended up having more wool than was expected, and there's enough on there to make a sheepskin rug! The skin is now in salt, so I now need to figure out what to do next...

I found this video, and this looks like a good method of making rugs without toxic weird stuff:


From the video description:

This is how we make really lovely sheepskin floor rugs - using only soap, salt, oxalic acid, washing soda and oil. They're so cheap and easy to make and you mostly just need household products to do it.

There are different ways of curing, drying and tanning skins and fleeces, depending on what you want them for. But most use seriously nasty chemicals. Our method is simpler and much less toxic, and they end up perfect for floor rugs or for taking outside by the bonfire, but they are not soft enough for, say, making a coat  (you'd need to tan them for that and that's a different process).

So this is a really easy and inexpensive method and you end up with something lovely and warm and friendly -- but it's a little bit stiff too. Ok?

The abattoir should just give you back the skins from your own sheep/lambs/goats/calves. And even if you don't have any sheep of your own, you should have no problem getting some -- the abattoir get next to nothing for them. Pick the best and cleanest you can though, and save yourself a lot of work.

YOU'LL NEED:
Salt -- the cheap and cheerful sort
Washing Soda -- again cheap and cheerful
Neatsfoot oil -- from your hardware shop or saddle shop
Saddle soap -- from the same places.
Oxalic acid -- through your chemist/drugstore or order online. This is the same acid that's found in rhubarb leaves so theoretically you could make your own, but it's very cheap to buy.

You will also need:
a large bath or barrel
Wire brush/comb -- hardware shop or petshop
Somewhere to hang the skins while they dry - which could be a week or more.

The precise amount you use isn't absolutely critical. For each 2 gallon bucket of water, we use approximately:

1 kilo salt  (about 2lbs)
1 cup of powdered oxalic acid

Then later, for the first wash,
1 cup of washing soda crystals for each bucketful water.


WARNING -- these go through a smelly stage while they're drying out, so be warned!


But I was also wondering if there are alternative ways to prepare the skin that would make it soft enough to use the skins for clothes or houseshoes/slippers?

I was reading in John Seymour's "Forgotten Arts and Crafts" that tanning was done with tannin-rich plants such as oak bark, but there's no precise instructions on how to do it.

Does anyone have any ideas, stories, or information to share about preparing skins?
 
Kate Downham
gardener & author
Posts: 3110
Location: Tasmania
1858
7
homeschooling goat forest garden fungi foraging trees cooking food preservation pig wood heat homestead
  • Likes 6
  • Mark post as helpful
  • send pies
    Number of slices to send:
    Optional 'thank-you' note:
  • Quote
  • Report post to moderator
Here's another video I found:

This one uses alum in the soaking water (I'm not quite sure what that is, and what an alternative for it would be)
Instead of oiling the skin with neatsfoot oil, it uses egg yolks, and then sands the skin once it's dry.
I wonder if I could follow the washing soda/salt method from the first video, but use egg yolk instead of oil? Or if it would work with sunflower oil/olive oil/other easily-found oil instead?
 
Kate Downham
gardener & author
Posts: 3110
Location: Tasmania
1858
7
homeschooling goat forest garden fungi foraging trees cooking food preservation pig wood heat homestead
  • Likes 6
  • Mark post as helpful
  • send pies
    Number of slices to send:
    Optional 'thank-you' note:
  • Quote
  • Report post to moderator
I found an article going into detail about doing this: https://www.motherearthnews.com/homesteading-and-livestock/tanning-sheepskin-zmaz75ndzgoe


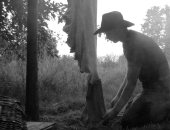
[1] OBTAIN THE HIDE . . . no problem if you have your own sheep. Otherwise, check with someone in your area who does slaughtering. The commercial houses don't buy any sheepskins from our local man, and he'd been throwing them out . . . so we've asked him to save them for us.

Remember that sheepskins must be cooled before they're salted (how many hours this cooling takes depends on the weather). If someone is saving hides for you, ask him to spread them flesh side up and not to stack them. Then, pick up the skins as soon as possible and get them treated.

[2] SALT. First cut off any large pieces of meat and fat and trim ragged areas from the edges of the hide. Then apply a good half inch of plain granulated salt on every square inch of the pelt’s flesh side. Watch for folds . . . the skin can putrefy at those points and the smell will be terrible. And don't try to cut costs by skimping on the preservative! There's no need to do so anyway . . . we paid $1.95 for 100 pounds of fine salt at the grocery.

[3] SCRAPE OR FLESH. After four days brush the salt off and with a knife (or bare fingers, if necessary) pull away the thin adhering layers of meat and fat. Be careful not to tear the hide by getting too rough with your blade. A railing, sawhorse, or stall divider in the barn can serve as a fleshing beam on which to spread the skin while you work.

An hour of effort should get the worst of the scraping behind you. As the flesh pulls free you'll also be removing much of the muscular inner skin, which must eventually come off altogether to reveal the fine, already leather–like area beneath. You can attack this residue periodically while the hide is in the tanning solution.

[4] TAN. As I've already mentioned, the tanning solution we used consisted of 1 pint of salt and 2 ounces of oxalic to each gallon of water. It's possible to do as we did the first time and brush the chemical onto the flesh side of the skins. Keep the surface dampened by applying the mixture twice a day, and between applications stack the hides two-by-two with their back sides together (or fold a single pelt in half, flesh side in). This process should take four days.

Now that I've had a little experience, though, I think it’s preferable to just immerse the entire hide in the liquid. Then you can work from time to time at getting off that darned thin muscular layer without having to repaint each pelt with the solution every time (since you'll 'be submerging it again anyhow). The skins will be ready after 48 to 72 hours soaking.

If you go this route, of course, You'll have to find container — such as a large canning crock or wooden barrel that won't be eaten up by the acid solution. The drum liners which bag companies supply for the shipping of chemicals could, however, be used to adapt a plastic or metal vessel for your purpose.

[5] NEUTRALIZE AND WASH. Rinse the hide in water, and then give it two washings in several gallons of water which you've added a cup of washing soda. Follow this important step — which removes the acid from the skin — with several launderings in soap, detergent, or Woolite. Rinse until the water remains clear.

[6] DRY AND SOFTEN. Wring out as much water possible, since the wool acts like a sponge and would take forever to drip dry. If the weather is warm, you can hang hide outside. Otherwise, you can proceed — as we did — to a very cautious use of the clothes dryer on its lowest setting. (Lacking both a dryer and a sunny spell, you'll have to resort to a hair dryer, or lots of wringing and separating the wool to encourage the moisture to leave.) In any case, the fleece will dry first . . . and while it still feels a bit damp is a good time to apply saddle soap and neat's-foot oil or leather conditioner to the skin side of the pelt.

As the hide dries, keep pulling and stretching it in all directions. This separates the leather fibers and keeps the rug from hardening like a plank. The skin may look yellowish in areas where the surface is drying, but its hue will lighten as you work. The finished product should be white (or slightly tan from the oil dressing), soft and supple.

Don't think that you can just apply a bit of softening agent to the damp hide and have the skin turn out like glove leather. Pulling, rubbing, and stretching periodically while the drying goes on Is the only way to produce a nice inner surface rather than a brown board.

[7] COMB-OUT. As long as the skin and fleece are damp it's very easy to pull the wool out, so resist the temptation to get on with the brushing until the whole thing is dry. Then draw the fingers of fleece apart and groom the curly mass into a finished product (after which you. may want to add a backing to your rug). Shorter-wooled hides make great slippers, vests, and so on.

 
Kate Downham
gardener & author
Posts: 3110
Location: Tasmania
1858
7
homeschooling goat forest garden fungi foraging trees cooking food preservation pig wood heat homestead
  • Likes 3
  • Mark post as helpful
  • send pies
    Number of slices to send:
    Optional 'thank-you' note:
  • Quote
  • Report post to moderator
More links...
Lots of helpful pictures on this one: https://www.yellowbirchhobbyfarm.com/how-to-make-a-sheepskin-rug/

A long and confusing comments section on this one: https://www.backcountrychronicles.com/how-to-tan-a-hide/

One comment said that using 2 quarts of white vinegar to every pound of skin and pound of salt can be used instead of the oxalic acid in the water. I'm not sure how much the skin would weigh without the wool on it, so I don't know how much vinegar to use, but the oxalic acid amounts recommended by people seem to change depending on who is writing the directions, so I don't think I can go too badly wrong with vinegar.
 
Posts: 15
Location: Nelson, VA
8
kids rabbit homestead
  • Likes 9
  • Mark post as helpful
  • send pies
    Number of slices to send:
    Optional 'thank-you' note:
  • Quote
  • Report post to moderator
The process above is not actually tanning the hide, it's called pickling, and was a common process used to preserve the hides for short periods of time for transport or to save enough hides to sell, and to preserve the hair by preventing bacterial growth. Oxalic acid doesn't have any actual tanning properties. Pickling works short term, but isn't a great option if you want a durable long lasting hide.

My main suggestion is to use emulsified oils and woodsmoke. It's how I've done most of my hides. The brain of the sheep is a wonderful source of lecithin, a tanning agent. You can boil the brain in a small amount of water and apply to the flesh side of the hide. This is a very common practice called brain tanning, and it was one that native Americans used all the time. Another source is egg yolks. You can research both of these methods online, their is a great deal of information about them, including the chemical process. But basically, you mash the boiled brain and water, and apply the brain-paste to the flesh side of the hide. You then rub and work the solution into the hide, and fold the skin flesh sides together, and allow the lecithin to do it's work.

You can also brush the back of the hide with vegetable tannins. I make a solution using acorns and oak galls. I brush the tanning solution onto the skin about 3 times a day and make sure it doesn't dry out in the mean time. The tanning solution is made by soaking the acorns in cold water for about a week, then removing the vegetable matter (you don't want starches in your tanning solution)
Once the hide has been tanned, cut a small strip from the edge and look at it from the side. You want to see the literal tan color all the way through the skin, if it's white in the middle it still needs to continue being treated with the tanning solution.

Once the hide is tanned, I always smoke the hide to add tannins and ensure the skin is tanned, and to waterproof the hide, as moisture is a hides worst enemy. Again, you can research this process online, but the basic method is to tie it up near a stove or fire, and let the smoke billow onto the skin continually for several hours. The creosote and chemicals in the smoke continue tanning the hide and preserve and treat it against moisture. I made a special smoking stove with a perforated pipe off to the side. I tie the hide around the perforated pipe, and the cooled smoke billow up the pipe and onto the skin.

Good luck with your hides! I'm sure they will be beautiful 😍
 
Kate Downham
gardener & author
Posts: 3110
Location: Tasmania
1858
7
homeschooling goat forest garden fungi foraging trees cooking food preservation pig wood heat homestead
  • Likes 2
  • Mark post as helpful
  • send pies
    Number of slices to send:
    Optional 'thank-you' note:
  • Quote
  • Report post to moderator
Thank you Amanda!

Good timing as well, I just picked up the hide and meat yesterday. I'd asked for the head as a friend of mine wanted to try an Icelandic dish that uses it, so if I can figure out how to get the brain out, I can use that.

I will post pictures here.
 
pollinator
Posts: 710
Location: SE Ohio
78
goat rabbit books fiber arts sheep homestead
  • Likes 6
  • Mark post as helpful
  • send pies
    Number of slices to send:
    Optional 'thank-you' note:
  • Quote
  • Report post to moderator
Using alum is the easiest way to do and soften it /but/ if it gets wet you have to soften it again. it's like the 'for decoration' tan. from what I've seen/read/heard.
I'm getting things in order to do 3 ram lambs and a 2y/o ram myself. So I'm also trying to decide what to try with the hides. At least if I have a go and ruin them, they won't be completely wasted. And if any turn out, even better! ha!
 
Kate Downham
gardener & author
Posts: 3110
Location: Tasmania
1858
7
homeschooling goat forest garden fungi foraging trees cooking food preservation pig wood heat homestead
  • Likes 5
  • Mark post as helpful
  • send pies
    Number of slices to send:
    Optional 'thank-you' note:
  • Quote
  • Report post to moderator
I've made some progress.

A young wether goat died. I'd never skinned an animal before and didn't have anyone there to teach me, but it went smoothly and wasn't as difficult as I'd thought it would be. Makes me more confident for future butchering.

I asked my husband nicely to split the skull with his axe to get the brain out for tanning.

I put lots of salt on the skin side and left it for two days.

Getting rid of the layer of fat clinging to the skin is a bit of a long process at times. Some parts peel off quickly in big pieces, others peel much more slowly. I did thIs in spare time over a couple of days.

I soaked the trimmed skin in a mix of 1 part vinegar 2 parts water for two days. Then washed it in our usual homemade laundry liquid, with some extra washing soda to help neutralise the acidity. Rinsed it out a couple of times.

I left it to dry, thinking it would take ages, but it was very quick in summer. Sheep skin probably takes longer.

I added water to the jar of brains and left it on the warm (not hotplate) part of the woodstove for an hour or two, then shook it to blend it up.

The brain and water mix got rubbed into the skin. After a couple of hours it was mostly dry.

I still have to sand it.

The sheep skin had been sitting there in salt since around the time I started this thread. For a while I was just too overwhelmed with other stuff to start a new project with lots of unknown times, but I opened the bag up, not sure if it would be usable or not, and it is still fine! The peeling bits off part is harder than for the small goat skin, but I am just picking it up and doing a bit each day, and it's getting done. There was no need for me to feel like I had to do it all in one day.
 
pollinator
Posts: 223
Location: East Texas, USA
131
books chicken fiber arts sheep homestead ungarbage
  • Likes 8
  • Mark post as helpful
  • send pies
    Number of slices to send:
    Optional 'thank-you' note:
  • Quote
  • Report post to moderator
I use the Mother Earth News article you shared above, buying my oxalic acid and washing soda from https://www.vandykestaxidermy.com/
The results have been beautiful, with squirrel skin preserved for decoration and a fluffy sheepskin on my sofa. My next goal is to provide my sister with the squirrel skins to make a pair of baby mocassins, but I'm not sure I can get the skins supple enough for the stitchwork without proper 'tanning,' so I need to refine my process somewhat.
 
Rusticator
Posts: 8593
Location: Missouri Ozarks
4560
6
personal care gear foraging hunting rabbit chicken cooking food preservation fiber arts medical herbs homestead
  • Likes 4
  • Mark post as helpful
  • send pies
    Number of slices to send:
    Optional 'thank-you' note:
  • Quote
  • Report post to moderator
Sorry I'm late to this party! I need to do (if they're still good, having been in the freezer, for months, with nothing being done, before going in there) 2 deer hides. One of the things I found, in my more recent searching, was using a pressure washer, to flesh the hide, instead of scraping. Seems like that would be WAY easier on my poor hands.
We have a pressure washer, so I'm equipped - but, has anyone here tried that?
 
Posts: 23
4
  • Likes 5
  • Mark post as helpful
  • send pies
    Number of slices to send:
    Optional 'thank-you' note:
  • Quote
  • Report post to moderator
I've been reading Unlearn, Rewild, and there's plenty of useful information in there about tanning.

He discusses different hardwoods for tannin tanning, as well as brain tanning, tanning with salt, tanning with eggs, and yet more techniques.

Not a response specifically to the pressure washer question, but might help someone out.

EDIT: this thread is relevant.
 
Carla Burke
Rusticator
Posts: 8593
Location: Missouri Ozarks
4560
6
personal care gear foraging hunting rabbit chicken cooking food preservation fiber arts medical herbs homestead
  • Mark post as helpful
  • send pies
    Number of slices to send:
    Optional 'thank-you' note:
  • Quote
  • Report post to moderator
Kate, how did this project go? I'm hoping you have pics?
 
Kate Downham
gardener & author
Posts: 3110
Location: Tasmania
1858
7
homeschooling goat forest garden fungi foraging trees cooking food preservation pig wood heat homestead
  • Likes 4
  • Mark post as helpful
  • send pies
    Number of slices to send:
    Optional 'thank-you' note:
  • Quote
  • Report post to moderator

Carla Burke wrote:Kate, how did this project go? I'm hoping you have pics?


I've experimented a bit with this now. I'll try to get photos sometime.

First one was a skin from a young goat. I salted it, scraped it, soaked in vinegar-acidified water (I may have used washing soda afterwards although I'm not 100% sure), then I rubbed the skin side with the goat's brains that I'd heated on the side of the woodstove with around 2/3 their volume in water and whisked up alltogether.

This one turned out quite well - it's now a rug on a chair. It's quite stiff, not something you'd use for clothes, but good as a furniture covering or floor rug. Looks great.

My friend does venison hides just with salt and brains, with no soaking, and she gets similar results to this, slightly stiffer than mine, but looking good on the fur side.

A sheepskin that I got around to doing on time, I did with salt, then scraping, then I tried the alum water bath. I didn't have any brains this time so I rubbed it with egg yolks... Not a good thing to use if there are cats around! We had a bunch of kittens at the time and they were all thinking it was a great treat! This one has some blue mould on the skin side, but is otherwise good. I might work on it some more, but for now it's a floor rug.

Scraping the sheepskin is a lot more work than the goat skin. I'm not sure if that's because it's from an older sheep vs a younger goat, or if sheep are just harder to do than goats.

I've had several skins that I've intended to cure along with these two, but just did not get around to them in time and they went bad. The salt helps preserve them for a short time, but in future I'll know that it's one of those projects I need to do sooner rather than later.
 
Carla Burke
Rusticator
Posts: 8593
Location: Missouri Ozarks
4560
6
personal care gear foraging hunting rabbit chicken cooking food preservation fiber arts medical herbs homestead
  • Likes 1
  • Mark post as helpful
  • send pies
    Number of slices to send:
    Optional 'thank-you' note:
  • Quote
  • Report post to moderator
Thanks, Kate! That sounds very much like deer, then. Not a huge surprise, but nice to know. My understanding is that if you smoke them while they're still wet from the tanning, it softens them, and something in that process helps them stay soft, even if they get wet, again. Smoking them like that is a process I've not yet tried - but, want to.  I'd wondered if you'd done that.
 
Kate Downham
gardener & author
Posts: 3110
Location: Tasmania
1858
7
homeschooling goat forest garden fungi foraging trees cooking food preservation pig wood heat homestead
  • Likes 2
  • Mark post as helpful
  • send pies
    Number of slices to send:
    Optional 'thank-you' note:
  • Quote
  • Report post to moderator
We don't have things set up here to smoke anything at the moment so it's not something I've tried. I guess a standard cold smoking set up would be right for it? We might set up one one day so maybe I'll try this then.
 
Carla Burke
Rusticator
Posts: 8593
Location: Missouri Ozarks
4560
6
personal care gear foraging hunting rabbit chicken cooking food preservation fiber arts medical herbs homestead
  • Likes 3
  • Mark post as helpful
  • send pies
    Number of slices to send:
    Optional 'thank-you' note:
  • Quote
  • Report post to moderator
Hmm... I don't know? Native Americans built smoky fires for it. It would be interesting to know if cold smoking would work.  I'll look into it, as well as the benefits of smoking, because it seems like it offered more than just keeping it soft(as if that's not reason enough to try it!).
 
Posts: 55
Location: Upper Midwest - 4b
11
kids books food preservation
  • Likes 4
  • Mark post as helpful
  • send pies
    Number of slices to send:
    Optional 'thank-you' note:
  • Quote
  • Report post to moderator

Carla Burke wrote:Sorry I'm late to this party! I need to do (if they're still good, having been in the freezer, for months, with nothing being done, before going in there) 2 deer hides. One of the things I found, in my more recent searching, was using a pressure washer, to flesh the hide, instead of scraping. Seems like that would be WAY easier on my poor hands.
We have a pressure washer, so I'm equipped - but, has anyone here tried that?


Yes, a pressure washer will work, provided that it's of sufficient capacity (PSI). The little electric ones won't cut it. You'll also want a straight stream (0 degree) nozzle. I've fleshed both deer and a cow hide with it, and it works quite well. There's a sweet spot where it pretty much just cuts the flesh away. Just be warned...it's messy. You will have a large area that's soaking wet and covered in little bits of animal flesh. I also tried using it to take the hair off the deer hide...that sort of works, but it's easy to cut the hide in the process. There are probably better way to do that part of it.
 
Carla Burke
Rusticator
Posts: 8593
Location: Missouri Ozarks
4560
6
personal care gear foraging hunting rabbit chicken cooking food preservation fiber arts medical herbs homestead
  • Mark post as helpful
  • send pies
    Number of slices to send:
    Optional 'thank-you' note:
  • Quote
  • Report post to moderator

Benedict Bosco wrote:Yes, a pressure washer will work, provided that it's of sufficient capacity. The little electric ones won't cut it. You'll also want a straight stream (0 degree) nozzle. I've fleshed both deer and a cow hide with it, and it works quite well. There's a sweet spot where it pretty much just cuts the flesh away. Just be warned...it's messy. You will have a large area that's soaking wet and covered in little bits of animal flesh. I also tried using it to take the hair off the deer hide...that sort of works, but it's easy to cut the hide in the process. There are probably better way to do that part of it.


Thank you! I'll be starting from scratch. Turned out hubby had tossed the hides, too Make room for the side of beef he bought. And, we didn't get any deer, this season... life got in the way of hunting. So the freezer is empty now, but for the hog we just bought. ~grumbles~
 
Benedict Bosco
Posts: 55
Location: Upper Midwest - 4b
11
kids books food preservation
  • Likes 2
  • Mark post as helpful
  • send pies
    Number of slices to send:
    Optional 'thank-you' note:
  • Quote
  • Report post to moderator
One other thing, regarding salt...just go to your local farm store and buy a big (probably 50#) bag of livestock salt. It's considerably cheaper, and plenty sufficient for hide preservation. Just don't confuse it with the table salt.
 
Kate Downham
gardener & author
Posts: 3110
Location: Tasmania
1858
7
homeschooling goat forest garden fungi foraging trees cooking food preservation pig wood heat homestead
  • Likes 3
  • Mark post as helpful
  • send pies
    Number of slices to send:
    Optional 'thank-you' note:
  • Quote
  • Report post to moderator
Photos of some hides I've tanned with brains.

The white one is the first one I did. It's been used as a chair cover for a while and is still looking good.

Black one is more recent, and has been used as a floor rug in a room without much traffic.
_2028828-splodgy-skin.JPG
brain tanned hide
_2028767-korova-skin.JPG
tanned hide floor rug
 
pollinator
Posts: 1560
Location: Zone 6b
211
goat forest garden foraging chicken writing wood heat
  • Likes 4
  • Mark post as helpful
  • send pies
    Number of slices to send:
    Optional 'thank-you' note:
  • Quote
  • Report post to moderator
Just a comment on the Indian tanning with brains and then smoking -- it does work.  Does a beautiful job, in fact (I've not done it myself, but we lived in a part of the Interior of Alaska for years where the local Athabaskan people still do this kind of work).  However.  It also smells, and the smell NEVER comes out.  Just so you know.  (That was how we identified locally tanned items vs. commercially tanned -- the sniff test.)  It's not necessarily a bad smell, per se, and if you are used to it, it's not really objectionable, but it is smoky and it is noticeable.  It's probably fine for rugs and boots; it's not so good for items that are going to be close to someone's face, unless they don't mind the smell.
 
Posts: 2
  • Likes 5
  • Mark post as helpful
  • send pies
    Number of slices to send:
    Optional 'thank-you' note:
  • Quote
  • Report post to moderator
I fleshed tanned and smoked 2 sheep hides with help for my first time.  I washed and soaked the salted hides before fleshing getting lots of dirt out..  I found the pressure washer much easier and faster than fleshing by hand.  Did egg wash with stretching on a rack.  Using adjustable toggle clamps was very helpful.   I found breaking the hide to soften it was tough.  I'd like to find a machine to break the hide.  If I read correctly there are toxic chemicals to break down the fibers instead of manual breaking /softening but I don't want to use toxic chemicals.  The hides definitely need thorough washing after smoking.  I was told that I can use a washing machine - at commercial laundry not my wife's.  Now I'm wondering is there some kind of agitator that would help break the hide?  One advantage to the natural smoked hide process is that the hides can be washed.  However with my back problems I need to find some labor saving options.   My back will no longer allow me to do the manual labor.  Tough facts of life changes.  Psalms say Sow with tears Reap with joy.
Anxious for suggestions.
 
Every snowflake is perfect and unique. And every snowflake contains a very tiny ad.
Freaky Cheap Heat - 2 hour movie - HD streaming
https://permies.com/wiki/238453/Freaky-Cheap-Heat-hour-movie
reply
    Bookmark Topic Watch Topic
  • New Topic