• Post Reply Bookmark Topic Watch Topic
  • New Topic
permaculture forums growies critters building homesteading energy monies kitchen purity ungarbage community wilderness fiber arts art permaculture artisans regional education skip experiences global resources cider press projects digital market permies.com pie forums private forums all forums
this forum made possible by our volunteer staff, including ...
master stewards:
  • Carla Burke
  • Nancy Reading
  • John F Dean
  • r ranson
  • Jay Angler
  • paul wheaton
stewards:
  • Pearl Sutton
  • Leigh Tate
  • Devaka Cooray
master gardeners:
  • Christopher Weeks
  • Timothy Norton
gardeners:
  • thomas rubino
  • Matt McSpadden
  • Jeremy VanGelder

RMH for Dummies! Please help guide me through my first build!

 
pollinator
Posts: 231
Location: Western Washington State
47
  • Mark post as helpful
  • send pies
    Number of slices to send:
    Optional 'thank-you' note:
  • Quote
  • Report post to moderator

Satamax Antone wrote:I have always heard, if it cracks, there is too much clay.

Have you tested your "dirt" for clay?


It is mostly silt and sand with little to no clay. (I have done a mason jar test, and a "squeeze test".
It is the same crappy soil I have to work with in my garden, so I am all too familiar with adding organic matter and amendments back into it.  Water runs through it like a sieve.

My original "goto" mix was 1/3 sand, 1/3 dirt and 1/3 clay.  I get some cracks with this.

I can use 50/50 sand and clay, but that is $$ and when adding straw to that mix, it turns to sandy straw crumble, so I have to add more clay back into it.  It is a hot mess.

**Do you think those cracks will affect the integrity of my bench??

Thank you.
 
Staci Kopcha
pollinator
Posts: 231
Location: Western Washington State
47
  • Mark post as helpful
  • send pies
    Number of slices to send:
    Optional 'thank-you' note:
  • Quote
  • Report post to moderator

thomas rubino wrote: /quote]

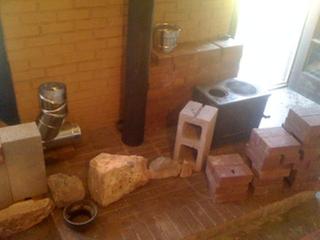
I am almost to covering the pipes! Cob is ready to go.

1)   do I just spread cob layer over the pipes and then add rock?

2) Should I lay an inch or so layer, let it set, and then start to add rock?

Thank you.

DSC_1128.JPG
[Thumbnail for DSC_1128.JPG]
 
Rocket Scientist
Posts: 1809
Location: Kaslo, BC
525
building solar woodworking rocket stoves wood heat greening the desert
  • Likes 1
  • Mark post as helpful
  • send pies
    Number of slices to send:
    Optional 'thank-you' note:
  • Quote
  • Report post to moderator
Staci,   If you try to rip a (dry) chunk of cob out that has these cracks in it, does it have any integrity or mostly crumble?
When you hit it with a hammer, is it pretty solid or mostly crumble?

If it is not holding up very well to these tests and you don't feel good about it, then perhaps remove the worst of it with a claw hammer, wet it down real good and try again. Certainly don't throw away the chunks, but rather bust them up, reconstitute them with enough water, and add some more clay until its back into a workable cob again.
I have changed my heater so many times recycling the same cob over and over again I'm amazed at how versatile cob is!
Being one layer(?) and a bench (not a house supporting wall) I would probably not worry too much about it but use your best judgement.

From your picture, it looks like you could squeeze those red bricks(?) even a bit closer together. As Thomas pointed out earlier, rock holds more heat longer than cob does and also decreases the amount of cob you have to make.
If you think of it as a rock bench rather than a cob bench it might help.
 
Staci Kopcha
pollinator
Posts: 231
Location: Western Washington State
47
  • Likes 1
  • Mark post as helpful
  • send pies
    Number of slices to send:
    Optional 'thank-you' note:
  • Quote
  • Report post to moderator

Gerry Parent wrote:Staci,   If you try to rip a (dry) chunk of cob out that has these cracks in it, does it have any integrity or mostly crumble?

Being one layer(?) and a bench (not a house supporting wall) I would probably not worry too much about it but use your best judgement.

From your picture, it looks like you could squeeze those red bricks(?) even a bit closer together. As Thomas pointed out earlier, rock holds more heat longer than cob does and also decreases the amount of cob you have to make.
If you think of it as a rock bench rather than a cob bench it might help.


Hi Gerry,
 I doubt that it would hold up to  some of those tests.  I did stand on it and it didn't collapse or crumble under me , so I am just going to go with it.
I guess the fact/idea that it is not "set in stone", is something to remember. AND the fact that the material is all reusable.
I will snug the bricks in closer as well, and pay closer attention in the future.
Thank you!
 
rocket scientist
Posts: 6382
Location: latitude 47 N.W. montana zone 6A
3232
cat pig rocket stoves
  • Likes 1
  • Mark post as helpful
  • send pies
    Number of slices to send:
    Optional 'thank-you' note:
  • Quote
  • Report post to moderator
Hi Stacie;  Keep building. It looks good, when you get a crack, mix some sandy clay and push it in. Your outer visual layer is the only one that is important. Working with cob cracking can be an ongoing thing. My barrel cob continues to crack to this day. I keep a 5 gal bucket with some reconstituted cob sitting aside waiting. When i need to patch just add water.
Having an all cob bench with children playing ... I'm guessing you may need a patch bucket sitting aside yourself.
The other option is to side your mass. I sided my mass with red brick , but anything can be used once you move away from the core. Even wood or sheet rock can contain your mass.
 
Staci Kopcha
pollinator
Posts: 231
Location: Western Washington State
47
  • Mark post as helpful
  • send pies
    Number of slices to send:
    Optional 'thank-you' note:
  • Quote
  • Report post to moderator
Smoke at manifold!!

Hi,
 I was just lighting today, and noticed very wispy light smoke swirling around the manifold cleanout.
Not sure what to do about this.  Cap is SUPER snug on there, so guessing it is coming from around the pipe...?
I still have another layer or 2 of cob to put in, but since i didn't allow enough length on the pipe, I am not going to be able to get much more cob around it.
???

DSC_1178.JPG
[Thumbnail for DSC_1178.JPG]
DSC_1177.JPG
[Thumbnail for DSC_1177.JPG]
 
Staci Kopcha
pollinator
Posts: 231
Location: Western Washington State
47
  • Mark post as helpful
  • send pies
    Number of slices to send:
    Optional 'thank-you' note:
  • Quote
  • Report post to moderator
It only seems to be visible at a slow start up.  Once it is cooking well, no more smoke.
 
thomas rubino
rocket scientist
Posts: 6382
Location: latitude 47 N.W. montana zone 6A
3232
cat pig rocket stoves
  • Likes 2
  • Mark post as helpful
  • send pies
    Number of slices to send:
    Optional 'thank-you' note:
  • Quote
  • Report post to moderator
Smear some more mud around it.  It will seal up.  If it persists than try removing cleanout door and sealing with mud from the inside.
How is your dragon doing ? Is she waking up and roaring yet?  Inquiring minds and all us permies would like to know???
 
Staci Kopcha
pollinator
Posts: 231
Location: Western Washington State
47
  • Likes 2
  • Mark post as helpful
  • send pies
    Number of slices to send:
    Optional 'thank-you' note:
  • Quote
  • Report post to moderator

thomas rubino wrote:Smear some more mud around it.  It will seal up.  If it persists than try removing cleanout door and sealing with mud from the inside.
How is your dragon doing ? Is she waking up and roaring yet?  Inquiring minds and all us permies would like to know???


Hi Thomas,
 Doing okay.  Next step is to cover the pipes.  I had to pick up more clay and builder's sand this weekend. Also collected a bunch of rocks for mass.
After pipes are covered, I am guessing 1 or 2 more layers to get to 6" above pipes!
Haven't fired it up for a few days, as it was pretty warm here.  Started it today.
It has been going a solid 2+ hours and here are the measurements: (these are pretty consistent now)

side barrel: 258 F
top barrel: 311
out of manifold: 139
after first 90: 109
after 180: 97
after 2nd 90: 85
end of run: 89
first 12" of chimney: 88
Last 12" chimney: 86
DSC_1180.JPG
[Thumbnail for DSC_1180.JPG]
DSC_1179.JPG
[Thumbnail for DSC_1179.JPG]
 
thomas rubino
rocket scientist
Posts: 6382
Location: latitude 47 N.W. montana zone 6A
3232
cat pig rocket stoves
  • Likes 1
  • Mark post as helpful
  • send pies
    Number of slices to send:
    Optional 'thank-you' note:
  • Quote
  • Report post to moderator
You know Stacie, that "smoke" you see could be steam... spread some more cob around and keep an eye on it.
 
Staci Kopcha
pollinator
Posts: 231
Location: Western Washington State
47
  • Mark post as helpful
  • send pies
    Number of slices to send:
    Optional 'thank-you' note:
  • Quote
  • Report post to moderator
Rocket woes!
Something has changed significantly  in the past three firings- along the lines of when I first fired up and was concerned of over-draft.  
Today was the worst.  After 40 minutes of trying to light it, I deferred to my husband.  It would light, start burning and then go out. I even had a nice coal bed.   I used ALL of my usual tricks- and I have a lot, but nothing.  My husband ended up jamming the tunnel full to block some of the draft.  Even then, the feed had to be 90% covered or it would go out.
 So that is #1.
#2 is the heater is not getting as hot.  I burned it for almost 4 hours yesterday, and not even a hint of steam coming out of the teapot (unusual).  It has been burning for a solid hour now, and readings of side barrel are 150 and top of barrel just over 200.  Again, abnormal.
 The other 2 times, there was some wind outside, so I chalked it up tp that.  Today, no wind and the most pronounced trouble.
I have tried packing the feed box full, even shoved in a fat piece of madrona wood, which is supposed to burn slow and hot, and it is just rip roaring them apart.  There is a very obvious windy/sucking sound much more than usual.

The only changes that I have made was covering the pipes with cob and then a layer of cob and stone.

Is it broken??
:(
DSC_1191.JPG
[Thumbnail for DSC_1191.JPG]
 
thomas rubino
rocket scientist
Posts: 6382
Location: latitude 47 N.W. montana zone 6A
3232
cat pig rocket stoves
  • Likes 1
  • Mark post as helpful
  • send pies
    Number of slices to send:
    Optional 'thank-you' note:
  • Quote
  • Report post to moderator
Pop the top on your barrel and check your riser. Make sure that is clear. If necessary go on the roof make sure nothing blocked you up there.  

Otherwise might just be the cob sucking up your heat.  
 
thomas rubino
rocket scientist
Posts: 6382
Location: latitude 47 N.W. montana zone 6A
3232
cat pig rocket stoves
  • Likes 1
  • Mark post as helpful
  • send pies
    Number of slices to send:
    Optional 'thank-you' note:
  • Quote
  • Report post to moderator
Might need to open a clean out door and check for excessive ash.
 
Staci Kopcha
pollinator
Posts: 231
Location: Western Washington State
47
  • Mark post as helpful
  • send pies
    Number of slices to send:
    Optional 'thank-you' note:
  • Quote
  • Report post to moderator

thomas rubino wrote:Pop the top on your barrel and check your riser. Make sure that is clear. If necessary go on the roof make sure nothing blocked you up there.  

Otherwise might just be the cob sucking up your heat.  


Hi Thomas,
 I can check on the barrel when it is cooled tomorrow.  I can also check the cleanout.
I do scoop out the ash from the feed and tunnel before lighting each time.
I am sure that the cob is sucking up some of the heat, but the increase in draft seemed odd.
It is almost like it is blasting through so fast, that the time for heat retention is reduced.  Any thoughts on what that could be?
Thanks!
 
thomas rubino
rocket scientist
Posts: 6382
Location: latitude 47 N.W. montana zone 6A
3232
cat pig rocket stoves
  • Mark post as helpful
  • send pies
    Number of slices to send:
    Optional 'thank-you' note:
  • Quote
  • Report post to moderator
Good Morning Stacie;

I guess I did not understand your post yesterday. I did not realize you were having the super draft issue again.
 This is very uncommon, most people do not have enough draw... What did you do ??? You bad rocket scientist :)
LOL don't worry with help it can be figured out.
Do you live in a windy area ?  Has there been a weather change recently  low pressure / high pressure ?  I read that Paul Wheaton had a RMH with this problem. Something is causing this ... and NO your stove isn't broken... if you had bad draft that might have been it.
I find it hard to believe that your stove has so much draft that is sucks itself out ! That's very weird.  That stove should be roaring with that much draft.  
Show us with a video or  pictures of your fire starting and feeding style step by step.  Your using super dry wood right ? Split small to start right ?  After it has started the feed tube should be full , completely full right ?  Of split dry larger pieces?
Your new cob will steal heat from your mass but your barrel top should not be much effected by wet cob. That barrel top should be 4-500 + shortly after getting going.
My 8" can hit 1100 F if I baby it and routinely runs 500-800 F all the time.
Your stove is still wet even if it looks dry on the outside.
Tell me your spec's)  How much horizontal run including the deductions are you pushing ?  What is your top gap at the riser ?
A "normal" wood stove has a straight vertical pipe , never have I heard of one with too much draw !  How can yours with 20-35' of horizontal run suck out a fire ?  
 
Staci Kopcha
pollinator
Posts: 231
Location: Western Washington State
47
  • Likes 1
  • Mark post as helpful
  • send pies
    Number of slices to send:
    Optional 'thank-you' note:
  • Quote
  • Report post to moderator

thomas rubino wrote:Good Morning Stacie;

I guess I did not understand your post yesterday. I did not realize you were having the super draft issue again.
 This is very uncommon, most people do not have enough draw... What did you do ??? You bad rocket scientist :)
LOL don't worry with help it can be figured out.  


Hi Thomas,
 Thank for helping me problem solve.  I am stumped. I am not sure why it would change after a dozen or so times.
Lighting normally goes well for me:
   I made egg carton/lint/wax starters.  I set one in, lay on some tiny thin sticks/tinder, place an alcohol soaked cotton ball on top and light.  I then add bits of shaved off pallet wood, then slightly thicker pallet wood and eventually thicker sticks and finally, when it is really going, some thin "logs" ( 3").  This has worked well for me, yesterday was the exception.  It would get going, pallet slivers ignited but kept going out.  I ended up using 4 lint starters and over 5 "balls of fire".  There was NO wind yesterday and temp was consistent with what it has been: 50's.   No clue about pressure systems.
 I fill up the box eventually, once it is going steady.
  The fact that the barrel was not getting "hot" has me concerned.  ??  Also, that the second pipe run is consistantly 80.  I am not sure how that will dry out the cob or warm my bottom.

   Do you think manifold could be too big?  Is that possible?  I never have to prime the thing. When I reach in to clean out the ashes, I always feel a draft on my hand.

The stats on my build are:

Bench: 25 feet, includes 1- 180 degrees and 2- 90 degrees.
Fire feed: 16" height
burn tunnel:  23" long
stove pipe from bench to ceiling: 80"
triple wall chimney above the roof (almost no pitch) 36"
Height above the barrel: a bit shy of 2.5"
I was careful to maintain a constant CSA for 6" system (= 30)

I will fire it up later today and see how it goes.  I will take pics and video (If I can be that saavy)
and let you know.
I have halted on cobbing for now.

Sidelight:  the super ugly barrel has been transforming into a beauty! Coppery tones and darker.  I am pleased!

Thank you.
 
Posts: 400
Location: SW Missouri
86
hugelkultur duck trees chicken pig bee solar wood heat
  • Likes 2
  • Mark post as helpful
  • send pies
    Number of slices to send:
    Optional 'thank-you' note:
  • Quote
  • Report post to moderator
Hey Staci, I wonder about trying to close up the barrel gap at the top of the riser.  If you could cut some bricks to about an inch thick and glue the to the top of the riser with clay slip it should choke it down and increase barrel temp.  Win win. Might take some experimenting to determine the best gap, but I would start by reducing it an inch and see what happens.

It's looking great! I'm so glad we did this!
 
thomas rubino
rocket scientist
Posts: 6382
Location: latitude 47 N.W. montana zone 6A
3232
cat pig rocket stoves
  • Likes 2
  • Mark post as helpful
  • send pies
    Number of slices to send:
    Optional 'thank-you' note:
  • Quote
  • Report post to moderator
We will figure this out.  
No a big manifold is a help not a hindrance.
Sounds like we can rule out the weather. High /low pressure system change might have an effect if you were getting smoke back. Your having too much draw... (that is so different)

I want you to try something.
Place two or maybe three split very dry pieces of log directly in front of the feed tube, you are effectively blocking 60-80 % of the burn tunnel, with wood that is large enough to stay going longer than a few minutes. It must be DRY.
Do you have dry cedar wood ?  If so use that to make your kindling.  Now, you should not need your wax helper starter stuff but use it if you like.  Place paper & kindling & starter all behind the larger wood .
Split dry wood to finger size & thumb size , place a few in with your kindling. Save the rest until the kindling is burning.Have extra kindling split and on hand.  It is very easy to "play" with the early kindling fire and make it go out.  
As your kindling gets going, slowly place your finger thumb size wood in behind the larger wood trying not to disturb the kindling fire too much. Leave room to add larger split wood sooner than maybe you have been.

That is how I start my stove.  Try it, see if it works for you.

EDIT)   I just read Eric's post.  I seem to recall that a 6" system can be 1.5" minimum gap.  Rather than cut brick you could just form a ring with fireclay/perlite at the top of your riser to shrink that gap down !  That might make a big difference in the super draw.  If it works you can cut bricks for a more permanent riser afterwards.  
 
Eric Hammond
Posts: 400
Location: SW Missouri
86
hugelkultur duck trees chicken pig bee solar wood heat
  • Likes 1
  • Mark post as helpful
  • send pies
    Number of slices to send:
    Optional 'thank-you' note:
  • Quote
  • Report post to moderator
Thomas's idea sounds way easier and faster then mine!
 
thomas rubino
rocket scientist
Posts: 6382
Location: latitude 47 N.W. montana zone 6A
3232
cat pig rocket stoves
  • Likes 1
  • Mark post as helpful
  • send pies
    Number of slices to send:
    Optional 'thank-you' note:
  • Quote
  • Report post to moderator
Stacie;  
Don't stop cobbing unless you want a break.  Your going to need it might as well keep going.
You have used your dragon enough to know the principle is sound. It is going to do everything that was claimed about it.
We will figure out (if Eric hasn't already) why your having issues and your going to LOVE your RMH , I know you do already.
 
Staci Kopcha
pollinator
Posts: 231
Location: Western Washington State
47
  • Likes 1
  • Mark post as helpful
  • send pies
    Number of slices to send:
    Optional 'thank-you' note:
  • Quote
  • Report post to moderator
Thanks, guys!
I will uncap the barrel, add 1/2-3/4" of perlite clayslip to the top and see how it goes.
I will also resume cobbing.

I will let you know!!

I DO love it already. Alas, I am an imperfect perfectionist!
 
Staci Kopcha
pollinator
Posts: 231
Location: Western Washington State
47
  • Mark post as helpful
  • send pies
    Number of slices to send:
    Optional 'thank-you' note:
  • Quote
  • Report post to moderator
Hi,
 I uncapped and added about 3/4 inch of clay/perlite.
Start up went fine, and it seemed a bit more subdued.
Temps on side of barrel were 225-250 degrees, and temp on the top was around 300.

Thomas, do you have an 8" system??  The hottest I have ever managed to get was 400.

(pics show early, mid, and later fire).

Not sure what to think.
S.
DSC_1198.JPG
[Thumbnail for DSC_1198.JPG]
DSC_1199.JPG
[Thumbnail for DSC_1199.JPG]
DSC_1200.JPG
[Thumbnail for DSC_1200.JPG]
DSC_1202.JPG
[Thumbnail for DSC_1202.JPG]
DSC_1207.JPG
[Thumbnail for DSC_1207.JPG]
DSC_1208.JPG
[Thumbnail for DSC_1208.JPG]
 
thomas rubino
rocket scientist
Posts: 6382
Location: latitude 47 N.W. montana zone 6A
3232
cat pig rocket stoves
  • Mark post as helpful
  • send pies
    Number of slices to send:
    Optional 'thank-you' note:
  • Quote
  • Report post to moderator
Yes, mine is an 8". I have never done a 6" build so I am not familiar with temps it should produce.
 Check your top gap like my photo, you may want to change gap again. Even smaller until it acts choked, then increase to fine tune.
Your fire looks pretty good in this burn ... how did it do ? Still get sucked out ? Was there a noticeable difference ? The smaller the top gap the higher the barrel top temp will be until you get too small and then there will be smoke back.
Your cob will dry and an 80 degree bench will be warm have no doubt.  My bench is straight apx 14' long with a 180 turn and 12' back.  The end near the core goes over 100, the far end will be 80-85.. of course it is in a mostly plastic greenhouse.  

Keep us posted on developments.
RMH-rebuild_109.JPG
[Thumbnail for RMH-rebuild_109.JPG]
setting the top gap
 
Gerry Parent
Rocket Scientist
Posts: 1809
Location: Kaslo, BC
525
building solar woodworking rocket stoves wood heat greening the desert
  • Likes 1
  • Mark post as helpful
  • send pies
    Number of slices to send:
    Optional 'thank-you' note:
  • Quote
  • Report post to moderator

thomas rubino wrote:Yes, mine is an 8". I have never done a 6" build so I am not familiar with temps it should produce.


Staci via Thomas,    I have a 6" system and within about 45 min from a cold start, the top portion right over the riser gets to be around 700-900F and the bottom of the barrel about half of that. My barrel however is an old 30 gallon water heater core which have a bit thicker metal and 18" in diameter which is narrower than a typical barrel.
My gap is around 3".
At these temps, its kinda cool (actually hot) to open up one of the bungs on the top and look down the firery inferno of the heat riser. My riser is perlite/clay and it glows solid orange at these temps.  
 
gardener
Posts: 3471
Location: Southern alps, on the French side of the french /italian border 5000ft elevation
194
  • Likes 1
  • Mark post as helpful
  • send pies
    Number of slices to send:
    Optional 'thank-you' note:
  • Quote
  • Report post to moderator
Stacy, i don't think too much draft can exist. Well, that's just my  opinion.

Realy, what would be interesting, is a video of your fire. Post it on YouTube.

But instead of chocking the heat riser. I would rather use a draft stabiliser. Just an idea.
 
thomas rubino
rocket scientist
Posts: 6382
Location: latitude 47 N.W. montana zone 6A
3232
cat pig rocket stoves
  • Mark post as helpful
  • send pies
    Number of slices to send:
    Optional 'thank-you' note:
  • Quote
  • Report post to moderator
Hi Max;  Draft Stabilizer ?  Do you mean a damper ?  Or maybe one of those spinning caps for the chimney ?
 
Satamax Antone
gardener
Posts: 3471
Location: Southern alps, on the French side of the french /italian border 5000ft elevation
194
  • Mark post as helpful
  • send pies
    Number of slices to send:
    Optional 'thank-you' note:
  • Quote
  • Report post to moderator

thomas rubino wrote:Hi Max;  Draft Stabilizer ?  Do you mean a damper ?  Or maybe one of those spinning caps for the chimney ?

 
Staci Kopcha
pollinator
Posts: 231
Location: Western Washington State
47
  • Likes 1
  • Mark post as helpful
  • send pies
    Number of slices to send:
    Optional 'thank-you' note:
  • Quote
  • Report post to moderator

Satamax Antone wrote:Stacy, i don't think too much draft can exist. Well, that's just my  opinion.

Realy, what would be interesting, is a video of your fire. Post it on YouTube.

But instead of chocking the heat riser. I would rather use a draft stabiliser. Just an idea.


Hi,
 I got a video of it with my phone.  Just need to figure out how to get in on You Tube.
I had already put the extra perlite/clay on the riser, so it is a bit more subdued. It can easily be removed though.

Staci
 
Staci Kopcha
pollinator
Posts: 231
Location: Western Washington State
47
  • Mark post as helpful
  • send pies
    Number of slices to send:
    Optional 'thank-you' note:
  • Quote
  • Report post to moderator

Satamax Antone wrote:

thomas rubino wrote:Hi Max;  Draft Stabilizer ?  Do you mean a damper ?  Or maybe one of those spinning caps for the chimney ?


Is that put onto the outside chimney?
 
Staci Kopcha
pollinator
Posts: 231
Location: Western Washington State
47
  • Likes 1
  • Mark post as helpful
  • send pies
    Number of slices to send:
    Optional 'thank-you' note:
  • Quote
  • Report post to moderator
Haven't gotten any more cob on...busy few days.
Tonight's lighting went fine.  Burn temp. still really low.  After an hour, the barrel top was the same temperature as the barrel side: about 200 degrees F.
Covering the fire feed about 90% with bricks allowed the burn to temp. to rise on the top to 270-300 degrees.
Pipe coming out of the bench: 85 and at top of the chimney: 90.

FYI: I did check my temperature reader, just as a precaution.  It read 365 degrees when I tested my baking oven set at 350.
 
Satamax Antone
gardener
Posts: 3471
Location: Southern alps, on the French side of the french /italian border 5000ft elevation
194
  • Likes 1
  • Mark post as helpful
  • send pies
    Number of slices to send:
    Optional 'thank-you' note:
  • Quote
  • Report post to moderator
Stacy, the draft stabiliser is usually put at the bottom of the vertical chimney.
 
Posts: 63
Location: Australia Zone 10a
9
2
forest garden wood heat woodworking
  • Mark post as helpful
  • send pies
    Number of slices to send:
    Optional 'thank-you' note:
  • Quote
  • Report post to moderator

Staci Kopcha wrote:Today I have dubbed it the "Bad ass rocket mass", affectionately.  

I combined some suggestions (Satamax and Thomas) on getting her started, and it was lit in no time.  Fire did almost go out, but then I got it going again.  There were waves  (and noise) of strong gusts of pulling air; I kept looking for wind outside, but it was still.  Not sure why this happened...?
I climbed onto the roof (many times) and kept sticking my nose in the exhaust; I am pleased to say that I achieved clean burn and mostly steam! (Paramount to this tree hugger.)
After a solid hour of burn time, I took the following temp. reads:

Barrel side:  170 degrees F
Barrel top: 250
ducting:
    direct out of manifold: 110
    after first 90 degrees: 90
    after first 180: 84
   after second 90:  80
   before chimney: 76
vertical stove pipe:
      at 1 foot: 80
     at  2 ft: 85  (multiple reads, think the spike is do to heat transfer from the barrel)
     at 3 ft:  82
     at the ceiling: 78
Mass on either side of ducting: 64, 67
Out chimney (roof) 63

Thoughts:  
  1) I feel better today after the second burn.  
  2) There is a very strong draft, I am not sure if it is going to be a problem.  (Any thoughts based on my temp readings).   I have put off cobbing in fear that I will need to change something.
  3) The fuel feed looks like a toilet, so some fancy cobwork/sculpting needs to happen
  4) I need to get busy with my lot of disorganized wood.  Sorting, cutting.  Small tinder is something I did not anticipate and need to accumulate. Worried that I may not have enough.  I have read so much about the importance of "good quality firewood" that I feel some trepidation about putting "unclean" fodder (pallet wood) in my B.A. heater.
  5) I am wondering how all of that bench mass will get heated up by 80-90 degree ducting.  AND how much wood that will take.


Hi Staci,

Would you (or anyone else) happen to know what the temperature at the highest point in the feed tube is when the fire is burning well and truly please?
I'm trying to come up with something to cover the whole top of the feed tube  (like a granite top )and don't want it to crack.
Thanks
Dan
 
thomas rubino
rocket scientist
Posts: 6382
Location: latitude 47 N.W. montana zone 6A
3232
cat pig rocket stoves
  • Likes 2
  • Mark post as helpful
  • send pies
    Number of slices to send:
    Optional 'thank-you' note:
  • Quote
  • Report post to moderator
Hey Dan;  

Most of us just use a firebrick or two.   I have a pair of insulated ones, very light that we use to close off the feed tube after the fire is done for the evening.
We never try to neck it down while running. That would defeat the purpose, I want my rocket to roar... its the only way to get a complete burn.  Choking the feed tube  does increase the velocity  of your incoming air and is a good way to help a struggling fire, but you certainly would not want to close the feed tube entirely, you would create creosote and ash... two of the things that the high level of combustion normally eliminates.
Having said that I suspect that a thick piece of soapstone would work.  


pollinator
Posts: 132
9
  • Mark post as helpful
  • send pies
    Number of slices to send:
    Optional 'thank-you' note:
  • Quote
  • Report post to moderator
Hi Dan

On my J tube rocket in my workshop I use a 5mm thick steel plate as an adjustable 'closure cover' for the feed tube. It's fitted with a heat resistant handle (from an old box stove door) that doesn't get hot.

The plate itself does get quite warm after a while but, as a bonus, it acts like a small radiator and gives off extra heat to the room. It hasn't really degraded or warped yet after several years of use.
 
Staci Kopcha
pollinator
Posts: 231
Location: Western Washington State
47
  • Likes 1
  • Mark post as helpful
  • send pies
    Number of slices to send:
    Optional 'thank-you' note:
  • Quote
  • Report post to moderator

Dan Hatfield Ii wrote:

Staci Kopcha wrote:


Hi Staci,

Would you (or anyone else) happen to know what the temperature at the highest point in the feed tube is when the fire is burning well and truly please?
I'm trying to come up with something to cover the whole top of the feed tube  (like a granite top )and don't want it to crack.
Thanks
Dan


Hi Dan,
 I can get you some readings on the top of the feed tube today when I fire it up.  It will be later this afternoon/evening.
I am using half firebrick now, and they can get very hot.
Will let you know!
Staci
 
Staci Kopcha
pollinator
Posts: 231
Location: Western Washington State
47
  • Likes 1
  • Mark post as helpful
  • send pies
    Number of slices to send:
    Optional 'thank-you' note:
  • Quote
  • Report post to moderator

thomas rubino wrote:Hey Dan;  

Most of us just use a firebrick or two.   I have a pair of insulated ones, very light that we use to close off the feed tube after the fire is done for the evening.
We never try to neck it down while running. That would defeat the purpose, I want my rocket to roar... its the only way to get a complete burn.  Choking the feed tube  does increase the velocity  of your incoming air and is a good way to help a struggling fire, but you certainly would not want to close the feed tube entirely, you would create creosote and ash... two of the things that the high level of combustion normally eliminates.
Having said that I suspect that a thick piece of soapstone would work.  


Hi Thomas,
 It generally works that the fire roars and is hot and fast for a hour or so, and then slows down.  If I stir it up when I add more wood, it will wake back up again.
To be clear:  It is better to keep that "awake"/active burn, in terms of reducing creosote build up?

Thanks!
 
thomas rubino
rocket scientist
Posts: 6382
Location: latitude 47 N.W. montana zone 6A
3232
cat pig rocket stoves
  • Likes 2
  • Mark post as helpful
  • send pies
    Number of slices to send:
    Optional 'thank-you' note:
  • Quote
  • Report post to moderator
Yes absolutely.  Your only getting your 90% + efficiency when at a full hot burn.  When it starts and when it stops your efficiency is low (hence the smoke out your chimney) as well as extra ash build up.
If you wish more heat, keep it stoked.  If your room / mass is hot enough for now , then let it go out. Once hot, they relight quickly if you need more.
I only cover my feed tube when I'm done burning and only if temp is below zero at night.
 
Staci Kopcha
pollinator
Posts: 231
Location: Western Washington State
47
  • Likes 1
  • Mark post as helpful
  • send pies
    Number of slices to send:
    Optional 'thank-you' note:
  • Quote
  • Report post to moderator
[quote=Dan Hatfield


Hi Staci,

Would you (or anyone else) happen to know what the temperature at the highest point in the feed tube is when the fire is burning well and truly please?
I'm trying to come up with something to cover the whole top of the feed tube  (like a granite top )and don't want it to crack.
Thanks
Dan

Hi Dan,
 I have been playing with fire today.  I put the half fire brick on top of the feed tube to test some limits for you.  Hottest it got was 320 degrees F, but it was hot and flames were high, I would normally not have had a brick on, but this was a test.  With "normal use", I say the range was 175-250 degrees.

Hope this sort of helps.
Staci
 
Dan Hatfield Ii
Posts: 63
Location: Australia Zone 10a
9
2
forest garden wood heat woodworking
  • Mark post as helpful
  • send pies
    Number of slices to send:
    Optional 'thank-you' note:
  • Quote
  • Report post to moderator

thomas rubino wrote:Hey Dan;  

Most of us just use a firebrick or two.   I have a pair of insulated ones, very light that we use to close off the feed tube after the fire is done for the evening.
We never try to neck it down while running. That would defeat the purpose, I want my rocket to roar... its the only way to get a complete burn.  Choking the feed tube  does increase the velocity  of your incoming air and is a good way to help a struggling fire, but you certainly would not want to close the feed tube entirely, you would create creosote and ash... two of the things that the high level of combustion normally eliminates.
Having said that I suspect that a thick piece of soapstone would work.  


Thanks, Thomas,
I wasn't clear. I don't want to cover the feed tube itself but put a large piece of granite over the top with a square hole cut into it for the feed tube.
I don't want to see the firebrick protruding.
I've attached a crappy drawing. I want to have the bench, ledge and feed tube top area all coved in granite.
I have not yet decided if I will do a brick bell or a concealed barrel in a brick wall.
I'm not sure how to upload pictures and embed them. Can someone direct me, please. This is in my dropbox folder
https://www.dropbox.com/s/cu8vkpu1dqdnz7t/IMG_1952.jpg?dl=0
 
thomas rubino
rocket scientist
Posts: 6382
Location: latitude 47 N.W. montana zone 6A
3232
cat pig rocket stoves
  • Likes 1
  • Mark post as helpful
  • send pies
    Number of slices to send:
    Optional 'thank-you' note:
  • Quote
  • Report post to moderator
Hi Dan;
 When you are creating your post , down at the bottom left of the page is the attachment button. click it to attach photos. It will prompt you to upload a file (photo) after the first you click on add another attachment  If your photos are on your computer it will automatically take you there. Photo size is important as well. Too large and they won't down load.  I think it likes 900 x 700 ???  for a size but it will do larger slowly sometimes.

Your idea of covering the bricks around your feed tube.
 If you bring that stone up even with the edge of the feed tube to cover the firebrick , then you are effectively raising the height of the feed tube.  This could be allowed for in your build by shortening the feed tube, the thickness of your decorative stone.
If your feed tube becomes too tall, then it will try to become the riser. Not a good thing.
Average feed tube is 16" deep. if you shorten that to 14" and lay a 2" thick slab of soapstone on top of your bricks ... I would guess you would be looking at temps of 400-500 F at the bottom of your stone.  I think granite would crack.

EDIT)   Just checked my stove Dan.   At 16" the top of the bricks were 225-250 F    2" down the side (inside) it read 550-600 F   that's 2" only it gets hotter from there.  
 
them good ole boys were drinking whiskey and rye singin' this'll be the day that I die. Drink tiny ad.
Rocket Mass Heater Jamboree And Updates
https://permies.com/t/170234/Rocket-Mass-Heater-Jamboree-Updates
reply
    Bookmark Topic Watch Topic
  • New Topic