• Post Reply Bookmark Topic Watch Topic
  • New Topic
permaculture forums growies critters building homesteading energy monies kitchen purity ungarbage community wilderness fiber arts art permaculture artisans regional education skip experiences global resources cider press projects digital market permies.com pie forums private forums all forums
this forum made possible by our volunteer staff, including ...
master stewards:
  • Nancy Reading
  • Carla Burke
  • John F Dean
  • Timothy Norton
  • r ransom
  • Jay Angler
  • Pearl Sutton
stewards:
  • Devaka Cooray
  • Leigh Tate
  • paul wheaton
master gardeners:
  • Christopher Weeks
gardeners:
  • M Ljin
  • thomas rubino
  • Megan Palmer

Counsel for new Shorty Core + statification bell Rocket Mass Heater

 
Posts: 7
Location: Rovigo, North Italy
3
earthworks wood heat rocket stoves
  • Likes 10
  • Mark post as helpful
  • send pies
    Number of slices to send:
    Optional 'thank-you' note:
  • Quote
  • Report post to moderator
Hello everyone, this is Leonardo from North Italy.
First of all, I'm thankful for this forum, where I've found SO MUCH information about building Rocket mass heaters.
Let me first introduce myself. I'm 27 years old, and with my precious wife and 4 little children we live in North Italy, close to Venice. We are part of a small christian community, which is a great blessing from God for us!  We thank God for that! We homestead, we try to eat healthy and we heat with wood.
I first found out about Rocket Stoves quite some time ago, but only now I get the chance of building one. Actually, if the first build goes well, several families of our community would want one as well. So we might end up building at least 4 RMH.

I'm writing this topic to ask for your counsel on my first RMH project.
I will attach a picture of a rough house plan, to give you an idea about the situation. The house is a two-story house, pretty long and narrow (20m x 5m,  65 ft x 16ft). We would like to build a RMH in the living room, which should be able to heat the livingroom and the entry room (they are pretty much an open-space) .
I would like to build a Batch Box, specifically, the Shorty core variation.
I have no constraints on the chimney size, because it must be rebuilt. I thought of a steel pipe going through the second floor and then out the roof, or out the side of the house.
The walls are 30cm (1 foot) thick, made of full bricks, insulated on the inside with approximately 4cm (2") of polistirene. The windows are double glazed.
The climate is pretty mild here. In the winter the temperatures drop below 0°C (32° F) only for some days a year. I would say that -5°C (23° F) is the minimum we would reach on most years.
I used the spreadsheet available on Peter van Den Berg's website to calculate the heat loss of the environment. Based on that calculation, I would have to build a 180mm (7") core.
For the bell I thought about a stratification chamber made of concrete clinkers lined with firebricks in the upper part. I also thought of a double layered bell so that it would retain the heat longer.
The bell's ISA should be 7.6 m2 (75,35 sqft), which is 15% smaller than the ISA of the bell for a 7” standard batch box.
I’m not sure if I will keep the flue pipe inside or outside of the bell. And, of course, I will install a bypass higher in the bell.

Does this project sound good to you all? Is there anything that I'm not considering, or considering wrong? Do you think I could go on calculating and drawing a detailed design? Would such a heater heat the two rooms? Would it somehow heat a bit also the second floor?

Do you have any suggestions on the materials to use, or building techniques, or anything else you would share with a complete novice? For example: is it worth spending extra money for better quality firebricks, or would basic hard firebricks be equally good for the job? Are there any planning, or building, “tricks” that would make the heater last longer, or perform better?

Thank you VERY MUCH for any advice you have for me! And thank you in advance if anyone of you would take this project at heart, and would like to support me in this journey!
house-plan-ground-level.jpeg
Floor plan - ground level
 
Rocket Scientist
Posts: 912
Location: Province of Granada, Andalucía, Spain
649
6
cooking rocket stoves woodworking wood heat
  • Likes 1
  • Mark post as helpful
  • send pies
    Number of slices to send:
    Optional 'thank-you' note:
  • Quote
  • Report post to moderator
Hi Leonardo. And welcome to permies!
I’m sure you’ll get some answers soon.
 
out to pasture
Posts: 13037
Location: Portugal
4070
goat dog duck forest garden books wofati bee solar rocket stoves greening the desert
  • Likes 2
  • Mark post as helpful
  • send pies
    Number of slices to send:
    Optional 'thank-you' note:
  • Quote
  • Report post to moderator

Leonardo Bevilacqua wrote: is it worth spending extra money for better quality firebricks, or would basic hard firebricks be equally good for the job?


We built one two seasons ago in Portugal using basic firebricks bought off the shelf. They work well BUT two seasons in a couple of them have cracked.
 
Posts: 831
Location: Sierra Nevada foothills, 350 m, USDA 8b, sunset zone 7
186
  • Likes 2
  • Mark post as helpful
  • send pies
    Number of slices to send:
    Optional 'thank-you' note:
  • Quote
  • Report post to moderator
Your room is 45 m2. Fi 175 mm in your climate should do the job. My climate is similar and calculations that I did for a 100 m2 house resulted in fi 170 mm.

Please remember that for the shorty you will need to fabricate the door, for regular BBR you can purchase door and adapt it for the heater.

I would get at least 40% Al2O3 bricks, the higher the better. Wood ash is fluxing the bricks lowering their melting temperature and high alumina is countering it. Because of that wood is a fuel that demands more from the material.
For the riser insulating firebricks IFB 26 (1400 C rating, but 1300 C will also do it).

Regarding long lifespan. Masonry heater builder master that I know recommends to build all parts of the firebox from bricks - smaller elements handle expansion better than large brick slabs or refractory concrete. If you also encase them in a tension frame it will serve for at least 30 years or more, because you live in a climate that will not require intense firing schedule.

If your ceiling is solid masonry then I would not count that any heat would percolate to the upper level.
 
Posts: 81
13
  • Likes 6
  • Mark post as helpful
  • send pies
    Number of slices to send:
    Optional 'thank-you' note:
  • Quote
  • Report post to moderator

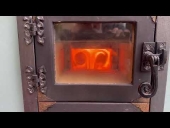
Leonardo Bevilacqua wrote: Hello everyone, this is Leonardo from North Italy.


Welcome! You will find many helpful people here! I'm also still constructing my first RMH, so experts may correct me or chime in.

Leonardo Bevilacqua wrote:
For the bell I thought about a stratification chamber made of concrete clinkers lined with firebricks in the upper part. I also thought of a double layered bell so that it would retain the heat longer.


Peter has proven this is possible with the pottery shop build which you probably have seen. I think it's a good idea. At least where I live, many people renovating their driveway give away these clinkers for free. You could copy where Peter applied his firebricks for some peace of mind. If you don't object the look, having the chimney outside the bell is more simple and more robust to execute. That being said, I will incorporate it into the bell myself, because I find it more aesthetically pleasing.

Leonardo Bevilacqua wrote:
Does this project sound good to you all? Is there anything that I'm not considering, or considering wrong? Do you think I could go on calculating and drawing a detailed design? Would such a heater heat the two rooms? Would it somehow heat a bit also the second floor?


Have you thought of putting it here:
In my opinion this is a better (more central) location of the house + putting the heater in a corner, facing exterior walls on 2/4 sides, is a bit of a shame I believe. You could use those corrugated sheeting which I believe Peter has behind the red heater in his house, inbetween the heater and the wall to transfer the radiant heat to convective heat, or at least pull it away from one exterior wall.
Drawing it out will never hurt in my opinion, I'd start with a top cross-section. The heater would also contribute to heating the upper rooms, in the way that heat always rises, but not in an active way. If you want that, you would have to continue the bell upstairs or make a second bell there. Personally, I would not invest in high-end firebricks for the bell (second-hand or cheap will be sufficient). But for the firebox, just buy new, decent dense firebricks and lay them with refractory mortar or with a tension frame and ceramic gasket (watch your lungs!)
Make the heater perform better: follow Peter's design meticulously. Allow for enough room for the gases to pass the core while cooling down. Insulate the chimney.

Good luck!
Screenshot_20260109-195203-2.png
[Thumbnail for Screenshot_20260109-195203-2.png]
 
gardener
Posts: 1167
Location: +52° 1' 47.40", +4° 22' 57.80"
601
woodworking rocket stoves wood heat
  • Likes 8
  • Mark post as helpful
  • send pies
    Number of slices to send:
    Optional 'thank-you' note:
  • Quote
  • Report post to moderator
Hi Leonardo, I received your PM about a month ago, and I was convinced I answered it. As it turns out, I didn't, sorry for that. Sometimes I miss one, this time of year is always the busiest.

A 180 mm system would heat the space. A double skin will hold the heat longer, that's true, although the external temperature will be somewhat lower as compared to a single skin item. Start with a drawing of the bell and how the core is positioned in there. Having the stove pipe at the side of the heater and the connection plus bypass like the heater in The Hague will result in less friction and a heater that will start cold and wet without problems.
The upper part of the bell in refractory bricks isn't necessary for a Shorty core, just the wall where the core exhaust is pointing at will be sufficient.

Regarding your question about coming to Italy and help with the build, I have to decline. I will turn 80 years of age in March, ice and weather permitting. Whether or not I will be able to travel to Italy and act as a build director remains to be seen. But, let's don't get ahead of time, start with planning first.

I fully agree with Julian, his suggestion for placement is much better.
 
Leonardo Bevilacqua
Posts: 7
Location: Rovigo, North Italy
3
earthworks wood heat rocket stoves
  • Likes 5
  • Mark post as helpful
  • send pies
    Number of slices to send:
    Optional 'thank-you' note:
  • Quote
  • Report post to moderator
Thank you all for your thoughts. This helps A LOT!

To you, Peter: you did answer to my PM. Thank you for your super fast answer! I just didn't get to write back to you. But, here we go! I totally understand your choice not to travel! Thank you for all the counsel you are willing to give us, even at a distance!

As far as I understand from the different comments, my idea sounds feasible. So, I will sketch a design that I will share with you later, so you can help me. As you suggested, I will sketch a top view first.

Thank you Julian (and Peter) for your idea for the better location for the heater. It makes a lot of sense to put it where you marked it.

Just a question before I start designing. When building the core, I need to stick faithfully to Peter’s dimensions, otherwise it won't work. But what about the bell? I get the point of not exceeding the ISA determined by the size of the core. But, are there any other proportions that need to be respected for the bell? What about the relation between the size/placement of the core and the size/shape of the bell?
Would it work if I make a bell which is long an tall but wide just enough to fit a core inside? Or should there be a minimum space between the core and the bell?

I hope I was clear enough with my question. Thank you very much for your thoughts
 
Peter van den Berg
gardener
Posts: 1167
Location: +52° 1' 47.40", +4° 22' 57.80"
601
woodworking rocket stoves wood heat
  • Likes 7
  • Mark post as helpful
  • send pies
    Number of slices to send:
    Optional 'thank-you' note:
  • Quote
  • Report post to moderator

Leonardo Bevilacqua wrote:I get the point of not exceeding the ISA determined by the size of the core. But, are there any other proportions that need to be respected for the bell? What about the relation between the size/placement of the core and the size/shape of the bell?


The core could be placed almost anywhere in the bell. Even with one side against the bell's wall will work. The shape of the bell is largely irrelevant, a flat ceiling is better than one with steps, the gases will stream more freely like that.

Leonardo Bevilacqua wrote:Would it work if I make a bell which is long an tall but wide just enough to fit a core inside? Or should there be a minimum space between the core and the bell?


The bell could be deep and tall, no problem. Down to just wide enough to house the core, although in that case there should be at least a space at the back. Size of that space: at the bare minimum, 5 times the cross section area of the stove pipe, more being better. That space is there to lead the gases down to the bell exhaust.

Just a tip: place the core higher in the bell, very convenient for loading. At the same time there will be an empty space below the core, where all the fine dust will settle. And as a bonus: there will be much more options available for the exhaust pipe's position.
The core shouldn't touch the walls of the bell, though, one layer of 12 mm superwool would be absolutely adequate.
 
Julian Adam
Posts: 81
13
  • Likes 4
  • Mark post as helpful
  • send pies
    Number of slices to send:
    Optional 'thank-you' note:
  • Quote
  • Report post to moderator

Peter van den Berg wrote:
The bell could be deep and tall, no problem. Down to just wide enough to house the core, although in that case there should be at least a space at the back. Size of that space: at the bare minimum, 5 times the cross section area of the stove pipe, more being better. That space is there to lead the gases down to the bell exhaust.


Peter, I have been thinking about your requirement to have the section around the core where the gases pass at least 5 times riser CSA. You gave me the advice last year not to count narrow slits. Since then, I've discovered the 'hydraulic diameter', which I believe, covers the load better, when we are talking about friction through a section. Are you aware of this? If so, what is the reason you chose not to use it?
I have made a small comparison between hydraulic diameter and your expression in function of riser CSA.

For those wanting to skip to the conclusion: it seems encasing a core in a drum, produces a (roughly calculated) free section of 6.8 times the riser CSA, but only results in a hydraulic diameter of 175 mm. If we take this same hydraulic diameter, and assume the passageway is a rectangle behind the core (green), it would only need to be 340 x 117 mm2, which is a mere 2.27 times the riser CSA.

Curious to hear your or anyone elses take on this.

PXL_20260113_221507701-3.jpg
[Thumbnail for PXL_20260113_221507701-3.jpg]
PXL_20260113_221419311-2.jpg
[Thumbnail for PXL_20260113_221419311-2.jpg]
 
Rocket Scientist
Posts: 4738
Location: Upstate NY, zone 5
680
5
  • Likes 5
  • Mark post as helpful
  • send pies
    Number of slices to send:
    Optional 'thank-you' note:
  • Quote
  • Report post to moderator
Calculating the hydraulic diameter is probably beyond the knowledge of all but a few. A simple number is much easier for most people to understand, even if it is only partially accurate, as long as errors don't fall in a nonfunctional range.
 
Julian Adam
Posts: 81
13
  • Likes 4
  • Mark post as helpful
  • send pies
    Number of slices to send:
    Optional 'thank-you' note:
  • Quote
  • Report post to moderator
Hi Glenn, thanks for your input. Personally, I would be suprised if you are able to calculate the free flowing CSA, but not the circumference, especially since most of these areas are likely to be rectangular or a sum of rectangles. I do agree with you that it is good to have the 5 times CSA as a simple rule of thumb. At the same time, maybe it could kill a project for someone because of space restrictions, while there is a setup which could be acceptable in terms of friction, but without following the 5 times riser CSA rule.
 
Peter van den Berg
gardener
Posts: 1167
Location: +52° 1' 47.40", +4° 22' 57.80"
601
woodworking rocket stoves wood heat
  • Likes 10
  • Mark post as helpful
  • send pies
    Number of slices to send:
    Optional 'thank-you' note:
  • Quote
  • Report post to moderator

Julian Adam wrote:

Peter, I have been thinking about your requirement to have the section around the core where the gases pass at least 5 times riser CSA. You gave me the advice last year not to count narrow slits. Since then, I've discovered the 'hydraulic diameter', which I believe, covers the load better, when we are talking about friction through a section. Are you aware of this? If so, what is the reason you chose not to use it?


Julian, a long time ago, an emeritus professor in hydrodynamics explained what the hydraulic diameter was all about. He even offered some examples to illustrate his point. I never bothered to learn how to calculate such a hydraulic diameter correctly, too complicated for DIY people and autodidacts like myself.

Bar one example from an entirely other source, a chimney sweep, in fact. He used a simple formula to calculate what a rectangular chimney cross section would be when compared to a circular one. This goes as follows: twice the width multiplied by the depth of the rectangle, devided by width plus depth will give the comparable diameter. This would look like this: 2xWxD : (W+D) = comparable diameter. As you may be aware, this is how I came about to compare a square riser to a circular one.

To keep it simple enough for the ordinary layman, I recommend at least 5 times cross section area of the chimney pipe. Without taking a lot of small slits into account, and the more space the better. This will work in the vast majority of cases, a certain president we all know about would have been mighty pleased with such an election outcome. Although my own nearly 11 years old heater sports roughly 14 times the pipe csa around the core. Being a good example of bigger is better, as a well-known motorbike manufacturer used to advertise.

My original take on this was derived from the work of Heikki Hyytiäinen. His Finnish contraflow worked with two 70 mm wide slits, each slightly larger than the chimney csa. One could say, roughly 2.25 times the masonry chimney csa in total. Later on, I realised this could lead to far too much friction or even a non-functional bell-type heater, so I switched to 5 times, just to be sure.

Making building these bell heaters more complicated means there will be more mistakes. As such, the short explanation of Glenn Herbert is wording it real nice:
Calculating the hydraulic diameter is probably beyond the knowledge of all but a few. A simple number is much easier for most people to understand, even if it is only partially accurate, as long as errors don't fall in a nonfunctional range.
Thanks, Glenn.
 
Julian Adam
Posts: 81
13
  • Likes 7
  • Mark post as helpful
  • send pies
    Number of slices to send:
    Optional 'thank-you' note:
  • Quote
  • Report post to moderator
Peter, thanks for your clarification!

Peter van den Berg wrote:
Bar one example from an entirely other source, a chimney sweep, in fact. He used a simple formula to calculate what a rectangular chimney cross section would be when compared to a circular one. This goes as follows: twice the width multiplied by the depth of the rectangle, devided by width plus depth will give the comparable diameter. This would look like this: 2xWxD : (W+D) = comparable diameter.


It's nice to see this coming from such a practical implementation, because this is indeed exactly the formula for hydraulic diameter applied to a rectangle!

Peter van den Berg wrote:
To keep it simple enough for the ordinary layman, I recommend at least 5 times cross section area of the chimney pipe. Without taking a lot of small slits into account, and the more space the better.  


Clear! Anyway, should anyone be reading this while doubting if the gases will be able to flow freely enough, I can calculate hydraulic diameter for you if you just give me a cross-section of the top view, where the gases go past the core, with all dimensions on it of the channel.

Peter van den Berg wrote:
My original take on this was derived from the work of Heikki Hyytiäinen. His Finnish contraflow worked with two 70 mm wide slits, each slightly larger than the chimney csa. One could say, roughly 2.25 times the masonry chimney csa in total. Later on, I realised this could lead to far too much friction or even a non-functional bell-type heater, so I switched to 5 times, just to be sure.


Interesting Peter, I had no previous knowledge about counterflow heaters, but now that you mention it you can indeed clearly see that the downdraft channels are quite small compared to your advice for the bbr bell.

Thanks for taking the time to reply!
Hydraulic-Diameter-non-circular-tubes.png
[Thumbnail for Hydraulic-Diameter-non-circular-tubes.png]
 
Leonardo Bevilacqua
Posts: 7
Location: Rovigo, North Italy
3
earthworks wood heat rocket stoves
  • Likes 4
  • Mark post as helpful
  • send pies
    Number of slices to send:
    Optional 'thank-you' note:
  • Quote
  • Report post to moderator
Thank you all for your thoughts. I finally had time to work on a first draft of the project.
I attach a few pictures of what I came up with.
I also attach a not very detailed sketchup project. The measurements are correct, but I didn't put in a lot of details.
I tried to make the bell as slim as possible, due to space costraints. Tell me if it could work like this.
To you, Peter, I calculated the area behind the core and, if I'm not mistaken, it is well above 5 times the CSA.

On the pictures you see the bell wall (blue), the core (orange) and the 12mm superwool lining between the core and the bell's walls.

As I was drawing I came up with a couple of questions:
1) Is it ok if both the long sides of the core touch the bell? There would be 12mm superwool in between.

2) How can I design the exhaust port at the bottom of the bell? How do you determine shape and size?

3) How high should the bypass pipe be installed on the bell?

4) Any thoughts on cleanout ports location?

Thank you very much!
core-fitting-in-bell-with-dimensions.png
How the core would fit in the bell
view-in-perspective.png
Here you see the core touching both walls of the bell
Filename: RMH-Shorty-Salone-01.skp
Description: Rough design of the whole heater
File size: 128 Kbytes
 
Peter van den Berg
gardener
Posts: 1167
Location: +52° 1' 47.40", +4° 22' 57.80"
601
woodworking rocket stoves wood heat
  • Likes 7
  • Mark post as helpful
  • send pies
    Number of slices to send:
    Optional 'thank-you' note:
  • Quote
  • Report post to moderator

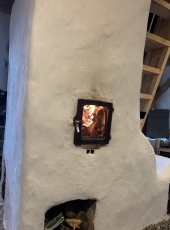
Leonardo Bevilacqua wrote:Thank you all for your thoughts. I finally had time to work on a first draft of the project.
I attach a few pictures of what I came up with.
I also attach a not very detailed sketchup project. The measurements are correct, but I didn't put in a lot of details.
I tried to make the bell as slim as possible, due to space costraints. Tell me if it could work like this.


It would work, but I am not overly fond of this. To me, there might be a better solution.

Leonardo Bevilacqua wrote:To you, Peter, I calculated the area behind the core and, if I'm not mistaken, it is well above 5 times the CSA.


Yes, it is, 9 times to be precise.

Leonardo Bevilacqua wrote:As I was drawing I came up with a couple of questions:
1) Is it ok if both the long sides of the core touch the bell? There would be 12mm superwool in between.


Could be done, although there are compromises in there, flow-wise.

Leonardo Bevilacqua wrote:2) How can I design the exhaust port at the bottom of the bell? How do you determine shape and size?


What you have drawn is in the right direction, starting low at floor level and quite wide. This construction makes it possible to sweep the chimney from the roof without dismantling anything. Is the roof accessible?

Leonardo Bevilacqua wrote:3) How high should the bypass pipe be installed on the bell?


You've drawn it very high, could be lower. Say, something like 30 cm from the top.

Leonardo Bevilacqua wrote:4) Any thoughts on cleanout ports location?


Two at the front and one at the right, where the chimney starts.

The firebox is placed quite high, that isn't really necessary, 65 cm from the floor is usually enough.

Now for something different. It seems to me that the front of the heater, where the door is, is facing the wrong direction. Built like this, you won't be able to sit by the fire with friends and family and see what is happening. With that in mind, please give the following a thought.

Instead of a straight core, you could build a right-handed sidewinder. The firebox door would be in the wide front of the heater then, facing directly into the rest of the room. Roughly calculated, that would mean the heater's front is protuding 14 cm more into the room. The bell will be obviously less wide, although not overly so. The whole of the thing will be more in proportion, no flow compromises .
 
Leonardo Bevilacqua
Posts: 7
Location: Rovigo, North Italy
3
earthworks wood heat rocket stoves
  • Likes 4
  • Mark post as helpful
  • send pies
    Number of slices to send:
    Optional 'thank-you' note:
  • Quote
  • Report post to moderator
Thank you Peter!

Peter van den Berg wrote:
It would work, but I am not overly fond of this. To me, there might be a better solution.
[...]

Leonardo Bevilacqua wrote:1) Is it ok if both the long sides of the core touch the bell? There would be 12mm superwool in between.


Could be done, although there are compromises in there, flow-wise.


Could you please expand more this point? Could you tell me what the compromises would be, or why you don't like my solution very much?
Your observation on the direction of the door is correct. I came up with that solution only to have the bell as slim as possible, in order not to use too much floor space. We use this room for meetings so if we use too much floor space we can simply fit less people in the room.
So, just to understand, do you think we would have problems with my design? If so, I would build a sidewinder, as you suggested. It's actually a very appealing idea.  Otherwise, I guess my idea would work better for how we use the room. But, since I'm a complete novice in this, I don't trust my understanding.


What you have drawn is in the right direction, starting low at floor level and quite wide. This construction makes it possible to sweep the chimney from the roof without dismantling anything. Is the roof accessible?


I just calculated roughly the measurements of the opening, trying to come up with a rectangular opening that had the same hydraulic diameter as the exhaust pipe. Is that right?

Leonardo Bevilacqua wrote:3) How high should the bypass pipe be installed on the bell?


You've drawn it very high, could be lower. Say, something like 30 cm from the top.


You mean 30cm from the top of the bell to the center of the pipe, or to the top of the pipe?

Now for something different. It seems to me that the front of the heater, where the door is, is facing the wrong direction. Built like this, you won't be able to sit by the fire with friends and family and see what is happening. With that in mind, please give the following a thought.

Instead of a straight core, you could build a right-handed sidewinder. The firebox door would be in the wide front of the heater then, facing directly into the rest of the room. Roughly calculated, that would mean the heater's front is protuding 14 cm more into the room. The bell will be obviously less wide, although not overly so. The whole of the thing will be more in proportion, no flow compromises.


Thank you for your suggestion. When you talk about a "right-handed sidewinder" you mean one that has the riser on the right of the core?
 
Leonardo Bevilacqua
Posts: 7
Location: Rovigo, North Italy
3
earthworks wood heat rocket stoves
  • Likes 5
  • Mark post as helpful
  • send pies
    Number of slices to send:
    Optional 'thank-you' note:
  • Quote
  • Report post to moderator
I'll add another two questions that came to mind, regarding materials to use to build the core.  
Regarding firebricks quality, Cristobal Cristo wrote:

Cristobal Cristo wrote:
I would get at least 40% Al2O3 bricks, the higher the better. Wood ash is fluxing the bricks lowering their melting temperature and high alumina is countering it. Because of that wood is a fuel that demands more from the material.
For the riser insulating firebricks IFB 26 (1400 C rating, but 1300 C will also do it).


I made a little research to see what's available in Italy. there are plenty of choices for firebricks. And Alumina is only one of the specifics for firebricks. Which ones should I get?
And then, is there a difference between firebricks and IFB? Should I use firebricks for the main part of the core and IFB for the riser? I'm a little confused.

The second question would be: how to I calculate how many brick I would need for the core (and the bell)? For firebricks the standard size here is 220x110x60mm. For clinkers I believe it is 240x120x60mm.
 
Julian Adam
Posts: 81
13
  • Likes 7
  • Mark post as helpful
  • send pies
    Number of slices to send:
    Optional 'thank-you' note:
  • Quote
  • Report post to moderator

Leonardo Bevilacqua wrote:
I made a little research to see what's available in Italy. there are plenty of choices for firebricks. And Alumina is only one of the specifics for firebricks. Which ones should I get?

And then, is there a difference between firebricks and IFB? Should I use firebricks for the main part of the core and IFB for the riser? I'm a little confused.


You could show your options here for more experienced people to comment, from the bricks I have bought, higher alumina firebricks have usually been lighter in color, so what you want (in my opinion) are the light-colored high-density firebricks. There is a big difference between firebrick and insulating firebrick (IFB). Insulating firebrick is much more porous/softer, and lighter (less dense). Because it is so light, it insulates much better than dense firebrick. In industrial applications it is usually only applied behind the dense firebricks (so not coming in contact with the flame). Because of limited mechanical strength, these are usually not used for the firebox. Many people have used it as a riser material in a regular batch box - in this case it is best to use it only above the riser port, again because of the flame touching it. For my shorty core, I will be using only dense  firebricks, because the 'riser' is so short, and to my understanding there is already a lot less mass to heat up compared to a 1st gen. batchbox. Just make sure to insulate at least the 'afterburner'/riser part with calcium silicate board, superwool (wear a mask!), perlite, or equivalent.

Leonardo Bevilacqua wrote:
The second question would be: how to I calculate how many brick I would need for the core (and the bell)? For firebricks the standard size here is 220x110x60mm. For clinkers I believe it is 240x120x60mm.


Others probably do it in sketchup or similar, but I've just drawn out the different projected views (knowing the core dimensions) on scale 1:10 and drawn my brick size onto that, and counted the bricks.
 
Peter van den Berg
gardener
Posts: 1167
Location: +52° 1' 47.40", +4° 22' 57.80"
601
woodworking rocket stoves wood heat
  • Likes 4
  • Mark post as helpful
  • send pies
    Number of slices to send:
    Optional 'thank-you' note:
  • Quote
  • Report post to moderator

Peter van den Berg wrote:Could be done, although there are compromises in there, flow-wise.


Leonardo Bevilacqua wrote:Could you please expand more this point? Could you tell me what the compromises would be, or why you don't like my solution very much?


The question is simple, the answer isn't.
Try to imagine the hot stream from the core's exhaust. It will travel more or less horizontal to the front and then up. OK so far, from there along the ceiling and the walls down to the large opening behind the core. Since the core is elevated from the floor, there's space underneath, you would like to have the stream going underneath the core and just above the floor to the back, where the exhaust of the bell is situated. It's obvious that the hot stream could choose to take the easiest route and going straight down, instead of the more complicated route through two changes in direction extra. Just my interpretation of what the preferred route could be.

Leonardo Bevilacqua wrote:So, just to understand, do you think we would have problems with my design? If so, I would build a sidewinder, as you suggested.


The problems lie in the fact that the heater's door, during burns the hottest spot of the entire heater, is pointing to everyone that is walking past the heater through the door opening right beside it. The chances that somebody, especially children, will burn themselves is actually built-in like that.

Leonardo Bevilacqua wrote:I just calculated roughly the measurements of the opening, trying to come up with a rectangular opening that had the same hydraulic diameter as the exhaust pipe. Is that right?


No, it isn't, due to part of the gases coming from the top. Just because in order to allow for a 180 degrees change in direction, you'll need a lot more than just the hydraulic diameter. I'd say about twice the cross section of that hydraulic diameter. The whole point is to eliminate most if not all of the potential friction points. Even it looks like it's spaciously enough, try to imagine that the gas stream is expanded by a factor of say, two and you see that it could be a potential pinch point.

Leonardo Bevilacqua wrote:You mean 30cm from the top of the bell to the center of the pipe, or to the top of the pipe?


The top of the pipe that's housing the bypass.

Leonardo Bevilacqua wrote:When you talk about a "right-handed sidewinder" you mean one that has the riser on the right of the core?


Yes, that's correct. Since there's room left and right of the combustion core, you won't have the possible shortcut delemma.

And to answer your question from another post: please stay away from IFB's, You'll never know how it will fare inside the hottest (or close to the hottest) parts of the heater. Use hard firebrick, and insulate that at the outside, a much safer route.
 
Leonardo Bevilacqua
Posts: 7
Location: Rovigo, North Italy
3
earthworks wood heat rocket stoves
  • Likes 4
  • Mark post as helpful
  • send pies
    Number of slices to send:
    Optional 'thank-you' note:
  • Quote
  • Report post to moderator
Peter, tank you SO MUCH!
Thank you for the clarification. I will go with a shorty right-sided sidewinder. It sounds like a much safer option.

Where can I find the formulas to calculate the dimensions of the sidewinder core?
I found a sketchup model for a 150 Sidewinder Shorty that you posted on Donkey32. I scaled it 1.2 times to make it become a 180mm core. Can I take that model and copy the measurements?

I compared the dimensions of the model with the dimensions for a regular shorty core, but the dimensions of the sidewinder seem to be somewhat different, like the port height, etc..
Do you have a table showing the dimensions/proportions for a sidewinder? I could then build myself a spreadsheet.

It would be very nice to have a place where anyone can find tables, and perhaps spreadsheets, with all the dimensions for the different types of core.
 
Peter van den Berg
gardener
Posts: 1167
Location: +52° 1' 47.40", +4° 22' 57.80"
601
woodworking rocket stoves wood heat
  • Likes 3
  • Mark post as helpful
  • send pies
    Number of slices to send:
    Optional 'thank-you' note:
  • Quote
  • Report post to moderator

Leonardo Bevilacqua wrote:Where can I find the formulas to calculate the dimensions of the sidewinder core?


At the moment, there isn't a central place where the figures of a Shorty core are summed up, yet. By the way, the numbers for the sidewinder version aren't any different. I don't know which sketchup file you used for upscaling, so I am unable to check whether it is correct.

But here are the numbers for the calculation, all mentioned numbers are internal.
Start with the base figure, written down as B. This is 72.34% of the diameter of the chimney pipe, equal to system size.
Width of the firebox: 2B.
Height of the firebox: 3B.
Depth of the firebox: 4B, upto 5B.
Height of the port: 2.1B.
Width of the port: 0.5B.
Position of the port in a sidewinder: centered in the port 1B from the rear wall, left or right.
Width and depth of the riser: 2B.
Heigth of the riser: 5B upto 5.5B.
Liner in the bottom half of the riser: left and right equal, seen from the port, double that thickness at the port side.
Height of the liner: 2.4B, also crossing over the port.
Resulting floor of the riser: square, each side equal to system size.
Exhaust opening of the riser: in the same wall as the port, width 2B, total square mm of the opening 100% of the chimney pipe's csa.
Heigth of the opening: follows from the calculation of the sentence above.
Piece of wall above the exhaust opening: same height as the opening.

The above is about a normal sidewinder version, a reversed sidewinder version is slightly different.
The above information should be sufficient to check the upscaled drawing you have there.

Leonardo Bevilacqua wrote:It would be very nice to have a place where anyone can find tables, and perhaps spreadsheets, with all the dimensions for the different types of core.


I am working on it, a Dutch description of the Shorty is online in preliminary form, English will be next. But don't hold your breath, winter is a very busy time for me. See https://batchrocket.eu/ontwerpen#shorty
 
Leonardo Bevilacqua
Posts: 7
Location: Rovigo, North Italy
3
earthworks wood heat rocket stoves
  • Likes 4
  • Mark post as helpful
  • send pies
    Number of slices to send:
    Optional 'thank-you' note:
  • Quote
  • Report post to moderator

Peter van den Berg wrote: But here are the numbers for the calculation, all mentioned numbers are internal. ....


Thank you Peter! I'll check the measurements of the model I scaled up.


At the moment, there isn't a central place where the figures of a Shorty core are summed up, yet.


Perhaps this topic can remain as a reference for other people in the future! Besides that, since I find it very useful to make myself spreadsheets that automatically calculate the dimensions, I could build one and make it available also for others who are interested.


I think I now have clear in mind how to go on with the core. Actually, I have started to build a trial core made of regular red bricks, just to get familiar with the building process.
As for firebricks, thank you for your thoughts on IFBs. Do you have any suggestion on Alumina content? Or, is it even important? I'm trying to understand what to buy in order to have the longest lifetime possible.


Then, another set of questions. What about the door? How do I calculate the square pipe section needed, and the cuts that need to be made, and their position?
Also, which kind of glass is needed?


Peter van den Berg
gardener
Posts: 1167
Location: +52° 1' 47.40", +4° 22' 57.80"
601
woodworking rocket stoves wood heat
  • Likes 5
  • Mark post as helpful
  • send pies
    Number of slices to send:
    Optional 'thank-you' note:
  • Quote
  • Report post to moderator

Leonardo Bevilacqua wrote:Then, another set of questions. What about the door?


The doors that I made myself in the past 40-odd years are all of the T-profile type.

Leonardo Bevilacqua wrote:How do I calculate the square pipe section needed, and the cuts that need to be made, and their position?


Use the link at the end my last post, all that you'll need is there. The text is in Dutch, admittedly, have it translated into English or Italian by Google Translate. I do that all the time with text that's in a language I don't understand. Links to the SketchUp drawings are there also, that's a standard 150 mm system. You have to start studying yourself, can't be helped.

Leonardo Bevilacqua wrote:Also, which kind of glass is needed?


Good quality heat-resistant glass. There are two brands in existence, Robax by Schott and Neoceram by Nippon Electric Glass. Both are suitable and pricey.
 
pollinator
Posts: 470
58
  • Likes 2
  • Mark post as helpful
  • send pies
    Number of slices to send:
    Optional 'thank-you' note:
  • Quote
  • Report post to moderator
Salutes to you, Peter
Thanks for helping us all

It's fascinating to see this rmh coming to life, and instructive to note the details
 
Posts: 381
Location: North East Iowa, USA
113
  • Likes 2
  • Mark post as helpful
  • send pies
    Number of slices to send:
    Optional 'thank-you' note:
  • Quote
  • Report post to moderator

Peter van den Berg wrote:

Leonardo Bevilacqua wrote:Where can I find the formulas to calculate the dimensions of the sidewinder core?


At the moment, there isn't a central place where the figures of a Shorty core are summed up, yet. By the way, the numbers for the sidewinder version aren't any different. I don't know which sketchup file you used for upscaling, so I am unable to check whether it is correct.

But here are the numbers for the calculation, all mentioned numbers are internal.
Start with the base figure, written down as B. This is 72.34% of the diameter of the chimney pipe, equal to system size.
Width of the firebox: 2B.
Height of the firebox: 3B.
Depth of the firebox: 4B, upto 5B.
Height of the port: 2.1B.
Width of the port: 0.5B.
Position of the port in a sidewinder: centered in the port 1B from the rear wall, left or right.
Width and depth of the riser: 2B.
Heigth of the riser: 5B upto 5.5B.
Liner in the bottom half of the riser: left and right equal, seen from the port, double that thickness at the port side.
Height of the liner: 2.4B, also crossing over the port.
Resulting floor of the riser: square, each side equal to system size.
Exhaust opening of the riser: in the same wall as the port, width 2B, total square mm of the opening 100% of the chimney pipe's csa.
Heigth of the opening: follows from the calculation of the sentence above.
Piece of wall above the exhaust opening: same height as the opening.

 See https://batchrocket.eu/ontwerpen#shorty


Peter I have applied and cross checked to some of the sketch up drawings, and I think I have this correct or at least pretty close.
could you verify if I have the port depth  correct for the system size, I will do this in MM's so you don't have to convert.

130mm  size     58mm port depth
150mm             67mm
180mm             80.5mm
200mm             89mm

thank you, if these are wrong, I will reapply some math.
thank you.
gift
 
3D Plans - Pebble Style Rocket Mass Heater
will be released to subscribers in: soon!
reply
    Bookmark Topic Watch Topic
  • New Topic