
• Post Reply Bookmark Topic Watch Topic
  • New Topic
permaculture forums growies critters building homesteading energy monies kitchen purity ungarbage community wilderness fiber arts art permaculture artisans regional education skip experiences global resources cider press projects digital market permies.com pie forums private forums all forums
this forum made possible by our volunteer staff, including ...
master stewards:
  • Carla Burke
  • Nancy Reading
  • paul wheaton
  • John F Dean
  • r ransom
  • Jay Angler
stewards:
  • Timothy Norton
  • Tereza Okava
  • Pearl Sutton
master gardeners:
  • Christopher Weeks
  • M Ljin
gardeners:
  • Jeremy VanGelder
  • Megan Palmer
  • Thekla McDaniels

Improving a steep slope with no access for diggers

 
Posts: 18
Location: France
8
  • Likes 9
  • Mark post as helpful
  • send pies
    Number of slices to send:
    Optional 'thank-you' note:
  • Quote
  • Report post to moderator
Hi there,
I'm interested in your experiences dealing with slopes where it's not possible to bring even a mini-digger.
I have a slope in my garden - it's along a big concave curve of +40 metres in length and the slope goes down around 10 metres at a 45 degree angle. My default way to deal with a slope would be to put in swales, but it's a big area and for various reasons machinery cannot be brought in so I will have to do this manually and I don't have a team of young things to help. The soil is very stony clay (rock hard in summer and sticky in winter) and there are mature trees planted irregularly all across the space. We've cleared the brambles that were growing there, although until each root is extracted they are going to keep coming back - but in the meantime it's also bare soil which is obviously not ideal.
Have you ever put terraces/swales in by hand in these kinds of conditions and do you have any tips? I don't have any money or loads of spare materials lying around to create retaining walls or anything like that. I'm going to have to do this slowly and very cheaply!
Thanks in advance for any tips and inspo photos!
 
Steward and Man of Many Mushrooms
Posts: 6201
Location: Southern Illinois
1953
transportation cat dog fungi trees building writing rocket stoves woodworking
  • Likes 10
  • Mark post as helpful
  • send pies
    Number of slices to send:
    Optional 'thank-you' note:
  • Quote
  • Report post to moderator
Hi Connie,

My very first thought is to take care of that bare soil and get just about anything growing so wind and water doesn’t tear it apart.  There are contractor bags of grass seed that are not designed for supper high-quality lawn grass, but rather just something to grow to hold soil in place.  That’s my #1 concern

But as for actual gardens, I guess you need some type of terrace.  I would start up top and make a pathway and a bed on the upslope section. It will be easier to reach it you reach up.  But this bed is likely only 1-2 feet.  I wouldn’t want to cut i. Too deep.

Also, you don’t have to make the bed the whole length of the slope all at once.  Start at the edge and work in.

As for material, you said stony clay, could you get some stones to make a 6 inch retaining wall?  Maybe a 12 inch?  Old cement blocks could work.

If you took old lumber a char the outside, that charged lumber becomes practically impervious to rot and decay.  It’s called Sou Shi Ban (my spell Checker is fighting with me so look that up and see what you can find.

You said that you cleared brush—does any of the cleared brush remain?  If so, you could make a wattle fence which is just wooden stakes (branches and twigs) pushed into the ground and other branches woven in between.  It won’t last long, but it’s free.


So there are just a couple of starting points.  If you have a picture, it could help.


Good luck, and if you have any other questions, fire away!


Eric
 
steward
Posts: 19354
Location: USDA Zone 8a
4881
dog hunting food preservation cooking bee greening the desert
  • Likes 6
  • Mark post as helpful
  • send pies
    Number of slices to send:
    Optional 'thank-you' note:
  • Quote
  • Report post to moderator
Welcome to the forum.

Several folks here on the forum talk about terracing without machines.

These threads might not be those:

https://permies.com/t/21357/Terrace-gradients-newbies

https://permies.com/t/2401/permaculture/Gradual-Terracing
 
gardener
Posts: 5759
Location: Cincinnati, Ohio,Price Hill 45205
1356
forest garden trees urban
  • Likes 13
  • Mark post as helpful
  • send pies
    Number of slices to send:
    Optional 'thank-you' note:
  • Quote
  • Report post to moderator
 I have a tiny front yard, with rocky clay soil.
I have terraced it extensively, often redoing parts, because of unrelated construction or my own mistakes.

My current favorite way to build terraces is to start from the bottom of the slope.
I drive metal or plastic  stakes in a line, then I put 2x4  lumber behind those stakes.
I secure them with wire or screws, either level or following grade, depending on what I'm trying to do .
Lately I've started lining the 2x4 with ceramic tile to help it resist rot, but I have plenty of older terrace that has been fine without that.

Once this "wall" is in place I pile brush, and stones against it, the idea being that this kind of fill will not create as much hydrostatic pressure against the wall.
On then do I start moving dirt.
With a hoe or soil rake I pull the slope above down onto the brush and stone fill.
I pause to tamp it with tools and feet, and then add more.
Eventually there won't be enough loose soil you can pull down to make any more headway.

By this point your terrace will be a little walkable , so step into it .
Figure out where you want the next terrace to start.
Define this line with two stakes and a string line.
Your going to dig to just past this line, taking soil as vertically as possible.
Add the soil to the terrace your standing on.
It may get to be enough, or too much soil for that terrace, so throw it up hill at that point, or just know you will move it again.

Once you have dugg out the place where your next wall will be, stake it, add the 2x4s , and back fill with brush.
Start pulling the soil down to form the next terrace.


Connie Graham
Posts: 18
Location: France
8
  • Likes 10
  • Mark post as helpful
  • send pies
    Number of slices to send:
    Optional 'thank-you' note:
  • Quote
  • Report post to moderator
Hi Eric,

So to answer some of your questions...
Plants: We're in the middle of the summer and a drought, with constant heat waves. Nothing is going to grow from seed right now without daily watering. I have some straw protecting the ground for now and I will plant once it's feasible but if I'm going to be moving soil around that needs to happen first.
Brush: We cleared years-old bramble and it's a terrible material that punctures you constantly through even the toughest gloves and becomes an impossible tangled mass the second you drop it to the ground. The idea of reusing it works in some situations (there are lovely examples of basketry using brambles, for example) but not here - too much, too tough, too thorny. I would mention too that I've tried hammering stakes into the ground here and it's impossible - they hit stone very quickly and then just won't go in any further but aren't in enough to be solid. It's a real pain.
Retaining walls: I could use some stone to help, although I'd have to dig down first to give the stone a base or it will just slide down the slope.
Lumber: I don't have access to lumber for free and buying it is prohibitively expensive.

I'm really just stuck on the method of moving the ground in the best way. What are the best tools, how you mark out curves (or do you just eyeball it), how you stop yourself from constantly sliding down while you work, is there a specific order to do the digging in, etc. I've not created swales on such a steep slope before and I want to work productively.

Thanks,
Con
 
Connie Graham
Posts: 18
Location: France
8
  • Likes 8
  • Mark post as helpful
  • send pies
    Number of slices to send:
    Optional 'thank-you' note:
  • Quote
  • Report post to moderator

William Bronson wrote:  I have a tiny front yard, with rocky clay soil.
I have terraced it extensively, often redoing parts, because of unrelated construction or my own mistakes.


Hi William, Thanks for the step-by-step, this is so helpful and I can picture it exactly. It looks like wood would make this easier to do - I'll put my thinking cap on and see what ideas I can come up with. Thanks
 
Posts: 45
Location: Denver CO
11
rabbit urban chicken
  • Likes 18
  • Mark post as helpful
  • send pies
    Number of slices to send:
    Optional 'thank-you' note:
  • Quote
  • Report post to moderator
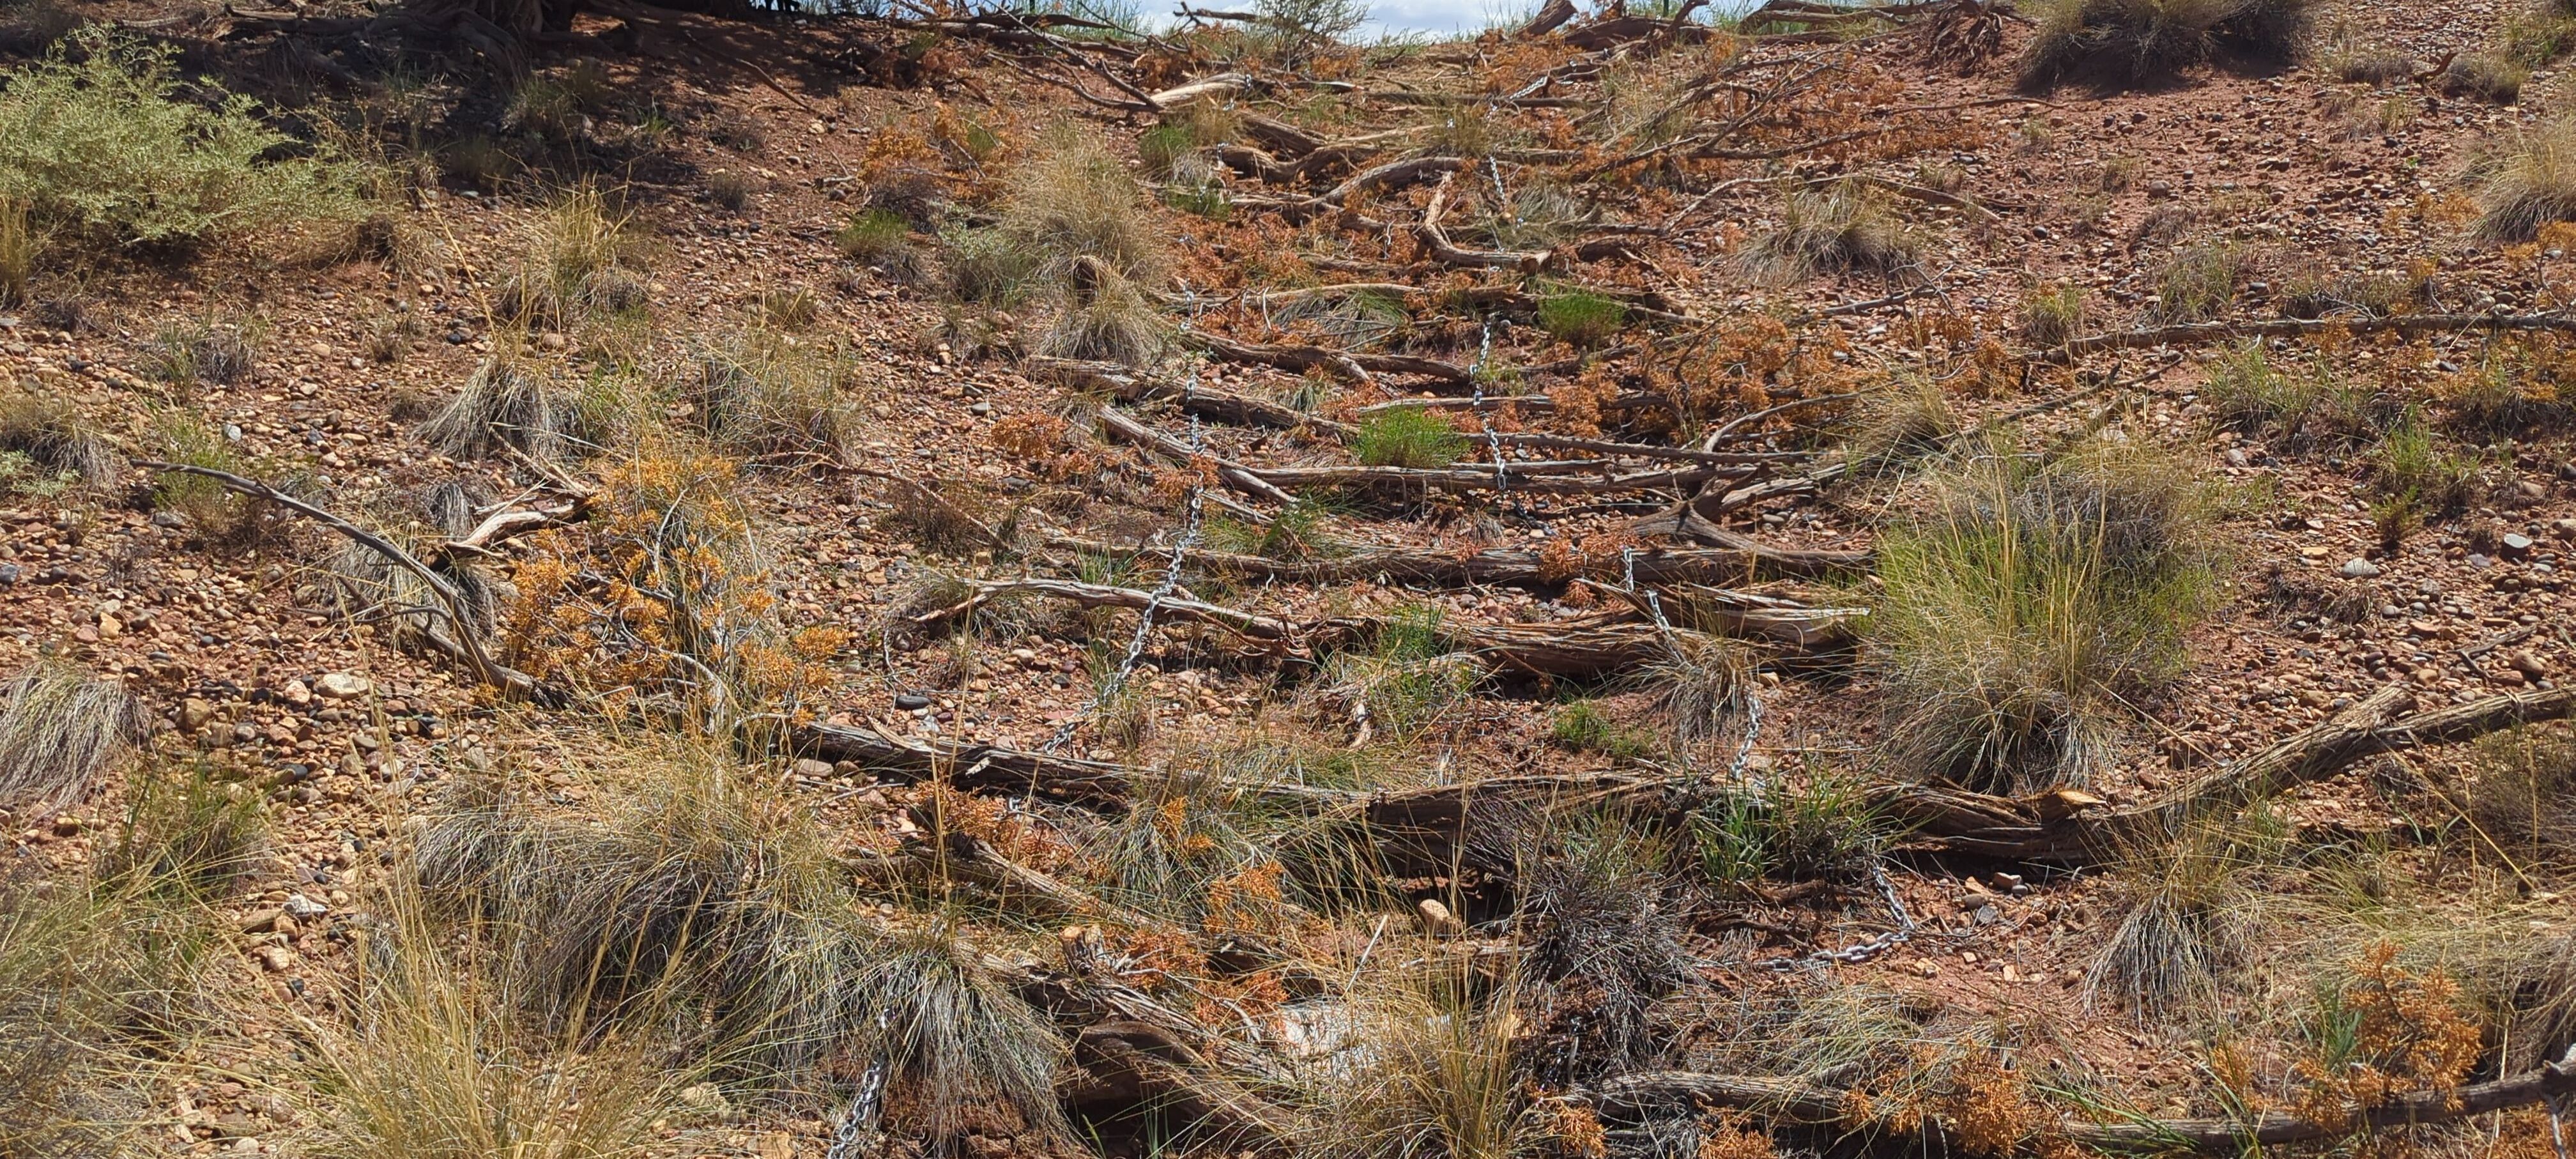
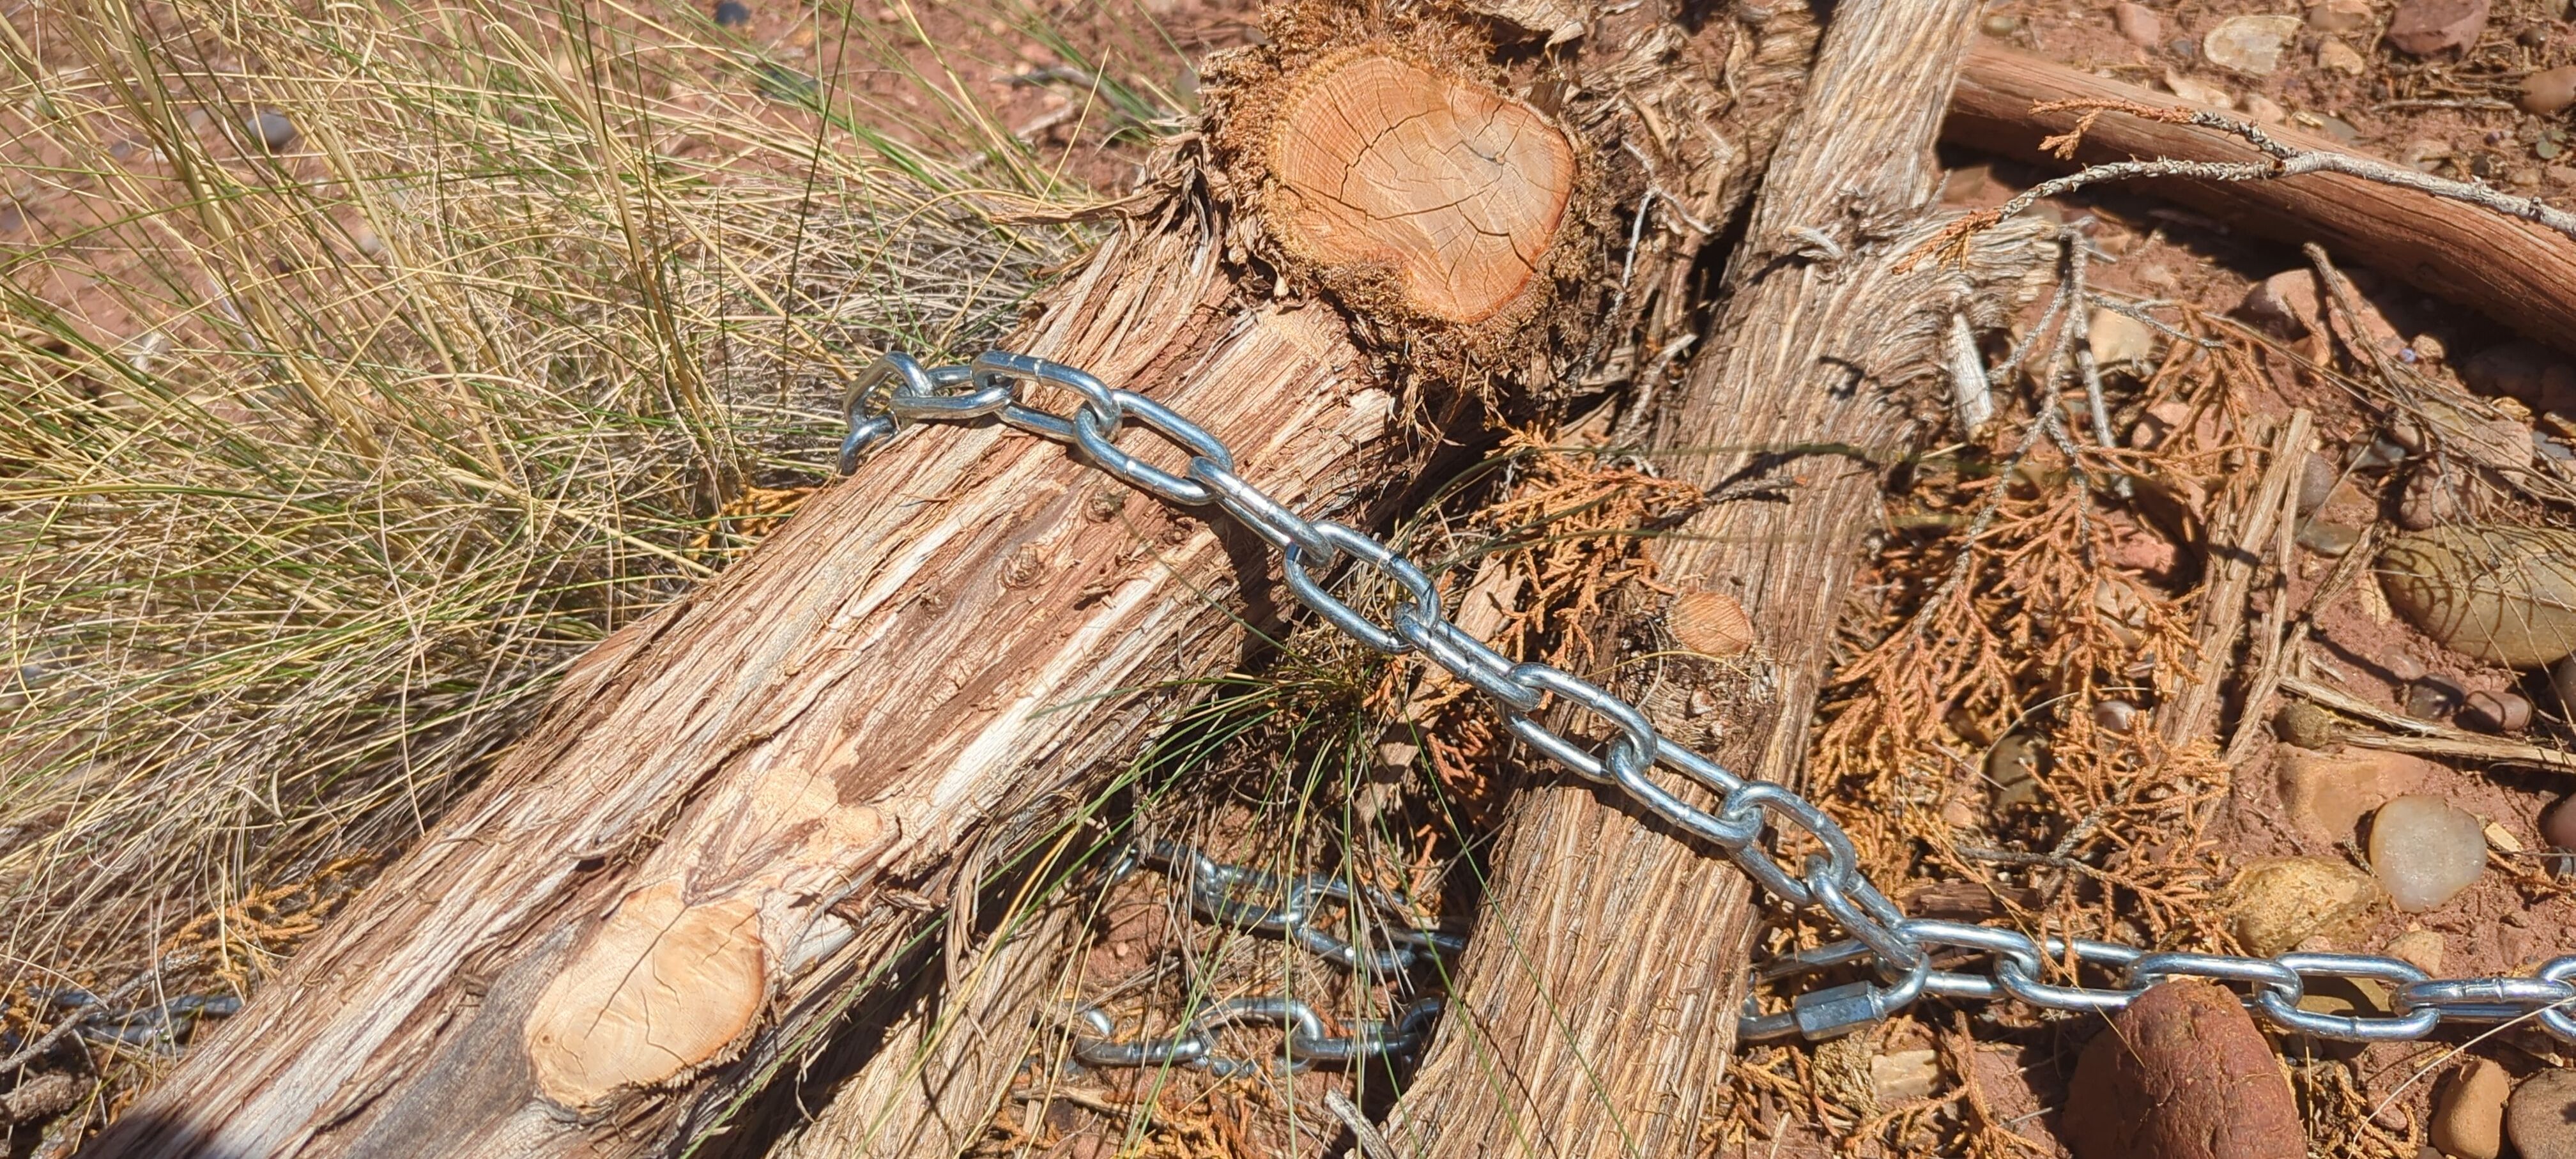
I'm trying out a technique that might help,

T-posts at the top of my ridge, 2 about ten ft apart. Each t-post has a metal chain attached, the chains run to the bottom.  I'm using branches off my cedars to cross between chains. It's like a rope ladder laying down the slope.  I had to buy the chain and quick links but hope that down the road I can reclaim the hardware without disturbing the logs
IMG_20260727_133436.jpg
view from bottom
view from bottom
IMG_20260727_133414.jpg
close up of chain holding log
 
William Bronson
gardener
Posts: 5759
Location: Cincinnati, Ohio,Price Hill 45205
1356
forest garden trees urban
  • Likes 13
  • Mark post as helpful
  • send pies
    Number of slices to send:
    Optional 'thank-you' note:
  • Quote
  • Report post to moderator
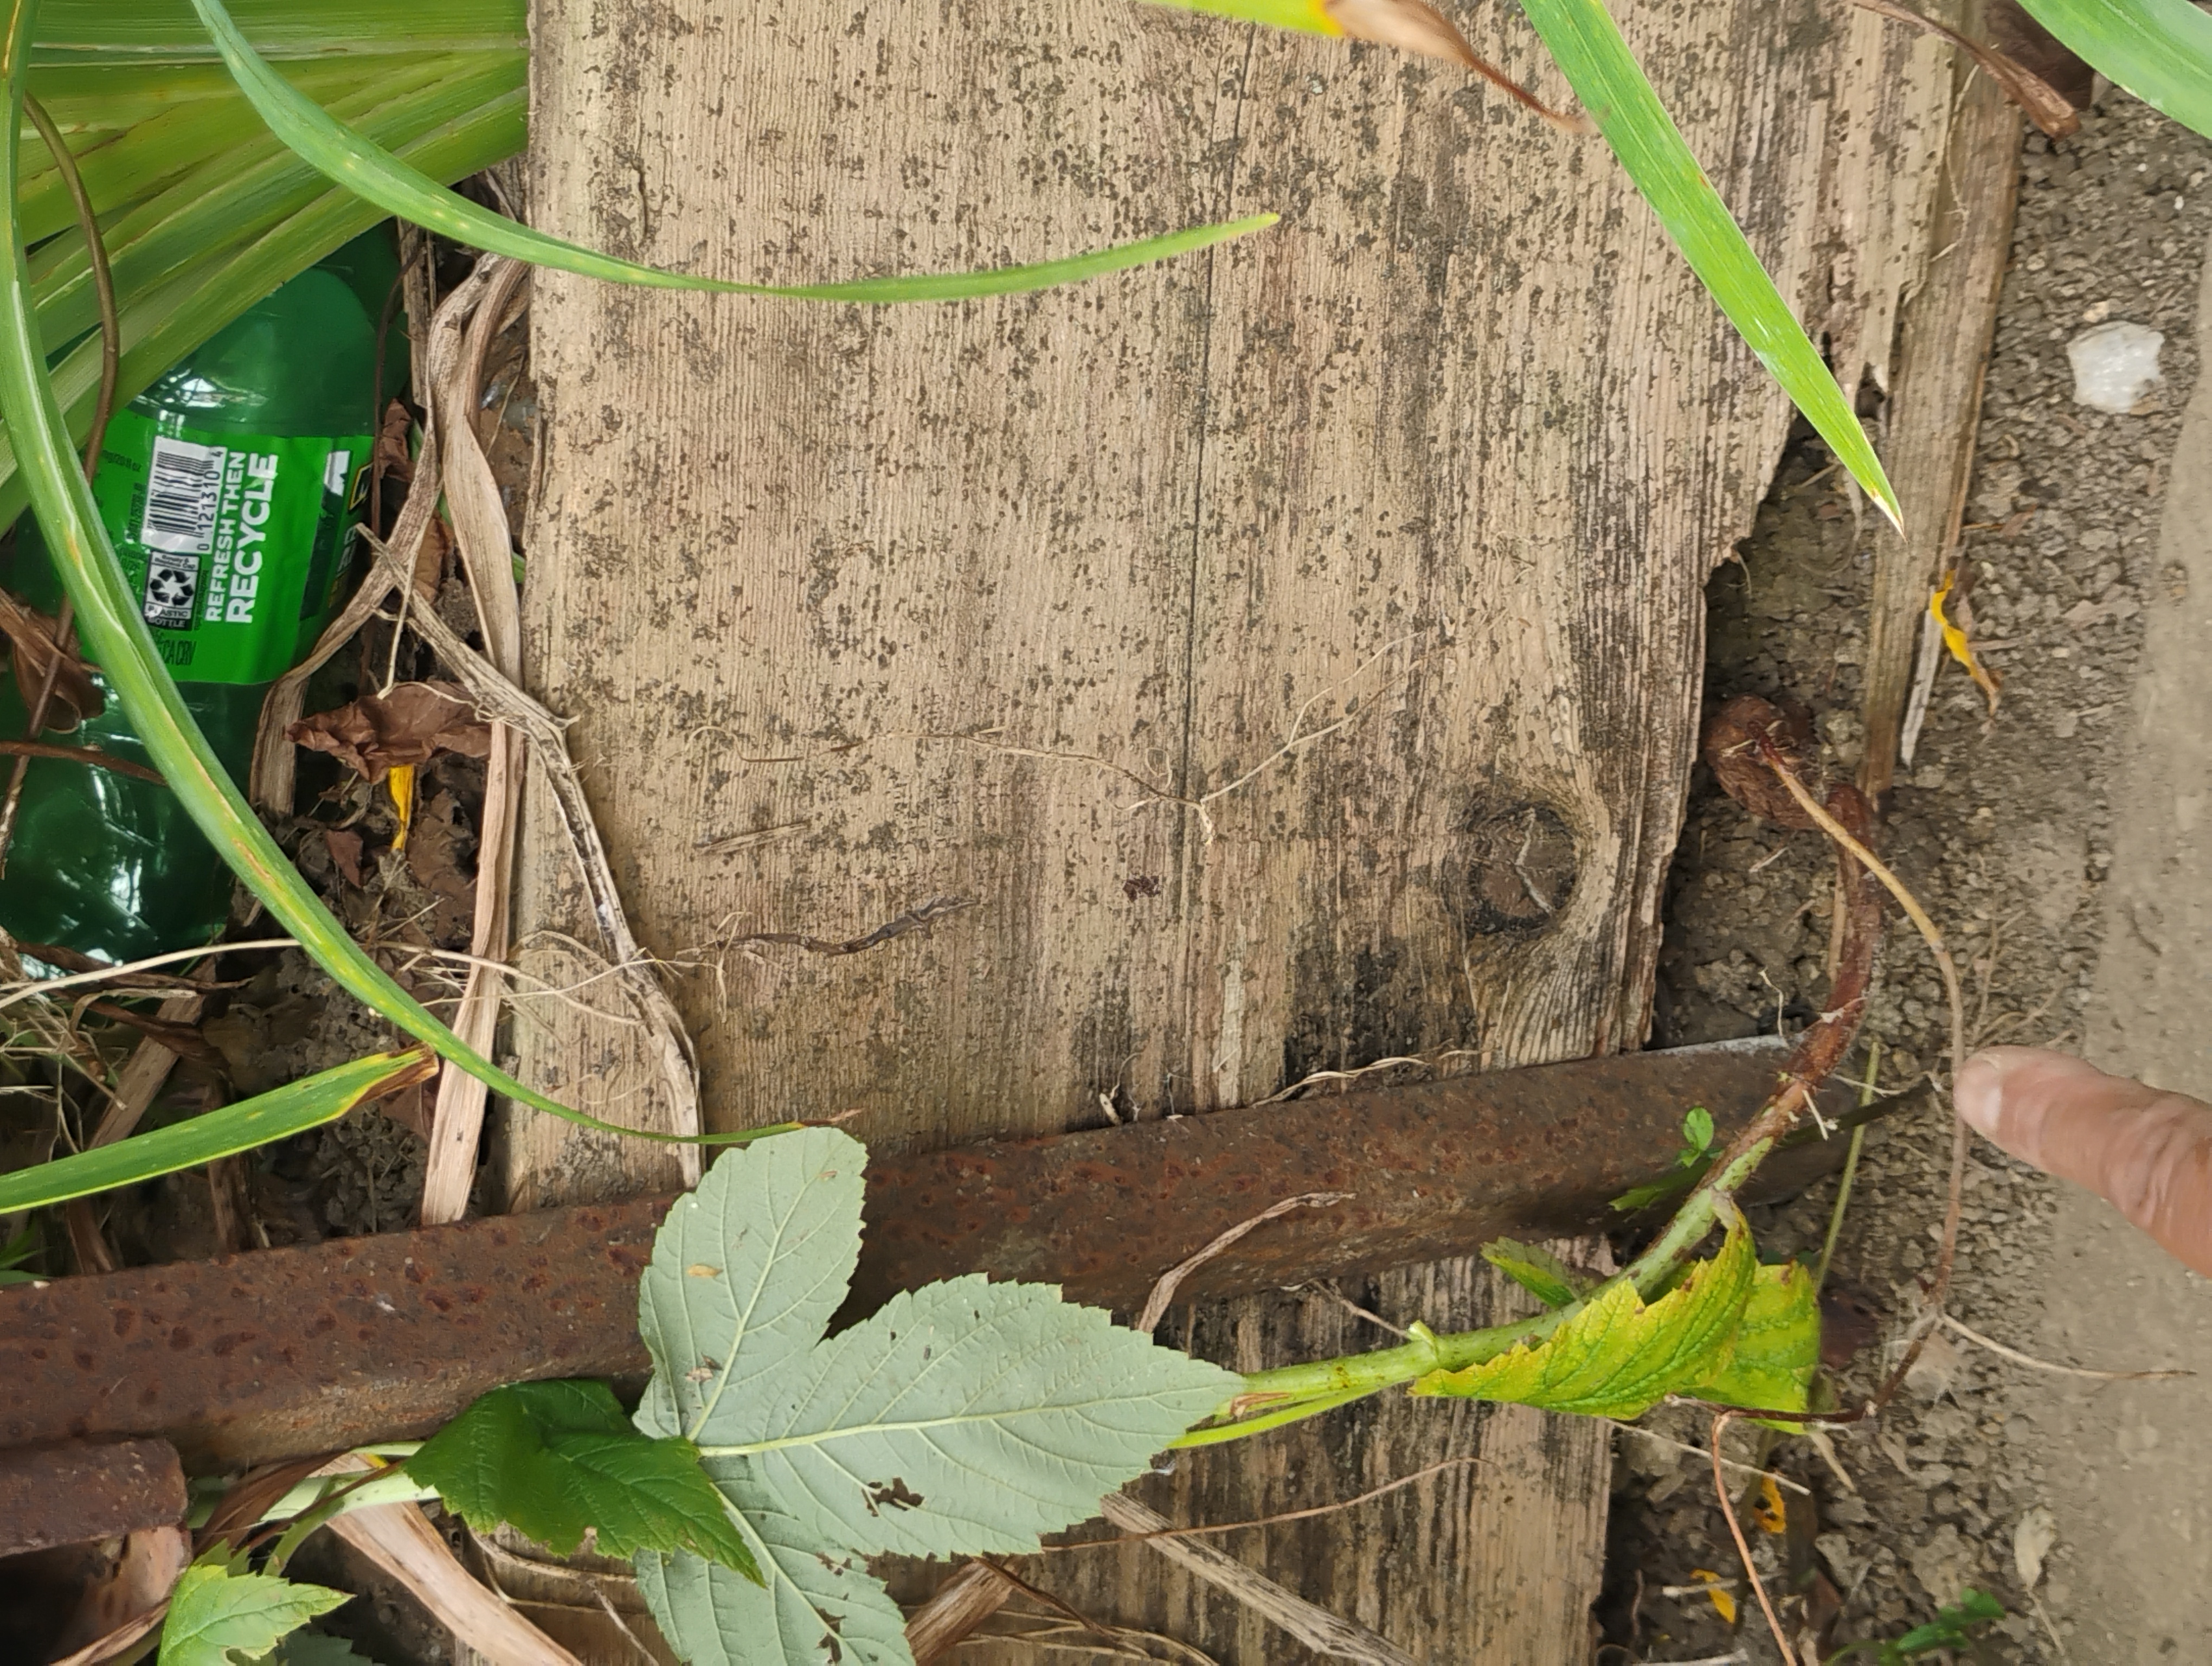
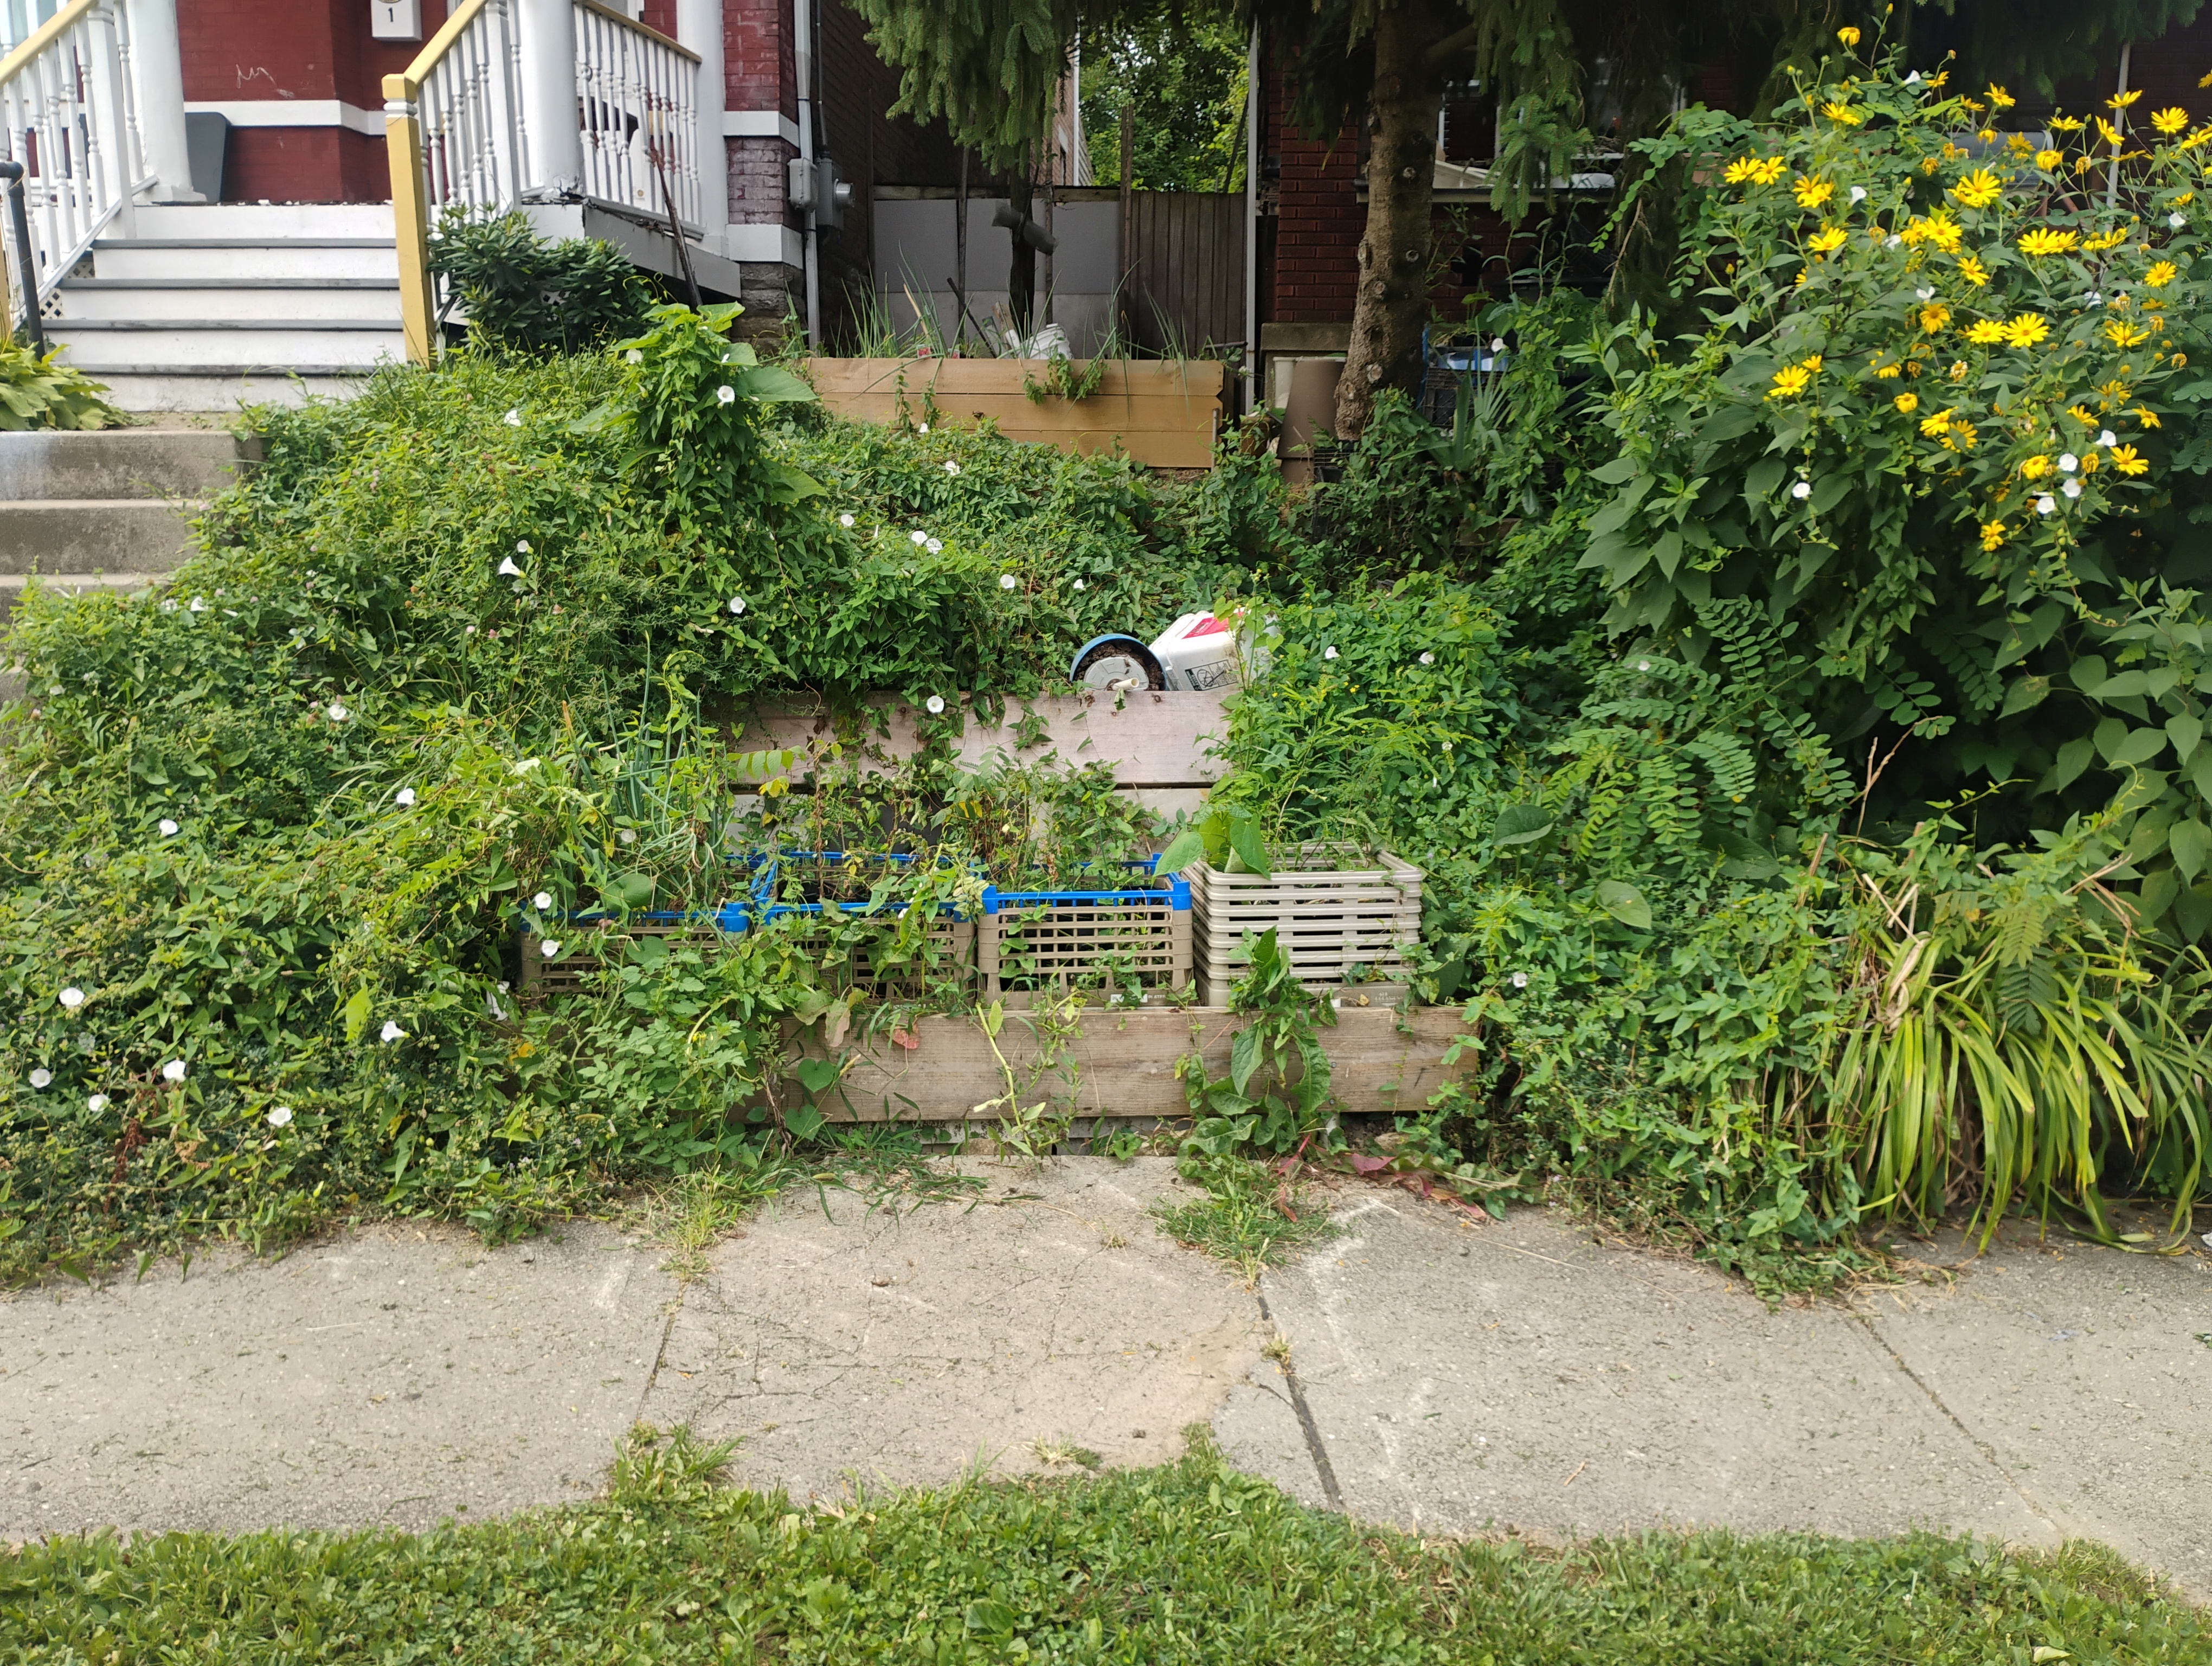
This a close up of the front on an old terrace.
The wood is only 3/4" thick, more or less, and not treated.
The stake is part of a bedframe.
Across 10 feet, this is the only hole that has developed.
Notice the soil is stable even as the raspberry is escaping.
I ran this wall flush with the sidewalk, but I want to replace it with something that is level instead.
IMG_20260727_114013426.jpg
5 to 7 years old?
5 to 7 years old?
 
master steward
Posts: 15990
Location: Pacific Wet Coast
10436
duck books chicken cooking food preservation ungarbage
  • Likes 13
  • Mark post as helpful
  • send pies
    Number of slices to send:
    Optional 'thank-you' note:
  • Quote
  • Report post to moderator
Connie Graham wrote:

I would mention too that I've tried hammering stakes into the ground here and it's impossible - they hit stone very quickly and then just won't go in any further but aren't in enough to be solid.  


I am very familiar with this problem.

Do you know if you're hitting huge rocks, or mostly small rocks?

For small rocks, I work in our winter after a month or two of rain. I use rebar stakes which I sharpen on Hubby's bench grinder until they're cone shaped. If the ground is really wet, I can usually get the rock to push out of the way.

Unfortunately, all too often, I end up with a "BIG" rock. A heavy pry bar dropped into the hole will cause enough vibration on the big rock for me to know that's what I've hit. Considering, you can't get a digger in, I would use that rock to your advantage. You need a beefy drill with a rock bit the size of your rebar stake. You drill a hole in the rock, and drop the stake in. Yes, I've done this - in one location I knew when I started that I was dealing with bedrock. I drilled at an angle to hold a guy wire for a tarp roof over a wood pile. The hole was looser than I would have liked, but I just dropped some pebbles down it fill up the gaps.

If your slope is steep, I wouldn't skimp on the stakes. I would also go for narrower, more frequent terraces so each support isn't holding back too much dirt. I have used small diameter trees instead of 2x4's. It had quite a rustic look, but they lasted as long as they were needed.
 
William Bronson
gardener
Posts: 5759
Location: Cincinnati, Ohio,Price Hill 45205
1356
forest garden trees urban
  • Likes 14
  • Mark post as helpful
  • send pies
    Number of slices to send:
    Optional 'thank-you' note:
  • Quote
  • Report post to moderator
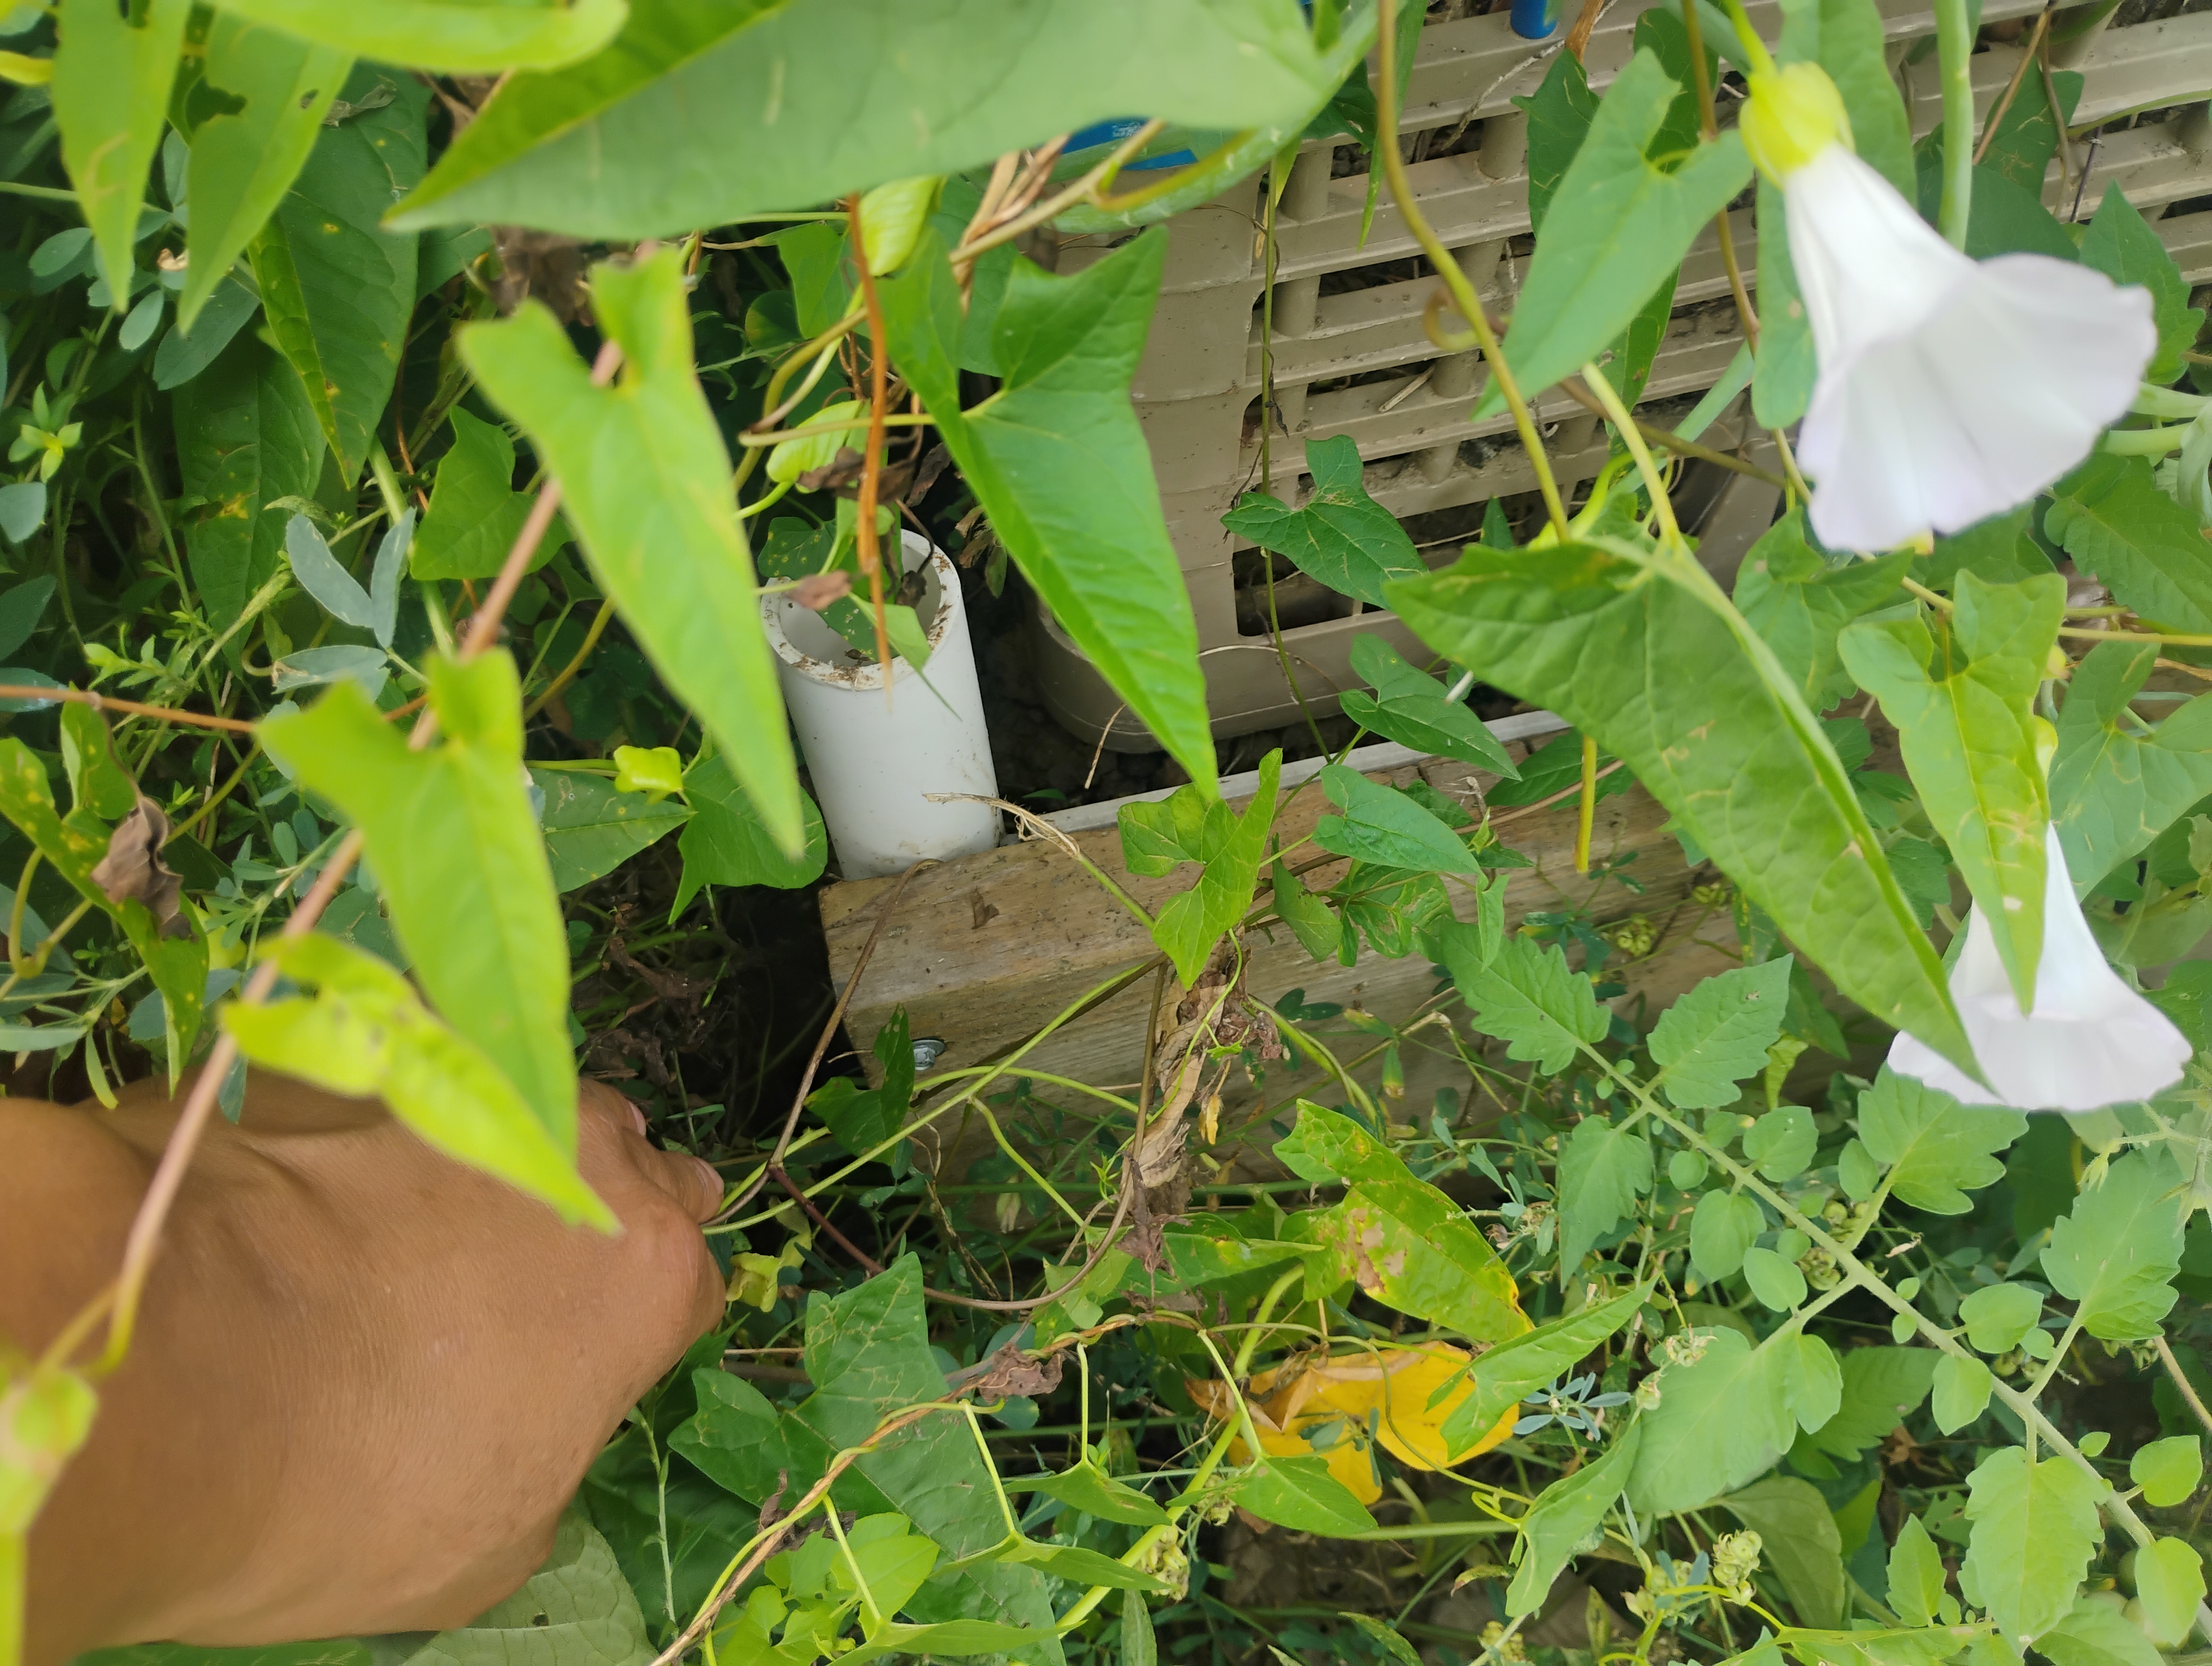
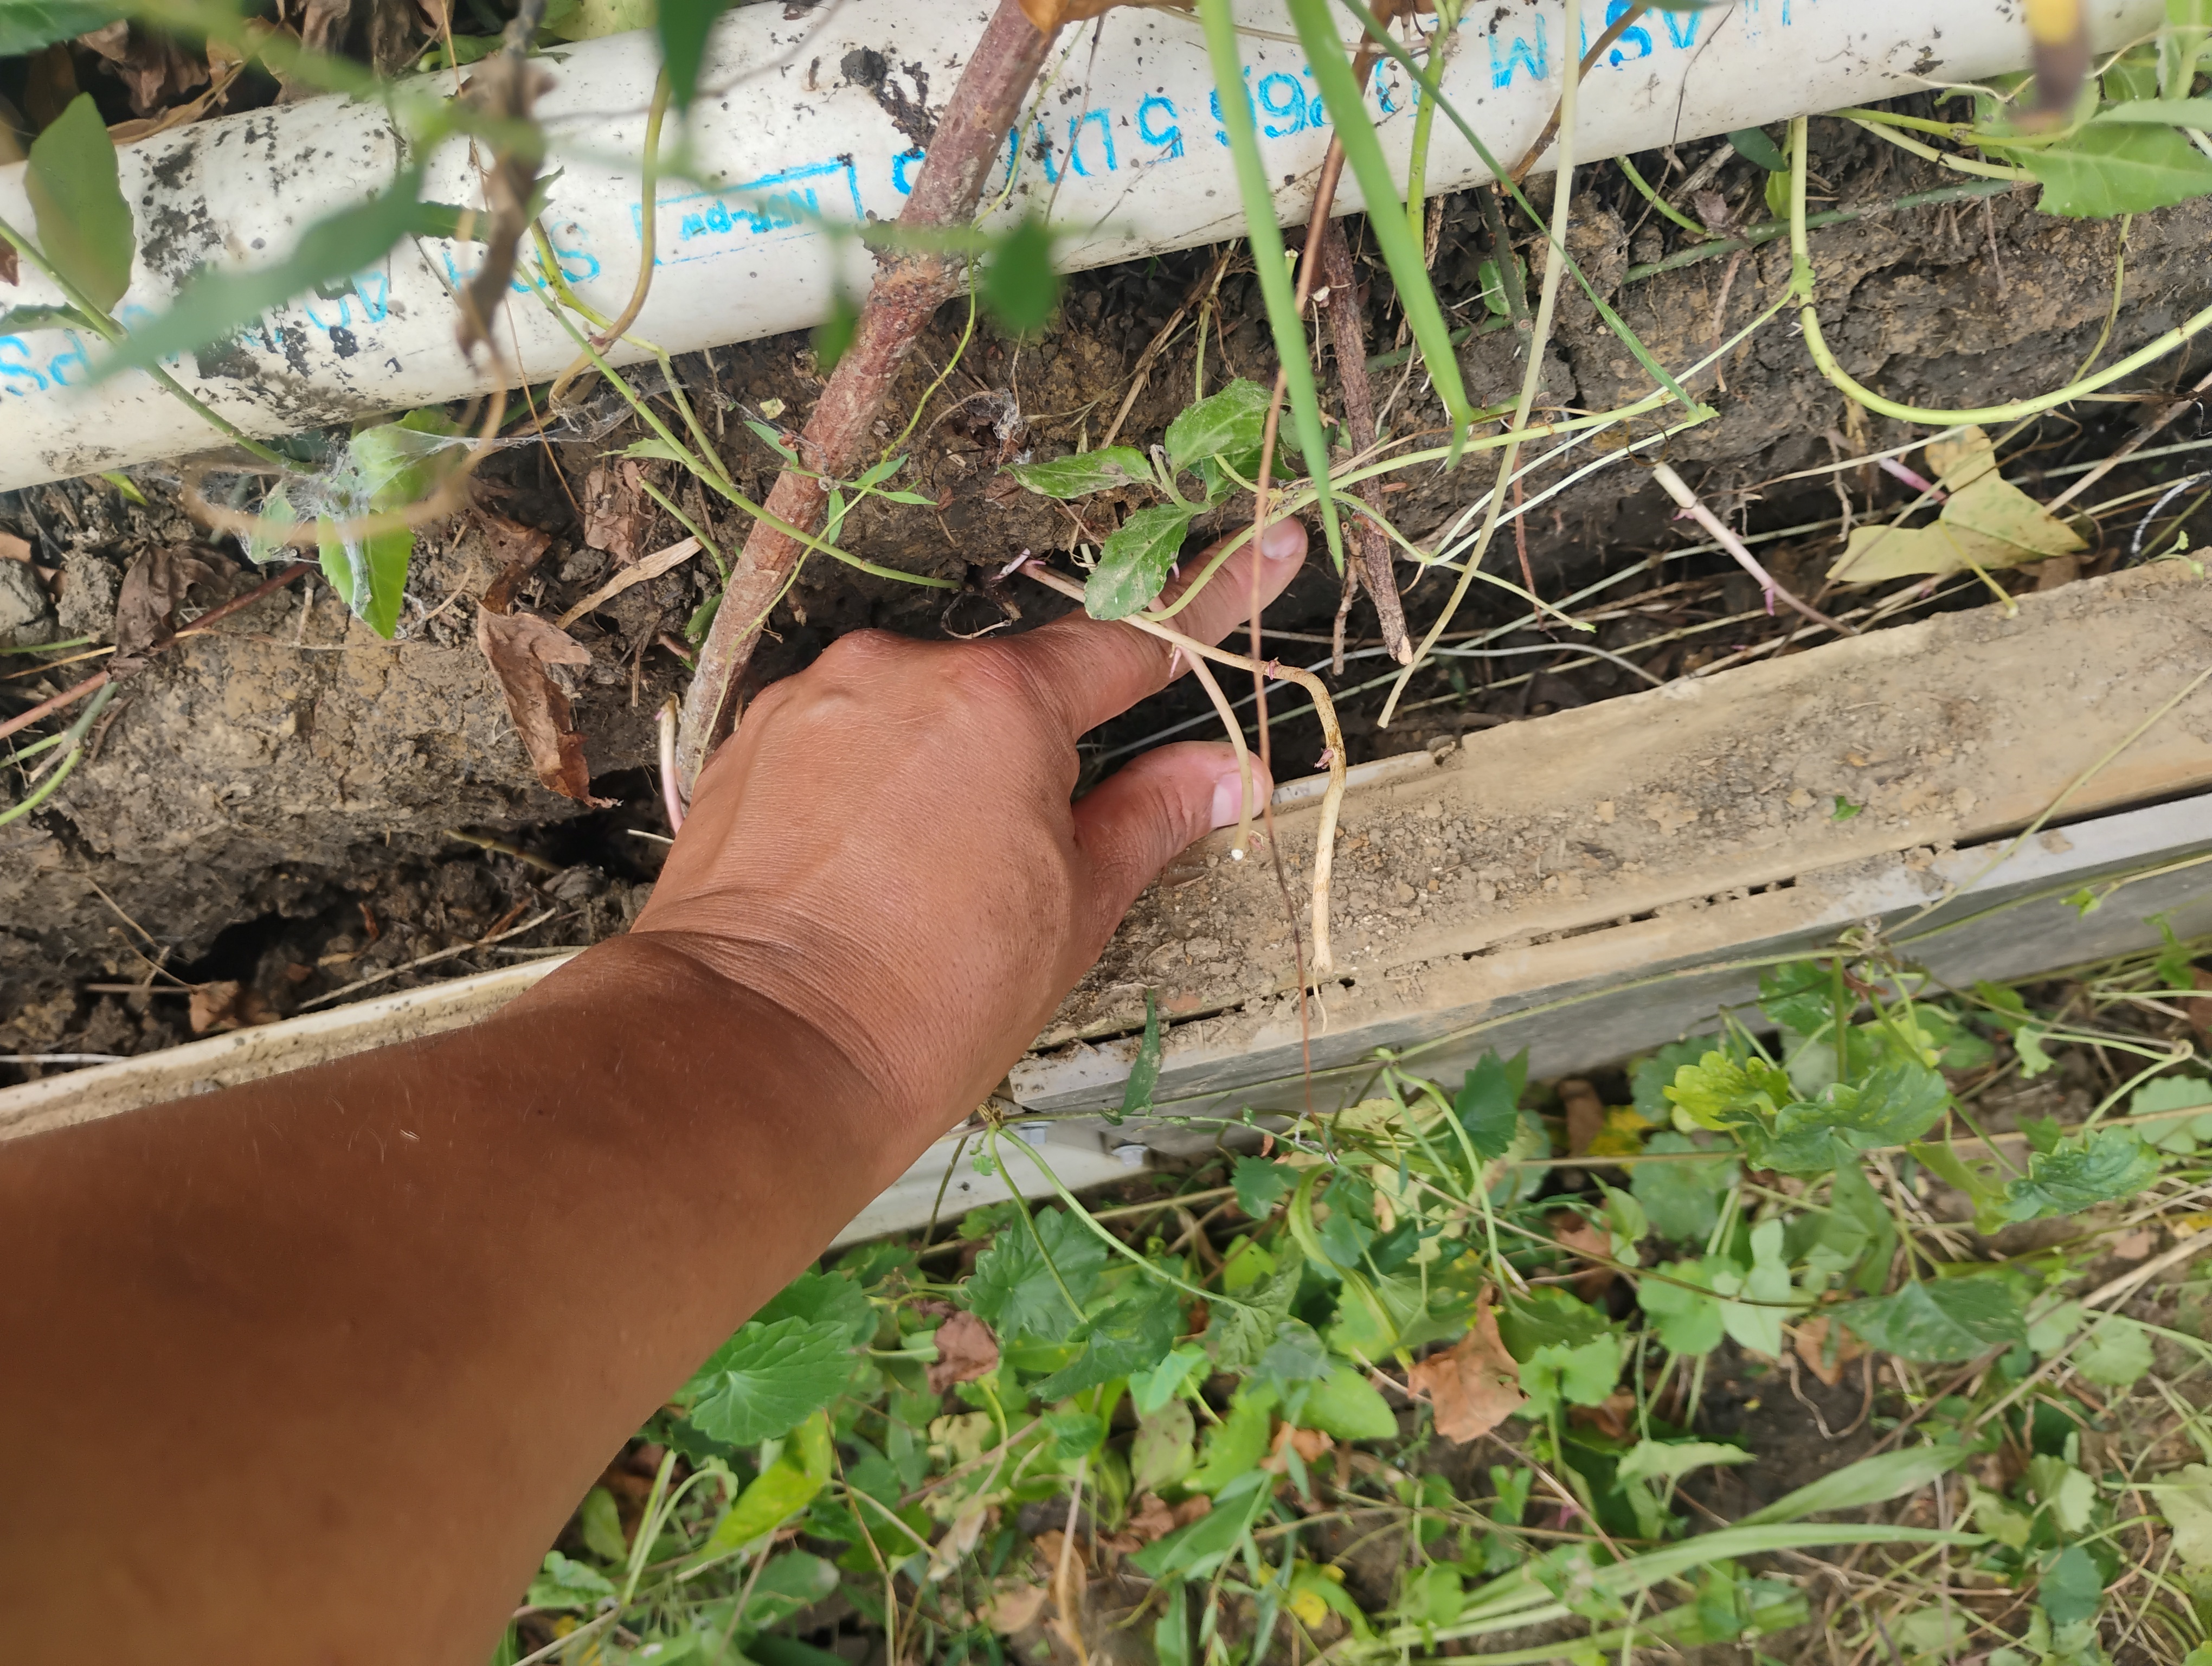
Heres some details on the newer retaining "walls" .
They are so short, it's hard to credit them with being walls, but that short height also helps keeps things stable.

I have used small diameter logs instead of dimensional lumber, and they work well, and last a long but they don't look as nice.
I know it doesn't look like it but as I get older I am  trying to make things look nicer.
For stakes, I cannot recommend wood,treated or not.
Even cedar fails too soon for my liking.
I've turned to PVC for my stakes, which has its own problems, obviously, but it takes a screw and it's strong.

Ideally, I would have trees as the stakes, though I m not sure how that would affect the tree in question.
A mulberry, for example would be fine with logs and dirt piled against the trunk.
If you have access to trees that will grow from stakes, you can build your retaining walls from them.
I have elderberry, but it's not strong enough for stakes, but I have soaked a 5' elderberry cuttings in a pond , horizontally, and it sprouted roots all along the length.
I used that one elsewhere, but I hope to add elderberry stakes to some of these terraces,, but I won't count on them for strength.


IMG_20260727_112704486.jpg
This is the new section of terrace.Its unfinished, like most things around here.The first "wall" is only a foot tall. The second will be two feet tall before it's done.
IMG_20260727_112645577.jpg
Close up on the stake and tile.This is the "wall" closest to the street.
IMG_20260727_113027875.jpg
A view from inside this terrace,looking down on the second "wall" .It has a layer of tile on either side,and was built a few inches away from the vertical face of soil.Notice very little slump
 
pollinator
Posts: 6211
Location: Bendigo , Australia
592
plumbing earthworks bee building homestead greening the desert
  • Likes 10
  • Mark post as helpful
  • send pies
    Number of slices to send:
    Optional 'thank-you' note:
  • Quote
  • Report post to moderator
Can you reconsider your aspirations and cover the slope with a creeper and not worry about walking around it?
Or grow pumpkins on it?
 
Connie Graham
Posts: 18
Location: France
8
  • Likes 7
  • Mark post as helpful
  • send pies
    Number of slices to send:
    Optional 'thank-you' note:
  • Quote
  • Report post to moderator
Thanks all for your explanations and pics, great to see your creative solutions!

Jay Angler wrote:Do you know if you're hitting huge rocks, or mostly small rocks?


It's a lot of huge rocks, sometimes smaller ones. I used rebar elsewhere where I needed to support a dead hedge and that worked pretty well so I'm going to put a few in on the slope and see if it would work there. Not sure, it might just be massive rock I can't get through. It's also tricky getting the rebar because it's soooo long. I managed to get the local DIY place to cut a batch in half for me so they could fit on my little trailer but they weren't happy about it and only agreed because I bought the thinner 10 mm ones. Ideally I would use thicker ones so they don't bend so easily but I don't think they will want to cut them for me. But metal stakes all the way in my book!
 
Connie Graham
Posts: 18
Location: France
8
  • Likes 5
  • Mark post as helpful
  • send pies
    Number of slices to send:
    Optional 'thank-you' note:
  • Quote
  • Report post to moderator

John C Daley wrote:Can you reconsider your aspirations and cover the slope with a creeper and not worry about walking around it?
Or grow pumpkins on it?


Hi John, My 'aspiration' is merely to protect the slope and the trees growing on it. I don't need to be constantly walking on it and I have no set plant list I 'must' grow there, I'm just looking for solutions to help me protect and stabilise the soil and not let water run straight off it. Pumpkins, for example, wouldn't work because being so steep it dries out so fast; some swales would help there (but also with the mature trees it is shady so I would have to pick shade-loving plants). So I'm just here looking for ideas based on what worked for other people.
 
Anne Miller
steward
Posts: 19354
Location: USDA Zone 8a
4881
dog hunting food preservation cooking bee greening the desert
  • Likes 6
  • Mark post as helpful
  • send pies
    Number of slices to send:
    Optional 'thank-you' note:
  • Quote
  • Report post to moderator
Since stakes don't work, why not use rocks to terrace?

Use the rocks that are as big as you can handle then fill in with organic matter?

What is organic matter?  Wood chips, leaves, coffee grounds, veggie scraps, limbs, twigs, etc.
 
Posts: 10608
Location: a temperate, clay/loam spot on planet earth, the universe
3775
4
  • Likes 10
  • Mark post as helpful
  • send pies
    Number of slices to send:
    Optional 'thank-you' note:
  • Quote
  • Report post to moderator

Anne Miller wrote:Since stakes don't work, why not use rocks to terrace?

Use the rocks that are as big as you can handle then fill in with organic matter?

What is organic matter?  Wood chips, leaves, coffee grounds, veggie scraps, limbs, twigs, etc.


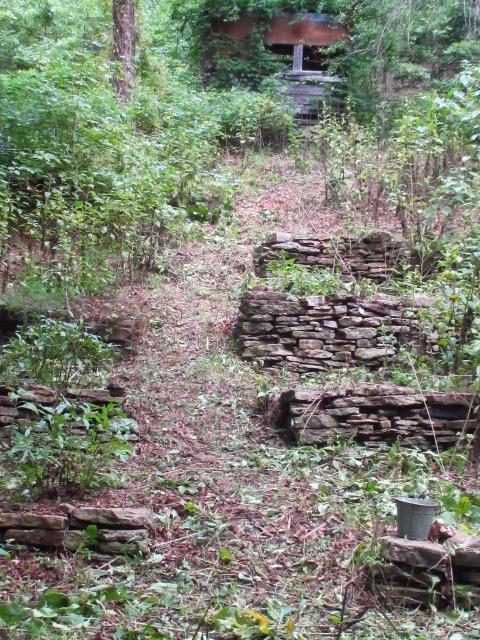
This is what we did but it was with young backs...the photo was taken a while ago when the terraces were 30yrs old ....now going on 50yrs....we have not lived there since the seventies and eighties.

We had no extra money and no road then (that came later) to the five acres...but we had rocks and pick axes and pry bars....made a wonderful garden space😊

https://permies.com/t/39732/permaculture/Reviving-homestead-wisteria
 
Connie Graham
Posts: 18
Location: France
8
  • Likes 6
  • Mark post as helpful
  • send pies
    Number of slices to send:
    Optional 'thank-you' note:
  • Quote
  • Report post to moderator

Anne Miller wrote:Since stakes don't work, why not use rocks to terrace?

Use the rocks that are as big as you can handle then fill in with organic matter?

What is organic matter?  Wood chips, leaves, coffee grounds, veggie scraps, limbs, twigs, etc.


It's just the sheer size of the task - 40 metres in length and I'll have to terrace multiple times down the slope, digging the stone out as I go presumably. Let's say I put a retaining 'wall' of stones every 1.5 metres of the slope. That's 266 metres of wall to source stone for and then put in place. I feel exhausted already. It is possible; I'm just collecting real experiences first so I don't do huge amounts of work I'll need to undo later because I forgot something.  
 
Judith Browning
Posts: 10608
Location: a temperate, clay/loam spot on planet earth, the universe
3775
4
  • Likes 11
  • Mark post as helpful
  • send pies
    Number of slices to send:
    Optional 'thank-you' note:
  • Quote
  • Report post to moderator
A  stone terrace would be a long term project and the preparation to lay that first row of stone correctly is crucial to it's longevity...Early in the process Steve relaid some of the terraces in my photo above that slumped.

Since you mentioned there are some full sized trees on the slope already, I wonder about planting more trees, fruit and nuts....shape each new planting hole into a depression with a small wall of rocks on the downhill side?
Scythe or sickle the brambles and grasses in between the trees to maintain....could even add trails on contour that might later become terracing.

 
Connie Graham
Posts: 18
Location: France
8
  • Likes 6
  • Mark post as helpful
  • send pies
    Number of slices to send:
    Optional 'thank-you' note:
  • Quote
  • Report post to moderator

Judith Browning wrote:A  stone terrace would be a long term project and the preparation to lay that first row of stone correctly is crucial to it's longevity...Early in the process Steve relaid some of the terraces in my photo above that slumped.

Since you mentioned there are some full sized trees on the slope already, I wonder about planting more trees, fruit and nuts....shape each new planting hole into a depression with a small wall of rocks on the downhill side?
Scythe or sickle the brambles and grasses in between the trees to maintain....could even add trails on contour that might later become terracing.


Hi Judith, Yes, I can only imagine and having never built a wall from scratch despite renovating lots of houses I would worry A LOT if I was getting the foundation right!

Interesting about planting trees/fruits - I was thinking at one point about creating a patchwork of adjacent horse-shoe-shaped depressions with under-story plants. I can't remember if there was a reason I moved on from that but I do like the idea.

Part of my concern with any of these ideas is getting the lines/levels right. The whole area curves rather than being straight, so marking out with string is going to be hard. Then there's the fact it slopes left to right as well as front to back. So I kind of need to know in advance what the positions of things are going to be, which stops me from just starting 'here' today as it were. Hope that makes sense!

There are 12 mature oak trees in the space (40 m x10 m) already, not planted regularly though.
 
Anne Miller
steward
Posts: 19354
Location: USDA Zone 8a
4881
dog hunting food preservation cooking bee greening the desert
  • Likes 6
  • Mark post as helpful
  • send pies
    Number of slices to send:
    Optional 'thank-you' note:
  • Quote
  • Report post to moderator

Connie Graham wrote:

Anne Miller wrote:Since stakes don't work, why not use rocks to terrace?

Use the rocks that are as big as you can handle then fill in with organic matter?

What is organic matter?  Wood chips, leaves, coffee grounds, veggie scraps, limbs, twigs, etc.


It's just the sheer size of the task - 40 metres in length and I'll have to terrace multiple times down the slope, digging the stone out as I go presumably. Let's say I put a retaining 'wall' of stones every 1.5 metres of the slope. That's 266 metres of wall to source stone for and then put in place. I feel exhausted already. It is possible; I'm just collecting real experiences first so I don't do huge amounts of work I'll need to undo later because I forgot something.  


Start small, lets say a 10 foot wide stripe top to bottom.

Beside stake or stones there are other possibilities.

Jordan said, "when i terraced my garden, it was not the hardest work, it was just a lot of work. you just start at the bottom and work your way up.


https://permies.com/t/2401/permaculture/Gradual-Terracing#17096

For inspiration:

https://permies.com/w/spring-terrace-plans

https://permies.com/t/42861/Building-terraces

https://permies.com/t/5553/Bowl-Terraces-crater-gardens#47725

 
Connie Graham
Posts: 18
Location: France
8
  • Likes 7
  • Mark post as helpful
  • send pies
    Number of slices to send:
    Optional 'thank-you' note:
  • Quote
  • Report post to moderator

Anne Miller wrote:
Start small, lets say a 10 foot wide stripe top to bottom.

Beside stake or stones there are other possibilities.


Yes, I understand the principle of starting small, I just want to start small with the right solution and not have to undo hours and hours of work. I'm restoring a house and garden on my own, plus I have a job, so it's important I think through all my options before I get going. I've come up with maybe 30 different approaches but nothing beats other people's hindsight to get a sense of what's realistic. Isn't that why we have forums like this?
 
Judith Browning
Posts: 10608
Location: a temperate, clay/loam spot on planet earth, the universe
3775
4
  • Likes 6
  • Mark post as helpful
  • send pies
    Number of slices to send:
    Optional 'thank-you' note:
  • Quote
  • Report post to moderator

 
Part of my concern with any of these ideas is getting the lines/levels right. The whole area curves rather than being straight, so marking out with string is going to be hard. Then there's the fact it slopes left to right as well as front to back. So I kind of need to know in advance what the positions of things are going to be, which stops me from just starting 'here' today as it were. Hope that makes sense!


What device were you thinking of laying out the lines with?
Stakes and string and a level....and a compass? I may be remembering when we measured and recorded out 5 acres of steep rocky land so probably not the same.
I've never done that to lay out contour lines but I think there are many here who have.

 
Posts: 121
Location: West central Minnesota
57
  • Likes 7
  • Mark post as helpful
  • send pies
    Number of slices to send:
    Optional 'thank-you' note:
  • Quote
  • Report post to moderator
Keyline Design

https://en.wikipedia.org/wiki/Keyline_design

This may answer some questions for you. Some of it involves tillage but not all.
 
pollinator
Posts: 1052
Location: Illinois
242
  • Likes 8
  • Mark post as helpful
  • send pies
    Number of slices to send:
    Optional 'thank-you' note:
  • Quote
  • Report post to moderator
A heavy digging hoe can be used to make ridges along a steep slope.
https://www.amazon.com/Paiaojia-Hand-Sharpened-Heat-Treated-Strength-Performance/dp/B0FVL5JH8Z/ref=sr_1_1?sr=8-1
 
John C Daley
pollinator
Posts: 6211
Location: Bendigo , Australia
592
plumbing earthworks bee building homestead greening the desert
  • Likes 9
  • Mark post as helpful
  • send pies
    Number of slices to send:
    Optional 'thank-you' note:
  • Quote
  • Report post to moderator
You can use a clear plastic hose as a water level to sort the levels out.
No string is needed. just purchase the hose and attach a stick at each end to hold the hose while you set things out
water-level.jpeg
a water level
a water level
 
Jay Angler
master steward
Posts: 15990
Location: Pacific Wet Coast
10436
duck books chicken cooking food preservation ungarbage
  • Likes 9
  • Mark post as helpful
  • send pies
    Number of slices to send:
    Optional 'thank-you' note:
  • Quote
  • Report post to moderator

John C Daley wrote:You can use a clear plastic hose as a water level to sort the levels out.
No string is needed. just purchase the hose and attach a stick at each end to hold the hose while you set things out


From watching this done, and considering the description of the slope, I would highly recommend you have 2 or 3 people working as a team. Two people to man the two ends of the water level, and the third to hammer in marking pegs of some sort. It is very easy for the water level to get tipped over while trying to stabilize the first end.

But yes - low tech for the win!
 
master pollinator
Posts: 5439
Location: Due to winter mortality, I stubbornly state, zone 7a Tennessee
2413
7
forest garden foraging books food preservation cooking fiber arts bee medical herbs
  • Likes 10
  • Mark post as helpful
  • send pies
    Number of slices to send:
    Optional 'thank-you' note:
  • Quote
  • Report post to moderator
I think the a frame level is a better way to find your contour. My project was much smaller, but I was able to mark the contour by myself. Here is an article about the a frame level.

I used construction flags for my markers. Like these. The feet of my A frame level was about feet wide. I used a flag at each foot, and eyeballed the center of the contour for my flags to be 18 inches apart.


Here is my tiered wattle garden thread. Spoiler, my wattle was mostly structurally sound for only two years. Now at the four year mark, my clay is sill sorta holding shape. The wattle is scattered sticks. But maybe you can use this info and Williams tiers to figure out something that is more permanent than mine.
 
Connie Graham
Posts: 18
Location: France
8
  • Likes 8
  • Mark post as helpful
  • send pies
    Number of slices to send:
    Optional 'thank-you' note:
  • Quote
  • Report post to moderator

Judith Browning wrote:
What device were you thinking of laying out the lines with?
Stakes and string and a level....and a compass? I may be remembering when we measured and recorded out 5 acres of steep rocky land so probably not the same.
I've never done that to lay out contour lines but I think there are many here who have.


I have a laser and a low-tech level (water tube) so I think I'm going to place different markers up and down the slope to show me what level is at different points - just because it's so hard once you're standing there to get your bearings - and then I can use stakes and string. I'll do the curves themselves by eye and use an old hose so I can step back and see what the form looks like from a distance. Those are just my musings having not started yet and so not knowing if it will work! I might have to adapt.
 
Anne Miller
steward
Posts: 19354
Location: USDA Zone 8a
4881
dog hunting food preservation cooking bee greening the desert
  • Likes 6
  • Mark post as helpful
  • send pies
    Number of slices to send:
    Optional 'thank-you' note:
  • Quote
  • Report post to moderator
Something else to consider while building terraces is a method to prevent erosion.

Planting deep rooted plants as you work might help.

Also points to consider would be how to manage water runoff, and setting up safe pathways.

Some threads for suggestions:

https://permies.com/t/6871/Erosion-Control-Plants-North-Facing

https://permies.com/t/5790/permaculture/plant-steep-slope

https://permies.com/t/4775/West-facing-slope
 
Posts: 17
Location: Ames IOWA
2
greening the desert
  • Likes 9
  • Mark post as helpful
  • send pies
    Number of slices to send:
    Optional 'thank-you' note:
  • Quote
  • Report post to moderator
Native Forbes - wild flowers have deep roots and stand upright catching debris and soil
Native grasses bend and allow water to flow over. We call them waterways.
The forbs somewhat slow the water.
As the soil organic material-SOM/SOC increases the water holding capacity increases.
The soil stability is better.
Grasses seem to clump and water erodes between clumps
To establish make small catchments to catch water and get the seeds started
The same idea as justdigit useing earth smiles on less sloping areas
 
Connie Graham
Posts: 18
Location: France
8
  • Likes 4
  • Mark post as helpful
  • send pies
    Number of slices to send:
    Optional 'thank-you' note:
  • Quote
  • Report post to moderator
A follow-up question for those who have used rebar instead of stakes as discussed further up this post... Like I said I used 10 mm wide bar already in a spot where it's just doing minimal support and it was fine for that but hammering it in I could tell it as going to bend if there was too much resistance (stone in the ground) or if a lot of weight was pushing up against it. In your experience, what thickness of rebar offers the right amount of rigidity for building terraces? I don't want to overdo the thickness because of cost (materials as soooo expensive these days) and also all the saw blades I'll get through cutting it up into short lengths. Thanks for sharing any experiences you've had!
 
Posts: 150
Location: Payson, Utah, US of A - Zone6B/High Desert/4500' /14" Rainfall
85
  • Likes 14
  • Mark post as helpful
  • send pies
    Number of slices to send:
    Optional 'thank-you' note:
  • Quote
  • Report post to moderator
Some ideas:

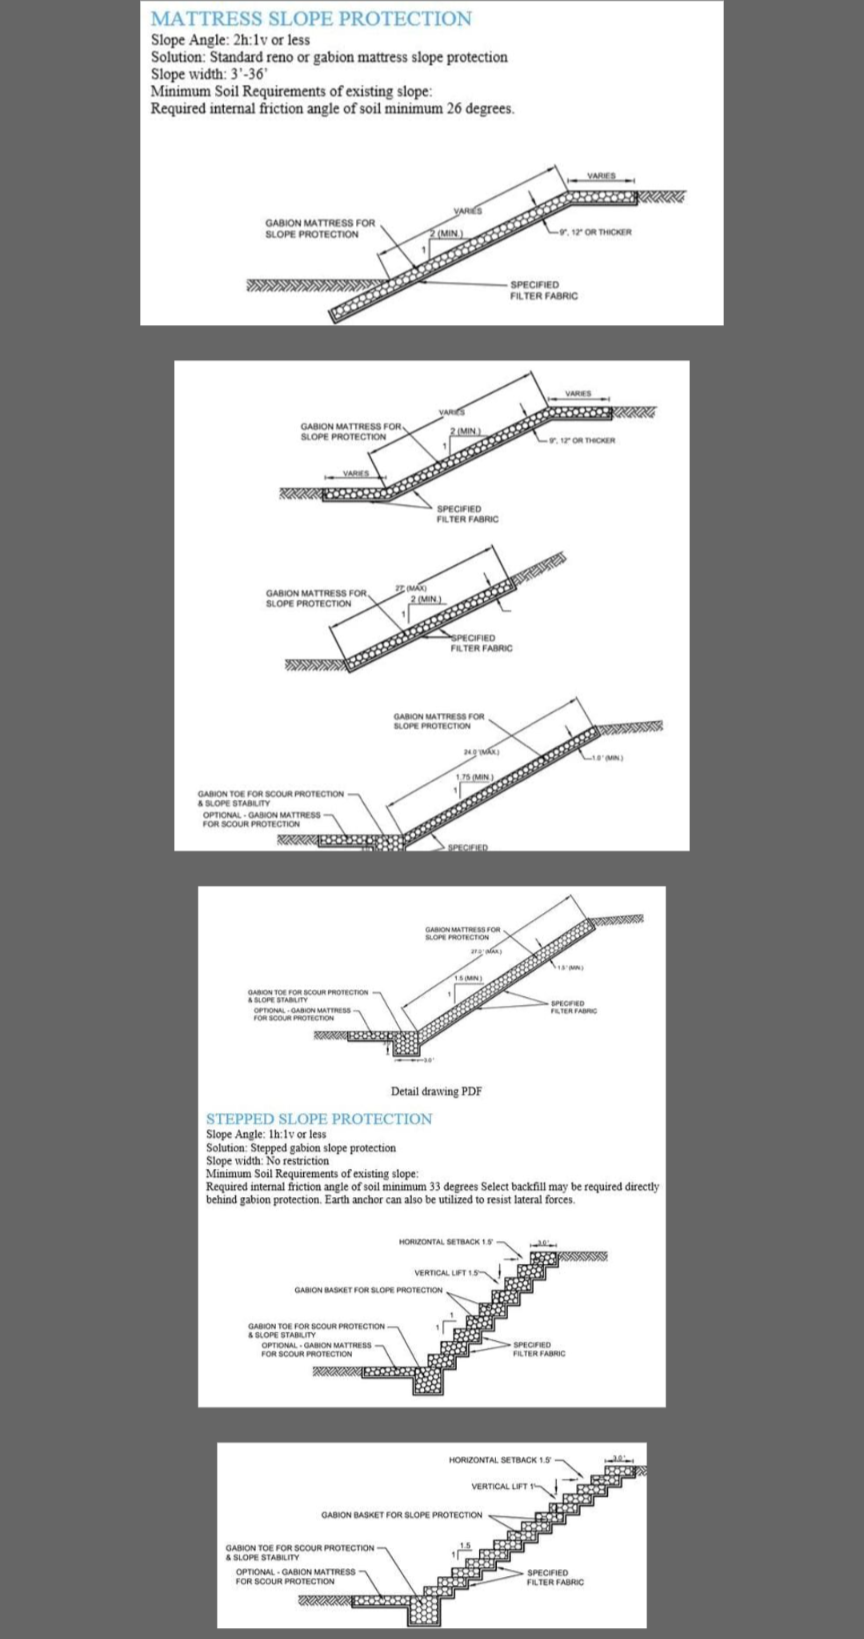
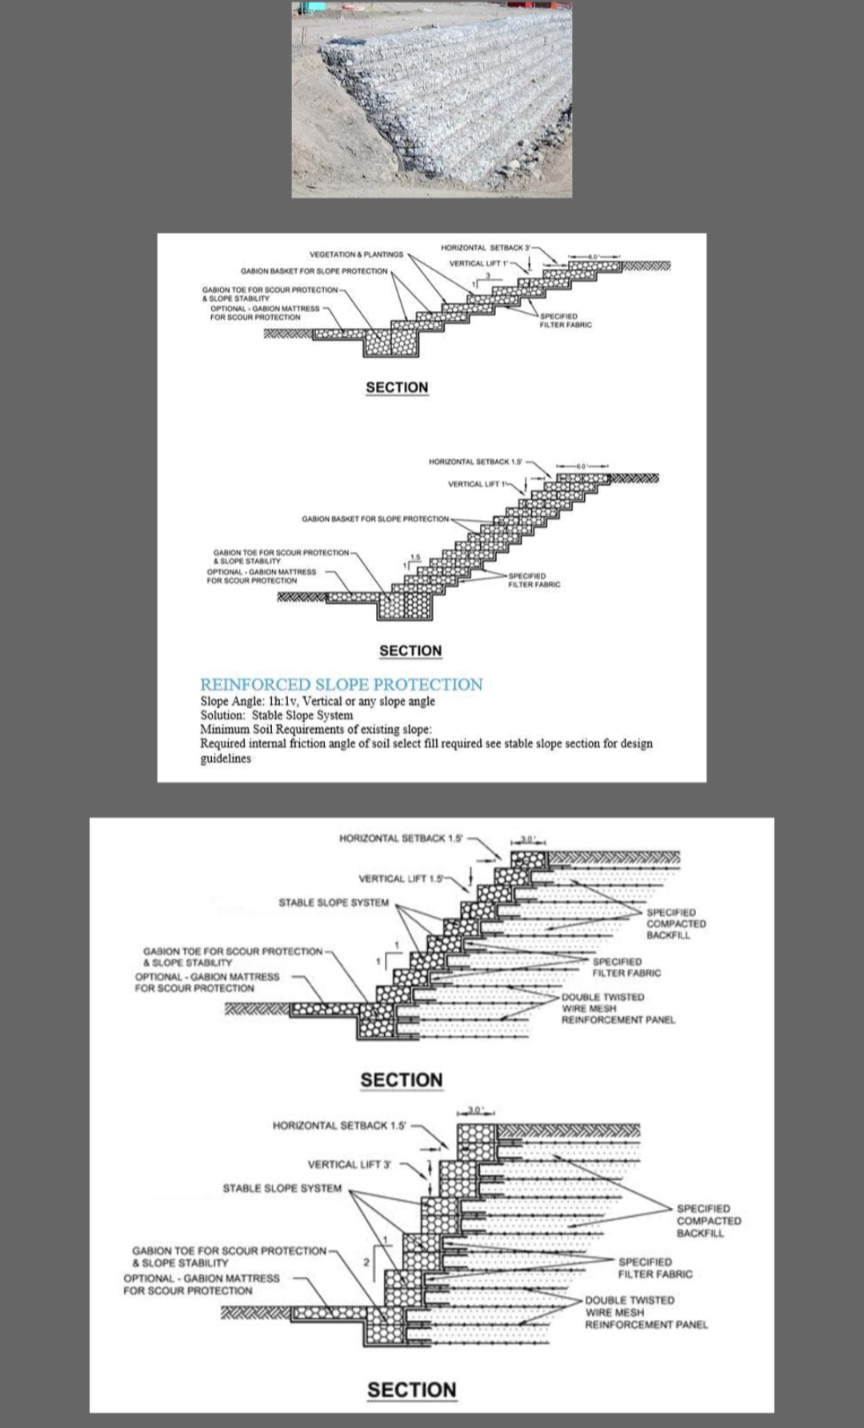
Gabions: These can be fancy, well constructed,tiered systems, or they can be primitive, with a couple of hog panels held up by stakes or trees. I've included some pictures. Gabions are cool because eventually, if they're in the path of flowing water, they'll accumulate debris and begin filling up with organic matter, eventually becoming a fertility battery for the downslope.

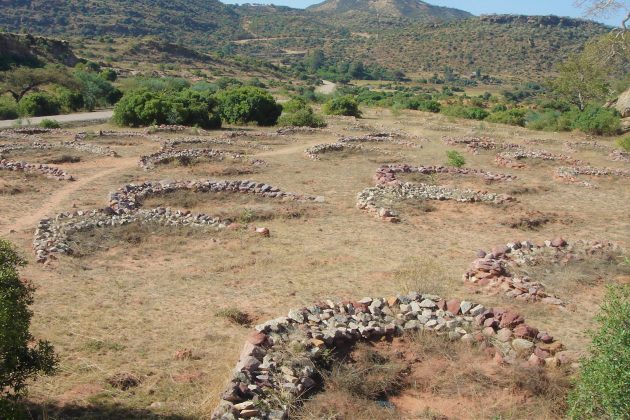
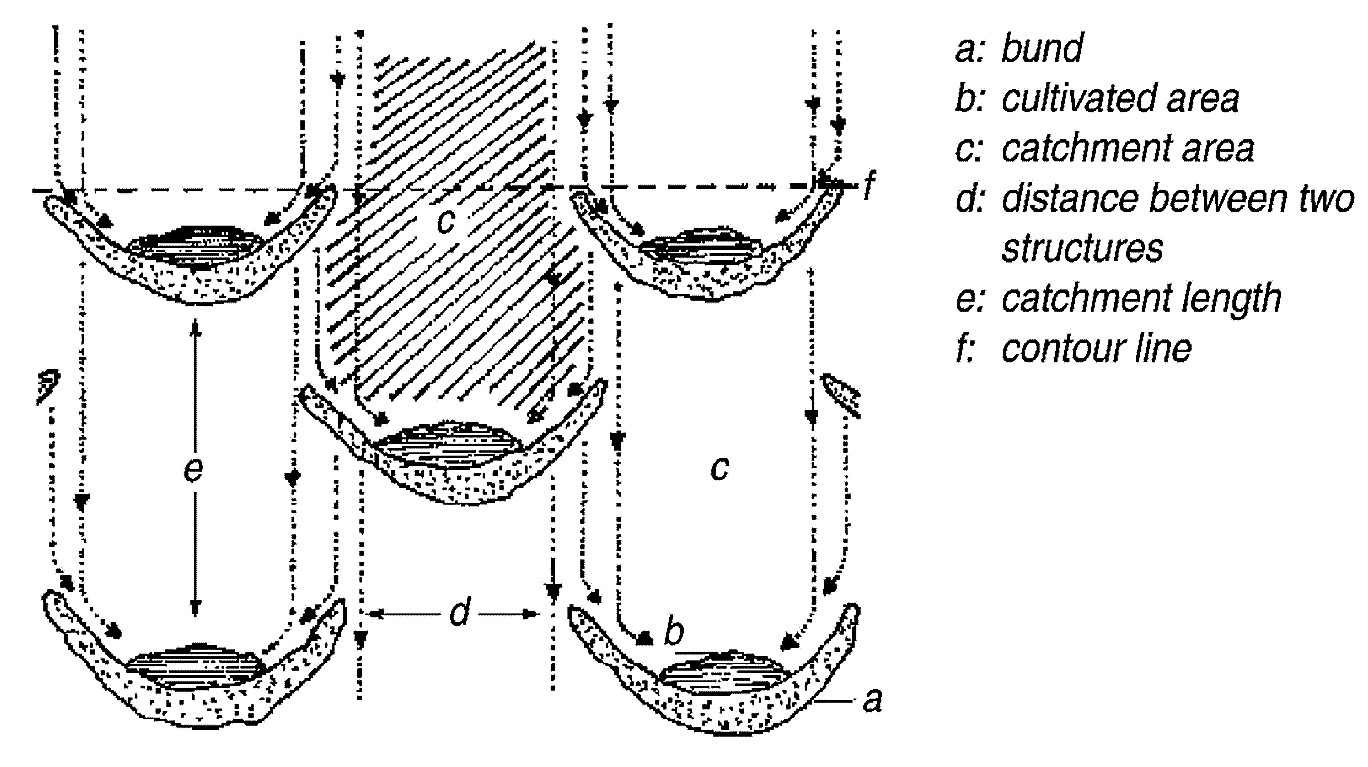
Demilunes: I've used these to great success on slope myself. Either carve out small demimoons, or place rocks/logs on top of the soil close enough to touch or even overlap, with the concave side facing uphill to collect the water and debris. You position the demimoons downslope offset from the upslope ones so that you have overflow catchment in each tier. I pulled some pics from the Internet to crappily demonstrate visually what I'm saying.

Screenshot_20260730-060239.png
Gabions 1
Gabions 1
Screenshot_20260730-060255.png
Gabions 2
Gabions 2
Eyebrow-terraces-630x420.jpg
Demilune 1
Demilune 1
ANSCHUETZ-et-al.-2003.-Layout-of-semi-circular-bunds.jpg
Demilune 2
Demilune 2
 
Chance Lunceford
Posts: 150
Location: Payson, Utah, US of A - Zone6B/High Desert/4500' /14" Rainfall
85
  • Likes 9
  • Mark post as helpful
  • send pies
    Number of slices to send:
    Optional 'thank-you' note:
  • Quote
  • Report post to moderator

Connie Graham wrote:A follow-up question for those who have used rebar instead of stakes as discussed further up this post... Like I said I used 10 mm wide bar already in a spot where it's just doing minimal support and it was fine for that but hammering it in I could tell it as going to bend if there was too much resistance (stone in the ground) or if a lot of weight was pushing up against it. In your experience, what thickness of rebar offers the right amount of rigidity for building terraces? I don't want to overdo the thickness because of cost (materials as soooo expensive these days) and also all the saw blades I'll get through cutting it up into short lengths. Thanks for sharing any experiences you've had!


Bolt cutters would save you a lot of time and money, and an angle grinder with a cutting blade would save time, money, and lots of effort, too.
 
Connie Graham
Posts: 18
Location: France
8
  • Likes 9
  • Mark post as helpful
  • send pies
    Number of slices to send:
    Optional 'thank-you' note:
  • Quote
  • Report post to moderator

Chance Lunceford wrote:
Bolt cutters would save you a lot of time and money, and an angle grinder with a cutting blade would save time, money, and lots of effort, too.


Yes, I have a good saw already though and I find it very effective on the 10 mm stuff. Might get bolt cutters if I come across a good pair. Angle grinders are a hard no because of wildfire risks at the moment.
 
Connie Graham
Posts: 18
Location: France
8
  • Likes 5
  • Mark post as helpful
  • send pies
    Number of slices to send:
    Optional 'thank-you' note:
  • Quote
  • Report post to moderator

Chance Lunceford wrote:Some ideas:

Gabions: These can be fancy, well constructed,tiered systems, or they can be primitive, with a couple of hog panels held up by stakes or trees. I've included some pictures. Gabions are cool because eventually, if they're in the path of flowing water, they'll accumulate debris and begin filling up with organic matter, eventually becoming a fertility battery for the downslope.

Demilunes: I've used these to great success on slope myself. Either carve out small demimoons, or place rocks/logs on top of the soil close enough to touch or even overlap, with the concave side facing uphill to collect the water and debris. You position the demimoons downslope offset from the upslope ones so that you have overflow catchment in each tier. I pulled some pics from the Internet to crappily demonstrate visually what I'm saying.


I'm a big gabion fan and have some on order right now for a different spot where a rubbish concrete block wall split in three and fell over during some rain last year (previous owners loved cement/concrete). And I really love the demilune idea, they look great and I definitely want to try doing that somewhere, maybe on one of my other slopes. Do you see more vigorous growth/earlier fruiting in your demilunes?
 
Chance Lunceford
Posts: 150
Location: Payson, Utah, US of A - Zone6B/High Desert/4500' /14" Rainfall
85
  • Likes 9
  • Mark post as helpful
  • send pies
    Number of slices to send:
    Optional 'thank-you' note:
  • Quote
  • Report post to moderator
So, where I've installed my demilunes in my yarden, there is way more vigorous growth, and that's from the flawless biomass accumulation and water percolation. Earlier? Not that I've noticed.

Note:

In the area that receives no irrigation, and I'm in the high desert with 100°+ summers and 14" avg annual rainfall, there is green in the bottoms of these features through the whole summer now.

I don't grow anything intentionally in them (anymore) because they get sprayed by herbicide every year. The slope is actually part in my yard and part beyond my fence line, and the the section beyond is managed carelessly by the Strawberry Highline Canal Corp.

However, they still grow tons of stuff, and the demilune areas recover from the herbicide about a month faster than the unmanaged slope above my neighbors' yards

Mine are hugelkultur style, from some insanely dense stump wood from a coppiced (not intentionally, the former owners of this house were... special) box elder maple, and after the first two years became a powerful sponge (nothing like my old 25' x 7' x 7' hugelkultur mound at my last place, but MAAAN did that piss off my neighbors... hahahaha).
 
Connie Graham
Posts: 18
Location: France
8
  • Likes 6
  • Mark post as helpful
  • send pies
    Number of slices to send:
    Optional 'thank-you' note:
  • Quote
  • Report post to moderator

Chance Lunceford wrote:So, where I've installed my demilunes in my yarden, there is way more vigorous growth, and that's from the flawless biomass accumulation and water percolation. Earlier? Not that I've noticed.

Note:

In the area that receives no irrigation, and I'm in the high desert with 100°+ summers and 14" avg annual rainfall, there is green in the bottoms of these features through the whole summer now.

I don't grow anything intentionally in them (anymore) because they get sprayed by herbicide every year. The slope is actually part in my yard and part beyond my fence line, and the the section beyond is managed carelessly by the Strawberry Highline Canal Corp.

However, they still grow tons of stuff, and the demilune areas recover from the herbicide about a month faster than the unmanaged slope above my neighbors' yards

Mine are hugelkultur style, from some insanely dense stump wood from a coppiced (not intentionally, the former owners of this house were... special) box elder maple, and after the first two years became a powerful sponge (nothing like my old 25' x 7' x 7' hugelkultur mound at my last place, but MAAAN did that piss off my neighbors... hahahaha).


Fascinating, thanks for the insights!
 
Posts: 182
26
  • Likes 9
  • Mark post as helpful
  • send pies
    Number of slices to send:
    Optional 'thank-you' note:
  • Quote
  • Report post to moderator
If you need something just to get things going so you can improve on it later, try logs and wood chips. You can even use the trees that are there to hold the logs, then have chip drop or somebody else dump wood chips in the top of the hill and let gravity help. The logs don’t have to be perfectly on contour they are just there to help with erosion and holding the chips. You can then do as you see fit as time goes on.
 
William Bronson
gardener
Posts: 5759
Location: Cincinnati, Ohio,Price Hill 45205
1356
forest garden trees urban
  • Likes 6
  • Mark post as helpful
  • send pies
    Number of slices to send:
    Optional 'thank-you' note:
  • Quote
  • Report post to moderator

Connie Graham wrote:A follow-up question for those who have used rebar instead of stakes as discussed further up this post... Like I said I used 10 mm wide bar already in a spot where it's just doing minimal support and it was fine for that but hammering it in I could tell it as going to bend if there was too much resistance (stone in the ground) or if a lot of weight was pushing up against it. In your experience, what thickness of rebar offers the right amount of rigidity for building terraces? I don't want to overdo the thickness because of cost (materials as soooo expensive these days) and also all the saw blades I'll get through cutting it up into short lengths. Thanks for sharing any experiences you've had!


Your 10mm is the equivalent to our 3/8", and yes , it is  fairly bendable.

I think the 1/2" or 13 mm( ?) rebar would suffice against the forces you will be dealing with.
You might already know this but you might be able to save your sawblades by cutting 1/3rd or half way through, then breaking that section off by bending it back and forth.
Whatever you do, please cover the upward pointy bits in someway to prevent accidental impalement.
 
  • Likes 14
  • Mark post as helpful
  • send pies
    Number of slices to send:
    Optional 'thank-you' note:
  • Quote
  • Report post to moderator
Hello everyone, hello Connie.

Usually I'm more of a permaconsumer around here, soaking up as much info as possible, but your case actually makes me write my first ever post here.

I'm sitting on a bit of a slope myself, although it's only 11 degrees, not 45 like in your case. Just this year I planted Vetiver along a slope on our land between olive trees, hoping that in a couple of years, a terrace will form without much intervention from my side, except for providing water and "food" during the establishing phase of the plants. Even though I'm living in a hot and really dry region in summer, having already experimented with the plant for couple of years I can say that it just needs to be watered initially, from the second season on it will find water deep in the soil with its incredible root system. I can imagine that Vetiver would work in your case, as it is widely being used to stabilise similar slopes in large landscaping projects all over the world where there's sufficient sun for it to thrive. Pretty much all the information you need is to be found in this document from the vetiver international network:

https://vetiver.org/PUBLICATIONS/Vetiver%20System%20for%20Slope%20Stabilization.pdf

Greetings from the Alto Alentejo in Portugal
 
pollinator
Posts: 1641
Location: Zone 6b
245
goat forest garden foraging chicken writing wood heat
  • Likes 8
  • Mark post as helpful
  • send pies
    Number of slices to send:
    Optional 'thank-you' note:
  • Quote
  • Report post to moderator
I haven't done it, and - given the state of my back - I'm not going to do it. But if you want to see someone doing it with just hand tools, look on YouTube for some of the primitive skills videos done by people in SE Asia (I suspect mostly in Vietnam). It's rather amazing what some of them accomplish with just one or two tools and a lot of energy. I think there is a lot to learn from watching those videos, at least most of them, where they basically teach skills without talking at all.
 
expectation is the root of all heartache - shakespeare. tiny ad:
It's a bit like "run away to the circus" but for gardeners
https://wheaton-labs.com/bootcamp
reply
    Bookmark Topic Watch Topic
  • New Topic