• Post Reply Bookmark Topic Watch Topic
  • New Topic
permaculture forums growies critters building homesteading energy monies kitchen purity ungarbage community wilderness fiber arts art permaculture artisans regional education skip experiences global resources cider press projects digital market permies.com pie forums private forums all forums
this forum made possible by our volunteer staff, including ...
master stewards:
  • Carla Burke
  • Nancy Reading
  • John F Dean
  • r ranson
  • Jay Angler
  • paul wheaton
stewards:
  • Pearl Sutton
  • Leigh Tate
  • Devaka Cooray
master gardeners:
  • Christopher Weeks
  • Timothy Norton
gardeners:
  • thomas rubino
  • Matt McSpadden
  • Jeremy VanGelder

Rocket Stoves

 
Posts: 617
Location: ontario, canada
15
transportation fungi tiny house
  • Likes 2
  • Mark post as helpful
  • send pies
    Number of slices to send:
    Optional 'thank-you' note:
  • Quote
  • Report post to moderator
i gave you a slice of PIE , first time i've ever given any!  but i don't really know what to do with it. :P  Here's the first rocket i ever made, my first one, i also used a 100Lb LP tank as well.  https://permies.com/t/240/52476/compact-RMH-hybrid-cook-top , it has a couple hundred lbs of homemade refractory mass internally :D  its a 6" CSA system.  i really like the 100 lb LP tank size as well, i called it "compact hybrid"

 
Posts: 57
11
  • Mark post as helpful
  • send pies
    Number of slices to send:
    Optional 'thank-you' note:
  • Quote
  • Report post to moderator
Hello John,
Firstly, thank you for the pie! It is an honor when someone goes the extra distance to appreciate your work!
I watched your YouTube video of your first Rocket Stove and was very impressed with the design and overall operation. I too get better performance with hardwood pellets but I use softwood pellets for early fall and late spring. Your pellet basket burner is remarkable in its simplicity; I cannot tell you how many hours I agonized on developing a pellet basket that slides in and out of the burner tube so I could facilitate an easy preheat/ lighting process that my family could do in my absence.
I wish I saw your video much earlier in my design of the Frankenstove as I would have held out for a 100 pounder and used that as the form for the refractory. I can see how your stove rocks out as a 6” feed and riser. I’m certain the heat generated is amazing!  The reason for the 3” riser on my design was because it was originally meant to heat a 14’ aluminum stepvan, my original workshop. The only reason why it ended up in the house was, as I was testing it outside , my wife walked by it, felt the heat and said,” This.....whatever it is called, is being painted pink and being installed in the living room before our family Christmas dinner!”  All I could say was yes dear!
I incorporated an ash catcher to my stove because it lacks the draft of a 6 incher but the pellets that fall thru my pellet basket continue to generate heat in the stainless steel pot. Each morning there is about a cup of ash, much like yours.
As for refractory, I have about 24” from base of the cylinder that acts as the thermal mass and preventing it from cracking due to the thermal cycling.
I am trying desperately to source a ceramic spray from Eastwood to coat my riser, but alas, they are located in the eastern states and the cost of shipping to Canada is twice the cost of product. The ceramic coating would prevent deterioration if my metal riser and then qualify it as a rocket stove bu definition (ceramic riser).
I encourage you to throw a high heat paint on your stove and install it in your home and reap the rewards of inexpensive heat and comfort!
FFBD5AD4-6101-47E3-9DB0-ADB68A3DA886.jpeg
Ceramic spray for riser
 
John McDoodle
Posts: 617
Location: ontario, canada
15
transportation fungi tiny house
  • Mark post as helpful
  • send pies
    Number of slices to send:
    Optional 'thank-you' note:
  • Quote
  • Report post to moderator
i was thinking "header coating" before i saw your photo lol.   headers now are commonly made from stainless steel , which i think is also corrosion resistant, never rusts, and can take more heat than regular steel headers.  i used a stainless steel sleeve liner in the original one.  i thought yours was 100 lbs also?   i made 2 different pellet baskets.  one simple which fits the vertical feed tube, and another is a jet type burner, its more complex and fits inside the burn tube rather than the feed tube.  im in canada also!  
 
pollinator
Posts: 564
Location: Nomadic
50
  • Mark post as helpful
  • send pies
    Number of slices to send:
    Optional 'thank-you' note:
  • Quote
  • Report post to moderator
Thanks, please keep us posted on updates. Im in the Seattle region and glad to hear a 3” riser will do the job.
 
Peter Chauffeur
Posts: 57
11
  • Mark post as helpful
  • send pies
    Number of slices to send:
    Optional 'thank-you' note:
  • Quote
  • Report post to moderator
Hello Jeremy,

The 3” riser works well for the design you see. It was meant to couple with the typical wood pellet stove venting kit that you can purchase at any “blue” or “orange” renovation store. I think it is important to maintain a consistent cross sectional  area through the rocket stove.

Going smaller in design ( ie 6” to 3”) does preset challenges. The draft demonstrated by John’s video is very impressive and although my design does make the characteristic noise of a rocket stove the draft by comparison is not. It is for that reason that I incorporated an ash capture system directly below the pellet basket and directly below the riser.  I encourage you to build one for yourself and find out what “ twists” in design you can come up with.
Be safe
 
Peter Chauffeur
Posts: 57
11
  • Likes 1
  • Mark post as helpful
  • send pies
    Number of slices to send:
    Optional 'thank-you' note:
  • Quote
  • Report post to moderator
Hello Jeremy,

Another side note to my stove set up. My chimney needed an extension of 36” to increase the draft as the prevailing winds are 90* to the house wall. The extension was about $100 Cdn and helped to prevent back drafts. As I mentioned earlier, scaling down a Rocket Stove does have its challenges.
The other challenge that I can think of now is avoiding brands of wood pellets that have extra long pellets. These have the potential of getting lodged in the feed tube. From the research I have done online, the max length published is 40 mm. Of course wood pellets have a larger market demand in Europe ( 80% of  Canadian production is exported to the EU ) but that equates to 1.75”. The inside dimensions of my pellet  feed tube is 2”x2” so that is something to consider. I would recommend using a larger pellet feed tube and have it vertically mounted as opposed to the current design.
When I built the Mark 2 I poured the refractory around a piece of thick wall square tuning that the 2”x2” burner tube could slide into. I automatically bottlenecked the design by doing this. Fortunately, the stove does work well with the original burner assembly from Frankenstove and I am hoping to do another pellet feed / burner tube /  vertical feed / Steam addition / increased hopper capacity retrofit before the New Year. I have all the resources and parts ( except for the ceramic manifold spray) to do all of this ; just need to avoid the holiday “ Honey-Do” list.

Stay tuned, Be Safe


John McDoodle
Posts: 617
Location: ontario, canada
15
transportation fungi tiny house
  • Mark post as helpful
  • send pies
    Number of slices to send:
    Optional 'thank-you' note:
  • Quote
  • Report post to moderator
yes the final stack does make quite a difference in overall performance!  what does the steam do?

take care!
 
Peter Chauffeur
Posts: 57
11
  • Likes 1
  • Mark post as helpful
  • send pies
    Number of slices to send:
    Optional 'thank-you' note:
  • Quote
  • Report post to moderator
Steam addition is a way of reducing nitrogen into the combustion stream. Under extreme temperatures Nitrogen reacts with Oxygen to form nitrous oxides, (NOx). Under extreme temperatures the steam dissociates to Oxygen and Hydrogen free radicals and combines with CO and free Carbon in the combustion stream. Refer to Steam Reformation for a better explanation.  The Steam Addition, also adds a few percent of moisture to the combustion mix as wood pellets are generally drier than the ideal moisture content in wood burning.
 
Peter Chauffeur
Posts: 57
11
  • Likes 1
  • Mark post as helpful
  • send pies
    Number of slices to send:
    Optional 'thank-you' note:
  • Quote
  • Report post to moderator
Happy New Year!  

Here is the pellet feed brand have been working with. Note the moisture percent of 6% which is considered lower than ideal for combustion purposes. Steam addition helps for a cleaner burn. I haven’t found values for softwood. Furthermore I have found that there is less ash than the softwood pellets I originally used in my first rocket stove.
I have been working on a new vertical pellet feed tube coupled with a larger feed hopper and new ash containment system but I am running into some difficulties with burn performance so I’m sticking with the original burner design. I suspect the vertical feed allows too much pellets to drop into the combustion chamber and chocking out the primary air. I will post again once I get over this hurdle.
All the best to everyone here so Permies for 2020. Keep up the good work and share your ideas often!
D03DA4EE-8748-4665-82B4-E40BDD059B96.jpeg
Hardwood pellets
Hardwood pellets
 
pollinator
Posts: 302
Location: West Virginny and Kentuck
112
forest garden books building ungarbage
  • Likes 1
  • Mark post as helpful
  • send pies
    Number of slices to send:
    Optional 'thank-you' note:
  • Quote
  • Report post to moderator

Peter Chauffeur wrote:Hello Gerry,

I hope these answers satisfy your questions.

A1) The Primary cover is a repurposed glass pen holder with holes thru it that just so happen to give optimal burn and air mix that helps keep the burn chamber clear of ash (ash ends up being pushed down into the stainless steel burn pan directly under the primary burn chamber. There is no air adjustment per say, but I have found that sliding the pellet basket forward or backward in the burn chamber does allow for some heat output adjustment. Designing the pellet basket to allow for just the right size of ember to fall thru the grate down into the stainless burn pot.


From way back at the beginning, on the Frankenstove:  I just want to clarify that the glass item with holes in it is actually a frog - a flower frog.  If someone else wants to incorporate that feature, it's nice to know what to call it when searching for one.


Ingenious use of found materials!
 
Peter Chauffeur
Posts: 57
11
  • Likes 1
  • Mark post as helpful
  • send pies
    Number of slices to send:
    Optional 'thank-you' note:
  • Quote
  • Report post to moderator
Hello Ruth!  

Thank you so much for clarification on what I assumed was a pen holder!  I had a good laugh at myself for misdiagnosis of the item I was repurposing!

Goes to show you, one persons frog is another’s air mixing valve!  

Now I know where I can find more if I need them instead of scouring thrift stores for “pen holders “ lol
 
Posts: 3
  • Mark post as helpful
  • send pies
    Number of slices to send:
    Optional 'thank-you' note:
  • Quote
  • Report post to moderator

Peter Chauffeur wrote:My First Rocket Stove Fabrication!

Hello! I have completed my First Prototype Rocket Stove. It is capable of heating a 2000 square foot home and burns about 1.25 pounds of wood pellet fuel an hour. It is designed to run for hours at a time without fussing with it and requires no electricity to operate. It has unique feature that uses supersaturated steam to help with a cleaner burn and regulate the intense burn chamber temperature. The refractory acts as a mini thermal mass and stays warm for about 3 hours after the pellets burn off. The stove is started up in the morning using a propane torch and is shut down at nighttime. This stove has run for over two years now. I originally posted the build on Instructables for a metal build contest and it got 10k views in the month I had it on their site. I decided to take it down because I didn’t feel it was the appropriate site. I know that wood pellet isn’t exactly “salt of the earth “ homesteading but it is using a renewable resource. One would have to make a larger burn chamber for split wood.

 
Terry Sharp
Posts: 3
  • Mark post as helpful
  • send pies
    Number of slices to send:
    Optional 'thank-you' note:
  • Quote
  • Report post to moderator
I'm in the 2nd week of running my rocket stove in my pole barn and love it. Question for anyone. I've been burning pellets the last couple of days and today I ran about 10 pounds of pellets thru it. As the fire is burning down I notice creosote build up on the inside of the feed riser. Can someone let me know what going on or is this normal? Sincerely Terry Sharp
 
rocket scientist
Posts: 6355
Location: latitude 47 N.W. montana zone 6A
3209
cat pig rocket stoves
  • Mark post as helpful
  • send pies
    Number of slices to send:
    Optional 'thank-you' note:
  • Quote
  • Report post to moderator
Hi Terry;
I wouldn't worry about it.   The feed tube does not reach high enough temps to burn creosote.
Rest assured that from the far end of the burn tunnel to about 1 third of the way up the riser is plenty hot enough to burn up the particulates.
No creosote survives beyond the riser.
 
Peter Chauffeur
Posts: 57
11
  • Mark post as helpful
  • send pies
    Number of slices to send:
    Optional 'thank-you' note:
  • Quote
  • Report post to moderator
Hello Terry,

My Rocket Stove has a very slight build up of creosote in the riser too. Occasionally I take a flat bar and scrape the stuff off.  If I leave it too long the pellets will get hung up and the stove will self extinguish as my feed tube is only 2.5 inches square.  Good observation though!
 
Peter Chauffeur
Posts: 57
11
  • Mark post as helpful
  • send pies
    Number of slices to send:
    Optional 'thank-you' note:
  • Quote
  • Report post to moderator
Hello Permies!  It has been a while since I posted news about my Mark II and here is a quick update.  I managed to find the elusive ceramic spray that I mentioned earlier in a post to prevent metal riser deterioration. I found this spray at a local tool store and managed to buy the last can and got 2 spray nozzles as an added bouus!!  So you can get the stuff in Canada without having to pay $47 in shipping.  Anyways, I began the coating process by submersing the two hoses in boiling water and then straightened them out by pulling on each end and running under cold water.  I cut one tube and removed the brass nozzle from one of the spray cans and joined the two hoses together so it would be long enough to insert down the entire riser from the 3/4" threaded hole in the top of my heater bell.  I generously coated the 3" riser with the internal exhaust coating and let dry for the recommended 24 hours.  I also added a 6" extension to my secondary air addition port which is directly below the burn chamber.  I sealed the pipe in place by using some "Steel Stick" epoxy material to hold the 6" nipple inside the threaded 1.25 threaded pipe. By doing this I can still adjust the inlet air from the bottom of the threaded fitting.  Also when it is necessary to empty the fly ash from the burn chamber I just have to unscrew this fitting and any ash just falls out. Here is a picture of the two mods I have done.
ceramic-riser-coating.jpg
Internal exhaust coating
 
Peter Chauffeur
Posts: 57
11
  • Likes 1
  • Mark post as helpful
  • send pies
    Number of slices to send:
    Optional 'thank-you' note:
  • Quote
  • Report post to moderator
So here is an update on my new ceramic coated metal riser.  It appears that the running temperature at the top of my heat bell is around 550 F with my secondary temp 6" below the bell is 400 F. This results in an extra 50 F increase in operating temperatures which seems to suggest that more heat is climbing the riser and not being transmitted to the riser itself.  I am happy with this result as it means the ceramic spray is helping protect the metal riser and making available more heat to be dissipated by the heat bell. So it is a win on two sides -  more heat delivered to the heat bell and less heat being absorbed by the metal riser.  I will acknowledge, however, that it would be wise to have a ceramic riser in the first place and this coating material is a "quick fix" on an engineering error in the first place. It will solve the problem for the short term and give me an excuse to build a "Mark III" in the future; but let's make it thru this winter / spring and save some money heating out home with the pellet fed rocket stove and learn from our mistakes in a warm house.  I"m not sure when I will be able to build the "Mark III", but I can assure you that it will begin with an autopsy of the "Mark II" - just like the Frankenstove!
 
Peter Chauffeur
Posts: 57
11
  • Likes 2
  • Mark post as helpful
  • send pies
    Number of slices to send:
    Optional 'thank-you' note:
  • Quote
  • Report post to moderator
Well my fellow Permies.... I bit the bullet and purchased some Ceramic Tubes to retrofit my Mark II Rocket Stove that has a 3" metal riser that has been coated with a ceramic spray listed above. I finally tracked down a distributor of Ceramic Tubes out here on the West Coast of  Canada! Yay..... But, the company had a minimum $100 order.  My present riser is approximately 36" so you can understand my distain to have to purchase 9 of these 12" tubes to make minimum order but sometimes you have to spend the money to do the job right the second time.  Besides the Ceramic Exhaust Spray was over $30 as a stop gap so now I will have a  riser that is 77% larger in diameter surface area and will probably give a better draught and make lighting easier and generate more heat for my current design. Again I will keep you all posted and probably do a semi autopsy of the Mark II when I cut the bell out to remove the steel pipe riser. Here is a pic the Ceramic Tubes I purchased.
Mark2-Ceramic-Riser.jpg
Ceramic Tubes 4" I.D. x 12"
Ceramic Tubes 4
 
thomas rubino
rocket scientist
Posts: 6355
Location: latitude 47 N.W. montana zone 6A
3209
cat pig rocket stoves
  • Likes 1
  • Mark post as helpful
  • send pies
    Number of slices to send:
    Optional 'thank-you' note:
  • Quote
  • Report post to moderator
Excellent Peter;   Those are going to work much better and last a lifetime.
If you have no need of the other riser parts. It is possible someone at Permies would buy them from you.
Looking forward to the Autopsy!
 
Peter Chauffeur
Posts: 57
11
  • Likes 1
  • Mark post as helpful
  • send pies
    Number of slices to send:
    Optional 'thank-you' note:
  • Quote
  • Report post to moderator
Hello Thomas,

I will post the progress of the retrofit. In the meantime, here is a screenshot of the US distributor. The Western Canada Distributors for this product is: www.oclim.com. Here in Canada, we can only purchase 3” or 4” I.D. by 12” lengths. The 4” pieces weigh about 8 pounds each. They are fragile so I imagine that shipping would be quite pricey. Therefore, I would encourage anyone that wishes to purchase these tubes to call the distributor directly to find where they can purchase these tubes locally.
B0482571-8246-4CDA-82BD-AC0834906595.png
Tube Distributor Us
Tube Distributor Us
BCE83EF5-CBB1-4A3B-90C9-E2645F999D8A.png
Canada Distributor
Canada Distributor
 
Peter Chauffeur
Posts: 57
11
  • Mark post as helpful
  • send pies
    Number of slices to send:
    Optional 'thank-you' note:
  • Quote
  • Report post to moderator
Ok everyone!  I rigged my makeshift rocket stove to test my new ceramic tubes and honestly, I’m at a bit saddened to admit I ruined two ceramic tubes
Firstly, let me explain what my makeshift rocket stove is all about. I got a hold of two drums from a transport tractor and stacked them on each other, end to end such that there is a large chamber that makes up a confined fire chamber. On the bottom of this chamber I have a stainless steel grilling pan that has 3/8” holes punched through out it that holds the burning coals yet provides combustion air from the bottom. On top of these two brake drums is a disk brake rotor upon which I placed three 4” x 12 ceramic tubes to act as the riser. View the pic to see the setup. I had the fire rocking and added the three tubes on top on the brake rotor. After 20 minutes I heard an odd “pop” and noticed that the bottom two tubes cracked along the length of the tube. See pic. I’m under the assumption that the ceramic tubes were heated too rapidly and cracked due to uneven thermal expansion.  Tomorrow I will try a slower heat by not putting the tubes on top of an already fully heated and rocking stove to allow the tubes to acclimate to the heat. Stay tuned.
Oh, Higher Power, please grant me patience immediately!
C74E09F5-56B5-49CE-8F47-821B986E5F46.jpeg
Makeshift rocket stove
5E718C11-3462-44F6-AEFB-A93A949C17D6.jpeg
Thermal failure
Thermal failure
 
thomas rubino
rocket scientist
Posts: 6355
Location: latitude 47 N.W. montana zone 6A
3209
cat pig rocket stoves
  • Likes 1
  • Mark post as helpful
  • send pies
    Number of slices to send:
    Optional 'thank-you' note:
  • Quote
  • Report post to moderator
Oh man Peter!   Bummer! Good thing you got extra sleeves.
I agree that quickly heating must have caused the cracking but geez how discouraging.
Well lets hope they do better today!
I wonder if wrapping them in an insulator (maybe rockwool) would slow the thermal transfer?
Good luck with today's launch of your rocket!
download.png
[Thumbnail for download.png]
 
Rocket Scientist
Posts: 4530
Location: Upstate NY, zone 5
576
5
  • Likes 1
  • Mark post as helpful
  • send pies
    Number of slices to send:
    Optional 'thank-you' note:
  • Quote
  • Report post to moderator
Exactly what purpose are these tubes manufactured for? You need insulated ceramic material; if the tubes cracked like that, my guess is that they are not insulated by themselves and would need added insulation. The cracked tubes, if still standing by themselves, will probably work fine once insulated. I would try them with a wrapping of fiber insulation before trying more new ones. They remind me of chimney flue tile, which is recommended to be sawcut before use in a RMH bell to allow for expansion.
 
Peter Chauffeur
Posts: 57
11
  • Likes 1
  • Mark post as helpful
  • send pies
    Number of slices to send:
    Optional 'thank-you' note:
  • Quote
  • Report post to moderator
Hello Glenn,

The original use for these tubes are for refractory burners and casting liquid molten metals. My error was to place them on an established super hot burner without allowing them to acclimate to the immediate intense heat.

When I retrofit my Mark II  I will attach the lengths together with an thermal silicone (just to have the pipes align and place then in as the riser. After that, I will take a 6” or 8” sheet metal pile and center it around the ceramic riser. I will tamp vermiculite down the gap to insulate and hold the riser in place. If these riser tubes manage to crack ( which I doubt will happen) it shouldn’t matter as they will be sealed in place. I am encouraged that the cracks were in the direction of the exhaust flow. I am certain that once properly installed they will operate perfectly.

However, all this is on hold as this damp spring weather on the west coast continues to keep Mark II in operation status flooding our home with inexpensive and comfortable warmth.

Stay tuned for the retrofit

 
Peter Chauffeur
Posts: 57
11
  • Mark post as helpful
  • send pies
    Number of slices to send:
    Optional 'thank-you' note:
  • Quote
  • Report post to moderator
Hello Everyone!  

the details of my absence from my ongoing posts are inconsequential ; very well where do I begin....

First, thank you for your patience. My job on the road has prevented me from tinkering with the Mark II during the summer so a retrofit/ autopsy was not attempted as it is still in commission keeping us comfortable in our home. Believe me ! I want to see what is going on in this heater to confirm what is going on with the ceramic riser coating and all but wifey wants a warm house during our cold damp fall and so be it!  

Of course that can only mean one thing... Yes I am happy to announce that a Mark III is under construction and over the next few days, fingers crossed, should be completed and replacing the old Mark II which will then be examined under the relentless appetite my grinders cutting wheel.

Secondly, I would like to thank all of you here at Permies for viewing this post over 2200 times!  I’m certain that 50 or so can be attributed to me with edits and clarifications, but it does confirm that there is an interest in a  pellet fed rocket heater that is a little different than what seems to be norm in rocket heaters on this site.

Finally, I tend not to take as many photos as most people like but please bear with me on this. Construction of a RMH is a personal fabrication and tends to change on a budget, design consideration, material availability and a plethora of other things. So please, don’t nail me to the proverbial cross when you read below and you see something that is incongruous with above design wants and considerations. I am posting all my successes and failures so someone else can look at this and hopefully build a better version of what I have and keep themselves and others warm in their home.

So without further adieu, I introduce the Mark III almost complete .... but first, this tiny ad. Just kidding!  Lol always wanted to put that in a post.

A brief explanation of what actually changed from the Mark II and what remains the same

What remains the same....
2 x 100 lb. propane tanks for the low footprint but increased height for more surface area and increased riser height.
The horizontal flame tube (3” heavy wall square iron) remains so the smaller burner tube can easily be removed/ replaced as it does erode under the extreme heat and yes, I’m still working with the original burner assembly from the “Frankenstove “ era (I’m using it for testing and will post the new burner assembly in another post later) I have learned that it is wise to change only a couple of variables at a time.

What has changed in the Mark III  construction ...

The Ceramic Tube Risers have finally been used!
The use of high heat refractory material such as perlite, silica sand and home made water glass as the adhesive material. Caution ⚠️ making water glass involves nasty chemicals and extreme caution so be careful; that’s all I’m saying on that.

The shape of the secondary air / ash drop has been changed to a conical shape that allows ash to drop into the base of the stove and yet allow combustion air to travel up the riser at the same time. Two birds ...

Increased riser diameter from 3” to 4” and increased riser height from 33” to 45”

The increases in riser height and diameter is expected to improve ease of lighting and draft within the heater.

Here is the build so far
2E9F2C7F-BCE2-4FB2-91E8-4DA4E119F2CA.jpeg
Mark III construction
7133831C-3F4E-4D9A-BA90-6947769E15BD.jpeg
Ceramic riser
Ceramic riser
F470E2C7-9C98-4FD9-B148-D96E64F81E58.jpeg
Setting water glass
Setting water glass
 
Peter Chauffeur
Posts: 57
11
  • Mark post as helpful
  • send pies
    Number of slices to send:
    Optional 'thank-you' note:
  • Quote
  • Report post to moderator
well everyone, I fired up the new design today only to find that the stove ran sub par to the old Mark II. Although the flame into the base of the riser seemed to be more vigorous than the Mark II. When I added the bell housing on top of the riser there seemed to be very little heat radiating from the bell.  This reminded me back when I tried to have a long 3inch diameter metal riser and an extended bel on the original  Mark II l. I shortened the riser and the bell on the Mark II to what you see in the previous pictures.  So, sadly, it appears that there is a maximum riser height to surface area relationship that I have yet to discover. Next modification will be to decrease the height of the ceramic riser by 12" and the bell housing the same amount and see if going to a 4" ceramic riser makes a difference, all other parameters being the same.  That means a lot of refabricating so it may be a month or so before I get this reengineering done.  The old Mark II will continue to heat  our home unmodified.

Take care. Be Safe.
 
Peter Chauffeur
Posts: 57
11
  • Mark post as helpful
  • send pies
    Number of slices to send:
    Optional 'thank-you' note:
  • Quote
  • Report post to moderator
Update to the Mark III my friends.  I managed to evade some of the things on my wife's honey-do list and quickly wert back into the shop  to decrease the riser and the bell by 12 " each on the recently completed Mark III.  The result is a hotter running temp  of approxim. 425F that is horrizontal of the top of the riser, which is around 75F hotter than the standard run temp of the Mark II with the metal riser. The draft appears to be stronger so I can assume that I am also using slightly more wood pellets per hour, not a big deal, i will monitor how much more I use and give you all an answer when the weather gets a little colder.
So I am happy to confirm that the  ceramic riser was a good investment and I can now do an autopsy on the Mark II in the near future, followed with a Ceramic tube riser and then probably do some experimenting with a new burner / pellet feed assembly. The reason why I am sticking to a thick gauge metal square tube burner assembly is that it works well with pellet feeding.  I thank the Puritans for not freaking out about the metal burn tubes as they stray from the definition of the rocket mass heater but sometimes you have to work around convention.   The original burn tube assembly has lasted over 4 years now and continues to perform well.  Yes, there is some metal erosion on the outlet of the square tubing, just like all the gurus on this site have argued and it gives me an excuse to fabricate a new one where I can tinker with a couple of ideas that have been rattling around in my head.
Peace, Health and Happiness to all.
Happy Thanksgiving Canada's is in October
 
Peter Chauffeur
Posts: 57
11
  • Mark post as helpful
  • send pies
    Number of slices to send:
    Optional 'thank-you' note:
  • Quote
  • Report post to moderator
Update time My fellow Permies!  
Here are two pics of the recently built Mark III with the ceramic riser. I have added a picture of the Mark II and Mark III together so you can see the final size difference between the two side by side. I also installed two temperature gauges on the Mark III; one horizontal to the top of the riser and the second horizontal to the top of the exhaust. I have instructed my wife how to light this stove and her feedback is that it fires up and heats the house a little faster and of course, consumes a little more pellets over the course of the day.
So I’m happy to say that the Mark III has been installed and will continue to heat our home for another damp fall and soggy, chilly winter!  
The Mark II is destined for a new aquaponic greenhouse after the retrofit with the extra ceramic tubes I have left over and a new burner assembly
Stay tuned!
60024E89-2E59-4783-A5F7-D1EEA2BDEC20.jpeg
Mark II and III
Mark II and III
EEE6979A-6B97-471C-AFFF-6754F0CB0E26.jpeg
Mark III gauges
Mark III gauges
 
Peter Chauffeur
Posts: 57
11
  • Mark post as helpful
  • send pies
    Number of slices to send:
    Optional 'thank-you' note:
  • Quote
  • Report post to moderator
Happy Belated Valentines Day my fellow rocket mass heater friends!  I am happy to announce that I have solved a little issue I have been having with my rocket stove. You see, with a pellet fed stove that relies solely on gravity to drop in the pellets into the combustion "carbeurator", sometimes the pellets would get hung up due to a very small amount of creosote build up on the entry side of the slanted pellet feed tube.  I wrestled a long time over how to fix this without building an entire pellet feed and burn tube.  The simple solution that adds additional combustion air right where the carbon build was that was hanging up the feed.  I drilled three {3} 1/4" holes right at the base of the pellet feed. The result, no more pellet hang up.  See picture below. Now I don't have to poke the feed tube every couple of hours. I have been running the stove for about a week now and the quick fix to get rid of the buildup that was hanging up the pellets seems to be solved . I have closed the secondary air addition behind the pellet feed and now it only allows the atmospheric steam addition downstream. There is a nominal temperature drop at the top of the bell but Im not sure if it is related. Autopsy on the Mark II and new burn chamber to be performed in the warmer weather. Stay tuned and enjoy working on your own project. I sincerely hope that those of you who are reviewing this understand that I am keeping this build on a single thread to keep the developments in a cronological order.
Peace out for now.  Stay warm economically!
Mark2airjets.jpg
[Thumbnail for Mark2airjets.jpg]
 
Peter Chauffeur
Posts: 57
11
  • Mark post as helpful
  • send pies
    Number of slices to send:
    Optional 'thank-you' note:
  • Quote
  • Report post to moderator
Hello Fellow Permies,

It has been far too long since I last wrote you all here but I finally got around to getting around to having a look at my ceramic riser stove modification. Well, I have a confession to make and it is a lesson we all make: Haste makes Waste.   Yes, I was so excited to install the ceramic riser that  I miscalculated the amount of water glass solution I need to make and it ended up costing me a lot of extra work to rework the whole riser assembly. Fortunately, I still had the Mark II hanging around and it rescued me from high heating bills over the last part  of the winter.  So what happened you ask.... well, it turns out that my plan to build the ceramic riser was fine. The insulation using perlite, silica sand and water glass was fine. What wasn't fine was I had to roll the whole stove assembled back to the living room and I did not have enough vertical support and my ceramic started to tilt inside the bell until it contacted the bell itself. I noticed this as I could barely see down the riser to see the swirling flames coming out of the horizontal burn tube. So, sadly, the Mark III was in need of some re-engineering. This included a better method of aligning the ceramic tubes using a sheet metal strip and a hose clamp. Also I managed to find sodium hydroxide  and crystal kitty litter in quantities to make sufficient water glass solution to better secure the riser to prevent movement. I am having difficulty adding pictures so bear with me.  

 
Peter Chauffeur
Posts: 57
11
  • Mark post as helpful
  • send pies
    Number of slices to send:
    Optional 'thank-you' note:
  • Quote
  • Report post to moderator
here is the overhaul pics, The first is the complete dig out of the original riser.  The new riser was cut larger to allow new refractory to be packed in between the metal burn tube and yes, the metal burn tube is deteriorating but hopefully the new water glass / silica / perlite mix will make a slightly larger burn tube as the metal oxidizes under the intense heat. Yes Lesson already Learned.  The second pic shows the refractory mixture being packed around the new riser.  Also the new riser was soaked in a water glass solution to increase the heat resistance of the ceramic tube. I will add the remaining picture of the more robust refractory packing using a 10" diameter sheet metal form.
RMH-overhaul.jpg
[Thumbnail for RMH-overhaul.jpg]
RMH-packing-refractory.jpg
[Thumbnail for RMH-packing-refractory.jpg]
 
Peter Chauffeur
Posts: 57
11
  • Mark post as helpful
  • send pies
    Number of slices to send:
    Optional 'thank-you' note:
  • Quote
  • Report post to moderator
Here is the ceramic riser refit prior to packing with the perlite / silica sand / water glass solution. The hole you see at the bottom of this stove has two purposes; first as a secondary air addition and second as an place where any ash that makes it down the horizontal burn tube. This is a means of preventing the burn tube from clogging and the ash falls safely into the bottom of the metal bell. The build up is about a cup a month and is easily removed.
RMH-riser-refit.jpg
[Thumbnail for RMH-riser-refit.jpg]
 
Peter Chauffeur
Posts: 57
11
  • Likes 1
  • Mark post as helpful
  • send pies
    Number of slices to send:
    Optional 'thank-you' note:
  • Quote
  • Report post to moderator
Hello Fellow Permies

This morning I poured a quart of water glass downthe riser tube and around the base where the 10” riser form is located. The overflow liquid flowed down to the base where the 3/4” NPT  secondary air addition/ fly ash drain is located. After an hour I added my low flame torch to dry the refractory and cure the water glass. Ther is a pic of the new pour. The other pic is the set up for setting the water glass/ refractory mix. From what I have read dewatering and setting is a slow process where the temperature is slowly raised in a controlled manner. As I do not have any means to reliably control this process, I will use a small adjustable propane torch to slowly warm my new pour from the inside out. There is a substantial amount of refractory in this project and i have a couple of months before I have to recall the new Mark III back into service. (As the Mark II is still operational with its 3” steel muffler pipe as the riser. ) stay tuned for further updates. I am also hoping to further develop the vertical pellet feed and modified steam addition.
Stay tuned. I encourage you to keep plugging away with your design.
B143B846-E1DF-4A70-AC8D-0E6688EFCD01.jpeg
Final pour of refractory
BD8DB41F-0B39-42B3-9584-10A2E31BDD3A.jpeg
Propane torch slow warm
 
Peter Chauffeur
Posts: 57
11
  • Mark post as helpful
  • send pies
    Number of slices to send:
    Optional 'thank-you' note:
  • Quote
  • Report post to moderator
Here is a follow up on the conditioning of the new insulation matrix of silica sand / perlite / water glass. I started up the stove yesterday and ran it without a chimney using wood pellets so I could run it at a higher temperature than the low torch but lower than with the exhaust pipe. You can see the “ lazy steam “ exiting the pipe and the swirling of the flame as it enters the ceramic riser.
Extra care was taken bringing the stove into the house and High Temperature Silicone (red) was used to seal the bell to the lower half of the stove and painted with High Heat aerosol spray.
BFB49C4D-52FA-47DC-93FF-E5C8BE74C655.jpeg
Slow burn conditioning
AB6BD76C-FA7F-4773-84DC-CE4F77D6D3AB.jpeg
Flame from top of bell
8C61C186-14D1-4B47-B286-83DB444F1383.jpeg
Flame with bell removed
 
Peter Chauffeur
Posts: 57
11
  • Mark post as helpful
  • send pies
    Number of slices to send:
    Optional 'thank-you' note:
  • Quote
  • Report post to moderator
As mentioned earlier, I used water glass as the refractory matrix glue. Here  is a picture of  the “ every day items” used to make the refractory material. There are many videos and instructions on the internet to make water glass and I suggest you watch a few and be safe.
7A32EA87-52C0-41E3-8AAE-FE038FECA9B6.jpeg
Materials for refractory matrix
 
Peter Chauffeur
Posts: 57
11
  • Likes 1
  • Mark post as helpful
  • send pies
    Number of slices to send:
    Optional 'thank-you' note:
  • Quote
  • Report post to moderator
Wow! Over 3,000 views!  Thank you everyone for having interest in my rather unique form of Rocket Mass Heater Stove!  I am happy that I have found a forum to share my design experience. I am also proud that my wife has become proficient at staring this stove on her own and has taken ownership of the overhauled Mark III ! So I can say with a happy heart that I am doing my part to heat a home safely with secondary processed wood [ wood pellets ] and having a happy wife that actually enjoys starting a fire in a self designed contraption. I know that this design has deviated from the puritan version of a rocket stove but this is the beauty of this site.... we are all doing what we can to be a little more self reliant than most people who just complain about the current situation of today's world.  It has been a long journey from the first days of the Frankenstove and a lot of modifications but some of the parts are still original and can be recognized from the first post! Sometimes it is better to be luckier than good! However, when you are lucky AND good, the Gods give you an "Attaboy" and your design works even better than you imagined it would! What I have built has now kept our home warm and cozy, engaged conversation over this weird contraption with curious visitors, operated under the radar of a fire department located a mere 400 yards away and more importantly, kept a 2000 square foot, 4 bedroom, 2 story home warm an comfortable that an originally electrically heated home (baseboard heating only) was bankrupting us just to stay barely marginally comfortable.  I have kept this thread rolling from the beginning so anyone that follows this can see my trials and tribulations and guide them in their own creation because there is no "only one way to build one of these things" ! There are, however, some basic guidelines to follow but I encourage anyone interested in building a RMH (or variant) to educate yourself on this site and try!  Do your research, ask questions and most importantly, learn from the mistakes of others! The satisfaction you will feel when your design works and the money you save to do what you want instead of paying for some CEO's vacation home in whereverville  is priceless! Good luck....
I still have some things I want to try now that I have a 4" ceramic riser ( which took me at least 3 years to source and finally successfully install into the Mark III (modified) and they are as follows:

1) a vertical pellet feed
2) utilizing my steam addition to act as a venturi to assist secondary air addition to act as a bellows ( I will elaborate on this later once I get it to work but it is based on the premise that when you start a fire and you blow on the tinder it forces more oxygen into the embers and aids combustion.
3) some kind of view portal to see the flames to add to the warmth experience ( this will be the crowning achievement in my design and probably most costly as it will probably require quartz tubing!)

Stay tuned, I will probably resurrect my Mark II to achieve all this as budget for R&D is scarce these days!
 
Peter Chauffeur
Posts: 57
11
  • Likes 5
  • Mark post as helpful
  • send pies
    Number of slices to send:
    Optional 'thank-you' note:
  • Quote
  • Report post to moderator
Hello Permies!  
It has been a long time since I last posted about developments on “Frankenstove Mark 5”.
“Frankenstove 5” has been heating our home and cycling daily during our PNW cold wet weather and soggy humid winters since its initial build and commissioning.
Here are some of the modifications I have done that I feel, you deserve to learn as you have either followed or have read this forum to the end to get to the prize of a gravity pellet fed vertical rocket mass heater that you can safely use to heat your home and have a means to hot water at no real extra cost.
Ok, where to begin…….

1) the 4” ceramic riser has held up very well with the daily high temp heat cycling. There are small cracks at the 90* where it glows red going up the riser.
2) The addition of a “bypass heating channel” to prime the chimney to increase an initial draft has solved a slow Smokey startup to just a short period of steam condensation and then clean burning out the stack. So those who say a RMH with a 4” riser won’t work are wrong, it just needs the draft to be established.
4) I re-engineered the ash bin to become a “secondary rocket stove to burn the small embers to completion using old double walled stainless steel thermos bottles.
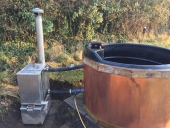
5) the additional of 100 feet of copper pipe wrapped on the OUTSIDE OF THE BELL to act as a contact external heat exchanger to heat water for our hot tub. Note: our hot tub heater circuit died, leaving us with only a circulating pump which runs 24/7 which we have to leave on due to freezing conditions and to keep the hot tub filtered.
6) a knife valve to stop pellet feed was added to allow a fast shutdown of pellet supply. This means that the hopper doesn’t have to be emptied every night.
IMG_7927.jpeg
Frankenstove “5”
Frankenstove “5”
IMG_9363.jpeg
Ember gasifier
Ember gasifier
IMG_9414.jpeg
Copper water heater for hot tub
IMG_9377.jpeg
Burn tube temp into ceramic riser
IMG_8166.png
4” ceramic riser sections
image.jpg
Frankenstove “5” operational
 
thomas rubino
rocket scientist
Posts: 6355
Location: latitude 47 N.W. montana zone 6A
3209
cat pig rocket stoves
  • Likes 3
  • Mark post as helpful
  • send pies
    Number of slices to send:
    Optional 'thank-you' note:
  • Quote
  • Report post to moderator
Very Cool Peter!
Besides being functional it is a work of art!  

Congrats on version #5!
Is there a version #6 floating about your head?
 
Rocket Scientist
Posts: 797
Location: Guernsey a small island near France.
299
  • Likes 1
  • Mark post as helpful
  • send pies
    Number of slices to send:
    Optional 'thank-you' note:
  • Quote
  • Report post to moderator
That is mad ha ha I like it a lot!
 
Look! I laid an egg! Why does it smell like that? Tiny ad, does this smell weird to you?
Rocket Mass Heater Jamboree And Updates
https://permies.com/t/170234/Rocket-Mass-Heater-Jamboree-Updates
reply
    Bookmark Topic Watch Topic
  • New Topic