• Post Reply Bookmark Topic Watch Topic
  • New Topic
permaculture forums growies critters building homesteading energy monies kitchen purity ungarbage community wilderness fiber arts art permaculture artisans regional education skip experiences global resources cider press projects digital market permies.com pie forums private forums all forums
this forum made possible by our volunteer staff, including ...
master stewards:
  • r ranson
  • Carla Burke
  • Nancy Reading
  • John F Dean
  • Jay Angler
  • paul wheaton
stewards:
  • Pearl Sutton
  • Burra Maluca
  • Joseph Lofthouse
master gardeners:
  • Timothy Norton
  • Christopher Weeks
gardeners:
  • Jeremy VanGelder
  • Maieshe Ljin
  • Nina Surya

Barn Building: 30 X 48 for $4450

 
pollinator
Posts: 4958
1199
transportation duck trees rabbit tiny house chicken earthworks building woodworking
  • Likes 10
  • Mark post as helpful
  • send pies
    Number of slices to send:
    Optional 'thank-you' note:
  • Quote
  • Report post to moderator
On another thread titled “The Solution Becomes the Problem Becomes the Solution”, I mentioned in passing that building barns was rather inexpensive for me, building them at $6500 per 100 head of sheep. That is actually a little off base because I actually built my last 30 x 48 foot barn for $4450. That was because I already had the concrete pad poured. The $4450 includes everything, from steel lined walls, electrical outlets and swing in managers. . The $6500 quoted is what the cost would be for the same 30 x 48 foot barn including the concrete. Both quotes include new steel roofing. In any case, A person on here contacted me via private messaging and asked for a few more details, and I provided that to them. However upon further reflection I feel it may be of interest to a lot of homesteaders because a barn is a great asset, but can be cost prohibitive. Here is a possible design solution that gives a lot of space very economically.

Now I have placed this on the Homesteading Sub-Forum, only because it did not fit the other sub-forums in Building so readily. But there are basically two ways of approaching a “green” barn. (1) Using untraditional building materials (2) Or, using a unique design to drastically reduces conventional materials. Without apology; the barns I build are of this latter design concept.

In a nut shell, they use 1/3 less of the traditional framing lumber because they are posted 4 feet on center instead of 16 inches on center, yet use the same  2 x 6 and 2 x 4 dimension lumber. This adds up to significant savings. To carry the loads imposed, they are constructed as trusses, but not in the usual way, instead they are rather a cross between timber framing and stick built construction. I typically build the walls out of 2 x 4’s, the rafters out of 2 x 6’s and all the braces out of 2 x 4’s as well. This is not only to make the weight of the trusses lighter, but also reduce the number of lumber required to build the same size barn.

The truss dictates the shape of the barn, because it incorporates the wall framing and rafters as one cohesive unit, like how bents are raised on timber frame construction, only they are 1-1/2” inches wide instead of 8 inches. Like timber frame bents, the parts are all cut on the ground with the bents built on the ground. To connect the walls to the rafters, bracing and whatnot that makes up an individual bent, plywood gussets are used. Now ONLY engineered wood can be used for gussets because if they are made out of solid wood, they will split when nailed or stressed. I have used OSB (Oriented Strand Board, also called chip board), but I don’t recommend it because it is prone to moisture issues, ½ plywood is best, and honestly a few sheets of it goes a VERY long ways. That is because it only takes (2) gussets, 3 x 8 inches to make most solid connections. The strength of the joint comes from the layers of the plywood and the nails. Never skimp on nails for this reason. Where 4 will work, I put in 8.

It does take a little bit of confidence to construct a barn this way, because I might spend a whole day just cutting rafters, studs, bracing and gussets to various lengths. This is NOT a cut, check the fit, cut another, check the fit sort of construction. You lay out the first bent, get all your patterns, count up how many parts of each you need, and cut them out. Then you nail it all together, gussets on each side of the joints.

When you get a bent together it will scare you, they are designed to carry compression loads, not side loads so they are very floppy. This is because you can make some rather large bents since you are just flipping them up into place. Bracing the first bent is the hardest proposition, but as each bent goes up, it gets easier. Purlings laid across the top of the rafters, and in between the “bays” , whalers stiffen the building as it is being built. Time wise though, this is very fast construction because everything has been built on the ground. You need to just tie everything together as you stand the bents upright. Working in 4 foot increments, it goes fast! My father (67), my wife (35 and weighing 130 pounds mind you) and myself (40) were able to frame my last 30 by 48 foot barn in half a day. It took me one day previous to cut all the bent parts and assemble them, but 1-1/2 days for a barn that size is fast. I used a nail gun, but it is not required, you can do everything by hand.

Other than plywood gussets, the only other requirement is a steel roof. It has to shed snow due to its four foot spacing. At $1.99 for 3 square feet, it is very cheap roofing material though. Just place the steel on the purlings and screw it down with steel roofing screws. Most of my roofs are 6/12 in pitch, but due to an already existing building, my last barn had a much lower roof pitch. I just merely needed to add more bracing to reduce the load on the roof should we get a lot of heavy snow. I am NOT shoveling off the roof of that barn…no way.

Is this design a disaster waiting to happen?

NO!

This is a design taken from chicken barns built in the 1960’s all around me and are still standing. These were 3 floor, 400 foot long buildings too. The oldest barn of this design on my farm is 30 years old and is still standing. I have a total of 4 built like this and all are standing and sound.

The key is to get the snow load off the roof, but also think of terms of stress. “If I step on the roof here, where does my weight get transferred too? What would have to fail for this to collapse? Thinking that way, through bracing you can reduce spans and fortify weak points. Short sections of bracing cut 2 feet long with 45 degree cuts on each end stiffen the bent tremendously just as they do on timber framing bents. The steel roofing tightens things up as well.

Is this design okay for human living?

Yes and No. This is not because it is not structurally sound, but rather because the 4 foot spacing makes it hard to insulate and hang sheetrock. I was able to add strapping (1 x 3 inch boards) on my insulated lambing pen, but it was almost harder than it was worth. Just adding a bent every 2 feet would have been easier and thus make insulation and drywall easier to put up. On a living home, I would just go with 2 foot spacing instead of 4. Same method of construction, just more bents.

Is this a beautiful barn?

Gracious no! I would love to have a timber frame barn and admire those that have them, but in Maine where I need a way to house my sheep, yet do so cheaply because of the thin financial margins of sheep farming, this style of barn works well. Perhaps in my next life, or down the road, I’ll build the ultimate barn.

Now a few caveats. Where I live we have no building codes or code enforcement officers that inspect the premises. As long as I purchase a $25 building permit, I can build whatever I want. This may, or may not be the case where you live. Generally outbuildings are less restrictive, but not always. Any building funded by the NRCS or FSA must be engineered by a licensed structural engineer. Another thing is the price. It is low because I have plenty of logs to convert into rough sawn lumber. Even then, I have to purchase a few sheets of plywood. It can be built with lumber from a lumber supply store, it will just cost more.

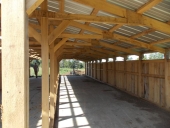
Pictures are worth a thousand words however, so you can judge for yourself.


Travis Johnson
pollinator
Posts: 4958
1199
transportation duck trees rabbit tiny house chicken earthworks building woodworking
  • Likes 3
  • Mark post as helpful
  • send pies
    Number of slices to send:
    Optional 'thank-you' note:
  • Quote
  • Report post to moderator
Opps, no pictures...

DSCN3583.JPG
[Thumbnail for DSCN3583.JPG]
DSCN3666.JPG
[Thumbnail for DSCN3666.JPG]
DSCN3770.JPG
[Thumbnail for DSCN3770.JPG]
 
steward
Posts: 2719
Location: Maine (zone 5)
593
2
hugelkultur goat dog forest garden trees rabbit chicken food preservation
  • Mark post as helpful
  • send pies
    Number of slices to send:
    Optional 'thank-you' note:
  • Quote
  • Report post to moderator
Very nice!  Thanks for the explanation.  Now I see how you did it.  A picture is worth a thousand words and you seemed to have gone above and beyond in your description.  Thank you.  Very well done.
 
steward
Posts: 15720
Location: Northern WI (zone 4)
4947
7
hunting trees books food preservation solar woodworking
  • Mark post as helpful
  • send pies
    Number of slices to send:
    Optional 'thank-you' note:
  • Quote
  • Report post to moderator

Travis Johnson wrote:
The key is to get the snow load off the roof, but also think of terms of stress. “If I step on the roof here, where does my weight get transferred too? What would have to fail for this to collapse?


How do you get the snow load off of that roof?  I was imagining you were going with a fairly steep pitch but that doesn't seem to be steep enough to shed snow.
 
Travis Johnson
pollinator
Posts: 4958
1199
transportation duck trees rabbit tiny house chicken earthworks building woodworking
  • Mark post as helpful
  • send pies
    Number of slices to send:
    Optional 'thank-you' note:
  • Quote
  • Report post to moderator
Yeah you are right, it doesn't shed snow well. It does eventually slide off, but it takes awhile.

I am not sure if you can tell in the photos, but I was under some tight constraints with this one. The concrete was already there so it made sense to add on to the shop with a new roof line. The problem was, being 30 feet out, then being high enough to clean out the barn with my tractor, it made for a low pitched roof. You can even see in the photos that the second bay is really short, 6 feet tall. It is all I can do to squeeze by bulldozer in there to clean out, but I can, I just have to duck my head for the light bulbs! It would have been nice to have another foot of headroom, but if I had done that, I would have had a really low pitched roof. It worked out, but barely!

I would NEVER recommend a pitch this shallow that is for sure. I pull it off here in two ways. Part is the micro-climate. The long sloped roof faces the North and prevailing winds. I am also at the top of a big hill (I can see some 175 miles away) so this place gets slammed with wind. Typically the snow loads are low because it blows off this roof. In 2 foot storms with wet heavy snow, I fret, but it is braced really good. It has 7 load bearing points on that 52 feet of rafter, so the longest rafter span is only 8 feet.

We do like this barn though. We have had it up for two years now and the through-barn feature is nice. Two passes with the bulldozer and the floors are clean. The fold up managers have worked flawlessly and being draft-free below 4 feet, but wide open above, makes for healthy sheep. We had a sheep di a few weeks ago so the State Vet and I cut her open and her lungs were gorgeous. When I asked why, he pointed to the barn, "wide open barn". There is no manure smell build up so no pneumonia. By closing it in anyone can use it for something else, but this is designed and works perfect for sheep.

BTW: The gates inside the barn act as a covered sorting chute, foot bath and shearing room. That is important because uncovered chutes 4 feet high with 3 feet of snow in them do not work.
 
Mike Haasl
steward
Posts: 15720
Location: Northern WI (zone 4)
4947
7
hunting trees books food preservation solar woodworking
  • Mark post as helpful
  • send pies
    Number of slices to send:
    Optional 'thank-you' note:
  • Quote
  • Report post to moderator
Ok, that makes sense.  Didn't know if I was missing something.  It does look beautiful and a great use of a concrete pad.
 
Posts: 19
Location: Far South Coast, NSW
1
cat books urban
  • Mark post as helpful
  • send pies
    Number of slices to send:
    Optional 'thank-you' note:
  • Quote
  • Report post to moderator
Although I LOVE green buildings, I have a feeling I will be the latter of those two myself when I get to outbuilding time - I'm good at sourcing used materials for super cheap, so I gotta use my superpower for something.

I was curious - any chance you might be able to put a picture up of the 'floorplan' for these buildings? I loved the detail but if you've got a quick sketch it'd round out your lovely post.
 
Travis Johnson
pollinator
Posts: 4958
1199
transportation duck trees rabbit tiny house chicken earthworks building woodworking
  • Mark post as helpful
  • send pies
    Number of slices to send:
    Optional 'thank-you' note:
  • Quote
  • Report post to moderator

Marisol Dunham wrote:I was curious - any chance you might be able to put a picture up of the 'floorplan' for these buildings? I loved the detail but if you've got a quick sketch it'd round out your lovely post.


Let me see what I can do. This is harder than you realize, only because I am very old school. So old school in fact I don't even have a cell phone. I don't mean a smart phone, I don't even have a flip up phone or anything! In any case, I love mechanical drawing and that is what I typically do for doodling up what I intend to build. But the Commissioner of Agriculture here in Maine challenged us to "share our knowledge" and I have really tried to do that this year.

I hope I do not sound too conceited when I say this, but while the design is really efficient, the floor plan has proven to be even better. The older portions are many years old, and the new barn is two years old, so when I say that, it is time tested. I also want to share this because it houses a variety of animals. Straight up, we are a commercial sheep farm and that is what we do, but we have a few other animals that we house for our own use; ducks, chickens and a beef cow.

The cow has a 3 sided lean too off the chicken coop that is 8 x 12 feet in size. This has concrete floors, lights and outlets.

Beside that is a 8 x 12 foot chicken/duck coop that is insulated, heated via geothermal, with a wall inside the outer wall by four feet. This wall is lined with chicken wire so that there is a double door system. With springs on both doors, it is impossible for the kids to leave the doors open and let the ducks/chickens out. In the summer when they free range, but nest back in the coop at night, latches on the door keep them propped open. The 8 x 4 foot area inside, but off limits to the ducks is our "grain room". This is where we keep metal trash cans for the chicken grain. It also houses a shelf where we keep our egg crates stacked. It also has a traffic cone fabricated to the wall upside down, our method of butchering birds (the bird is placed upside down in the traffic cone, sticking their heads through the tiny part, where...well you know). Overhead of the chicken coop is a storage area, accessed by built in ladder in the grain room. Naturally this grain room/coop has lights, outlets, a concrete floor as well with an insulated door from the outside.

The next area is a 12 x 24 insulated lambing pen. This room is split into two parts. On one wall next to the chicken coop is (5) 4 x 6 feet lambing pens. These are boxed in 4 feet high with outlets above every pen for heating pads to warm the lambs. Each pen has a manager for hay and water buckets. These are only used for a day or two for Ewes and their day old lambs. The majority of the area is open. That is to allow ewes and newborn lambs over 1 day up to a week or two, co-mingle with other lambs and ewes, yet not be out in the main barn. This area has a concrete floor, and two doors. The first is a big door that allows a farm tractor to clean out the bigger open area. To clean out the lambing pens it is shoveled out to the main part where it is scooped out. The second door is towards the front and leads to the main barn. The barn is insulated, along with both doors, but not heated. The body heat from sheep keep this super-insulated lambing barn from freezing even at below zero (f) weather. This is also where shearing takes place.

There is an 18 inch elevation change from the lambing barn to the main barn, there is also a 7 foot by 24 foot area broken into (6) four foot sections. The first 4 x 6 foot section has a man door to the outside so we can enter the lambing barn to tend animals, or slip thrrough a latched gate into the main barn. This area has concrete, but is also sloped. In the floor is a foot bath with a trap door so it can be ramp, or a foot bath too. Because of its position, it allows the entire flock of sheep to be run through the hour glassed area. This area also houses a fire extinguisher and our chalk board for writing down sheep numbers we are having issues with. The area also contains a ladder going up to a 7 x 24 foot hay loft over this area of the barn. I is used for storage and for a kids fort. Long stuff can be placed up there via a hayloft door on the outside of the barn. This area is well lit, has its own outlet and even a 220 outlet for my welder.

The next bay over contains our tools, everything from hoof trimming tools to fencing tools, to towels to dry off newborn lambs. It has a table and hutch, and plenty of pegs to hang barn cleaning tools. It is just a 4 x 6 storage spot. The next four 4 x 6 stalls we call our "medical pens". These are where sick sheep go and so the individual stalls have lights overhead and their own outlets for heating pads, heat lamps or additional lighting. Every bay here, all 6, have latched gates. This area is not quite done, I still need to pour concrete on the floors and board in the individual pens, but I am a busy guy!

Our main barn is a through barn meaning to clean out, we simple push the manure from one end of the barn right out the back to the other. Our barn is further split down the middle by the "half wall". With gates at each end in this half wall, the barn acts like a sorting chute. We used steel tube gates with steel roofing screwed to the gates at the ends. This gives our end gates a draft-proof setting when our lambs are born in winter as we winter lamb, but the gates in the middle are just for extra sorting. It all depends on where we are in lambing. We might enclose 1/4 of the barn for ewes and nursing lambs who would be crushed in "general population" as we call it, or we might pen in dry ewes. The point is, we never chase sheep. Typically we let the sheep from one side of the barn (a 12 foot alley) through a half wall gate so all our sheep are contained in one half of the barn. Then we clean out, fill the livestock tank with water, then fill their flip out managers. Then we let the sheep back in and clean out the other side. With steel roofing along the walls, and a concrete floor, the manure easily pushes out.

As for outside lights, goodness gracious we have them. Front, back, sides; I guess I must be afraid of the dark because our barnyard is about 3-1/2 acres in size, and when we flip every outside light on, there is not a shadow to be found in those 3 acres.

So yes it works quite well. It is geared towards sheep farming obviously, but ultimately I think we properly house our animals. I feel good in doing that.

 
pioneer
Posts: 72
Location: MO, Zone 6a
5
8
forest garden fungi tiny house
  • Mark post as helpful
  • send pies
    Number of slices to send:
    Optional 'thank-you' note:
  • Quote
  • Report post to moderator
Hi Travis,
do realize this is an old thread, but I was wondering if you had any more detailed pictures of the construction? And a floor plan? I've had my eye on this design since you posted it and finally thinking of getting to work on it.

Thank you either way!
 
pollinator
Posts: 3893
Location: 4b
1413
dog forest garden trees bee building
  • Mark post as helpful
  • send pies
    Number of slices to send:
    Optional 'thank-you' note:
  • Quote
  • Report post to moderator

Bryan de Valdivia wrote:Hi Travis,
do realize this is an old thread, but I was wondering if you had any more detailed pictures of the construction? And a floor plan? I've had my eye on this design since you posted it and finally thinking of getting to work on it.

Thank you either way!


I would love to see more details as well. I've never built anything very substantial, so I kind of need step by step instructions.  I don't even know what a "bent" is...
 
Travis Johnson
pollinator
Posts: 4958
1199
transportation duck trees rabbit tiny house chicken earthworks building woodworking
  • Likes 1
  • Mark post as helpful
  • send pies
    Number of slices to send:
    Optional 'thank-you' note:
  • Quote
  • Report post to moderator

Bryan de Valdivia wrote:Hi Travis,
do realize this is an old thread, but I was wondering if you had any more detailed pictures of the construction? And a floor plan? I've had my eye on this design since you posted it and finally thinking of getting to work on it.

Thank you either way!


I will have to get that for you, but you caught me just in the nick of time. About 2 weeks ago we sold all the sheep off, so the barn is going to be reconfigured to something else, but I am not sure what.
 
Bryan de Valdivia
pioneer
Posts: 72
Location: MO, Zone 6a
5
8
forest garden fungi tiny house
  • Mark post as helpful
  • send pies
    Number of slices to send:
    Optional 'thank-you' note:
  • Quote
  • Report post to moderator
Thanks Travis! I'm looking at housing goats and maybe also sheep, and last year we had a wet snow that was about 18" deep that would not slide of those 3-story tall fancy inflated hoop buildings, collapsing them, so I'm figuring your location is my best bet on a low cost barn design.
 
pollinator
Posts: 262
Location: Vermont, annual average precipitation is 39.87 Inches
50
  • Mark post as helpful
  • send pies
    Number of slices to send:
    Optional 'thank-you' note:
  • Quote
  • Report post to moderator
Bryan, thank you for renewing tbis thread.  Travis, thank you for sharing all this. We hope to build a barn in a couple of years but the finances of it really worried me.  I clearly have more to learn,  but it seems more possible now.
 
Travis Johnson
pollinator
Posts: 4958
1199
transportation duck trees rabbit tiny house chicken earthworks building woodworking
  • Mark post as helpful
  • send pies
    Number of slices to send:
    Optional 'thank-you' note:
  • Quote
  • Report post to moderator
Well you picked the perfect time because we are in the midst of a blizzard so I will not be doing any logging today.

Just what are you looking for in terms of "details"? I can make up a floor plan, but I am not sure what you mean by details.
 
gardener
Posts: 874
Location: Piedmont 7a
324
7
hugelkultur trees woodworking
  • Mark post as helpful
  • send pies
    Number of slices to send:
    Optional 'thank-you' note:
  • Quote
  • Report post to moderator
Travis, in my experience, the concrete pad alone would cost in excess of 5x your total cost around here - more if any kind of slope involved and stem walls and fill required.  

Am assuming you used the earthcrete method for the pad that you have mentioned in other threads?  If you have time, could you repeat the recipe for that, and also show some photos of the finished pad and comment on how it held up over time to animals/machinery?
 
pollinator
Posts: 298
Location: Ozarks
78
homeschooling goat dog building wood heat homestead
  • Mark post as helpful
  • send pies
    Number of slices to send:
    Optional 'thank-you' note:
  • Quote
  • Report post to moderator
Looks a lot like most of the old barns here in MO although most of these old ones were built from fairly green oak so all the boards are twisted and bowed but they hold together.

Around here, mostly in Arkansas, they're tearing down old chicken houses to rebuild them to new Tyson specs and the contractors sell off the old materials. Average size chicken house is 40x400. They started out selling parts and pieces pretty cheap but now they all sell them as kits. 40x40 up to 40x_____(any length). The 40x40 is $2800. The trusses are steel - comes with 2 Inch foam insulation for roof and 2x4's for purlins and the trusses have angle iron brackets to hold the 2x4s upright. The poles for the side walls are 6-7 foot tall so in most cases, those would need to be extended. They center is high enough as is to back an 18 wheeler inside. The roofing is 26ga steel which is on the thick side. The cheap stuff is 29ga irrc.
 
Travis Johnson
pollinator
Posts: 4958
1199
transportation duck trees rabbit tiny house chicken earthworks building woodworking
  • Likes 2
  • Mark post as helpful
  • send pies
    Number of slices to send:
    Optional 'thank-you' note:
  • Quote
  • Report post to moderator

Artie Scott wrote:Travis, in my experience, the concrete pad alone would cost in excess of 5x your total cost around here - more if any kind of slope involved and stem walls and fill required.  

Am assuming you used the earthcrete method for the pad that you have mentioned in other threads?  If you have time, could you repeat the recipe for that, and also show some photos of the finished pad and comment on how it held up over time to animals/machinery?


It held up well, but it was not Earthcrete. It was bought concrete called "Government Mix" because the USDA pad for the pad. They call it a "Heavy Use Area". Sometimes a "Heavy Use Area" will qualify for it to be a "Covered Heavy Use Area With End Walls"...what you and I call a barn! I did not qualify for that, so I used my own money to build my barn.

It held up well considering how often I literally drove a bulldozer over it. That was my preferred method of cleaning out the barn, although my tractor does just as good.

If you choose to go with Earthcrete, I would mix in gravel and not dirt, and then figure a 5 or 6 bag mix. That is 5 or 6 bags of 94 pound Portland cement per cubic yard. My cost for that is $65 per cubic yard of concrete. If you are a Veteran, you can go to Lowes and get your Veteran discount, and bulk discount, and get the cost down to $40 per cubic yard. That is without calculating gravel into the mix. Around here a 14 cubic yard truckload of gravel is $150.

I never figure out earthwork costs because I am never sure what a person has. If they build on a gravel embankment the earthwork cost is low, but if they have to fill in a 20 foot drop, then it would be expensive. All I can do is calculate out what the concrete pad would be. Here concrete costs $110 per cubic yard bought from a cement mixer, so a 30 x 48 barn would cost $1466.00 today. Earthcrete with gravel would cost about $1000.


Travis Johnson
pollinator
Posts: 4958
1199
transportation duck trees rabbit tiny house chicken earthworks building woodworking
  • Likes 3
  • Mark post as helpful
  • send pies
    Number of slices to send:
    Optional 'thank-you' note:
  • Quote
  • Report post to moderator
All gates are represented by angled red lines, and yes there is a lot of them. All have latches as well.

All doors are indicated by angled blue lines. All doors are insulated exterior doors.

Blue Circles indicate trash cans filled with grain for the chickens and the sheep

Any green areas, both dark and light green, are fully insulated and thus heated, by geothermal or by the heat of the animals themselves. This includes 12 “ in the attic, and 6” in the walls.

The dark yellow area is of the medical pens. These are 4x7 foot areas with an overhead attic above. These areas were designed for sick sheep, but could also be used by beef cows, pigs, etc. The first yellow pen with the circles are for grain storage, and tools. We even had a table in that pen.

The purple area with the blue box is the ramp area. It was 100% utilitarian. It is where the phone, main electrical panel, ladder for the attic area, chalk board, and the foot bath was located. The blue box is the foot bath area that had a removable cover over it.

The browinish area is the main thru-barn. It is NOT split in half as it looks. The middle is a “half-wall” complete with gates between the half-wall for sheep movement.

The baby blue area is where the built in hay racks are that pivot out of the way.

The entire barn was wired for outside lights, inside lights and electrical outlets. This included (1) 220 outlet by the main electrical panel for my welder. The attic area is also wired for lights.
Barn.jpg
[Thumbnail for Barn.jpg]
 
Bryan de Valdivia
pioneer
Posts: 72
Location: MO, Zone 6a
5
8
forest garden fungi tiny house
  • Mark post as helpful
  • send pies
    Number of slices to send:
    Optional 'thank-you' note:
  • Quote
  • Report post to moderator

Travis Johnson wrote:Well you picked the perfect time because we are in the midst of a blizzard so I will not be doing any logging today.

Just what are you looking for in terms of "details"? I can make up a floor plan, but I am not sure what you mean by details.


Thank you Travis! I'll have a look at the floor plan in a bit. In terms of details, do you have pictures of where you reinforce the bents? That is, where the plywood is reinforcing at the junctions and stress points?

Also, the purlins, are these 2"x4" on 4' centers?

In particular, I'm looking at making a barn that has a peak in the middle, 6/12 slope, so I'd be curious to know how you reinforce it at the peak.

And how do you connect it to the pad to deal with uplift? We get strong thunderstorms here and it is tornado country.

Any other tips in terms of maximum span recommendations given this construction method would be appreciated, so I could apply it to my own particular situation.

Many thanks! Apologies if messy writing, doing this in a rush so as to take advantage of your time off :)
 
Travis Johnson
pollinator
Posts: 4958
1199
transportation duck trees rabbit tiny house chicken earthworks building woodworking
  • Likes 2
  • Mark post as helpful
  • send pies
    Number of slices to send:
    Optional 'thank-you' note:
  • Quote
  • Report post to moderator
No the purling's are placed 2 feet on center.

For this barn, I Hilti-Gunned the sole plate to the concrete, but keep in mind the concrete slab was poured in 2008, and I built the barn in 2015. If I had a fresh concrete pad, I would have installed anchors right into the concrete, and bolted the sole plates down. And with this construction too, you have to put the sole plates down first, and then place the bents over the sole plates and nail them in.

As for the connections, there is nothing special about them. They do have to be plywood because if you use regular lumber like a board or framing lumber, they will split. Plywood does not do that.

I never worried about the angles on the connections, but my Uncle always bisected the angle. Lets say you are making a 90 degree L-shaped piece. My Uncle would cut the two pieces at 45 degrees (bisect the angle) then nail plywood on both sides. Me, I just make the cuts at 90 degrees and nail on the plywood gussets. I have never had an issue in all the years I have done it my way. If you feel better about it, bisect the angle by all means.

If I was making a stand alone barn, I would make it with a conventional roof myself. In this case, I had the concrete pad, and the barn, so it was best to connect them, but that was my situation, and just adapting what I had.

Here is a picture I had on hand with some connections. It really is far more simple then writing it out seems. It really is easy, fast, sound construction. But keep in mind, I have no building codes here so I can build it anyway I want.
DSCN3683.JPG
[Thumbnail for DSCN3683.JPG]
 
Bryan de Valdivia
pioneer
Posts: 72
Location: MO, Zone 6a
5
8
forest garden fungi tiny house
  • Mark post as helpful
  • send pies
    Number of slices to send:
    Optional 'thank-you' note:
  • Quote
  • Report post to moderator
Thanks! Will have a closer look later, out and about. Lucky for me, there's an exception here for sole ag use buildings, no permit required :)
 
Travis Johnson
pollinator
Posts: 4958
1199
transportation duck trees rabbit tiny house chicken earthworks building woodworking
  • Mark post as helpful
  • send pies
    Number of slices to send:
    Optional 'thank-you' note:
  • Quote
  • Report post to moderator
I figure you are doing me a favor asking me these barn questions, and me getting pictures today.

Katie wanted me to build a coffee table to match our kitchen table. I did not mind, but I am beginning to think that at age 45, I will not live long enough to sand the plane marks out of the tabletop. I have been at it for two hours now, and can still feel the ridges. That is a good excuse to stop and take pictures of a barn.

Here are some pictures...

alleyway.jpg
alleyway
alleyway
attic-area.jpg
attic area
attic area
connection.jpg
connection
connection
grain-pen.jpg
grain pen
grain pen
lamb-pens.jpg
lamb pens
lamb pens
medical-pen.jpg
medical pen
medical pen
 
Travis Johnson
pollinator
Posts: 4958
1199
transportation duck trees rabbit tiny house chicken earthworks building woodworking
  • Likes 5
  • Mark post as helpful
  • send pies
    Number of slices to send:
    Optional 'thank-you' note:
  • Quote
  • Report post to moderator
Here are the fold out hay rack details. The first one is of it closed, and the other is of it opened. They pivot on (1) nail for a hinge, and the angle of the cuts allow them to fold in and out into the barn wall. The toggles can be turned to keep them closed.

hay-rack-closed.jpg
hay rack closed
hay rack closed
hay-rack-open.jpg
hay rack open
hay rack open
 
pollinator
Posts: 2628
Location: RRV of da Nort, USA
760
  • Mark post as helpful
  • send pies
    Number of slices to send:
    Optional 'thank-you' note:
  • Quote
  • Report post to moderator
Thanks for the extra pics, Travis.  I've been toying with the idea of a shed roof-type structure of with a ~20 X 30 floor plan for equipment and other types of storage, but grew increasingly concerned about snow load.  Your pictures gave me some good ideas of how to maximize open space without compromising roof integrity.
 
Bryan de Valdivia
pioneer
Posts: 72
Location: MO, Zone 6a
5
8
forest garden fungi tiny house
  • Mark post as helpful
  • send pies
    Number of slices to send:
    Optional 'thank-you' note:
  • Quote
  • Report post to moderator
Thank you Travis! All the extra pics and explanations are of great help.

What's the maximum span that you would recommend with this type of construction, and with your snow loads?
 
Travis Johnson
pollinator
Posts: 4958
1199
transportation duck trees rabbit tiny house chicken earthworks building woodworking
  • Mark post as helpful
  • send pies
    Number of slices to send:
    Optional 'thank-you' note:
  • Quote
  • Report post to moderator
I am not sure.

I would think with my method, which is 6 inch rafters and purlings placed flat ways, 4 ft on center is about the widest I would go.

I think if a person went with 2x6 rafters and 2x4's rolled up on edge they might be able to go 6 feet.

I think with (2) 2x8 rafters and 2x4 purlings on edge a person could span 8 feet. But if you figure out the board foot, it is cheaper to put a bent every 4 feet with 2x6 rafters then with (2) 2x8 rafters every 8 feet.
 
Bryan de Valdivia
pioneer
Posts: 72
Location: MO, Zone 6a
5
8
forest garden fungi tiny house
  • Mark post as helpful
  • send pies
    Number of slices to send:
    Optional 'thank-you' note:
  • Quote
  • Report post to moderator
Doh, sorry, the question made sense in my brain but see now how it came out :) I meant the maximum span on the floor between vertical supports.

For example, far as I can tell from the pics and your description, you have a vertical 2×4 post at the edge, then a vertical support for the bent at 8' away, and then again another 8' away, then 7' away.

However, in the bigger barn, the brown section, it is 24' across and I only see a line down the middle, but you also wrote that it's not divided. Then again, I don't know if this section was constructed in the same manner.

ps. You don't have an overhang at the edge, do you?
 
Travis Johnson
pollinator
Posts: 4958
1199
transportation duck trees rabbit tiny house chicken earthworks building woodworking
  • Likes 1
  • Mark post as helpful
  • send pies
    Number of slices to send:
    Optional 'thank-you' note:
  • Quote
  • Report post to moderator
Mine is a shed roof (pitched all one way) so yes, there is an overhang at both ends. To stiffen up the last 6 foot wall where it was too low to put in a collar tie all the way across, I put in a 45 degree block to add reinforcement. This gives the end a rather strange shape. It is represented by the red line making for a triangular block of wood.  (I will try and get a picture for you). I only did this because I could not put in a collar tie all the way across. The blue solid block is the nailed on plywood gusset.

In my barn, which started with an existing barn, the rafter span was 45 feet in all! So it went with a wall at 1 ft, then at 12 foot, then at 20 feet, then at 32 feet, then at 44 feet. The longest span is thus 12 feet. I also put in a few 45 degree braces to help shorten that span up some.

I used 2x4 vertical walls just because I can get so many more 2x4's out of a log instead of 2x6's. But they would be stronger, and they would allow for more insulation if you use them. My walls at 1 foot and 12 foot are 2X6's thick because my lambing pen and chicken coop was insulated.

Rafter.jpg
[Thumbnail for Rafter.jpg]
 
Bryan de Valdivia
pioneer
Posts: 72
Location: MO, Zone 6a
5
8
forest garden fungi tiny house
  • Mark post as helpful
  • send pies
    Number of slices to send:
    Optional 'thank-you' note:
  • Quote
  • Report post to moderator
Thank you Travis! Have to chew on this a bit now as to how to apply it to my needs, very much appreciate your time and help on this sir.
 
Travis Johnson
pollinator
Posts: 4958
1199
transportation duck trees rabbit tiny house chicken earthworks building woodworking
  • Likes 1
  • Mark post as helpful
  • send pies
    Number of slices to send:
    Optional 'thank-you' note:
  • Quote
  • Report post to moderator

Bryan de Valdivia wrote:Thank you Travis! Have to chew on this a bit now as to how to apply it to my needs, very much appreciate your time and help on this sir.


Give me your dimensions and what you want for a general shape, and I will draw you up a bent (truss) layout. Just be sure to add an extra one when you figure up how many bents you need...the first one is always at 0'-0"...kind of like counting up the fence posts you need!
 
Bryan de Valdivia
pioneer
Posts: 72
Location: MO, Zone 6a
5
8
forest garden fungi tiny house
  • Mark post as helpful
  • send pies
    Number of slices to send:
    Optional 'thank-you' note:
  • Quote
  • Report post to moderator

Travis Johnson wrote:

Bryan de Valdivia wrote:Thank you Travis! Have to chew on this a bit now as to how to apply it to my needs, very much appreciate your time and help on this sir.


Give me your dimensions and what you want for a general shape, and I will draw you up a bent (truss) layout. Just be sure to add an extra one when you figure up how many bents you need...the first one is always at 0'-0"...kind of like counting up the fence posts you need!


Wow, thanks Travis!  The building I have in mind would be 24' x 40', 6/12 slope, side walls as tall as you think is safe Would 10' or 12' work? To have as many possibilities for future use. In terms of internal supports (posts) I was wondering if 24' could be free-spanned, again, to leave as many options open as possible. I had a look at a pole barn I have here, going on about 30 years old, and the trusses have the rafters made out of 2' x 6' with the rafter tie out of a 2' x 4' and no collar tie. The rafters are nailed to each other with no ridge board and the 2'x4' rafter ties are just nailed on to the face of the rafters, no gusset, no mending plates, just 4 nails at the ends and some hanger boards a'ways in. Trusses are set 4' OC.
20191114_145409.jpg
[Thumbnail for 20191114_145409.jpg]
 
Posts: 8
  • Mark post as helpful
  • send pies
    Number of slices to send:
    Optional 'thank-you' note:
  • Quote
  • Report post to moderator
Aloha Jason!
Do you have any photos of these kits and where can I obtain a kit like this?
God bless and be well!
 
I agree. Here's the link: http://stoves2.com
reply
    Bookmark Topic Watch Topic
  • New Topic