• Post Reply Bookmark Topic Watch Topic
  • New Topic
permaculture forums growies critters building homesteading energy monies kitchen purity ungarbage community wilderness fiber arts art permaculture artisans regional education skip experiences global resources cider press projects digital market permies.com pie forums private forums all forums
this forum made possible by our volunteer staff, including ...
master stewards:
  • Carla Burke
  • Nancy Reading
  • John F Dean
  • r ranson
  • Jay Angler
  • paul wheaton
stewards:
  • Pearl Sutton
  • Leigh Tate
  • Devaka Cooray
master gardeners:
  • Christopher Weeks
  • Timothy Norton
gardeners:
  • thomas rubino
  • Matt McSpadden
  • Jeremy VanGelder

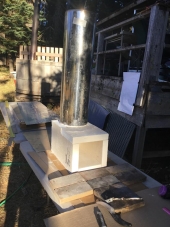
Just built my first rocket heater.

 
  • Likes 5
  • Mark post as helpful
  • send pies
    Number of slices to send:
    Optional 'thank-you' note:
  • Quote
  • Report post to moderator
Finished building my first rocket heater. I am planning on building a gravel mass to go with it.  It is only a 4 inch system. I am trying to attach pictures, but I am not sure if it is going to work.

If it lasts me this winter I will be happy(hopefully it lasts longer).  It is built out of regular concrete bricks with regular mortar.  I thought I might be able to get away with this because I lined the burn tunnel with 2 inch thick 2600 degree ceramic fiber insulation.  The feed tube is lined with fire brick I got from tractor supply. Since there is no mass right now I have to have it running constantly. I think the longest I have had it running was about 10 hours straight. The outside of the bricks are usually between 150 and 200 after a couple hours. Part of the feed tunnel is only lined with fire brick and no ceramic fiber insulation. That section got up to 285 once (at the end of the 10+ hour burn).  That is the only section I have any concerns about lasting. Been burning it pretty hot and hard for about a week now. Looks like there is a bit of a crack forming near the hot spot... so I will probably have to rebuild at some point.

Functionally this thing has been great! I dont have a pic of the back with the exhaust installed, but it runs about an inch away from the back of the bell(IDK if thats the right terminology, but its what I have been calling the part that is usually a drum).  Right now this thing pulls air pretty quick when its cold.  When I first started it it did not put out any smoke.  Now it is putting smoke out.  It started making a pulsing as it burned, I think that comes from it not getting enough air.   I think I just need to clean out the ash from the burn chamber. I have never done that, and its got a good inch or two on the bottom.... It will be the first thing I do next time it gets cold.

The bell (not a drum) is a tank from a water heater that I cut sandblasted and painted. The manifold is 4x10x6 90 degree boot.  I plan on running 6 inch pipe through the mass to reduce drag.

It is mostly working great, but its eating through wood right now since we need it running so much. Can't wait to get my mass built!

Editing to add videos on this build.

IMG_20181210_172716.jpg
[Thumbnail for IMG_20181210_172716.jpg]
IMG_20181212_113756.jpg
[Thumbnail for IMG_20181212_113756.jpg]
 
rocket scientist
Posts: 6355
Location: latitude 47 N.W. montana zone 6A
3209
cat pig rocket stoves
  • Mark post as helpful
  • send pies
    Number of slices to send:
    Optional 'thank-you' note:
  • Quote
  • Report post to moderator
Hi D;  Welcome to Permies!

Nice looking little rocket you built! Very clean looking.

Being a 4" it may give you issues as you add mass.   If you keep a short run of mass it should be fine thru this winter.

I recommend at least a 6" if you do a rebuild later.
 
D Anthony Dayringer
Posts: 12
  • Likes 1
  • Mark post as helpful
  • send pies
    Number of slices to send:
    Optional 'thank-you' note:
  • Quote
  • Report post to moderator
Thanks!! I had fun building it. Its my first masonry project.  I am making some videos and will be posting them to my youtube channel when I get them done.  Eventually I am going to build another one to heat my office in the shop.

Arent the problems with 4 inch systems usually flow?  This thing sucks air really well, even when its cold. Thats why I am kinda confused about the recent smoke development. There is NO smoke coming back in the room. But since it started pulsing there has been some smoke out the exhaust.  The thing still makes the rockety roar. But it has been getting a bit harder to start.

If I do a total rebuild I was thinking about switching to a 6 inch system... The only reason I havent cleaned out the ash is the feed tube is to small for me to get my hand down! I am glad I didnt secure the fire brick in the feed tube.... I am going to have to take it out to clean it!

On the other hand... I kinda wanted to build a 4 inch system because I wanted to prove that I could.... Who knows what I will do. All I know is I am warm!
 
D Anthony Dayringer
Posts: 12
  • Likes 1
  • Mark post as helpful
  • send pies
    Number of slices to send:
    Optional 'thank-you' note:
  • Quote
  • Report post to moderator
So... I didn't realize how bad this thing was running. Cleaned out the ash. This thing got HOT FAST.  A ton more air flow. It still pulsed a bit when I packed it full... But I didn't get any smoke out the exhaust.  Had trouble getting it lit this time because the draft kept blowing out my fire... But I like having that problem! Lol
 
Rocket Scientist
Posts: 1809
Location: Kaslo, BC
525
building solar woodworking rocket stoves wood heat greening the desert
  • Likes 1
  • Mark post as helpful
  • send pies
    Number of slices to send:
    Optional 'thank-you' note:
  • Quote
  • Report post to moderator

D Anthony Dayringer wrote:
The only reason I havent cleaned out the ash is the feed tube is to small for me to get my hand down! I am glad I didnt secure the fire brick in the feed tube.... I am going to have to take it out to clean it!


You can make yourself a simple ash cleaning tool to help you reach in there. Many ideas have been presented in other posts from sardine cans to beautiful copper pieces of art. I am currently using one out made out of cardboard with a crooked handle on it bent from a coat hanger....or you could also get a shop vac and stick the hose in there (not the best long term as the ash can gum up the motor and/or bypass the filter and into your home) or even blow it out with a leaf blower.
 
gardener
Posts: 3471
Location: Southern alps, on the French side of the french /italian border 5000ft elevation
194
  • Mark post as helpful
  • send pies
    Number of slices to send:
    Optional 'thank-you' note:
  • Quote
  • Report post to moderator
If it's pulsing, there is a restriction.

https://permies.com/t/61657/Flue-exhaust-transition-plenum-pictures

http://donkey32.proboards.com/thread/1406/calculating-ring-circumference-projection-gap

If you can find the restriction, and don' want to rebuild it all. May be a batch conversion would do.

http://donkey32.proboards.com/thread/1361/converting-8-6-batch

http://batchrocket.eu/en/contact


D Anthony Dayringer
Posts: 12
  • Likes 1
  • Mark post as helpful
  • send pies
    Number of slices to send:
    Optional 'thank-you' note:
  • Quote
  • Report post to moderator
Thanks for the links! Some of that was information I had not found before. Thankfully it verified that I had the right calculations!

The pulsing was/is def a restriction. Before it was the ash build up in the burn tunnel. So it's burning much better tonight than it was last night. I just need to come up with a better way to get the ash out... I don't want to have to pull half the fire bricks out every time I need to clean it, just so I can fit my hand down there.  

After I cleared the ash out it only pulsed when I packed it extra tight filling all the air gaps with smaller sticks... So the fuel itself was the restriction.
 
pollinator
Posts: 637
Location: Wellington, New Zealand
15
  • Mark post as helpful
  • send pies
    Number of slices to send:
    Optional 'thank-you' note:
  • Quote
  • Report post to moderator
People in the past used barrels of water to capture solar heat.  Would a couple of water filled barrels in the room be worthwhile at storing some of the heat being released from your metal barrel?
 
D Anthony Dayringer
Posts: 12
  • Mark post as helpful
  • send pies
    Number of slices to send:
    Optional 'thank-you' note:
  • Quote
  • Report post to moderator
Thats not a bad idea. Not sure what the best way to implement it would be. And I don't think it would be worth it in my case, as the mass is my next project.

Also upon looking further.... I am wondering if I was actually getting smoke out before.  I am starting to think it may have been changes in the weather causing more steam to condense as it hit the atmosphere.
 
D Anthony Dayringer
Posts: 12
  • Mark post as helpful
  • send pies
    Number of slices to send:
    Optional 'thank-you' note:
  • Quote
  • Report post to moderator
I edited the first post to add the first video I made on this build. (I thought It would be better if all the info on the build was in the first post) Apparently the staff have to accept the edit.  So until that happens (or doesn't)... Here is the link to the first video on this build

 
Graham Chiu
pollinator
Posts: 637
Location: Wellington, New Zealand
15
  • Mark post as helpful
  • send pies
    Number of slices to send:
    Optional 'thank-you' note:
  • Quote
  • Report post to moderator
Yeah, it seems you can't edit a post if another is made after it.

Water barrels are easy enough. Just plastic, and fill with water. If your furniture catches alight, you can use the water! Water is much more efficient as heat storage than stone. And easier to move. Just empty the water out first.
 
D Anthony Dayringer
Posts: 12
  • Likes 1
  • Mark post as helpful
  • send pies
    Number of slices to send:
    Optional 'thank-you' note:
  • Quote
  • Report post to moderator
Second part of my build is up. I would like to add it to the first post... But I can't figure out how I did it the first time. Anyway... Here it is!  Let me know what you think! I haven't finished editing the rest of the build yet, so if there is anything I really need to add I still have time to put it in the next video.

 
Gerry Parent
Rocket Scientist
Posts: 1809
Location: Kaslo, BC
525
building solar woodworking rocket stoves wood heat greening the desert
  • Likes 1
  • Mark post as helpful
  • send pies
    Number of slices to send:
    Optional 'thank-you' note:
  • Quote
  • Report post to moderator
Hi D,
Just saw your video....wow you build fast!     :)
Just wondering what made you decide on portland cement? I believe it has a working temperature of around 400F *(see Edit below) before it starts spalling and cracking. It looked to me in the video that the feed tube did not have any ceramic fiber around it so it is probably going to get pretty hot. Perhaps fire clay may have been a better choice as it can withstand higher temps and is way more forgiving to take apart if changes are needed...... Time will tell.
Wondering what you had in mind for the thermal mass. Pipe or bell?
Keep up the good work....I'm enjoying your videos and your explanations as you go. Look forward to the next one!

* Edit - Whoops, wrong chart.... around 600F is more accurate

 
D Anthony Dayringer
Posts: 12
  • Likes 1
  • Mark post as helpful
  • send pies
    Number of slices to send:
    Optional 'thank-you' note:
  • Quote
  • Report post to moderator
I thought it was 600f... but that's still to low to hold up
I went with the cement because it was cheap and easy. And I thought the ceramic would protect it enough.

From my understanding the feed tube is the coolest part of the burn chamber... So.... last minute decided to just line that part with fire bricks. Because it made the design easier.  So it's not just bare cement.. it does have a layer of fire brick. Long term idk if it will hold up.  But it's working for now.

I am done building (and am running) the heater, but I have not started the mass yet. (Gotta get funds and time). I don't like how much heat I am putting out the exhaust. But I'm very happy about how clean this thing is burning!
For the mass I'm going to put in a pebble mass. I know it's not the best... But it's really the only thing I can put in the space.

Glad you are liking the videos! I plan on starting to edit the next one tomorrow... Hopefully I'll be able to release it by Friday.
 
pollinator
Posts: 290
Location: The Arkansas Ozarks
53
8
cat dog forest garden rabbit building solar rocket stoves woodworking wood heat homestead
  • Mark post as helpful
  • send pies
    Number of slices to send:
    Optional 'thank-you' note:
  • Quote
  • Report post to moderator

D Anthony Dayringer wrote:I thought it was 600f... but that's still to low to hold up
I went with the cement because it was cheap and easy. And I thought the ceramic would protect it enough.


Hi D,

Rapid Set Cement All from Home Depot is rated at 2460 degF decomposition temperature.  So it would be good in almost all areas of your design.  They don't give a rated operating temp, but I would guess it is at least 1500 degrees.

Nice masonry work.  Obviously not the first time you handled a trowell.

 
D Anthony Dayringer
Posts: 12
  • Mark post as helpful
  • send pies
    Number of slices to send:
    Optional 'thank-you' note:
  • Quote
  • Report post to moderator
Actually it was my first time with a trowel. I watched a bunch of brick laying videos before I started... I'm a bit of a perfectionist... And it took way longer than it should have.

I'll look into that stuff. I have plans to build more, and might have to redo this one in the future.
 
Rocket Scientist
Posts: 797
Location: Guernsey a small island near France.
299
  • Mark post as helpful
  • send pies
    Number of slices to send:
    Optional 'thank-you' note:
  • Quote
  • Report post to moderator

Ralph Kettell wrote:

D Anthony Dayringer wrote:I thought it was 600f... but that's still to low to hold up
I went with the cement because it was cheap and easy. And I thought the ceramic would protect it enough.


Hi D,

Rapid Set Cement All from Home Depot is rated at 2460 degF decomposition temperature.  So it would be good in almost all areas of your design.  They don't give a rated operating temp, but I would guess it is at least 1500 degrees.

Nice masonry work.  Obviously not the first time you handled a trowell.


Wow I wish I had that available where I live!
Normal Portland cement won’t go anywhere near that before is cracks and losses adhesion, I can get special hight temp cement easily enough, it is called Fondu and is rated to 1200c but because of the high aluminate conten it sets in minutes and is very differcult to use.
What we use in the pizza oven building world is a mixture of clay, lime, Portland cement and sand. The mix is commonly called ‘home brew’ it is extreamly easy to use, cheap and works pretty well. The benefit over plain clay is mainly ease of use, clean working, less water required, faster drying and good adhesion.
I think plain Portland cement would be ok for most areas that don’t receive direct heat like the lower part of a brick bell.


Ralph Kettell
pollinator
Posts: 290
Location: The Arkansas Ozarks
53
8
cat dog forest garden rabbit building solar rocket stoves woodworking wood heat homestead
  • Mark post as helpful
  • send pies
    Number of slices to send:
    Optional 'thank-you' note:
  • Quote
  • Report post to moderator

Fox James wrote:

Ralph Kettell wrote:
Wow I wish I had that available where I live!
Normal Portland cement won’t go anywhere near that before is cracks and losses adhesion, I can get special hight temp cement easily enough, it is called Fondu and is rated to 1200c but because of the high aluminate conten it sets in minutes and is very differcult to use.
What we use in the pizza oven building world is a mixture of clay, lime, Portland cement and sand. The mix is commonly called ‘home brew’ it is extreamly easy to use, cheap and works pretty well. The benefit over plain clay is mainly ease of use, clean working, less water required, faster drying and good adhesion.
I think plain Portland cement would be ok for most areas that don’t receive direct heat like the lower part of a brick bell.


I have bought some, but haven't used it yet.  The one drawback from other user comments is that it dries quite fast, so you would want to do small batches. I understand that this doesn't apply to you directly as you can't purchase it in the UK, but the fact that it may be difficult to use might lessen the pain a bit.  

 
Fox James
Rocket Scientist
Posts: 797
Location: Guernsey a small island near France.
299
  • Likes 1
  • Mark post as helpful
  • send pies
    Number of slices to send:
    Optional 'thank-you' note:
  • Quote
  • Report post to moderator
Oh I can buy rapid set, it is really common and I use it regularly for general plastering work, we also get fast set concrete, although they do contain a higher % of aluminate, the products we get do not withstand high temps.
 
D Anthony Dayringer
Posts: 12
  • Mark post as helpful
  • send pies
    Number of slices to send:
    Optional 'thank-you' note:
  • Quote
  • Report post to moderator
I just finished the video on the heat exchanger. Took me longer than expected. I hope to build the mass soon. This thing isnt much better than the kerosene heater I was using before without the mass. I still like it better, but if its off its cold!

here is the video

 
Gerry Parent
Rocket Scientist
Posts: 1809
Location: Kaslo, BC
525
building solar woodworking rocket stoves wood heat greening the desert
  • Likes 1
  • Mark post as helpful
  • send pies
    Number of slices to send:
    Optional 'thank-you' note:
  • Quote
  • Report post to moderator
Hiya D   Good job with the water tank teardown....done several myself. I had a cheapo sandblaster similar to the one you used that I just used regular sifted sand with from the hillside by the shop. Maybe not as good as the store bought medium but the price was right.
Its going to be interesting when you get the heat riser in place then have to put the barrel over top of it. Those water tanks are a little heavier guage steel and can be tricky when you have to lift it above chest height and then lower it all without smucking the riser. Suggestion: When your ready, bake a batch of brownies and blow it in the direction of the neighbour who won't be able to resist coming over and helping you
Look forward to seeing your next stage.
 
D Anthony Dayringer
Posts: 12
  • Likes 1
  • Mark post as helpful
  • send pies
    Number of slices to send:
    Optional 'thank-you' note:
  • Quote
  • Report post to moderator
Yeah... Lifting that thing over the heat riser isn't something I want to do everyday..... Should have cooked some brownies. Lol.

I'll tear it apart in the spring. And if all goes as planned, that will be the last time I lift this one. Until I tear it down for good.

I used the cheap media from tractor supply. After I moved it inside it was easy to just scoop up what was on the floor to reuse it.

Hopefully I'll get the next part edited quicker than the last! I need to do some more filming of the working heater before I finish it.
 
D Anthony Dayringer
Posts: 12
  • Likes 1
  • Mark post as helpful
  • send pies
    Number of slices to send:
    Optional 'thank-you' note:
  • Quote
  • Report post to moderator
I finally got the time to put together my last video on the heater build. I still have not had a chance to start on the mass. Its been a long winter.
Let me know what you think.

 
gardener
Posts: 1236
360
7
trees wofati rocket stoves
  • Mark post as helpful
  • send pies
    Number of slices to send:
    Optional 'thank-you' note:
  • Quote
  • Report post to moderator
To stop the smoke back on initial startup, just push that first piece or two of paper/tinder to the back of the burn tunnel, so it's under the riser. That will get the draft pulling the right way for you. Not sure about caulking the metal bell to the masonry, as it heats up and expands at different rates that seal might break. You can purchase stove gasket that is flexible which might work well, and with the little cracks and possible seal crack later, I'd really recommend a CO detector for the room too. I hope it runs well for you, and with the mass added your wood use should drop quite a bit!
 
I have discovered my inner Beavis through interpretive dance. I learned it from this tiny ad:
Heat your home with the twigs that naturally fall of the trees in your yard
http://woodheat.net
reply
    Bookmark Topic Watch Topic
  • New Topic