

|

|

|

|

|

|
|
|
|
|
|
|
|

|

|

|

|

|
 17
17


" All that is gold does not glitter; not all those who wander are lost; the old that is strong does not wither; deep roots are not reached by the frost. " J. R. R. TOLKIEN
5
" All that is gold does not glitter; not all those who wander are lost; the old that is strong does not wither; deep roots are not reached by the frost. " J. R. R. TOLKIEN


 8
8
For all your Montana Masonry Heater parts (also known as) Rocket Mass heater parts.
Visit me at
dragontechrmh.com Once you go brick you will never go back!
6
thomas rubino wrote:
It sounds like you have a good understanding of how to approach a new build.
An overall good plan, of course, there will be details that will need clarification.
thomas rubino wrote:
I do suggest buying an RA253ma stub for your secondary tube, rather than the RA330.
I have used both and sold both, but the RA253 has proven itself to be as impervious to the internal batchbox temperatures as the RA330.
I have stopped stocking the RA330 and now only stock the RA253, as it is that good.
thomas rubino wrote:
With a heavy brick core and riser, it will take a bit to reach working temperature, but it will retain that heat far longer.
thomas rubino wrote:
All my cores are heavy brick, but for the riser, I use Morgan Superwool and create five-minute risers for them.
thomas rubino wrote:
Especially with your climate, a good bypass is essential for enjoyable operation.
" All that is gold does not glitter; not all those who wander are lost; the old that is strong does not wither; deep roots are not reached by the frost. " J. R. R. TOLKIEN
10


For all your Montana Masonry Heater parts (also known as) Rocket Mass heater parts.
Visit me at
dragontechrmh.com Once you go brick you will never go back!


 10
10
Proudly presenting RocketMassHeaters.com
A good starting point to all RMH research
How Permies.com works
8
" All that is gold does not glitter; not all those who wander are lost; the old that is strong does not wither; deep roots are not reached by the frost. " J. R. R. TOLKIEN
9
" All that is gold does not glitter; not all those who wander are lost; the old that is strong does not wither; deep roots are not reached by the frost. " J. R. R. TOLKIEN
10
10
" All that is gold does not glitter; not all those who wander are lost; the old that is strong does not wither; deep roots are not reached by the frost. " J. R. R. TOLKIEN
10
9
Proudly presenting RocketMassHeaters.com
A good starting point to all RMH research
How Permies.com works
10
8
Glenn Herbert wrote:It looks like the G-26 IFB would be fine for the riser, while the AL80 firebrick would stand up to wear in the firebox and port.
" All that is gold does not glitter; not all those who wander are lost; the old that is strong does not wither; deep roots are not reached by the frost. " J. R. R. TOLKIEN
9
8


" All that is gold does not glitter; not all those who wander are lost; the old that is strong does not wither; deep roots are not reached by the frost. " J. R. R. TOLKIEN
9
sara ventura wrote:First questions raised by these drawings:
-Can the depth of the portal be 6.4cm? And the height of the riser 105cm instead of 108? 6.4 is the width of my firebricks.
sara ventura wrote:-Between the back of the firebox and the back wall of the stove I have left 21cm( x 61cm width). Is that enough?
sara ventura wrote:-Would it make sense to draw the riser on the left, place the exit pipe on the right corner and have a much shorter lever for the bypass?
sara ventura wrote:-Is 3 or 2 cm space enough to leave between the pipe and the internal walls? The exit pipe will have an angle as it is because of the thickness of the wall of the stove, so I may well place it wherever I want.
sara ventura wrote:-If I rise the core with a metal structure, would a vitcas paint coating 1750º/3180º or similar be ok to protect it and the wires to reinforce the riser and core?
regards, Peter
7
Yes, the port could be deeper than suggested, so 6.4 cm won't be a problem. The riser could be anything between 10B and 8B. Shorter isn't recommended. Top gap, above the riser, AT LEAST the chimney's diameter. More is better.
It would make sense, although not for the bypass. The door is further away from the wall as a left-hand sidewinder, I would see that as an advantage. Thought: you are building a 1st generation batchrocket. Provided there is an adequate chimney, this model doesn't need a bypass. So, what will the chimney be like?
Another thought: since your chimney pipe is in a corner, about half of the opening won't be used by the downward streaming gases that need to go through a 180 degree change of direction. Stream profile should be about twice the chimney's cross section area, in order to avoid friction spots. Calculating... that internal pipe should be at least 15 cm from the floor, assuming afor-mentioned pipe is shoved in the corner of the bell.
This internal chimney pipe should be insulated somehow, otherwise the heater's exhaust gases will be higher and efficiency would be quite a bit lower. Insulating of the pipe could be done with 1" superwool around it, fixed to the pipe with chicken wire.
It escapes me what you mean with wires to reinforce the heater core?

All the cold steel inside will be quitely coated with a layer of wood tar, no corrosion expected.
Yet another thought: the top of the bell should be double-walled (bricks on edge), with thin (1/2") superwool between it. See the Mallorca or the Brussels build. The reason for this is that the top of the bell will get hottest during the burn and the bricks will expand because of that. The inner skin will be able to expand in the above construction, without pushing the outer skin apart.
![[Thumbnail for Ideal-shape.jpg]](/t/280192/a/283257/Ideal-shape.jpg "Filename: Ideal-shape.jpg
Description:")
![[Thumbnail for Seccio-corona-campana.jpg]](/t/280192/a/283258/Seccio-corona-campana.jpg "Filename: Seccio-corona-campana.jpg
Description:")
" All that is gold does not glitter; not all those who wander are lost; the old that is strong does not wither; deep roots are not reached by the frost. " J. R. R. TOLKIEN
7
sara ventura wrote:I was hoping to be able to have a hot bench next to the bell. Making some twitches to my current design I'm around 4.7 ISA.
I've read somewhere that by adding a bypass you can increase the ISA, how much are we talking about?
Is it feasible to have a small operating bench like the picture I attach below?
sara ventura wrote:I'm almost certain it's an IA picture, but it's the one I've found that looks closer to what I have in mind for my build (Minus the oven). In case this was possible, would all the face next to the bell be all open wide inside to allow the gases to flow freely?
sara ventura wrote:The exit pipe from the stove is currently 2cm and 15cm from the corner, so I have to move it anyway. If it's centered at the back of the bell, gases can flow from 3 diferent directions?
sara ventura wrote:Left, right and from under the core, is that correct?
sara ventura wrote:And the section of the pipe can be parallel to the floor?
sara ventura wrote:Being at 15 cm from the floor, is it convenient to rise the core a bit more than that to not have them both at the same level?
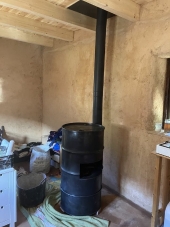
sara ventura wrote:I was planning to buy double wall insulated pipe for the masonry chimney to avoid condensation, which has always been an issue as it can be seen in the pictures of my corner. Can this same pipe be used inside the bell? and the section inside the house be simple wall?
sara ventura wrote:
It escapes me what you mean with wires to reinforce the heater core?
Sorry, I got lost in translation, I meant rods. As seen in the pictures of the Thomas Rubino's new build, I meant the internal frame that braces the core, and the wires to reinforce the riser.
sara ventura wrote:Then, probably just coating the wires from the riser that face the highest temps, and the rest of the metal inside the bell will be protected by the wood tar coating?
sara ventura wrote:If I go with the double wall tube, will this be protected enough? or giving a layer of Vitcas on the upper part won't hurt?
sara ventura wrote:My idea to crown the bell was to make double-skin only the last row and the top, as in the sketch below*. Should this apply to all the FB rows?
Even with cob finish instead of double skin bell?
regards, Peter
6
I'd think you mean the opening between the bell and the bench need to be as high and wide as the bench internal, the answer is yes.
In order to ensure free flowing of hot gases in and out of the bench, I highly recommend that the core would be lifted to the level of the bench' seat.
The stream profile into the chimney could be improved by mounting a 18 to 15 cm reducer at the bottom end of the pipe.
you want to use the same construction as Thomas', a compression frame and no mortar
In my mind, it would be sufficient to use some mortar for the riser and have insulation around it, held together by the wire. The wire is out of the highest zone and the wire is coated automagically.
Please, don't underestimate the thermodynamic forces that are in play here.
The firebrick liner inside the higher portions of the bell could be split bricks, probably 3 cm thickness.
" All that is gold does not glitter; not all those who wander are lost; the old that is strong does not wither; deep roots are not reached by the frost. " J. R. R. TOLKIEN
10
sara ventura wrote:I want to start the fire on the days that inside the house is colder than outdoors.
sara ventura wrote:The floor of the core aligned with the top of the bench? So the temp of the core doesn't mess with the cool gases going down and find the exit, yes?
sara ventura wrote:But that will rise my top of the bell too, thus increasing my ISA again, no? 1m ISA would be a square bench of 50 cm square right?
sara ventura wrote:I'm having trouble imagining any other proportions that would work as a relatively comfortable seat for one person/dog.
sara ventura wrote:Actually for the core, today my father suggested the possibility to do tongue and groove construction. Is there a reason I haven't seen any so far in the forum, other than the obvious extra work of carving the bricks? We have a wet saw and an skilled brick layer here.
sara ventura wrote:The firebrick we'll be using for the riser will be AL 79-82% 1550ºC, with wire and a band of superwool for movement allowance and protection I'll be good to go?
sara ventura wrote:About that, we've opened a can of worms with my dad, will be making new sketches next week with some (probably) crazy ideas, you'all'll let me know!
sara ventura wrote:And to recapitulate, which are the highest temps expected at this points:
- Inside Firebox -
-Inside Riser -
-Inside Top bell -
-Inside Top Bench -
-Exit pipe -
- Optimal fumes temp at exit? -
regards, Peter
6
Sara dear, you speak about your dad as a masonry heater builder? In that case, he on the one hand and me on the other, seems to be involved in a competition. I know how that works, it won't, been there, done that. Better having your dad advising and overseeing the build then.
The firebrick we'll be using for the riser will be AL 79-82% 1550ºC, with wire and a band of superwool for movement allowance and protection I'll be good to go?
I'm assuming you are talking about the outside measurements of the bench, please stick to inside, as long as ISA is in play.
" All that is gold does not glitter; not all those who wander are lost; the old that is strong does not wither; deep roots are not reached by the frost. " J. R. R. TOLKIEN
8
sara ventura wrote:The other is about the possibility to finish the top of the bell with an arch instead of a flat roof. Leaving aside the technical difficulty of making a vault, would this construction offer advantages on long term durability and performance?
sara ventura wrote:-With the ISA I gain from shortening the bench, I could make the bell a bit higher. That would allow me to rise the core a bit further from the floor, not as much as to align with the ceiling of the bench, but closer.
sara ventura wrote:- Having a higher bell, I want to keep it as slim as possible. In order to do that, would it be possible to leave part of the core outside the bell? How does it work, construction wise? Is there any thread around here where this has been done?
sara ventura wrote:-And the last twist in design would be to forget about the cob render and clad the whole build once finished with glazed tiles. The house is poor in natural light and I have to finish the build in light colors. Would refractory mortar be necessary for bonding? This way I could have a render 5cm thinner than with the cob.
What are the contraindications with tiling, besides cracking?
regards, Peter
8
A vault isn't better in long time durability, sorry about that.
What I feel now we are coming closer to a newer design, the Shorty core. This will allow to have a lower bell, higher raised core and aligning the seat with the bottom of the core.
Did you see the heater of the guy from a valley in northern Italy?
" All that is gold does not glitter; not all those who wander are lost; the old that is strong does not wither; deep roots are not reached by the frost. " J. R. R. TOLKIEN
9
sara ventura wrote:In Catalan architecture vaults are a thing, so I'm used to thinking that it's a shape that offers long time durability. But it's true Gaudi did never build masonry stoves, it makes sense that with high temps and expansion we're talking of a totally different game.
sara ventura wrote:Two first questions:
-Why is there a second door on top of the firebox on both designs?
sara ventura wrote:-In this design, the top of the bell and front wall are both lined with IBF to protect from direct heat, right?
regards, Peter
6
Both the DSR2 and DSR3 could have a second door above the firebox. Behind that second door is the afterburner space, in the Shorty core this same function is in the short riser, without the possibility of a door.
When clay/sand plaster is used, the layer would be much thinner. Applied in two layers, a shrink netting embedded in the first.
" All that is gold does not glitter; not all those who wander are lost; the old that is strong does not wither; deep roots are not reached by the frost. " J. R. R. TOLKIEN
8
For all your Montana Masonry Heater parts (also known as) Rocket Mass heater parts.
Visit me at
dragontechrmh.com Once you go brick you will never go back!
8
sara ventura wrote:For the purpose of clarification, If I wanted an oven with a shorty core, it would have to be placed above riser's exit port? Thus getting back to a much taller bell.
sara ventura wrote:-Exit flue outside the bell: Would be in the same wall as the door's firebox, cramped, and too exposed to casual contact.
-Exit flue through the roof of the bell: That leads me back to double wall insulated pipe → bigger area at the back of the core to allow gas flow. The pipe placed near the wall that transitions to the bench, thus allowing flow from 3 different directions.
Leaning for the second option, which would be the minimum space needed at the back of the core to ensure optimal operation?
sara ventura wrote:Getting back to the idea to keep tiling just for the outside top bench for longevity. How thick would be the finishing layer?
regards, Peter
6
In the Shorty design, the firebox is doubling as an oven. A friend of mine bakes his own bread, the firebox of his heater is used to that purpose during winter.
But there need to be ample space in other places of the least 5 times the chimney's cross section area, as I posted in the thread about the Pepper Shaker.
" All that is gold does not glitter; not all those who wander are lost; the old that is strong does not wither; deep roots are not reached by the frost. " J. R. R. TOLKIEN
10
In the Shorty design, the firebox is doubling as an oven. A friend of mine bakes his own bread, the firebox of his heater is used to that purpose during winter.
sara ventura wrote:That's a very interesting alternative, without any extra work. Since it's after the burnt is finished, it could be seen as a white oven? I wouldn't be using an oven that much so for occasional bakes sounds perfect!
regards, Peter
7
![[Thumbnail for Floor-plan-second-try.jpg]](/t/280192/a/283662/Floor-plan-second-try.jpg "Filename: Floor-plan-second-try.jpg
Description:")
![[Thumbnail for Front-section-second-try.jpg]](/t/280192/a/283663/Front-section-second-try.jpg "Filename: Front-section-second-try.jpg
Description:")

" All that is gold does not glitter; not all those who wander are lost; the old that is strong does not wither; deep roots are not reached by the frost. " J. R. R. TOLKIEN
8
sara ventura wrote:- I've drawn a square pillar to support the bell wall over the bench span. This leaves two openings to the bench of 35 x 40 cm. Is this room enough for optimal flow?
sara ventura wrote:- Exit flue position --> The back wall of the build has the shape of the old fireplace, and in order to keep the exit flue always in line with the wall the pipe must exit from the center of the build. Is this the best position for optimal flow? What if it was at the left back corner?
sara ventura wrote:- Bypass --> Considering the mild climate of Barcelona, high humidity all winter long, do I need one to ensure optimal starts when the system is cold?
sara ventura wrote:--> If so, could the handle exit through the roof too? This way I just need a T section on the pipe and a butterfly door. And the back seat of the bench won't have a metal handle in the middle of the way.
sara ventura wrote:- Optimal distance from the end of the pipe to the floor?
sara ventura wrote:-Firebox and riser measures are from the "shorty150 sidewinder core.skp" from https://batchrocket.eu/ontwerpen plus the thickness of my IFB that is 6.4 cm.
sara ventura wrote:-3 cm between core and side walls.
sara ventura wrote:-To calculate ISA I extracted the area of the firebox from the front wall, is that correct?
sara ventura wrote:-5 cm layer over the whole slab the build will be in, mortar + vermiculite to insulate. Same between corner walls and house wall but 3 cm thickness, will it be enough?
sara ventura wrote:-Building details: if I have a double layer of red bricks lying flat for the roof, the total thickness will be 9 cm plus the fiber blanket thickness. On top of this I plan to finish with render, shrink netting and 1.5cm glazed tiles, will this be enough mass?
sara ventura wrote:Walls will be 13 cm thick red brick and clay / sand render, the top of the bench will have also glazed tiles. IFB in front of the riser's exit port.
regards, Peter
6
Minimum distance would be 8.5 cm from the floor in this configuration. The scheduled bench is 40 cm high, I would go for 12 cm as optimum.
IFB is insulating firebricks, yes? For the firebox you'll need hard firebricks, no escaping from that. The riser/afterburner could be built out of hard firebricks as well. If you want to use IFB's, those should be the same size as the hard firebricks.
The heat will go through the insulation, conduction will be slowed down, that's all. So some heat will go into the walls around the heater, which isn't a bad thing at all, especially when those walls are internal in the house.
If you use the red bricks on edge, there will be more mass on the hot face.
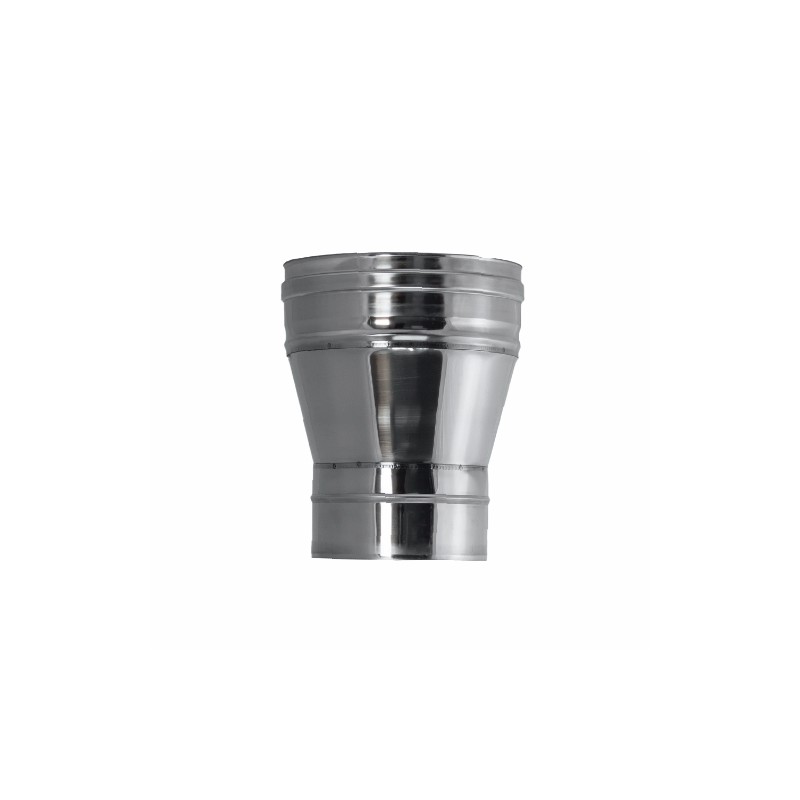
![[Thumbnail for ampliacion-acero-inoxidable-150-180.jpg]](/t/280192/a/283785/ampliacion-acero-inoxidable-150-180.jpg "Filename: ampliacion-acero-inoxidable-150-180.jpg
Description:")
![[Thumbnail for First-look.jpg]](/t/280192/a/283786/First-look.jpg "Filename: First-look.jpg
Description:")
" All that is gold does not glitter; not all those who wander are lost; the old that is strong does not wither; deep roots are not reached by the frost. " J. R. R. TOLKIEN
7
sara ventura wrote:Would it make sense to help gases flow through the exit pipe to cut the last section of the funnel? Like in the picture below
sara ventura wrote:The left wall it's underground but it must be well drained and insulated because it has no moisture issues at all, the back wall is open to the kitchen and the floor it's a slab on top of the lower floor, wild guess it's probably more than a meter of concrete foundation underneath.
sara ventura wrote:Given the size and height the top of the bell will have, I'm considering making it also sitting place like the bench.
Would it make sense to extend the heat shield of IFB to the first layer of the top? If it's two layers of red brick, it will get hotter than IBF and red brick on top?
regards, Peter
4

![[Thumbnail for Captura-de-pantalla-2026-02-19-a-les-17.42.40.png]](/t/280192/a/283965/Captura-de-pantalla-2026-02-19-a-les-17.42.40.png "Filename: Captura-de-pantalla-2026-02-19-a-les-17.42.40.png
Description:")
" All that is gold does not glitter; not all those who wander are lost; the old that is strong does not wither; deep roots are not reached by the frost. " J. R. R. TOLKIEN
4

" All that is gold does not glitter; not all those who wander are lost; the old that is strong does not wither; deep roots are not reached by the frost. " J. R. R. TOLKIEN
7
sara ventura wrote:- I've found this product, would it be suitable for tiling top bench and bell? https://www.unistara.com/en/product-/
I'd prefer to avoid high temp silicones as I imagine in case of repairs it's more difficult to get rid of.
sara ventura wrote:-The bell wall facing the riser's port exit - It will also be the face of the exterior bell that will serve as back support when sitting on the bench.
With a double skin of firebrick and red brick, what can be expected temperatures outside? Too much to rest your back on?
regards, Peter
7
sara ventura wrote:This gives me high hopes of real comfort when the Shorty is finished and the floor installed again 😊
regards, Peter
4
In short: it may be so that at the start of the heating season the heat seem to disappear, until all the walls and part of the mountain that is behind one of the walls is finally warmed up.
It might be a good idea to shape the seat's back wall with a generous layer of plaster, this will make the transfer and the top temperatures flatten out somewhat.
" All that is gold does not glitter; not all those who wander are lost; the old that is strong does not wither; deep roots are not reached by the frost. " J. R. R. TOLKIEN
5
It might be a good idea to shape the seat's back wall with a generous layer of plaster, this will make the transfer and the top temperatures flatten out somewhat.
sara ventura wrote:Can the thickness be done with clay / sand render or better to shape it with cob and render on top?
regards, Peter

|
He was expelled for perverse baking experiments. This tiny ad is a model student:
Experience months or even years of natural building and growing your own food
https://wheaton-labs.com/bootcamp
|


![[Download IZOSPAR_A.pdf]](https://permies.com/templates/default/betaview/images/download-attachment.gif)