• Post Reply Bookmark Topic Watch Topic
  • New Topic
permaculture forums growies critters building homesteading energy monies kitchen purity ungarbage community wilderness fiber arts art permaculture artisans regional education skip experiences global resources cider press projects digital market permies.com pie forums private forums all forums
this forum made possible by our volunteer staff, including ...
master stewards:
  • Carla Burke
  • Nancy Reading
  • John F Dean
  • r ranson
  • Jay Angler
  • paul wheaton
stewards:
  • Pearl Sutton
  • Leigh Tate
  • Devaka Cooray
master gardeners:
  • Christopher Weeks
  • Timothy Norton
gardeners:
  • thomas rubino
  • Matt McSpadden
  • Jeremy VanGelder

Details for a hollow log hive

 
steward
Posts: 15517
Location: Northern WI (zone 4)
4852
7
hunting trees books food preservation solar woodworking
  • Likes 13
  • Mark post as helpful
  • send pies
    Number of slices to send:
    Optional 'thank-you' note:
  • Quote
  • Report post to moderator
I have a few big chunks of cedar that are hollow in the middle.  I'm thinking I could turn them into a log hive.  

I presume that I should have two firewood lengths of this wood standing one on the other (tight fitting joint), put a roof over it and cut in some top bars for them to hang comb from.  Is that about right?

Do the bees come and go from a gap at the bottom where it sits on my homemade stand?  Or should I make a specifically sized opening?

How think should the walls of the log be?  I need to carve them out a bit since it's about a 20" log with a 4" hole in it currently.  I'm in a pretty cold area so I'm thinking a 3" wall would be a good place to start?

How big should the chunks of wood for the top bars be?

Thanks!
 
gardener & hugelmaster
Posts: 3698
Location: Gulf of Mexico cajun zone 8
1975
cattle hugelkultur cat dog trees hunting chicken bee woodworking homestead ungarbage
  • Likes 7
  • Mark post as helpful
  • send pies
    Number of slices to send:
    Optional 'thank-you' note:
  • Quote
  • Report post to moderator
Sounds about right Mike. There's a couple other permie's threads about making log hives. One or two of them have links & pics of specific builds. One used standard Langstroth frame pieces for the top bars. They are slightly over 1" wide. Roughly 1 1/32 inch wide & 3/4" thick. Using those will make it easy for inspections, which are required by some states.

I would make the bottom have as little gap as possible. I suggest making one gap there with a removable entrance reducer that can be added or removed seasonally & as the colony grows in size. Other than that a couple small holes drilled toward the top & bottom should work well. Having them in both places will help with condensation. It needs to breath just a little. The bees will seal any minor gaps they don't want or need at any given time. The upper hole gives them an exit if something (such as snow) blocks their entrance. Three inches thick walls seems like a good place to start. I'd guess six is probably not too much for Wisconsin winters.

Another thought ... I would slightly recess the top bars or hollow out enough of the top so that there is a bit of a gap between the top bars & the top cover. Otherwise the bees will probably seal them together & it could be very difficult to check on them or harvest honey without damaging their comb.
 
Mike Haasl
steward
Posts: 15517
Location: Northern WI (zone 4)
4852
7
hunting trees books food preservation solar woodworking
  • Likes 4
  • Mark post as helpful
  • send pies
    Number of slices to send:
    Optional 'thank-you' note:
  • Quote
  • Report post to moderator
Thanks Mike!  I searched around again here on permies and didn't find as much info as I was hoping.  Probably the best thread was this one: First Log Hive

Looks like a 40 liter internal cavity is a good size.  And 4" minimum wall thickness for my area.  In a youtube video a Brittish expert suggested a cavity diameter of 11-12" but I'm not sure if that was a minimum, maximum or target.  I'll have to do some math on my log.  My neighbor is taking down a huge pine tree in a month and I could get a fat section from that if my log is too small.  His won't be hollow though.

I had hoped to build a platform on the side of my sugar shack so the hive could be 7' off the ground and safe from bears.  Now that I'm imagining a big honking log up there, I'm less inclined to that approach.  But... bears...

I like the look of the single huge log with the cavity carved out from the side (in the link above) but I'm not sure how you'd harvest any honey from that.  This chunk of wood from my neighbor would be about 36" in diameter so maybe my local bears wouldn't be strong enough to topple it.  But if it needed to be in multiple sections to allow for harvesting off the top, then they could easily knock it over.
 
Mike Barkley
gardener & hugelmaster
Posts: 3698
Location: Gulf of Mexico cajun zone 8
1975
cattle hugelkultur cat dog trees hunting chicken bee woodworking homestead ungarbage
  • Likes 5
  • Mark post as helpful
  • send pies
    Number of slices to send:
    Optional 'thank-you' note:
  • Quote
  • Report post to moderator
I'm not sure there is much detailed info anywhere about log hives. There is scientific evidence that 11-12" is about right but bees don't read the same books people do. I intended to experiment with building a log hive this year but, um, stuff happened.
 
pollinator
Posts: 3769
Location: 4b
1368
dog forest garden trees bee building
  • Likes 4
  • Mark post as helpful
  • send pies
    Number of slices to send:
    Optional 'thank-you' note:
  • Quote
  • Report post to moderator

Mike Haasl wrote:This chunk of wood from my neighbor would be about 36" in diameter so maybe my local bears wouldn't be strong enough to topple it.


People here use hollowed out logs full of cookies and things like that for baiting bears.  I've never seen a log big enough that a black bear couldn't topple it easily with one hand.  They are unbelievably strong.
 
Mike Haasl
steward
Posts: 15517
Location: Northern WI (zone 4)
4852
7
hunting trees books food preservation solar woodworking
  • Likes 7
  • Mark post as helpful
  • send pies
    Number of slices to send:
    Optional 'thank-you' note:
  • Quote
  • Report post to moderator
I think you're right Trace...  

I've been noodling on this more.  I'm currently thinking about making the hive the "normal" size and then putting it on top of a cedar post.  The post would go 4-6' deep for stability and the bottom of the hive would be 7' or so off the ground.  Then I'll wrap the cedar post with single wall chimney pipe so the bears can't climb it.  I'm thinking a beefy ass 10-14" diameter post.  Then to work on the hive I'd have to do it from a step ladder.  I could put it on the downwind side of a row of pines for wind protection.  Plus then it won't be inside any fences so the bears won't have a reason to tear through them to investigate the hive.  From a distance the hive would look like a huge birdhouse on a post
 
Trace Oswald
pollinator
Posts: 3769
Location: 4b
1368
dog forest garden trees bee building
  • Likes 5
  • Mark post as helpful
  • send pies
    Number of slices to send:
    Optional 'thank-you' note:
  • Quote
  • Report post to moderator

Mike Haasl wrote:I think you're right Trace...  

I've been noodling on this more.  I'm currently thinking about making the hive the "normal" size and then putting it on top of a cedar post.  The post would go 4-6' deep for stability and the bottom of the hive would be 7' or so off the ground.  Then I'll wrap the cedar post with single wall chimney pipe so the bears can't climb it.  I'm thinking a beefy ass 10-14" diameter post.  Then to work on the hive I'd have to do it from a step ladder.  I could put it on the downwind side of a row of pines for wind protection.  Plus then it won't be inside any fences so the bears won't have a reason to tear through them to investigate the hive.  From a distance the hive would look like a huge birdhouse on a post


I think that will work much better.  Here the highway dept wraps the telephone/power poles in barbed wire to keep the bears from clawing them until they weaken them to the point they break off.  I have no idea why the bears claw the telephone poles, but I'm happy to post pictures of them if people doubt it.  You can see enormous scratch marks on the posts from some time before the barbed wire was wrapped around them.  

I would think your chimney pipe would work as well.  I haven't investigated to see which would be cheaper, but I'm guessing barbed wire may be.  Old functional barbed wire will be rusty, but can be had for free lots of places.  I have miles of it on my property from old fence lines that are long since not used.  You may be able to save money that way if it interests you.  On the other hand, if you fall off your ladder and instinctively grab the pole, barbed wire may be less than ideal
 
Mike Haasl
steward
Posts: 15517
Location: Northern WI (zone 4)
4852
7
hunting trees books food preservation solar woodworking
  • Likes 2
  • Mark post as helpful
  • send pies
    Number of slices to send:
    Optional 'thank-you' note:
  • Quote
  • Report post to moderator
I got the chimney pipe idea from a past neighbor who had 10 bird feeders hanging from a wire between several trees.  He found the only way to keep the bears off of them was with stove pipe.  It was ugly as hell though...  Which is a concern.  Barb wire would be much more subtle - Thanks!
 
Mike Haasl
steward
Posts: 15517
Location: Northern WI (zone 4)
4852
7
hunting trees books food preservation solar woodworking
  • Likes 11
  • Mark post as helpful
  • send pies
    Number of slices to send:
    Optional 'thank-you' note:
  • Quote
  • Report post to moderator
Hey, I'm back to working on this.  My neighbor's trees came down and I've been cutting and splitting like crazy.  The biggest log chunk is 21-22" diameter at the small end after the bark goes away.  So I think it would be perfect for a hive.  10-12" core with a 5" wall sounds ideal.  To get 40 liters of internal volume it only needs to be 22" tall.  I think I'd do more like 4'.  

To do my bear prevention, I'm now thinking I'll put two 12' posts in the ground (4' deep).  Then I'll lag bolt the log hive to the posts so the hive is several feet off the ground.  Ideally so the top is above easy bear reach but not too high to safely access from a 6' step ladder.  

I think I'll attempt a rough copy of Hal's log hive design from this video:


I'll put bars in the top per Michael Cox's design in the hopes that I could harvest some honey someday.  But it would be one integrated log, not cut apart chunks (due to bears...)


I'd use a chunk of the log as the roof, I'd just need a hasp system to lock it on in a way that a bear can't rip off.  Pics will be coming...
 
Trace Oswald
pollinator
Posts: 3769
Location: 4b
1368
dog forest garden trees bee building
  • Likes 3
  • Mark post as helpful
  • send pies
    Number of slices to send:
    Optional 'thank-you' note:
  • Quote
  • Report post to moderator

Mike Haasl wrote:Hey, I'm back to working on this.  My neighbor's trees came down and I've been cutting and splitting like crazy.  The biggest log chunk is 21-22" diameter at the small end after the bark goes away.  So I think it would be perfect for a hive.  10-12" core with a 5" wall sounds ideal.  To get 40 liters of internal volume it only needs to be 22" tall.  I think I'd do more like 4'.  

To do my bear prevention, I'm now thinking I'll put two 12' posts in the ground (4' deep).  Then I'll lag bolt the log hive to the posts so the hive is several feet off the ground.  Ideally so the top is above easy bear reach but not too high to safely access from a 6' step ladder.  

I think I'll attempt a rough copy of Hal's log hive design from this video:


I'll put bars in the top per Michael Cox's design in the hopes that I could harvest some honey someday.  But it would be one integrated log, not cut apart chunks (due to bears...)


I'd use a chunk of the log as the roof, I'd just need a hasp system to lock it on in a way that a bear can't rip off.  Pics will be coming...


I can't wait to see this.  What a cool project.
 
Mike Haasl
steward
Posts: 15517
Location: Northern WI (zone 4)
4852
7
hunting trees books food preservation solar woodworking
  • Likes 11
  • Mark post as helpful
  • send pies
    Number of slices to send:
    Optional 'thank-you' note:
  • Quote
  • Report post to moderator
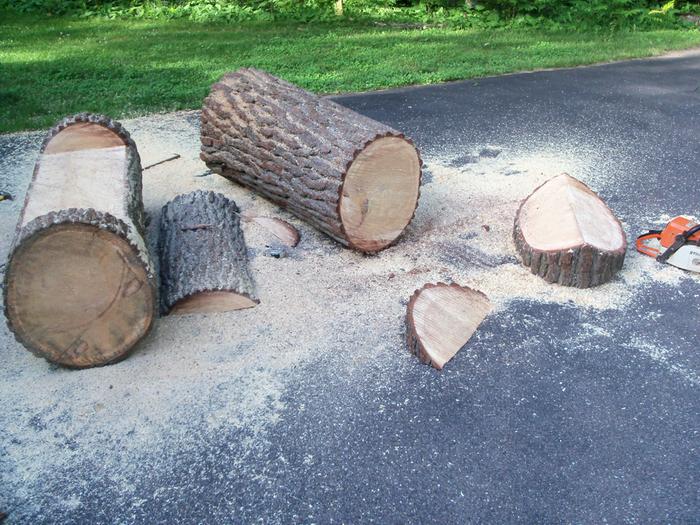
Well, I got the log home.  That was a fun job.  I cut the parent log into two 5' lengths.  The fatter end is gonna be the beehive, the smaller will be a one log bench.  I rolled it out of their yard, down the driveway, 300 yards down the road and then down my driveway.  It was fatter on one end so it kept rolling off to the left.  I'd roll it up onto a chunk of 2x4 so I could pivot it back onto the road.  Only 5 people stopped to ask what the hell I was doing :)

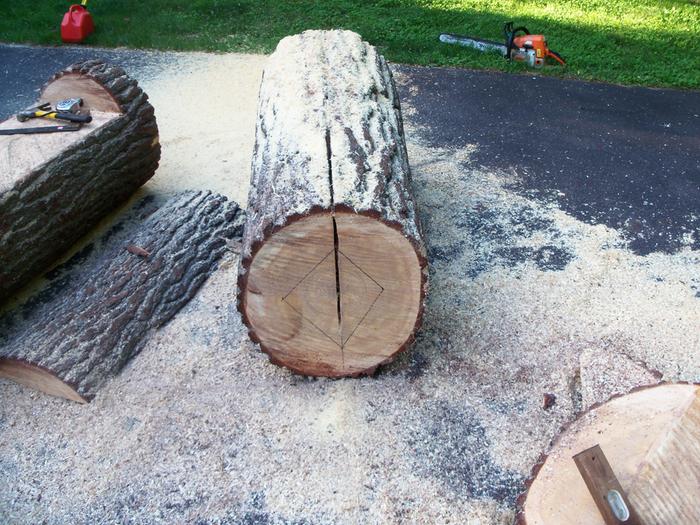
I had a few minutes this afternoon to work on it as well.  I changed the layout from Hal's video so we'll see if I did good or bad.  Instead of cutting out one quarter of the lot, I cut it in half (lengthwise.  I figure it will be easier to bolt together and the two pieces will fit together better as they shrink.

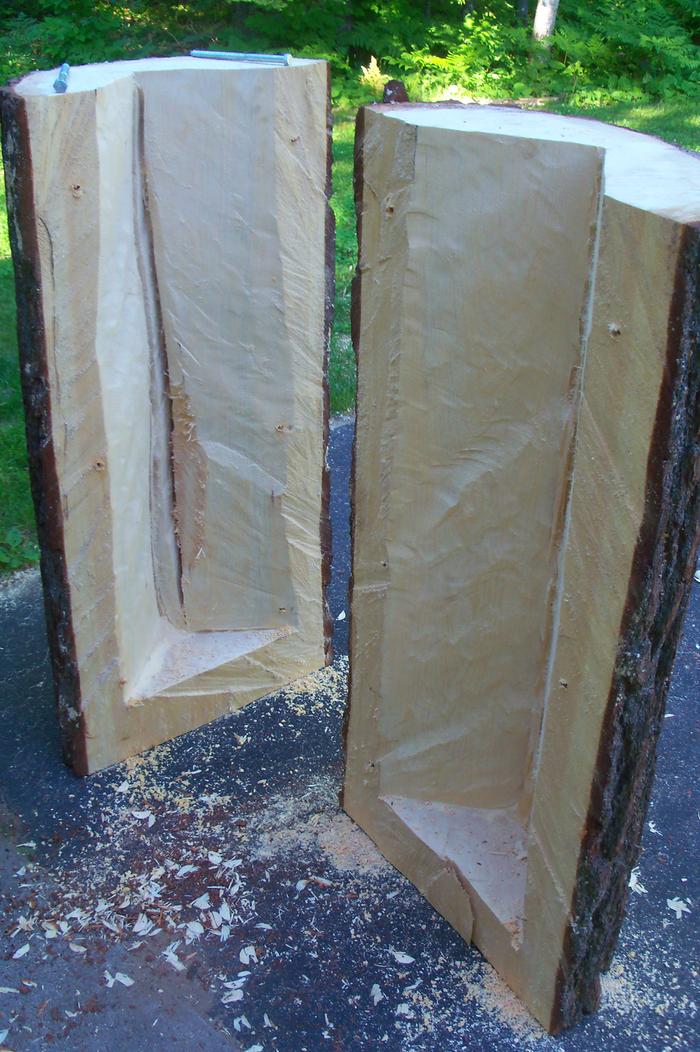
First I cut the two bevels for the roof piece, then I cut the roof piece off.  Cutting the log in half was easier than I thought it would be.  Cutting the hollow out was a bitch.  When cutting the full log in half I could stick the chainsaw's dogs/teeth into the bark and then pivot it.  With the cavity cuts I had to do all the work with my out-of-shape body.  

I heard in one youtube video that the chainsaw chain oil isn't attractive to the bees so I should remove some more wood.  I'll have to figure out how to do that next.  Tomorrow I'll lag bolt the two halves together so I can roll it off the driveway.
Rolling-the-log-home.jpg
Rolling the log home
It-started-down-a-driveway-by-the-arrow.jpg
It started down a driveway by the arrow
The-smaller-half-is-on-the-left-and-turned-into-a-one-log-bench-.-Roof-of-beehive-is-on-the-right.jpg
The smaller half is on the left and turned into a one log bench. Roof of beehive is on the right
Looking-at-the-top-end-of-the-log.-Cavity-is-marked-out.jpg
Looking at the top end of the log. Cavity is marked out
Yay-Cut-in-half.jpg
Yay! Cut in half
Yay! Cut in half
Ugh-that-job-sucked.jpg
Ugh, that job sucked
Phew-got-that-bit-done.jpg
Phew, got that bit done
 
Mike Haasl
steward
Posts: 15517
Location: Northern WI (zone 4)
4852
7
hunting trees books food preservation solar woodworking
  • Likes 10
  • Mark post as helpful
  • send pies
    Number of slices to send:
    Optional 'thank-you' note:
  • Quote
  • Report post to moderator
Got a bit more done today.  I couldn't find an angle grinder attachment for serious wood removal so I got a 36 grit sanding flapper wheel and used that to take off all the chainsaw marks.  It couldn't get into the overcuts in the corners so hopefully I got enough that it won't matter.

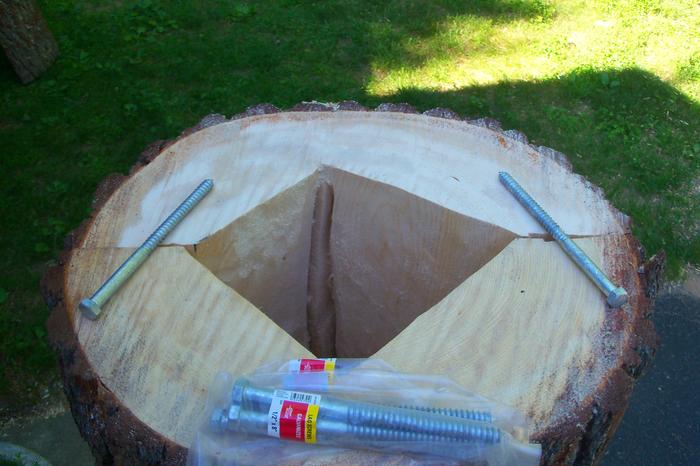
I could just barely pick up the end of them so I could get them lined up.  I ratched strapped them together and drilled for some 8" lag screws.  I wish I had a 12" long 3/8" drill bit, would've been much easier...  But I got them screwed together with 6 bolts.

Then I laid out the top bars and the opening was just perfect for 6 bars 1.375" wide.  I did a tiny bit of research that suggested that was the right size for temperate climate honeybees.  If that's wrong, please let me know asap...

I routed out the recesses for the top bars to sit in and chiseled out the corners.  

I'm assuming I need to put in some permanent cross bars for the bees to hang comb from down lower in the log.  Maybe at a few levels.  I presume that the distance they are below my bars dictates how much comb I can remove.  Any suggestions as to that distance?  I'm guessing 10-12"...
Logs-standing-up-with-lag-bolts-sitting-at-desired-angles.jpg
Logs standing up with lag bolts sitting at desired angles
Drilling-holes.-The-half-on-the-left-took-longer-to-chainsaw-cuz-I-was-cutting-too-deep-(.jpg
Drilling holes. The half on the left took longer to chainsaw cuz I was cutting too deep :(
Ready-to-route-.jpg
Ready to route!
Ready to route!
Routed-.jpg
Routed!
Routed!
 
Mike Haasl
steward
Posts: 15517
Location: Northern WI (zone 4)
4852
7
hunting trees books food preservation solar woodworking
  • Likes 6
  • Mark post as helpful
  • send pies
    Number of slices to send:
    Optional 'thank-you' note:
  • Quote
  • Report post to moderator
Didn't have much spare time today but I got the top in place and installed the two latches to hold it shut.  Hopefully if they're 8' off the ground a black bear can't get it open...
Top-latches-installed.jpg
Top latches installed
 
Mike Barkley
gardener & hugelmaster
Posts: 3698
Location: Gulf of Mexico cajun zone 8
1975
cattle hugelkultur cat dog trees hunting chicken bee woodworking homestead ungarbage
  • Likes 5
  • Mark post as helpful
  • send pies
    Number of slices to send:
    Optional 'thank-you' note:
  • Quote
  • Report post to moderator
Looking great!!!

https://permies.com/wiki/140882/Leo-Sharashkin-editor-Keeping-Bees#1105696

The Keeping Bees Naturally book we reviewed last month & another top bar reference I have both recommend 1.5" bar widths. So I think the 1.375" is close enough. Langstroth frames are barely over an inch.

Not quite sure what you meant by permanent bars in the lower section. Is that going to be considered "bees only" space?

Hard to get a sense of scale from the pix. Is it 5' tall?
 
Mike Haasl
steward
Posts: 15517
Location: Northern WI (zone 4)
4852
7
hunting trees books food preservation solar woodworking
  • Likes 3
  • Mark post as helpful
  • send pies
    Number of slices to send:
    Optional 'thank-you' note:
  • Quote
  • Report post to moderator
Thanks Mike, I didn't need to know about bees last month  Wish I had thought ahead.  This project is just an attempt to copy some of what I've seen on the youtube in the hopes of giving some swarming honeybees a place to move into.  And maybe to steal some comb from if I'm feeling frisky.

I can't find the video now but I saw one of these tall, single trunk style hives where they put cross bars randomly in the lower section for the bees to hang comb from.  They were permanently installed so I'm thinking it's "bee only" space?

It's 5' tall from the ground to the peak of the roof.  I think the roof chunk is about 10" tall.  With the bark missing it will be 22-24" diameter.  The chamber in the middle is about 8-10 inches across.
 
Mike Haasl
steward
Posts: 15517
Location: Northern WI (zone 4)
4852
7
hunting trees books food preservation solar woodworking
  • Likes 6
  • Mark post as helpful
  • send pies
    Number of slices to send:
    Optional 'thank-you' note:
  • Quote
  • Report post to moderator
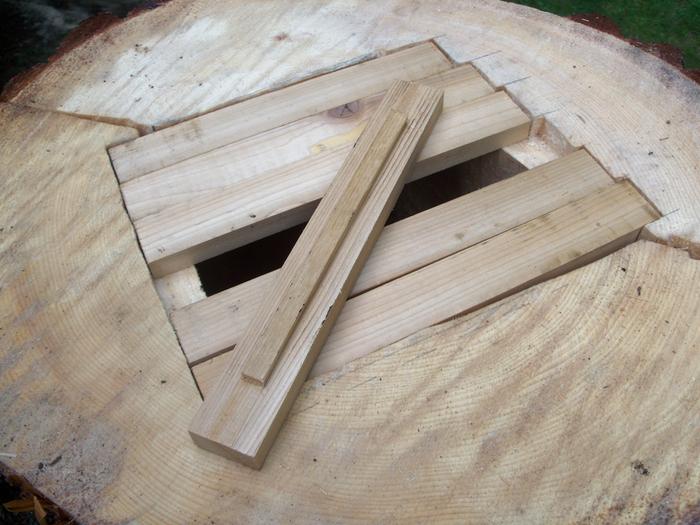
I got the top bars made today.  I made them from cedar, hopefully that's not a no-no...

The missus suggested having a way to pick them up so I added little handles and recessed out the top accordingly.
Cedar-top-bars-1.375-wide-with-3-8-wide-by-1-4-deep-comb-foundation-strip.jpg
Cedar top bars 1.375 wide with 3/8 wide by 1/4 deep comb foundation strip
Handles-and-recessed-lid.jpg
Handles and recessed lid
 
Mike Haasl
steward
Posts: 15517
Location: Northern WI (zone 4)
4852
7
hunting trees books food preservation solar woodworking
  • Likes 8
  • Mark post as helpful
  • send pies
    Number of slices to send:
    Optional 'thank-you' note:
  • Quote
  • Report post to moderator
Spent another hour or two on it today.  I found some scrap oak strips and made lower cross bars for the bees to use permanently.  I realized having a hinge on the lid would be helpful.  Now that it's on there I wish I spaced the two latches away from it so they'd be evenly distributed.  Oh well...

I melted some beeswax and coated the raised sections of the cross bars.  Lastly I drilled two entrance holes.  Per some reading I did, I put them a bit below the middle of the chamber.  I didn't put them at the bottom so that they wouldn't pick up mites coming and going.  I didn't put it up high so that they could stay warmer in the winter.  I put them close together so they could maybe defend both at the same time.

If it isn't blatantly obvious, I am not an experienced hive maker or beekeeper.  So copy me at your own peril

Next step is to roll it out to its final location and install it.  I've heard some lemongrass oil is helpful.  Where do you put it?  Around the opening?  In the hive?  On the plants around the hive?
Roof-is-hinged-.jpg
Roof is hinged!
Roof is hinged!
Bars-are-beeswaxed-.jpg
Bars are beeswaxed!
Bars are beeswaxed!
Lower-bars-in-place.jpg
Lower bars in place
Lower bars in place
 
Apprentice Rocket Scientist
Posts: 274
91
  • Likes 10
  • Mark post as helpful
  • send pies
    Number of slices to send:
    Optional 'thank-you' note:
  • Quote
  • Report post to moderator
i would like to live in a community where if you roll a log down a road most people would just nod and greet , round my way if i tried that there would be text alerts put all over and i would be posted up on a social media page---then followed home by a police car   ,still might be worth it though , i have my eye on a large piece of scotts pine trunk --just waiting for the property owner to be at home when i pass it again. Seen this idea for the chainsaw method ,as even thinking of plunge cutting by hand held freestyle  just makes my backbone turn to jelly and custard.
log-hive-hole-saw.jpg
[Thumbnail for log-hive-hole-saw.jpg]
 
Mike Haasl
steward
Posts: 15517
Location: Northern WI (zone 4)
4852
7
hunting trees books food preservation solar woodworking
  • Likes 7
  • Mark post as helpful
  • send pies
    Number of slices to send:
    Optional 'thank-you' note:
  • Quote
  • Report post to moderator
Yup, just move to the rural upper midwest and people would just consider you to be a slightly eccentric hard-worker if they see you rolling a log down the street :)

That's a cool idea for plunging a cylinder out of a tree.  I'm sure it would want to kick back but hopefully the guide would handle the forces and keep it safe.  I wonder what would happen if you get it plunged in 2" and then rotate the saw around the guide post and slowly work it deeper in.  The kerf would be larger but it would make a round hole...

Sorry, no new pictures till Monday...
 
Mike Haasl
steward
Posts: 15517
Location: Northern WI (zone 4)
4852
7
hunting trees books food preservation solar woodworking
  • Likes 6
  • Mark post as helpful
  • send pies
    Number of slices to send:
    Optional 'thank-you' note:
  • Quote
  • Report post to moderator
Ok, I made some more progress.  We picked a new spot for the hive that is a bit more out of the way but still protected from the wind.  I rummaged up some old 4x6 posts and dug a deep hole for one.  The struggle is getting the hive up in the air and attaching it to three legs and having those three legs in decent contact with the side of the hive.

So my approach was to measure how out of level one side of the hive was and put a post in the ground at that angle.  Then attach the hive to it.  Then dig the next hole and enlarge it until the post could rest flush against the side of the hive.  Then lag bolt that leg on.  Then attach the front of the hive and the roof.  Then put in the last post in a similar way.

I got all the way to putting the roof on today.  Getting the hive pieces up there required a bit of engineering creativity.  Nearing the end of this project :)

For some idea of size, the blue barrel in the picture is a 55 gallon barrel.  And the ladder is a 6 foot step ladder.
Phew-got-it-up-there-without-issue.jpg
Phew, got it up there without issue
 
Mike Barkley
gardener & hugelmaster
Posts: 3698
Location: Gulf of Mexico cajun zone 8
1975
cattle hugelkultur cat dog trees hunting chicken bee woodworking homestead ungarbage
  • Likes 3
  • Mark post as helpful
  • send pies
    Number of slices to send:
    Optional 'thank-you' note:
  • Quote
  • Report post to moderator
A drop or two of lemongrass oil goes inside the hive. I don't think it matters exactly where other than inside.
 
Mike Haasl
steward
Posts: 15517
Location: Northern WI (zone 4)
4852
7
hunting trees books food preservation solar woodworking
  • Likes 2
  • Mark post as helpful
  • send pies
    Number of slices to send:
    Optional 'thank-you' note:
  • Quote
  • Report post to moderator
Thanks Mike!  Any need to put it on the opening or can they sniff it out from inside?
 
gardener
Posts: 1174
Location: Western Washington
332
duck forest garden personal care rabbit bee homestead
  • Likes 4
  • Mark post as helpful
  • send pies
    Number of slices to send:
    Optional 'thank-you' note:
  • Quote
  • Report post to moderator

Mike Haasl wrote:Thanks Mike!  Any need to put it on the opening or can they sniff it out from inside?


I put a dab on the outside and a dab on the inside. Swarm commander from woods bee co is even better. It's lemongrass oil and queen pheromones.  It's usually $30 but lasts for a long time
 
Posts: 10
Location: 7a, Etowah, NC
  • Likes 4
  • Mark post as helpful
  • send pies
    Number of slices to send:
    Optional 'thank-you' note:
  • Quote
  • Report post to moderator
Real nice job there Mike! This beekeeper approves
 
Mike Haasl
steward
Posts: 15517
Location: Northern WI (zone 4)
4852
7
hunting trees books food preservation solar woodworking
  • Likes 10
  • Mark post as helpful
  • send pies
    Number of slices to send:
    Optional 'thank-you' note:
  • Quote
  • Report post to moderator
Thanks K.W.!  I just realized I forgot to post the finished photos.  Here it is in all its glory.   The third leg made it much more stable and a metal roof will hopefully keep it even drier.  

No bees yet but I'm hoping they'll arrive any day now (swarm).

Edit:  Yes the post on the right is bent.  I matched the bend to the best spot on the hive that matched the curve
Elevated-log-hive.jpg
Elevated log hive
Elevated log hive
 
Mike Barkley
gardener & hugelmaster
Posts: 3698
Location: Gulf of Mexico cajun zone 8
1975
cattle hugelkultur cat dog trees hunting chicken bee woodworking homestead ungarbage
  • Likes 2
  • Mark post as helpful
  • send pies
    Number of slices to send:
    Optional 'thank-you' note:
  • Quote
  • Report post to moderator
Did some bees move in yet?
 
Mike Haasl
steward
Posts: 15517
Location: Northern WI (zone 4)
4852
7
hunting trees books food preservation solar woodworking
  • Likes 2
  • Mark post as helpful
  • send pies
    Number of slices to send:
    Optional 'thank-you' note:
  • Quote
  • Report post to moderator
No  It's getting kinda cold so I think it will be vacant till next year.  The people down the road who normally have bees may not have this year.  I haven't seen many honeybees at all around here this summer.
 
  • Likes 2
  • Mark post as helpful
  • send pies
    Number of slices to send:
    Optional 'thank-you' note:
  • Quote
  • Report post to moderator
You mentioned cedar (first post)... WARNING: IT MAY KILL YOUR BEES.
Cedar is poisonous to many insects, toxic to many reptiles and chickens., so I wouldn't try it. I might if I had a surplus of bees, though.
 
pollinator
Posts: 168
Location: Ontario, Canada
54
cattle goat hugelkultur fungi foraging trees chicken fiber arts bee solar wood heat
  • Likes 7
  • Mark post as helpful
  • send pies
    Number of slices to send:
    Optional 'thank-you' note:
  • Quote
  • Report post to moderator
Had my nephew and his friend over to camp this summer. They helped me for a few hours in trying to hollow out our big log for a log hive.  It is still a work in progress.  Hopefully it will be done before the next season starts.  We have two logs. They do have a split in the middle. Maybe I can fill it with sawdust and glue?  It’s hard to find a hollow log. Even harder to roll something like this home. Our tractor could barely lift this one.
A517470A-BB62-4617-AAA0-422FC85CB9E9.jpeg
[Thumbnail for A517470A-BB62-4617-AAA0-422FC85CB9E9.jpeg]
F10CA071-D26F-46DE-BC5C-D23A198304CA.jpeg
[Thumbnail for F10CA071-D26F-46DE-BC5C-D23A198304CA.jpeg]
D9C290A4-9E87-48A7-9EA8-D29A2850D55F.jpeg
[Thumbnail for D9C290A4-9E87-48A7-9EA8-D29A2850D55F.jpeg]
 
pollinator
Posts: 261
Location: Central Virginia, Zone 7.
81
trees chicken food preservation bee solar composting
  • Likes 3
  • Mark post as helpful
  • send pies
    Number of slices to send:
    Optional 'thank-you' note:
  • Quote
  • Report post to moderator

>> You mentioned cedar (first post)... WARNING: IT MAY KILL YOUR BEES.


I spent five minutes Googling this.  Some folks, no doubt trying to be helpful, said they HEARD cedar was toxic to bees.  Ok, long ago I heard something about Richard Gere and a gerbil as well.

Others said it's toxic to chickens and reptiles, therefore ... it'll kill bees.  I don't follow the logic there.

The rest have said they have cedar hives and their bees haven't absconded, died, etc. for 20 years.


tony uljee
Apprentice Rocket Scientist
Posts: 274
91
  • Likes 3
  • Mark post as helpful
  • send pies
    Number of slices to send:
    Optional 'thank-you' note:
  • Quote
  • Report post to moderator
The worry about cedar being toxic might have come about from the cedarwood storage chests of  long ago used to store linen and clothes in and recently eco friendly cedar wood moth balls which state on the packaging as being toxic to moth ,spider and biting stinging insects like wasps  ---relatives of bees ,but the type of cedar wood tree used seems to be the spainish cedar and from the heartwood .Had to read a bit more on it as my large montery cypress , which has a strong similar scent to it ---might have  to be felled and would provide some good diameter logs ,as the large section of scotts pine i had wanted ---landed up being chainsawed into firewood.
 
master gardener
Posts: 3384
Location: Carlton County, Minnesota, USA: 3b; Dfb; sandy loam; in the woods
1652
6
forest garden trees chicken food preservation cooking fiber arts woodworking homestead ungarbage
  • Likes 3
  • Mark post as helpful
  • send pies
    Number of slices to send:
    Optional 'thank-you' note:
  • Quote
  • Report post to moderator

Mike Haasl wrote:...I think it will be vacant till next year.


Mike, that was end of summer 2020, which means you had the '21 and '22 seasons. Did your hive ever fill up?
 
Mike Haasl
steward
Posts: 15517
Location: Northern WI (zone 4)
4852
7
hunting trees books food preservation solar woodworking
  • Likes 3
  • Mark post as helpful
  • send pies
    Number of slices to send:
    Optional 'thank-you' note:
  • Quote
  • Report post to moderator
Nobody's moved in yet :(  I did some sort of essential oil to attract them (I think it was lemongrass).  This year we planted some anise hyssop around it so maybe that'll bring all the bees to the yard...
 
Mike Barkley
gardener & hugelmaster
Posts: 3698
Location: Gulf of Mexico cajun zone 8
1975
cattle hugelkultur cat dog trees hunting chicken bee woodworking homestead ungarbage
  • Likes 5
  • Mark post as helpful
  • send pies
    Number of slices to send:
    Optional 'thank-you' note:
  • Quote
  • Report post to moderator
Have you tried contacting your local beekeeper association to get on their swarm capture list?

https://wisconsinpollinators.com/Clubs.aspx
 
Mike Haasl
steward
Posts: 15517
Location: Northern WI (zone 4)
4852
7
hunting trees books food preservation solar woodworking
  • Likes 2
  • Mark post as helpful
  • send pies
    Number of slices to send:
    Optional 'thank-you' note:
  • Quote
  • Report post to moderator
Good call, I didn't know that was a thing!
 
tony uljee
Apprentice Rocket Scientist
Posts: 274
91
  • Likes 1
  • Mark post as helpful
  • send pies
    Number of slices to send:
    Optional 'thank-you' note:
  • Quote
  • Report post to moderator
I had also tried the various lure products for the first year , but nothing happened , i think what worked for me  was the use of some old hive bee wax given to me by a fellow keeper , because she uses no chems at all , does her inspections for nasties  and culls if needed  , i had  no problems in trusting it for my use  .  So gently warmed it up so i could just mould it  into a  crayon shape .  Which i used to draw and coat around the entrance   then skewered the rest with a wood spike  and wedged into the hive roof  ,   took a few weeks  during the swarming season before the first lot showed up , but they were late arriving and the following year they were struggling , numbers were very low . That hive was donated to another keeper , and he merged them with one of his nuke packages, so it kind of survived  , so i had to wait another season ---but reading up some more on this hobby ---a never ending learning curve , it seems to happen in nature or natural bee keeping practice . That sometimes a first hive finds a spot ---fails ---and the wax and scent left behind --lures  in and provides a kick start for the next hive , which happened for me , and the luck was to be there on the day the first part of the swarm showed up.  Been going strong ever since going into 4th year now , totally left them alone , they are my source of pollinators , provide some entertainment to view and observe ---have to time myself doing that as it is an addictive habit  --- and it doesn t take me long to get nothing done at all. They are also my weather prediction system , no bees around the entrance ---its going to be a cold day all day , no bees flying  --its going to be heavy rain all day  ---well roughly ---and any excuse to retreat inside next to the wood stove. They will find you and  make that  log  a hive .
 
We can walk to school together. And we can both read this tiny ad:
Christian Community Building Regenerative Village Seeking Members
https://permies.com/t/268531/Christian-Community-Building-Regenerative-Village
reply
    Bookmark Topic Watch Topic
  • New Topic