|

|
|
|
|

|

|

|

|

|
 15
15


A build too cool to miss:Mike's GreenhouseA great example:Joseph's Garden
All the soil info you'll ever need:
Redhawk's excellent soil-building series

Skill verified by Ash Jackson") 8
8
“It’s said war—war never changes. Men do, through the roads they walk. And this road—has reached its end.”

Skill verified by gir bot") 6
6
Jordan Holland wrote: Things don't always have to be complicated.
3
Visit Redhawk's soil series: https://permies.com/wiki/redhawk-soil
How permies.com works: https://permies.com/wiki/34193/permies-works-links-threads

Skill verified by Nicole Alderman")

Skill verified by Mike Haasl") 8
4
8
4
Jay Angler wrote:Trace, how did you stop the burn? Did you quench it with water, or turn it over to suffocate it the way Jordon describes, or some other way?
A build too cool to miss:Mike's GreenhouseA great example:Joseph's Garden
All the soil info you'll ever need:
Redhawk's excellent soil-building series
6
William Bronson wrote:
Whenever I think about making char, I think about capturing the heat for some use.
Doing that is never free, it always requires extra inputs, like operator involvement, refined fuels(pellets, chips, etc), and/or increased complexity of the char making apparatus.
A build too cool to miss:Mike's GreenhouseA great example:Joseph's Garden
All the soil info you'll ever need:
Redhawk's excellent soil-building series
2
5
My tree nursery: https://mountaintimefarm.com/
 6
6
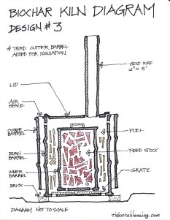
Colin Sternagel wrote:What is the purpose of leaning the barrel? Could it just be upright?
“It’s said war—war never changes. Men do, through the roads they walk. And this road—has reached its end.”
4
Colin Sternagel wrote:What is the purpose of leaning the barrel? Could it just be upright?
A build too cool to miss:Mike's GreenhouseA great example:Joseph's Garden
All the soil info you'll ever need:
Redhawk's excellent soil-building series
3
Check out Redhawk's soil series: https://permies.com/wiki/redhawk-soil
7
John Suavecito wrote:I love the innovation, Trace. Retort doesn't create enough biochar so try this. I have the same problem with retort. So you think it makes less smoke than a TLUD? I am a little confused about adding wood. Do you just add it from time to time? Do you end up adding more wood than you would to a straight up barrel?
Thanks,
John S
PDX OR
A build too cool to miss:Mike's GreenhouseA great example:Joseph's Garden
All the soil info you'll ever need:
Redhawk's excellent soil-building series
5
Check out Redhawk's soil series: https://permies.com/wiki/redhawk-soil
5
John Suavecito wrote:I have to admit I'm intrigued. Do you normally use a chimney when you use a TLUD? The tiliting "cover" is sort of like a chimney for reburning.
We are getting to the rainy, cold, dark season here, so I may have to wait until the spring to try this. I don't burn biochar in the winter because it's impractical.
Most of what I have developed in biochar is from comments from you all that got me thinking and trying stuff. I love it!
John S
PDX OR
A build too cool to miss:Mike's GreenhouseA great example:Joseph's Garden
All the soil info you'll ever need:
Redhawk's excellent soil-building series
Check out Redhawk's soil series: https://permies.com/wiki/redhawk-soil
5
Trace Oswald wrote:
William Bronson wrote:
Whenever I think about making char, I think about capturing the heat for some use.
Doing that is never free, it always requires extra inputs, like operator involvement, refined fuels(pellets, chips, etc), and/or increased complexity of the char making apparatus.
That is an area I haven't had time to explore much. I don't like the idea of wasting all that heat, but as you said, I don't know a simple way to do anything with it. I can only eat so many hotdogs :)
John Suavecito wrote:
I have to admit I'm intrigued. Do you normally use a chimney when you use a TLUD? The tiliting "cover" is sort of like a chimney for reburning.
We are getting to the rainy, cold, dark season here, so I may have to wait until the spring to try this. I don't burn biochar in the winter because it's impractical.
Most of what I have developed in biochar is from comments from you all that got me thinking and trying stuff. I love it!
John S
PDX OR
Nails are sold by the pound, that makes sense.
6
This is why I'm still putting up with only doing really small quantities in a warming tray in our wood-stove. I'm having a hard time justifying in my head doing a barrel-sized batch and not finding a good use for that heat. Coupled with the strict fire rules locally - we have summer drought and things would get *really* ugly if the area has a wild-fire go through.I have the same thoughts about the second bite at the apple, capturing the heat...
Visit Redhawk's soil series: https://permies.com/wiki/redhawk-soil
How permies.com works: https://permies.com/wiki/34193/permies-works-links-threads
7
![[Thumbnail for Biochar-chimney-lifting-device.jpg]](/t/193110/a/194428/Biochar-chimney-lifting-device.jpg "Filename: Biochar-chimney-lifting-device.jpg
Description:")
Check out Redhawk's soil series: https://permies.com/wiki/redhawk-soil
7

![[Thumbnail for barrel-hole-3.jpg]](/t/193110/a/201605/barrel-hole-3.jpg "Filename: barrel-hole-3.jpg
Description:") 8
8
Argue for your limitations and they are yours forever.

Skill verified by Mike Haasl") 6
6
Aelios Kalypso wrote:Thanks for your post Trace. Like keeping it simple. Had an idea though
As illustrated in my attached pic, what if a hole or few was made on the top end of the tilted bottom).
Would it help with the first part of the burn?
And for the 2nd part (when the barrel is stood upright again) the new hole is closed by the ground.
Wondering what y'all with more experience think. Thanks!
A build too cool to miss:Mike's GreenhouseA great example:Joseph's Garden
All the soil info you'll ever need:
Redhawk's excellent soil-building series
7
Mike Barkley wrote:That's an interesting concept Trace. I've been considering excavating a trench for charring large logs. Now I'm thinking a slanted trench with some sort of metal cover over the deep end might work better. Seems like the same basic idea as your barrel but on a larger scale.
A build too cool to miss:Mike's GreenhouseA great example:Joseph's Garden
All the soil info you'll ever need:
Redhawk's excellent soil-building series
4
Moderator, Treatment Free Beekeepers group on Facebook.
https://www.facebook.com/groups/treatmentfreebeekeepers/
6
3
Michael Cox wrote:I missed this thread previously!
This is a brilliantly simple design. I love it. I've used various processes that make a flame-cap: a hole in the ground, a long trench, a barrel cut down it's length. They all require works to some degree (digging holes, cutting barrels) - I really like that this doesn't need any of that. And to quench it you just need to put the lid on and seal it. The barrel itself is the quench!
This suits my needs really nicely. I need a portable system to take to the brash, potentially half a km away, and I have a small trailer on the back of the mower. I don't have water at the other end for quenching.
One thought - rather than stand it upright for quenching, have you considered tipping it upside down? Then all you need to do it shovel a small amount of dirt around the base to complete the seal. I've had lids on drums that don't fit brilliantly and I would worry about air leaks standing right-way-up.
Luke Cee wrote: Gave this method a try. So far I've done two batches, and each time generated about %50 of the volume of the 55-gallon barrel, so approximately 30 gallons or so; I've got about 60 gallons total.
$30 for the barrel, I tilted at about 30 degrees up from the horizontal. My feedstock was anything from small sticks to 2-3" diameter pieces I cut into lengths with a chop saw. I liked this method for the ease of assembly (or no assembly for that matter,) quality of the char, and waterless quenching. Followed instructions on adding layers, letting them ash over a bit, then adding more. I will say that adding too much at a time dropped the temp and the barrel would smoke dark yellow dirty smoke until it got back up to temp. But when the barrel was full, just tip it up, put the lid on, and place a cinderblock on top.
My lid doesn't even fit that securely, so there may be some leakage during quenching, but I let it sit overnight or for two days to make sure it's out and I'm left with a big 'ol batch of charcoal. The larger pieces I plan on cooking with on my grill (another advantage of the waterless quenching method), but will likely spread the finer uninoculated char into the chicken run to be scratched in and inoculated by their manure, all the while reducing nitrogen off-gassing and smells from the coop.
All-in-all hugely successful for the amount of time and effort (an hour or so to chop the wood to size, and another hour or two to tend the fire.) I am planning on trying a trench method next with all the random branches I have lying around; I don't feel like taking the time to cut them into pieces, and can generate probably a good bit more than 30 gallons depending on the trench size. Will just have to a buy a long hose to be able to water quench the pit, but if I'm using it strictly for biochar and not grill coals the additional water shouldn't be an issue.
Thanks Trace!
A build too cool to miss:Mike's GreenhouseA great example:Joseph's Garden
All the soil info you'll ever need:
Redhawk's excellent soil-building series

|
Hey, I'm supposed to be the guide! Wait up! No fair! You have the tiny ad!
Build a better world. Literally.
https://wheaton-labs.com/bootcamp
|