gift
PIP Magazine - Issue 19: Ideas and Inspiration for a Positive Future
will be released to subscribers in: soon!
  • Post Reply Bookmark Topic Watch Topic
  • New Topic
permaculture forums growies critters building homesteading energy monies kitchen purity ungarbage community wilderness fiber arts art permaculture artisans regional education skip experiences global resources cider press projects digital market permies.com pie forums private forums all forums
this forum made possible by our volunteer staff, including ...
master stewards:
  • r ranson
  • Nancy Reading
  • Carla Burke
  • John F Dean
  • Jay Angler
  • paul wheaton
stewards:
  • Nicole Alderman
  • Pearl Sutton
  • Anne Miller
master gardeners:
  • Christopher Weeks
  • Timothy Norton
gardeners:
  • Nina Surya
  • Matt McSpadden
  • thomas rubino

Making biochar in the wood stove

 
pollinator
Posts: 88
Location: Trumansburg, NY
38
hugelkultur forest garden fungi trees chicken food preservation
  • Likes 6
  • Mark post as helpful
  • send pies
    Number of slices to send:
    Optional 'thank-you' note:
  • Quote
  • Report post to moderator

I made this video last year and thought I'd share it here.  We've been working with this system for a few years now, and have generated a large amount of very high quality charcoal while heating our home.  Feels like a very effective way to create a continual flow of charcoal while using the heat effectively.
Would love to hear notes and ideas from folks!
 
steward
Posts: 15690
Location: Northern WI (zone 4)
4921
7
hunting trees books food preservation solar woodworking
  • Likes 1
  • Mark post as helpful
  • send pies
    Number of slices to send:
    Optional 'thank-you' note:
  • Quote
  • Report post to moderator
Hi Sean, I shared this same video of your last year .  I follow this process to make char and love it.

I started with a thin SS soup pan but after about 40 cycles it has developed holes in the bottom.  It still worked but was on its last legs so I upgraded to a steam table pan (or hotel pan).  Mine is smaller than yours, probably 6" wide by 6" tall and 12" long.  I think our stove is a bit bigger than yours but I'm happy leaving the extra space for the rest of the fire.

Mine will burn down to char in about 90 minutes.  I've found that it still keeps oxygen out even if the lid is propped open 1/4" or so on some taller chunks of wood.  As it off-gasses the wood shrinks and the lid settles down into place.  Our main fuel source is pallet slats that failed to be removed in one nice piece for pallet projects.  I set the chop saw up for 5.5" cuts and the pieces will stand up in the retort and fill it up efficiently.

When you put it outside on a cement slab, don't take the lid off to "cool it down faster".  That introduces oxygen and it will slowly build back up into a fire.  

If you pull it out of a hot fire, get it outside promptly because it can still be giving off some stinky fumes.  We usually just do one batch a day and pull the retort out of a cold fire in the morning so there aren't any fumes.

 
pollinator
Posts: 936
Location: Central Ontario
171
kids dog books chicken earthworks cooking solar wood heat woodworking homestead
  • Likes 1
  • Mark post as helpful
  • send pies
    Number of slices to send:
    Optional 'thank-you' note:
  • Quote
  • Report post to moderator
Nice video.  The pans are a great way for using up scraps. I just harvest coals for my gasifiers and biochar the dust. I used to use containers  but they wear out with time. Nice clean efficient setup. Here is my much messier rig. https://m.youtube.com/watch?v=LKZPTBA-boU
Best regards, David Baillie
 
Posts: 3
  • Mark post as helpful
  • send pies
    Number of slices to send:
    Optional 'thank-you' note:
  • Quote
  • Report post to moderator
I'm very new to biochar. Just wondering if I can use the regular charcoal I find in my wood stove in the mornings after it cools? Obviously the quantity is a lot less, but is this just the same kind of stuff?
 
pollinator
Posts: 316
Location: Yukon Territory, Canada. Zone 1a
82
transportation hugelkultur cat books cooking food preservation bike building writing rocket stoves wood heat
  • Likes 6
  • Mark post as helpful
  • send pies
    Number of slices to send:
    Optional 'thank-you' note:
  • Quote
  • Report post to moderator
Hey Lucia,
Wood pyrolized in a very low oxygen environment tends to by almost crystalline. It has a 'ring' or a 'tinkle' to it when shifted around and is very light weight. If that's the sort of charcoal you are getting, then, it will work! But if you are getting lumpy, smudgy bits of dull sounding char, that is less than good.

I use a paint-can, with a few small holes punched in the top, full of wood shards and chips during a regular burn in my wood-stove. I place the can on the ash, turn the can upside-down so it can off-gas, but not take in oxygen, and make a morning fir as per usual. It gives high quality charcoal with almost no extra work.

The higher quality charcoal has a fractal-like physical structure, giving acres of effective surface area for micro organisms to inhabit. Low quality char has a more sponge like structure and orders of magnitude less surface area.

Once you inoculate that charcoal with biological organisms, it becomes biochar.
 
master pollinator
Posts: 5213
Location: Canadian Prairies - Zone 3b
1418
  • Likes 1
  • Mark post as helpful
  • send pies
    Number of slices to send:
    Optional 'thank-you' note:
  • Quote
  • Report post to moderator
Nice summary, Chris.

I find that "tinkly char" can also be made in an actively managed open burn pit, though there is more ash content. It may not be as good, but I make wheelbarrows full at a time, so maybe that compensates a little. It's great to add stable carbon to soil, for many reasons.

Looking at Sean's excellent and well-considered video, I'm taken down memory lane, and realize how much I miss my old wood stove.
 
Posts: 68
Location: Zone 5ish, Ontario, CA
28
fungi foraging cooking fiber arts homestead ungarbage
  • Mark post as helpful
  • send pies
    Number of slices to send:
    Optional 'thank-you' note:
  • Quote
  • Report post to moderator
I love this idea and how many functions are being stacked! I think I'll have to do it. There's a huge slash pile from the property owners here, mostly invasive trees. Seems like it would be great to run them through a chipper and toss them in a hotel pan when we run the woodstove in the winter.

Yesterday I decided to sift some thoroughly cooled wood ash to separate the charcoal so I could use it as a carbon source for my compost pile (plus, some of it was pretty tinkly, so I'm hoping some of it will actually get charged).

I'm still pretty new to the idea of biochar, but it seems like lighting a fire for the express purpose of making the stuff seems wasteful unless you're using the heat. This is much more up my alley - thanks!
 
steward and tree herder
Posts: 9308
Location: Isle of Skye, Scotland. Nearly 70 inches rain a year
4452
4
transportation dog forest garden foraging trees books food preservation woodworking wood heat rocket stoves ungarbage
  • Mark post as helpful
  • send pies
    Number of slices to send:
    Optional 'thank-you' note:
  • Quote
  • Report post to moderator
I did my first trial making biochar (actually charcoal, since I'm planning an alternative use for it in due course) in our wood fired range.  From our zero waste shop, which of course isn't zero waste, I am slowly acquiring rectangular tins formerly holding olive oil.  These are just the right size for the firebox.  They could be deeper, but not bad in terms of footprint.
I have modified the tin by snipping off the top and making tabs to try and reduce the air holes. My husband welded in a core plug to replace the plastic spout.  I had hoped it would just push in, but the top of the tin is too flimsy.


We have lots of twiggy bits of alder that has been drying all summer, it was tedious to push as much into the tin as possible.  The sharp edges of the tin did not help. Then the top was replaced, also a tricky operation - I need to try and flatten the edges!.


I put it in the firebox towards the end of the evening and left the tin in overnight. There had been a smallish log put in not long before.


Final yield was slightly disappointing, the volume has reduced quite a bit and there is a bit of ash indicating that the twigs were burning a bit in there.  Either the fire was too hot, or oxygen was getting into the tin. I can try letting the fire die down a bit first when I try it again.


I can do a burn like this any time I have the fire on overnight or am letting it die out, as long as I can be bothered to refill the tin.  Hopefully this will generate enough charcoal for my project by christmas. I like the idea of keeping the heat generated in the house, and it may even stay warmer overnight for longer.
 
gardener
Posts: 1237
361
7
trees wofati rocket stoves
  • Likes 1
  • Mark post as helpful
  • send pies
    Number of slices to send:
    Optional 'thank-you' note:
  • Quote
  • Report post to moderator
Hi Nancy, I think the issue was the holes/seal of the container letting in oxygen, which let your coals burn down to ash. While you don't want a tight seal causing gas pressure buildup, there shouldn't be any visible gaps/holes in the container. That round hole in the top of the lid was sealed correct? I'd say the gaps around the edge would also need to be smoothed out.
 
gardener
Posts: 706
Location: Geraldton, Ontario -Zone 1b
274
hugelkultur forest garden foraging tiny house wood heat
  • Likes 1
  • Mark post as helpful
  • send pies
    Number of slices to send:
    Optional 'thank-you' note:
  • Quote
  • Report post to moderator

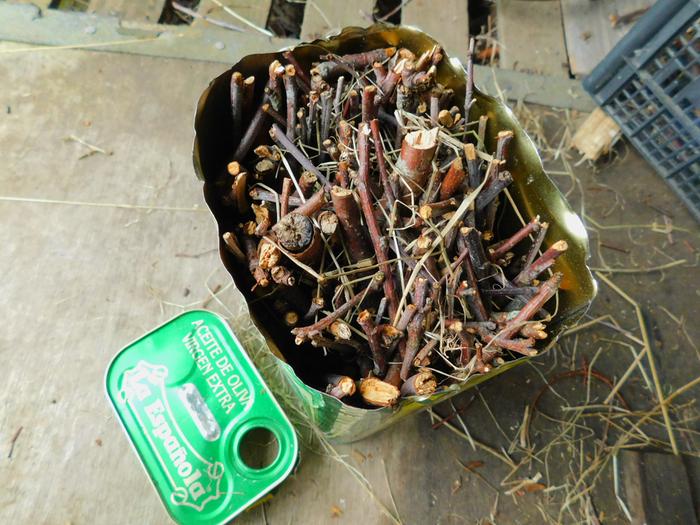
Nancy Reading wrote:

Final yield was slightly disappointing, the volume has reduced quite a bit and there is a bit of ash indicating that the twigs were burning a bit in there.  Either the fire was too hot, or oxygen was getting into the tin. I can try letting the fire die down a bit first when I try it again.


I think the important result was that you made your first batch. I've always got stuff charring, and the results of each batch help me to adjust how I do subsequent batches. If you play with your container, adjust the time it's in there and the type of material you're charring, you'll get different results. Maybe better results. My first attempts were heavily leaning toward the ash category.
 
Nancy Reading
steward and tree herder
Posts: 9308
Location: Isle of Skye, Scotland. Nearly 70 inches rain a year
4452
4
transportation dog forest garden foraging trees books food preservation woodworking wood heat rocket stoves ungarbage
  • Mark post as helpful
  • send pies
    Number of slices to send:
    Optional 'thank-you' note:
  • Quote
  • Report post to moderator
Thanks both!

Mark Brunnr wrote:Hi Nancy, I think the issue was the holes/seal of the container letting in oxygen, which let your coals burn down to ash. While you don't want a tight seal causing gas pressure buildup, there shouldn't be any visible gaps/holes in the container. That round hole in the top of the lid was sealed correct? I'd say the gaps around the edge would also need to be smoothed out.


The main hole had an engine block core plug welded in. There are a few visible holes however, welding the core plug in was tricky due to the thin steel and there are a couple of blow holes. I might have some fire cement I can use to plug them. I’ll definitely try and even out the edge overlap as well. Hopefully will get a better yield next time.
Do you think the fact the tin is on it’s side is likely to be a big problem - the gases will not be trapped by gravity at all? This is not something I can easily change with these tins.
 
Mark Brunnr
gardener
Posts: 1237
361
7
trees wofati rocket stoves
  • Likes 1
  • Mark post as helpful
  • send pies
    Number of slices to send:
    Optional 'thank-you' note:
  • Quote
  • Report post to moderator
I’ve seen setups where gases escape at the bottom and the top. The top involved monitoring and removing the container from a running wood stove while the bottom hole version was in a TLUD which would go out a little while after the volatile gases were cooked out.
 
Posts: 4
Location: St Andrews, NB
  • Mark post as helpful
  • send pies
    Number of slices to send:
    Optional 'thank-you' note:
  • Quote
  • Report post to moderator
I have been following sean's method of making charcoal in our woodstove for a couple of years now with great results (except the time I left the damper open and went to the garden and almost burned the house down, lesson learned)

we are in the process of building our forever home and we will be considerably updating our woodstove. We are almost settled on a Margin Flame View Heater (https://stovesandmore.com/product/flame-view-heater/) because it has the option to heat domestic hot water, has outside air and a front loading fire box with viewing window.

I'm hoping that the high temperatures of making charcoal won't affect the water coil? the system will be designed to "dump" the hot water into our radiant floor if the holding tank gets too hot, so I'm hoping that it won't change my ability make charcoal. The stove also has a gas reburn system that my current woodstove does not have, will this be a problem?

TIA for any advice before we pull the trigger
 
Nancy Reading
steward and tree herder
Posts: 9308
Location: Isle of Skye, Scotland. Nearly 70 inches rain a year
4452
4
transportation dog forest garden foraging trees books food preservation woodworking wood heat rocket stoves ungarbage
  • Likes 2
  • Mark post as helpful
  • send pies
    Number of slices to send:
    Optional 'thank-you' note:
  • Quote
  • Report post to moderator
I've had a few more tries of making biochar with my modified tin. I think now that the apparent low yield is mainly due to packing and shrinkage. with small uneven bits there is a lot of air and difficult to pack tightly. I've stopped making it this way though. I had a few instances where the smoke from the tin ignited with an exciting bang, which disturbs the dogs who sleep in the kitchen.
I guess the fire isn't hot enough to keep the flame going, so the fumes build up and this is making me (and the dogs nervous. Anyone found a way around this?
 
Mike Haasl
steward
Posts: 15690
Location: Northern WI (zone 4)
4921
7
hunting trees books food preservation solar woodworking
  • Likes 3
  • Mark post as helpful
  • send pies
    Number of slices to send:
    Optional 'thank-you' note:
  • Quote
  • Report post to moderator
I put mine in with a roaring fire next to it.  I want it to off-gas quickly and burn those gasses.  I don't think a smoldering fire would be good because if the gasses accumulate and then finally catch it could make a boom.  Mine is sealed well enough that I just let it sit in there till the fire is cold in the morning.  Removing it while it's hot is an option but it feels more risky so I don't tend to do that.
 
Nancy Reading
steward and tree herder
Posts: 9308
Location: Isle of Skye, Scotland. Nearly 70 inches rain a year
4452
4
transportation dog forest garden foraging trees books food preservation woodworking wood heat rocket stoves ungarbage
  • Likes 1
  • Mark post as helpful
  • send pies
    Number of slices to send:
    Optional 'thank-you' note:
  • Quote
  • Report post to moderator
Thanks Mike, Yes - that's what I'm doing wrong then. I guess I'm nervous about burning through the tin, but the explosion is certainly worse! Perhaps I'll give it another try.
 
Mike Haasl
steward
Posts: 15690
Location: Northern WI (zone 4)
4921
7
hunting trees books food preservation solar woodworking
  • Likes 3
  • Mark post as helpful
  • send pies
    Number of slices to send:
    Optional 'thank-you' note:
  • Quote
  • Report post to moderator
I think IF you burn through the tin, you'd just burn up your char and there wouldn't be any danger...  I think.....
 
pollinator
Posts: 820
Location: South-central Wisconsin
330
  • Likes 3
  • Mark post as helpful
  • send pies
    Number of slices to send:
    Optional 'thank-you' note:
  • Quote
  • Report post to moderator
My in-stove charring containers all have a hole punched in the top to let gasses escape. I've never had any of them go "bang", even when the fire smoldered. The way my containers are, the lids are only held on by gravity, so if the vent hole gets plugged the pressure still has a safe way to escape. Maybe something like that would help?
 
Mark Brunnr
gardener
Posts: 1237
361
7
trees wofati rocket stoves
  • Likes 3
  • Mark post as helpful
  • send pies
    Number of slices to send:
    Optional 'thank-you' note:
  • Quote
  • Report post to moderator
The ones I've seen on Youtube are just sitting a lid on the pan but not snapping anything shut, it's just sitting on by gravity so a small amount of pressure lets gas out, but I could see where a small lift of the lid exposes the internal gasses as well. So maybe a small hole or dent so the seal isn't perfect allows a little out non stop?
 
Nancy Reading
steward and tree herder
Posts: 9308
Location: Isle of Skye, Scotland. Nearly 70 inches rain a year
4452
4
transportation dog forest garden foraging trees books food preservation woodworking wood heat rocket stoves ungarbage
  • Mark post as helpful
  • send pies
    Number of slices to send:
    Optional 'thank-you' note:
  • Quote
  • Report post to moderator

Ellendra Nauriel wrote:My in-stove charring containers all have a hole punched in the top to let gasses escape. I've never had any of them go "bang", even when the fire smoldered. The way my containers are, the lids are only held on by gravity, so if the vent hole gets plugged the pressure still has a safe way to escape. Maybe something like that would help?


Thanks Ellandra for the suggestion. Unfortunately it is the build up of smoke in the firebox of the stove (not the biochar container) that is the problem. My container lid is quite poorly fitting, so I don't think it is too well sealed at all! We sometimes have this happen if we over-damp the stove when there is a lot of fuel in the firebox - not enough oxygen to maintain the burn then...WOOF! It's better sometimes for us to not be so stingy and just let the fuel burn.
 
Posts: 1
  • Mark post as helpful
  • send pies
    Number of slices to send:
    Optional 'thank-you' note:
  • Quote
  • Report post to moderator
Hello,

Could you please post a link for the type of metal container you are using for this purpose?

Thank you!
 
master gardener
Posts: 3846
Location: Carlton County, Minnesota, USA: 3b; Dfb; sandy loam; in the woods
1883
6
forest garden trees chicken food preservation cooking fiber arts woodworking homestead ungarbage
  • Mark post as helpful
  • send pies
    Number of slices to send:
    Optional 'thank-you' note:
  • Quote
  • Report post to moderator
It looks to me like he's using 1/3 hotel pans like these: https://www.amazon.com/Kingrol-Stainless-Counter-Service-Kitchen/dp/B0BRB2TFX4/
 
master pollinator
Posts: 1838
Location: Ashhurst New Zealand (Cfb - oceanic temperate)
564
duck trees chicken cooking wood heat woodworking homestead
  • Likes 2
  • Mark post as helpful
  • send pies
    Number of slices to send:
    Optional 'thank-you' note:
  • Quote
  • Report post to moderator
I found the 1/4 size 65 mm deep gastronorm pans to be a perfect fit for our fire. I can fit up to three in at a time. I get two seasons out of the bottoms and have yet to burn out a lid.
 
I have begun to write a book. I already have all the page numbers done! And one tiny ad:
Promoting Your Stuff on Permies for FREE!
https://permies.com/wiki/20020/Promoting-Stuff-Permies-FREE
reply
    Bookmark Topic Watch Topic
  • New Topic