|

|
|
|
|

|

|

|

|

|


 6
6


![[Thumbnail for DSCN0380.JPG]](/t/94980/a/66935/DSCN0380.JPG "Filename: DSCN0380.JPG
Description: Insulation in place ready to pour the floor")
![[Thumbnail for 20181031_104902.jpg]](/t/94980/a/66936/20181031_104902.jpg "Filename: 20181031_104902.jpg
Description: Mock up")
![[Thumbnail for 20181031_115010.jpg]](/t/94980/a/66937/20181031_115010.jpg "Filename: 20181031_115010.jpg
Description: mock up")
![[Thumbnail for 20181031_135710.jpg]](/t/94980/a/66938/20181031_135710.jpg "Filename: 20181031_135710.jpg
Description: starting to look like a rocket")
![[Thumbnail for 20181031_135719_001.jpg]](/t/94980/a/66939/20181031_135719_001.jpg "Filename: 20181031_135719_001.jpg
Description: I can hear it roaring already")
![[Thumbnail for 20181031_115048.jpg]](/t/94980/a/66940/20181031_115048.jpg "Filename: 20181031_115048.jpg
Description: some materials near by.")
For all your Montana Masonry Heater parts (also known as) Rocket Mass heater parts.
Visit me at
dragontechrmh.com Once you go brick you will never go back!
1
Silence is Golden
For all your RMH needs:
dragontechrmh.com
1
![[Thumbnail for 20181103_144939.jpg]](/t/94980/a/67096/20181103_144939.jpg "Filename: 20181103_144939.jpg
Description: bottom layer and CF core")
![[Thumbnail for 20181103_145008.jpg]](/t/94980/a/67097/20181103_145008.jpg "Filename: 20181103_145008.jpg
Description: The shop heater build gets started")
For all your Montana Masonry Heater parts (also known as) Rocket Mass heater parts.
Visit me at
dragontechrmh.com Once you go brick you will never go back!
Silence is Golden
For all your RMH needs:
dragontechrmh.com
1
For all your Montana Masonry Heater parts (also known as) Rocket Mass heater parts.
Visit me at
dragontechrmh.com Once you go brick you will never go back!
1
Eric Hammond wrote:Looking good. After researching your suggestions it seems that the heat riser with ceramic blanket is the only way to go. I was afraid to deviate from the book when building mine. I will build a shop heater in the future, and plan to incorporate a very tall riser with a brick type of bell perhaps. Looking forward to more progress.
2
For all your Montana Masonry Heater parts (also known as) Rocket Mass heater parts.
Visit me at
dragontechrmh.com Once you go brick you will never go back!
thomas rubino wrote:Note for all who wish to build with CF board.
For my next CF board core, I will build a square wooden liner. With an outside dimension the same as the inside dimension of the burn tunnel. This wooden form will burn out with the first fire and will make moving and building a ceramic fiber board core much easier.
For all your Montana Masonry Heater parts (also known as) Rocket Mass heater parts.
Visit me at
dragontechrmh.com Once you go brick you will never go back!
1
thomas rubino wrote:Hey Dan;
I used pure fireclay with no sand to stick the boards together. The whole assembly is wobbly as you move it , by having a thin wooden form inside, it would be much more stable while moving.
But more important in my eyes is not having to constantly check dimensions when surrounding with brick.
I had my bricks almost to the top of the core when I realized that I had pushed with each brick moving the top of my side walls closer together. I had 7.5 " at the bottom and 7" at the top... with a wooden form this would be a non issue.
I removed two rows of brick to correct this ... I could have had the whole core covered by now if that little boo boo hadn't happened. Wood form might take 30 minutes to make... burn out with the first fire... no brainer for me.
1
![[Thumbnail for 20181111_133404.jpg]](/t/94980/a/67363/20181111_133404.jpg "Filename: 20181111_133404.jpg
Description: getting there")
![[Thumbnail for 20181111_133418.jpg]](/t/94980/a/67364/20181111_133418.jpg "Filename: 20181111_133418.jpg
Description: you end up with quite a mess")
![[Thumbnail for 20181111_133452.jpg]](/t/94980/a/67365/20181111_133452.jpg "Filename: 20181111_133452.jpg
Description: coming along")
![[Thumbnail for 20181111_133534.jpg]](/t/94980/a/67366/20181111_133534.jpg "Filename: 20181111_133534.jpg
Description: Morgan Superwool plus")
For all your Montana Masonry Heater parts (also known as) Rocket Mass heater parts.
Visit me at
dragontechrmh.com Once you go brick you will never go back!
1
![[Thumbnail for 20181112_123802.jpg]](/t/94980/a/67423/20181112_123802.jpg "Filename: 20181112_123802.jpg
Description: shop RMH build")
![[Thumbnail for 20181112_123816.jpg]](/t/94980/a/67424/20181112_123816.jpg "Filename: 20181112_123816.jpg
Description: feed tube at full height")
![[Thumbnail for 20181112_123810_001.jpg]](/t/94980/a/67425/20181112_123810_001.jpg "Filename: 20181112_123810_001.jpg
Description: shop RMH build")
![[Thumbnail for 20181112_123837.jpg]](/t/94980/a/67426/20181112_123837.jpg "Filename: 20181112_123837.jpg
Description: shop RMH build")
![[Thumbnail for 20181112_123827.jpg]](/t/94980/a/67427/20181112_123827.jpg "Filename: 20181112_123827.jpg
Description: shop RMH build")
For all your Montana Masonry Heater parts (also known as) Rocket Mass heater parts.
Visit me at
dragontechrmh.com Once you go brick you will never go back!


My online educational sites:
https://www.pinterest.ca/joelbc/homestead-methods-tools-equipment/
https://www.pinterest.ca/joelbc/mixed-shops/
God of procrastination https://www.youtube.com/watch?v=q1EoT9sedqY
For all your Montana Masonry Heater parts (also known as) Rocket Mass heater parts.
Visit me at
dragontechrmh.com Once you go brick you will never go back!
thomas rubino wrote:Got a little time to play in the mud today. Sure is a slow process getting started. A working brick layer would be embarrassed to see my work... maybe I'll get better by the top of the bell.
Silence is Golden
For all your RMH needs:
dragontechrmh.com
1
God of procrastination https://www.youtube.com/watch?v=q1EoT9sedqY
2
For all your Montana Masonry Heater parts (also known as) Rocket Mass heater parts.
Visit me at
dragontechrmh.com Once you go brick you will never go back!
1
Silence is Golden
For all your RMH needs:
dragontechrmh.com
1
![[Thumbnail for 20181114_151222.jpg]](/t/94980/a/67596/20181114_151222.jpg "Filename: 20181114_151222.jpg
Description: starting barrel seat")
![[Thumbnail for 20181114_151211.jpg]](/t/94980/a/67597/20181114_151211.jpg "Filename: 20181114_151211.jpg
Description: Shop RMH")
![[Thumbnail for 20181114_151229.jpg]](/t/94980/a/67598/20181114_151229.jpg "Filename: 20181114_151229.jpg
Description: Shop RMH")
![[Thumbnail for download.png]](/t/94980/a/67599/download.png "Filename: download.png
Description: Shop RMH")
For all your Montana Masonry Heater parts (also known as) Rocket Mass heater parts.
Visit me at
dragontechrmh.com Once you go brick you will never go back!
For all your Montana Masonry Heater parts (also known as) Rocket Mass heater parts.
Visit me at
dragontechrmh.com Once you go brick you will never go back!
2
![[Thumbnail for 20181118_152420.jpg]](/t/94980/a/67835/20181118_152420.jpg "Filename: 20181118_152420.jpg
Description: shop RMH")
![[Thumbnail for 20181118_152428.jpg]](/t/94980/a/67836/20181118_152428.jpg "Filename: 20181118_152428.jpg
Description: shop RMH")
![[Thumbnail for 20181118_152435.jpg]](/t/94980/a/67837/20181118_152435.jpg "Filename: 20181118_152435.jpg
Description: feed tube complete shop RMH")
![[Thumbnail for 20181118_152446.jpg]](/t/94980/a/67838/20181118_152446.jpg "Filename: 20181118_152446.jpg
Description: shop RMH")
![[Thumbnail for 20181118_152532.jpg]](/t/94980/a/67839/20181118_152532.jpg "Filename: 20181118_152532.jpg
Description: Riser seat shop RMH")
For all your Montana Masonry Heater parts (also known as) Rocket Mass heater parts.
Visit me at
dragontechrmh.com Once you go brick you will never go back!
6
For all your Montana Masonry Heater parts (also known as) Rocket Mass heater parts.
Visit me at
dragontechrmh.com Once you go brick you will never go back!
1
Silence is Golden
For all your RMH needs:
dragontechrmh.com
3
![[Thumbnail for 20181122_145744.jpg]](/t/94980/a/68013/20181122_145744.jpg "Filename: 20181122_145744.jpg
Description: Rubber boots OFF for break time")
![[Thumbnail for 20181122_145623.jpg]](/t/94980/a/68014/20181122_145623.jpg "Filename: 20181122_145623.jpg
Description: Starting up with the walls")
![[Thumbnail for 20181122_145632.jpg]](/t/94980/a/68015/20181122_145632.jpg "Filename: 20181122_145632.jpg
Description: Shop RMH")
![[Thumbnail for 20181122_145532.jpg]](/t/94980/a/68016/20181122_145532.jpg "Filename: 20181122_145532.jpg
Description: Shop RMH")
For all your Montana Masonry Heater parts (also known as) Rocket Mass heater parts.
Visit me at
dragontechrmh.com Once you go brick you will never go back!
1
thomas rubino wrote:
First photo is the most important one...
Happy Wife..Happy Life !
4
![[Thumbnail for 20181123_134950.jpg]](/t/94980/a/68070/20181123_134950.jpg "Filename: 20181123_134950.jpg
Description: Shop RMH")
![[Thumbnail for 20181123_134940.jpg]](/t/94980/a/68071/20181123_134940.jpg "Filename: 20181123_134940.jpg
Description: Shop RMH")
![[Thumbnail for 20181123_135011.jpg]](/t/94980/a/68072/20181123_135011.jpg "Filename: 20181123_135011.jpg
Description: Shop RMH")
For all your Montana Masonry Heater parts (also known as) Rocket Mass heater parts.
Visit me at
dragontechrmh.com Once you go brick you will never go back!
1
James 1:19-20
Not all those who wander are lost - J. R. R. Tolkien
3

For all your Montana Masonry Heater parts (also known as) Rocket Mass heater parts.
Visit me at
dragontechrmh.com Once you go brick you will never go back!
God of procrastination https://www.youtube.com/watch?v=q1EoT9sedqY
For all your Montana Masonry Heater parts (also known as) Rocket Mass heater parts.
Visit me at
dragontechrmh.com Once you go brick you will never go back!
1
thomas rubino wrote:Hi max;
It is a diamond wheel, I just think of it as masonry blade. It still is on a hand grinder and the safe thing to do, would be to get a wet saw... Luckily I'm almost done cutting, so no need...

God of procrastination https://www.youtube.com/watch?v=q1EoT9sedqY
![[Thumbnail for 20181128_152103.jpg]](/t/94980/a/68313/20181128_152103.jpg "Filename: 20181128_152103.jpg
Description: new bricks")
![[Thumbnail for 20181128_152131.jpg]](/t/94980/a/68314/20181128_152131.jpg "Filename: 20181128_152131.jpg
Description: old bricks with \"class\"")
![[Thumbnail for 20181128_152153.jpg]](/t/94980/a/68315/20181128_152153.jpg "Filename: 20181128_152153.jpg
Description: \"special\" bricks that go around corners")
For all your Montana Masonry Heater parts (also known as) Rocket Mass heater parts.
Visit me at
dragontechrmh.com Once you go brick you will never go back!
![[Thumbnail for 20181129_135229.jpg]](/t/94980/a/68389/20181129_135229.jpg "Filename: 20181129_135229.jpg
Description: shop RMH")
![[Thumbnail for 20181129_135326.jpg]](/t/94980/a/68390/20181129_135326.jpg "Filename: 20181129_135326.jpg
Description: Shop RMH")
For all your Montana Masonry Heater parts (also known as) Rocket Mass heater parts.
Visit me at
dragontechrmh.com Once you go brick you will never go back!
1
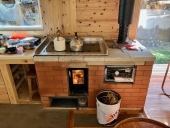
![[Thumbnail for 20181204_091533.jpg]](/t/94980/a/68544/20181204_091533.jpg "Filename: 20181204_091533.jpg
Description: Shop RMH")
![[Thumbnail for 20181204_091308.jpg]](/t/94980/a/68545/20181204_091308.jpg "Filename: 20181204_091308.jpg
Description: Shop RMh")
![[Thumbnail for 20181204_091334.jpg]](/t/94980/a/68546/20181204_091334.jpg "Filename: 20181204_091334.jpg
Description: Shop RMH heatsinks")
![[Thumbnail for 20181204_091411.jpg]](/t/94980/a/68547/20181204_091411.jpg "Filename: 20181204_091411.jpg
Description: Shop RMH heatsinks")
For all your Montana Masonry Heater parts (also known as) Rocket Mass heater parts.
Visit me at
dragontechrmh.com Once you go brick you will never go back!

|
Beauty is in the eye of the tiny ad.
Build a better world. Literally.
https://wheaton-labs.com/bootcamp
|