• Post Reply Bookmark Topic Watch Topic
  • New Topic
permaculture forums growies critters building homesteading energy monies kitchen purity ungarbage community wilderness fiber arts art permaculture artisans regional education skip experiences global resources cider press projects digital market permies.com pie forums private forums all forums
this forum made possible by our volunteer staff, including ...
master stewards:
  • Nancy Reading
  • Carla Burke
  • r ranson
  • John F Dean
  • paul wheaton
  • Pearl Sutton
stewards:
  • Jay Angler
  • Liv Smith
  • Leigh Tate
master gardeners:
  • Christopher Weeks
  • Timothy Norton
gardeners:
  • thomas rubino
  • Jeremy VanGelder
  • Maieshe Ljin
  • Likes 5
  • Mark post as helpful
  • send pies
    Number of slices to send:
    Optional 'thank-you' note:
  • Quote
  • Report post to moderator
This badge bit (BB) is part of the PEP curriculum.  Completing this BB is part of getting the straw badge in textiles.

In this project, you will make and sew a new buttonhole! You could sew it by hand or by machine.

Minimum requirements:
  - Sew a new buttonhole

To document completion of the BB, provide proof of the following as pics or video (< 2min):
  - The cloth before you made a buttonhole
  - Progress of the buttonhole
  - The finished buttonhole
  - The button going through the buttonhole to show you made it the right size

Here's a great video on how to hand sew a buttonhole:


How to use an automatic buttonhole foot on a sewing machine:


This one shows how to measure the hole size for your button:


For a nicer, more tailored buttonhole, this tutorial is very detailed and fantastic!

COMMENTS:
 
steward
Posts: 21553
Location: Pacific Northwest
12040
11
hugelkultur kids cat duck forest garden foraging fiber arts sheep wood heat homestead
  • Likes 3
  • Mark post as helpful
  • send pies
    Number of slices to send:
    Optional 'thank-you' note:
  • Quote
  • Report post to moderator
Approved submission
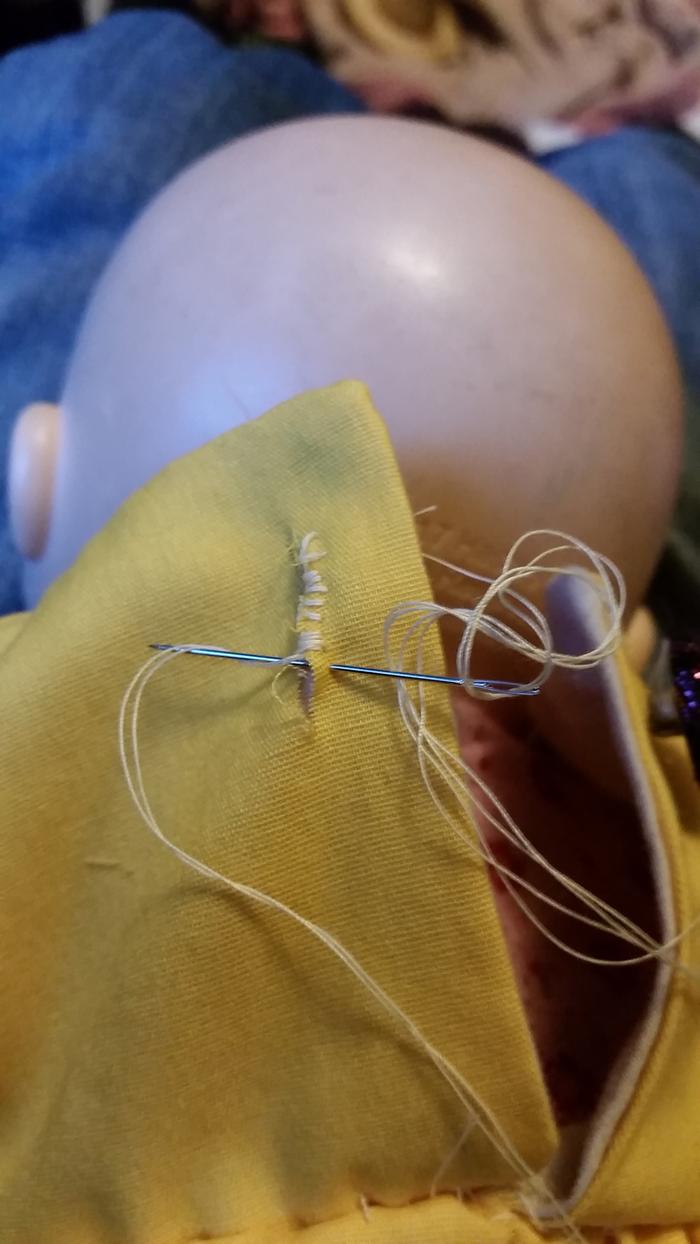
My daughter wanted a Princess Belle dress for her doll, and I ended up making and sewing my very first buttonhole in the process!
20201129_160339-Copy.jpg
Before picture
Before picture
20201129_161029-Copy.jpg
My son snapped a picture of me sewing
Closeup of my first clumsy stitches. I ended up going back over this area because it looked so bad!
20201129_161333-Copy.jpg
and close up of sewing the button hole
My son snapped this candid picture of me sewing the buttonhole
20201201_200539.jpg
Button is buttoned!
Button is buttoned!
20201129_162119.jpg
Close up of the finished buttonhole
Staff note (gir bot) :

Leigh Tate approved this submission.

 
steward
Posts: 12420
Location: Pacific Wet Coast
6991
duck books chicken cooking food preservation ungarbage
  • Likes 3
  • Mark post as helpful
  • send pies
    Number of slices to send:
    Optional 'thank-you' note:
  • Quote
  • Report post to moderator
Approved submission
To get the back-story, see here: https://permies.com/wiki/101131/pep-textiles/Sewing-button-PEP-BB-textile#1215311

I used the tutorial above. However, it was clear that my thread was too thick to use doubled, so I used it singly. It's still slightly too thick in my opinion - it didn't knot as tightly as I'd have liked, but as noted in my above link - this silk thread doesn't take kindly to knots! If I needed to do even 5 of them, by the fifth one I'd know all the tricks, but alas, this shirt needs only one.

So here's the almost finished shirt - the safety pin marks where the button hole will go:


The only salvaged buttons I had that I liked the colour of are only 1/2", so that makes it fiddly for a first time, and the picture below shows how the thread is a bit on the large side for this:


It might not look like much - but the next picture shows it really works - the slippery silk just lets the button slide right through...

and yet it's snug enough that I have no concerns about it undoing when I don't want it to. I won't convince anyone that this is a *real* 18th Century shirt, but it will keep the sun off me, and be a *real working shirt*.
Staff note (gir bot) :

Nicole Alderman approved this submission.
Note: I hereby certify that this badge bit is complete!

 
Posts: 68
Location: Northeast Indiana (zone 6a)
73
home care urban food preservation fiber arts medical herbs homestead
  • Likes 4
  • Mark post as helpful
  • send pies
    Number of slices to send:
    Optional 'thank-you' note:
  • Quote
  • Report post to moderator
Approved submission
I've been making a lot of cloth feminine pads lately, and buttons are my favorite way to close them. Since I don't currently have a machine with a buttonhole attachment, that means doing it by hand. I taught myself to hand-sew buttonholes by trial and error, and I like to think I've gotten fairly good at them.
starting.jpg
A button, but no buttonhole
cutting.jpg
Carefully cutting the buttonhole.
sewing.jpg
In progress.
In progress.
finished.jpg
The finished buttonhole.
buttoned.jpg
The button goes through but it's tight enough that it won't fall out.
Staff note (gir bot) :

Someone approved this submission.
Note: I hereby certify that this badge bit is complete!

 
Posts: 123
64
  • Likes 2
  • Mark post as helpful
  • send pies
    Number of slices to send:
    Optional 'thank-you' note:
  • Quote
  • Report post to moderator
Approved submission
I understand if the pile of fabric is not the right kind of before picture, but I feel so proud of my self and wanted to share. This is the first buttonhole I've sewn that has ever turned out right. A younger freind of mine sent me home with one of her stuffed animals to sew a leg back on and I can't sent Mrs.Lamma home naked.
20230126_183706.jpg
Before I cut any fabric.
20230126_211244.jpg
Cut for the buttonhole.
20230126_212619.jpg
 Stiched around.
Stiched around.
20230127_100051.jpg
Stiching finished.
Stiching finished.
20230127_095537.jpg
Button closed and secure.
Staff note (gir bot) :

Someone approved this submission.
Note: Nice job!

 
Posts: 72
Location: London, UK
43
urban books cooking writing
  • Mark post as helpful
  • send pies
    Number of slices to send:
    Optional 'thank-you' note:
  • Quote
  • Report post to moderator
Submission flagged incomplete
I bought a shirt from a charity shop that's a bit low cut for me so I decided to sew on an extra button and buttonhole. I haven't sewn a buttonhole before (as you can see from the relatively clumsy stitches), but with the youtube videos at the top of this page I managed to make one that works! I used 100% cotton thread for this.
Before-shirt.jpg
The shirt before (I know it's very crumpled....)
Thread.jpg
100% cotton thread
100% cotton thread
Cut-hole.jpg
Cut hole
Cut hole
First-row.jpg
The first row of stitiches. Not the best but they do the job
Finished-hole.jpg
The finished buttonhole
Button-in-buttonhole.jpg
The button in my finished buttonhole :)
Staff note (gir bot) :

Someone flagged this submission as not complete.
BBV price: 1
Note: You need to add stitching to the ends (see the pink button  hole above) because otherwise the fabric may rip and then the hole will be too large.

 
Addy Fletcher
Posts: 72
Location: London, UK
43
urban books cooking writing
  • Likes 2
  • Mark post as helpful
  • send pies
    Number of slices to send:
    Optional 'thank-you' note:
  • Quote
  • Report post to moderator
Approved submission
I corrected my buttonhole from my previous post (thank you to the person who advised me on my last post). I didn't sew all the way round the hole but this time I believe that I have. I used 100% cotton thread to create this buttonhole on a shirt I found in a charity shop.
Thread.jpg
100% cotton thread
100% cotton thread
Before-shirt.jpg
My shirt before
My shirt before
Cut-hole.jpg
The hole I cut
The hole I cut
First-row.jpg
First part of the buttonhole
Finished-buttonhole.jpg
The newly finished buttonhole with stitches going all the way around
Button-in-hole.jpg
The button in the hole
Staff note (gir bot) :

Someone approved this submission.
Note: That looks less likely to rip now!

 
Posts: 76
48
  • Likes 1
  • Mark post as helpful
  • send pies
    Number of slices to send:
    Optional 'thank-you' note:
  • Quote
  • Report post to moderator
Approved submission
Testing a dice bag pattern and- coincidentally- it requires I make my first ever button holes in step 2. I used cotton embroidery thread to match my cotton fabric.
IMG_1940.jpeg
My fabric, thread, needle, and the marking
IMG_1941.jpeg
Running stitches around
IMG_1943.jpeg
In progress
In progress
IMG_1953.jpeg
First hole done, second begun
IMG_1955.jpeg
Testing a button
Testing a button
IMG_1959.jpeg
The button fits! Snug, secure, and easily in and out.
Staff note (gir bot) :

Nicole Alderman approved this submission.
Note: I hereby certify that this badge bit is complete! Very nice looking buttonhole!

 
pollinator
Posts: 245
77
fungi foraging fiber arts medical herbs woodworking ungarbage
  • Mark post as helpful
  • send pies
    Number of slices to send:
    Optional 'thank-you' note:
  • Quote
  • Report post to moderator
Approved submission
I have made dozens of buttonholes on my machine and so decided to learn to do them by hand. It's harder than I thought to make them tidy.
20240802_172519.jpg
fabric before
fabric before
20240802_174050.jpg
in progress
in progress
20240802_181147.jpg
completed
completed
20240802_180106.jpg
button fits
button fits
Staff note (gir bot) :

Nicole Alderman approved this submission.
Note: I hereby certify that this badge bit is complete!

 
Uh oh. Gotta go. Here, you read this tiny ad. Bye!
Switching from electric heat to a rocket mass heater reduces your carbon footprint as much as parking 7 cars
http://woodheat.net
reply
    Bookmark Topic Watch Topic
  • New Topic