gift
Companion Planting Guide by World Permaculture Association
will be released to subscribers in: soon!
  • Post Reply Bookmark Topic Watch Topic
  • New Topic
permaculture forums growies critters building homesteading energy monies kitchen purity ungarbage community wilderness fiber arts art permaculture artisans regional education skip experiences global resources cider press projects digital market permies.com pie forums private forums all forums
this forum made possible by our volunteer staff, including ...
master stewards:
  • Nancy Reading
  • Carla Burke
  • r ranson
  • John F Dean
  • paul wheaton
  • Pearl Sutton
stewards:
  • Jay Angler
  • Liv Smith
  • Leigh Tate
master gardeners:
  • Christopher Weeks
  • Timothy Norton
gardeners:
  • thomas rubino
  • Jeremy VanGelder
  • Maieshe Ljin

PEP Badge: Oddball

BB oddball - sand badge
 
steward
Posts: 15505
Location: Northern WI (zone 4)
4846
7
hunting trees books food preservation solar woodworking
  • Likes 7
  • Mark post as helpful
  • send pies
    Number of slices to send:
    Optional 'thank-you' note:
  • Quote
  • Report post to moderator
Approved submission
Ok, here's a bigger submission.  Built a 17x34' cabin in the woods a few years back.  It was off the ground due to wanting to not have an expensive foundation.  This was a bit before my permie days but I did still use a lot of upcycled and recycled materials.  We had a family build week where the bulk of the framing went up so don't count hours for that.  Some details:
- Dug footer holes with a borrowed backhoe
- Made concrete and poured pilings
- Framed the posts and decking and covered it with osb
- Family came so (magic) (magic) (magic) it got framed, sheathed, housewrapped and shingled (don't count that part for points!!!).
- Wired the whole cabin including from the meter pedestal into and including the main panel
- Did not plumb it due to regulations in that county :(
- Got some used tiles and used them for the kitchen and porch floor
- Got some demo maple flooring and did the main room with that (unfinished, as-is and it worked great)
- Got a bunch of tongue and groove pine off cuts and used them for a healthy chunk of the walls and ceilings
- Got all the cedar siding from a demolition garage for siding in the bedroom
- Made the cabinets, the sliding/retractable ladder and loft railing
- Tiled the shower (never again)
- Vinyl siding, soffit and fascia install
- Trim work, doors, knobs, windows, etc

Of course I couldn't do this full job all by myself.  My darling wife was by my side.  I did all the skilled work, she helped holding and nailing things from time to time.  She really helped with the insulation.  I'd say I did 99% of the skilled work and 80% of the work overall so feel free to ding the points accordingly.

It took about 2 years to complete.  The footings were done in the first fall, by the second fall we just got the vapor barrier and stove in before it snowed.  I had a flexible work arrangement where I had alternating 2 and 4 day weekends.  They were mostly all consumed with this project for that whole time.  Plus building cabinetry, prepping reclaimed materials and other tasks in the evenings at home.


Framing-for-main-footprint-of-the-cabin.jpg
Framing for main footprint of the cabin
Wow-family-rocks-Did-all-this-in-a-week-).jpg
Wow, family rocks! Did all this in a week :)
Temporary-cabin-in-the-background.-Putting-on-siding....jpg
Temporary cabin in the background. Putting on siding...
Ceiling-boards-(reclaimed-with-a-shadow-mark-that-would-later-get-covered-with-a-fake-beam)-in-the-porch.jpg
Ceiling boards (reclaimed with a shadow mark that would later get covered with a fake beam) in the porch
Tiling-with-used-tiles-(still-had-grout-on-the-back).jpg
Tiling with used tiles (still had grout on the back)
Siding-in-the-living-room.jpg
Siding in the living room
Habitat-Restore-door-of-course....jpg
Habitat Restore door of course...
Working-in-the-attic.jpg
Working in the attic
(Pic-out-of-order)-Insulation-isn-t-fun.jpg
(Pic out of order) Insulation isn't fun
Reclaimed-garage-siding-in-bedroom.jpg
Reclaimed garage siding in bedroom
More-tile-and-now-doing-trim-work.jpg
More tile and now doing trim work
Sexy-library-ladder.-Reclaimed-wood-floor.-Cubbies-along-attic-walls.jpg
Sexy library ladder. Reclaimed wood floor. Cubbies along attic walls
Bottom-8-of-ladder-hinge-up-to-get-it-out-of-the-way-when-not-in-use.-Yes-they-locked-in-the-extended-position-).jpg
Bottom 8 of ladder hinge up to get it out of the way when not in use. Yes, they locked in the extended position :)
One-of-many-loads-from-home.-Homemade-cabinetry.jpg
One of many loads from home. Homemade cabinetry
Purty-much-done-at-this-point.jpg
Purty much done at this point
Earlier-view-from-the-other-side.jpg
Earlier view from the other side
Staff note (gir bot) :

paul wheaton approved this submission.
Note: lotsa otis charm. lotsa piano factor and pep factor.  360 points

 
pollinator
Posts: 259
Location: New Zealand
307
chicken food preservation fiber arts woodworking homestead
  • Likes 2
  • Mark post as helpful
  • send pies
    Number of slices to send:
    Optional 'thank-you' note:
  • Quote
  • Report post to moderator
Approved submission
Fixing the hook timing on a treadle sewing machine

My reliable treadle Singer started having trouble after sewing through some nylon netting. After an incident where the thread got caught between the needle and bobbin, it wouldn't set any stitches anymore. I discovered that was because, in trying to pull the thread free, I'd badly messed up the hook timing (the point at which the hook grabs the thread from the needle).

To fix it, I opened up the casing, brought the machine to the first set point, and then checked the second set point. This revealed that the hook was miles away from the needle at the second set point. To fix it, I brought the hook forward to where it was just touching the needle at the second set point. After re-assembly, it worked great!

This was a valuable maintenance lesson, and I am now able to relatively easily fix the machine if I sew something that's a bit too holey and get a thread tangle which can then upset the hook timing.
mb-bb-oddball-14-hook-timing-1.JPG
Taking off the face plate and looking at the two set points
mb-bb-oddball-14-hook-timing-2.JPG
Rotating around to the first and second set point
mb-bb-oddball-14-hook-timing-3.JPG
Hook is way out at the second set point! Fixed.
mb-bb-oddball-14-hook-timing-4.JPG
Machine sews beautifully after the adjustment!
Staff note (gir bot) :

Someone approved this submission.
Note: Approved for 1/2 oddball point!

 
gardener
Posts: 1179
Location: Eastern Tennessee
520
homeschooling forest garden foraging rabbit tiny house books food preservation cooking writing woodworking homestead
  • Likes 1
  • Mark post as helpful
  • send pies
    Number of slices to send:
    Optional 'thank-you' note:
  • Quote
  • Report post to moderator
Approved submission
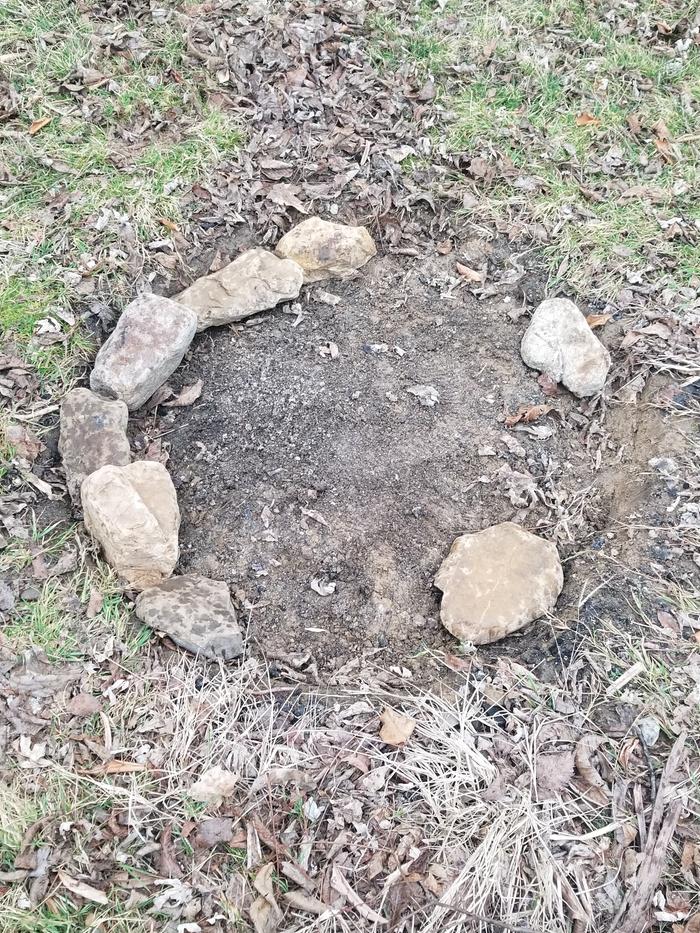
The area behind our house had an ugly burn pit. It was filled with melted plastic, deteriorated metal, and other trash. It was a glorified pile of trash.


We spent time digging out the trash and throwing it away. Since there was no way to know what had been contaminated, it all went to trash. To be extra safe, we dug down into the soil to remove any potential contamination.

Next we gathered stones from the property and created a fire ring. All told, it is a dramatic improvement and we'll be enjoying s'mores in the near future!

This was done over a few days as time allowed. All told, it was about an hour and a half of work. Technically it took closer to 2, but that's because my children wanted to help and don't have a sense of urgency to their movements. :)
Staff note (gir bot) :

Mike Barkley approved this submission.
Note: Certified for 1/2 oddball point.

 
D. Logan
gardener
Posts: 1179
Location: Eastern Tennessee
520
homeschooling forest garden foraging rabbit tiny house books food preservation cooking writing woodworking homestead
  • Likes 2
  • Mark post as helpful
  • send pies
    Number of slices to send:
    Optional 'thank-you' note:
  • Quote
  • Report post to moderator
Approved submission
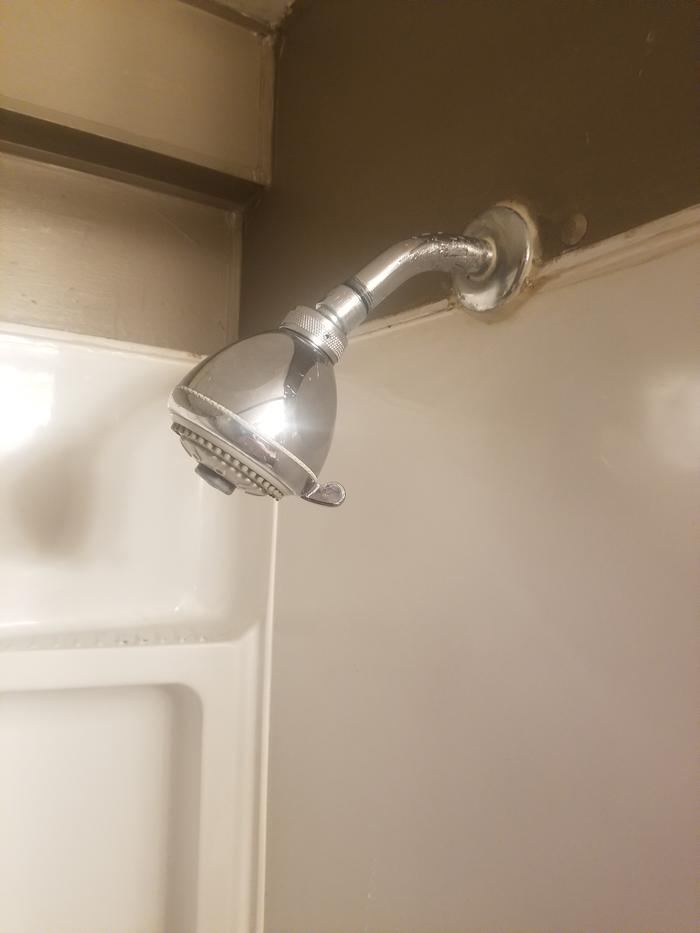
I honestly thought replacing a shower head was in plumbing pep somewhere, but didn't find it. Maybe I missed it since this is via my phone. If so, let me know and I will repost there instead. For now, I will assume that the task didn't make the cut for the plumbing badge and post here instead.

My wife prefers a shower head that has an extending hose setup, so I replaced the current one. Nothing exciting. I just removed the existing one, added new thread tape, then installed the new one. Nothing fancy here.


Staff note (gir bot) :

Mike Barkley approved this submission.
Note: Certified for 1/2 oddball point.

 
Posts: 123
64
  • Likes 2
  • Mark post as helpful
  • send pies
    Number of slices to send:
    Optional 'thank-you' note:
  • Quote
  • Report post to moderator
Approved submission
I incubated and hatched chickens for the first time. I've done Turkeys before and I've got to say chickens are way easier. Even counting that the dog knocked the incubator over and what I was able to glue back together with nail polish had to be hand turned the last week. Of what hatched 5/7 was cracked.
20230105_094621.jpg
Start of incubation.
20230109_003427.jpg
Day 17. Jan 9
Day 17. Jan 9
20230120_211701.jpg
Jan 20
Jan 20
20230120_224311.jpg
Dog knocked over incubator.
20230125_165527.jpg
First eggs piping.
First eggs piping.
20230125_170133.jpg
Slithering out.
Slithering out.
20230125_170544.jpg
Just hatched.
Just hatched.
20230125_171611.jpg
Trasport to brooder.
20230127_110720.jpg
7 hatched.
7 hatched.
Staff note (gir bot) :

Someone approved this submission.
Note: Certified for 1/2 point

 
pollinator
Posts: 196
Location: In the foothills of the Blue Ridge Mountains
118
homeschooling cat personal care foraging trees hunting books food preservation fiber arts medical herbs writing
  • Mark post as helpful
  • send pies
    Number of slices to send:
    Optional 'thank-you' note:
  • Quote
  • Report post to moderator
Submission flagged incomplete
I am not sure if this project is big enough to receive points, but I figured I would throw it out here.

I made a Haybox with a cardboard box I had on hand, brown paper, and some of my spare blankets.
DSCN1180.JPG
My materials and a doggie photo bombing XD
DSCN1181.JPG
The time. 10:00 AM
The time. 10:00 AM
DSCN1182.JPG
First layer, brown paper.
DSCN1183.JPG
Pot to check size.
Pot to check size.
DSCN1184.JPG
Third layer, blanket
DSCN1185.JPG
Fourth, another blanket
DSCN1186.JPG
A bit more cardboard
DSCN1187.JPG
Another blanket on top
DSCN1188.JPG
And all closed up
And all closed up
DSCN1189.JPG
All done, and time. 10:20 AM
Staff note (gir bot) :

Someone flagged this submission as not complete.
BBV price: 1
Note: I think it's a bit shy.  If a pro, with the materials/tools at hand, can do it in under 7 minutes, it's too small.  I think they could do that in under 7 minutes.  Sorry but thanks for posting!

 
Posts: 60
31
food preservation woodworking homestead
  • Likes 3
  • Mark post as helpful
  • send pies
    Number of slices to send:
    Optional 'thank-you' note:
  • Quote
  • Report post to moderator
Approved submission
Here is my oddball submission for restoring dried out rake and shovel handles by sanding + linseed oil application.

There are BB's for sharpening, but none currently appear to exist for restoring handles in this way. I posed the question in Mike's BB Clarification Thread where it was agreed this task seems appropriate as an oddball sub for now.

sand_oil_long_handles_before.JPG
Dried out handles
Dried out handles
sand_oil_long_handles_before2.JPG
Dried out handles
Dried out handles
sand_oil_long_handles0698.JPG
SuperTuff cloths work well and are reusable, but you could use other recycled cloth for the job
sand_oil_long_handles0760.JPG
After sanding, a small amount of linseed oil on the cloth works well. I did 3 coats over 2 days + burnished the handles afterward
sand_oil_long_handles0701.JPG
Comparison
Comparison
sand_oil_long_handles0762.JPG
After
After
sand_oil_long_handles0757.JPG
Sanding / first layer of oil ~ 1 hour, subsequent oil layers ~15 minutes each (2 additional THIN layers), burnishing ~ 10 minutes.
Staff note (gir bot) :

Someone approved this submission.
Note: Certified for 1 oddball point

 
master gardener
Posts: 3289
Location: Carlton County, Minnesota, USA: 3b; Dfb; sandy loam; in the woods
1603
6
forest garden trees chicken food preservation cooking fiber arts woodworking homestead ungarbage
  • Mark post as helpful
  • send pies
    Number of slices to send:
    Optional 'thank-you' note:
  • Quote
  • Report post to moderator
Approved submission
Two years ago I was in the midst of putting in a hickory floor. I've gone back and scraped together some thorough documentation so that I can submit that project as an oddball BB. There is a flooring BB in Dimensional Woodworking, but this doesn't qualify for that because the wood we used was treated with a polyurethane finish that the mill put on when they were making it for us. There was a lot of planning and research and buying tools and supplies that went into it first, but I laid the first plank on 19 Dec 2020 and the last one on 24 May 2021. I used hickory, which caused more bent and reshot nails than I would have had with a softer wood, but we love, love, love it. The boards are ~2/3 3.25" and ~1/3 4.25" wide. The total job is about 1072 square feet. I have no idea what a professional installer would have taken to complete this but I think it was in the neighborhood of 80 hours of work for me -- I'm thinking of it as roughly 20 4-hour chunks of time. My wife did ~1% of the work and my daughter did ~5%.

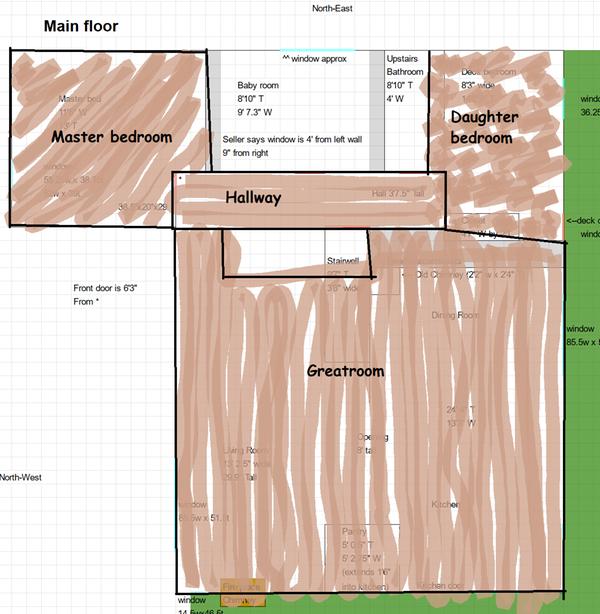
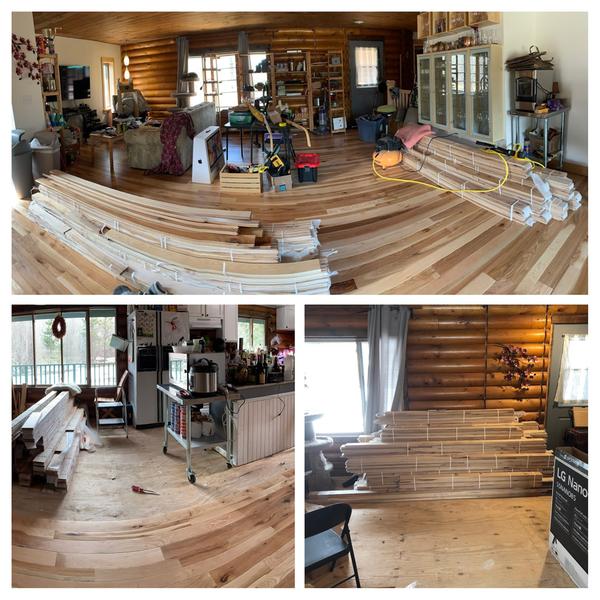
We mapped out the floor plan in a spreadsheet which we used a reference with the remodeling crew. I've taken a copy of that and drawn over it to indicate the rooms that I was flooring. When we moved in, we were on bare plywood for a few months. We ordered the flooring at the mill eight months before we moved in and it was delivered two months earlier than they said it would be -- apparently Covid was slowing their business so they got to us quickly. The pile of wood had to be moved around several times before we moved in and then after as we figured out how to live and work around it.


There was a lot of figuring things out -- which direction would the planks run, what lines could we count as straight, where would transitions take place, how would the flooring interact with the baseboard and door-trim. Even, how do these tools work?


Eventually, it was time to put the first board down. I was starting in the hallway, right in front of the bathroom door. It was the only floor to run "east-west" and all other rooms would be at 90-degrees to that. Learning to make those transitions nice took time and mistakes, some of which are still there, but I'm the only one they bother.


It's interesting -- in my head, we did my daughter's bedroom next, but getting the pictures all together clearly shows we did our master bedroom first. Kivi came up with the idea of writing secret messages on the subfloor in her room, and I took that and did a tape outline of a body in ours. :-)
 

By the time I got started on Kivi's room, I felt like I mostly knew what I was doing. There were some tricks, like fitting the planks around her exterior doorway, and mating to her closet opening, but it wasn't rocket-science.


The greatroom is larger than all the flooring I'd done so far, but clean sweeps of coverage go pretty quickly. It's all the fitting around corners and walls that aren't quite straight that takes the real work. And moving furniture out of the way and then back onto the finished surface, and especially that giant pile of wood!


The kitchen is just part of the greatroom, but it also involved demolishing the cabinetry that was there when we moved in, rebuilding and truing up the subfloor, and coordinating with the cabinet shop and granite countertop people for when they were bringing the new stuff in so that we could minimize the time we were without a kitchen. Also, we thought the sloped face of the patch of tile in front of the front door was attractive, but it was a little bit of a bitch to work around because the tile guy didn't get it quite perfectly 45-degrees, so I had to do quite a bit of exploratory cutting to get it just right.


At that point it was such a relief to be done, but I had to go back and finish the two closets that I'd left undone.
Staff note (gir bot) :

Someone approved this submission.
Note: Nice job!  Certified for 35 points

 
Bethany Paschall
pollinator
Posts: 196
Location: In the foothills of the Blue Ridge Mountains
118
homeschooling cat personal care foraging trees hunting books food preservation fiber arts medical herbs writing
  • Mark post as helpful
  • send pies
    Number of slices to send:
    Optional 'thank-you' note:
  • Quote
  • Report post to moderator
Submission flagged incomplete
VA is starting to warm up and the maples, cherries, and peaches are starting to bud.  I am planning to expand my herb garden and now is the time to start seedlings. With any luck, I will add almost a score of new varieties of plants to my collection. I will put my list and how many plantings below.

Tarragon-2
Lobila-6
Calendula-4
Comfrey-16
Chamomile-6
Angelica-4
Arnica-6
Tulsi-4
Basil-2
Bee Balm-6
Dill-4
Echinacea-6?
Valerian-4
Lovage-4
Lavender-8
Toothache plant-4
Mullein-6
Elecampane-6
Hyssop-4

Below are ones that I scatter sowed in a small containers
Chives
Garlic chives
Bunching onions
Creeping thyme
Spearmint

Filling pots, planting, topping, and watering along with some last minute choices took an hour and fifteen minutes.
DSCN1216.JPG
My planting trays, the smaller containers are where I planted the lower list
DSCN1218.JPG
Planting
Planting
DSCN1221.JPG
Trays and containers planted
DSCN1223.JPG
Cramp bark seeds are so pretty!
DSCN1224.JPG
Topping off with soil
DSCN1226.JPG
A very blurry picture of me watering.
DSCN1227.JPG
All done. The top two trays were done yesterday with veggies, so they are not part of this project.
Staff note (gir bot) :

Someone flagged this submission as not complete.
BBV price: 1
Note: I'm sorry Bethany but Gardening things don't count in oddball.  I'm so sorry.  Here's the bit about it from the first post "Any projects that are in the Food Prep and Preservation or Gardening realm do not count here in Oddball. "

 
Bethany Paschall
pollinator
Posts: 196
Location: In the foothills of the Blue Ridge Mountains
118
homeschooling cat personal care foraging trees hunting books food preservation fiber arts medical herbs writing
  • Likes 2
  • Mark post as helpful
  • send pies
    Number of slices to send:
    Optional 'thank-you' note:
  • Quote
  • Report post to moderator
Alright. Sorry I missed that part of the instructions. Still glad I have those planted
 
when your children are suffering from your punishment, tell them it will help them write good poetry when they are older. Like this tiny ad:
GAMCOD 2025: 200 square feet; Zero degrees F or colder; calories cheap and easy
https://permies.com/wiki/270034/GAMCOD-square-feet-degrees-colder
reply
    Bookmark Topic Watch Topic
  • New Topic