• Post Reply Bookmark Topic Watch Topic
  • New Topic
permaculture forums growies critters building homesteading energy monies kitchen purity ungarbage community wilderness fiber arts art permaculture artisans regional education skip experiences global resources cider press projects digital market permies.com pie forums private forums all forums
this forum made possible by our volunteer staff, including ...
master stewards:
  • John F Dean
  • Carla Burke
  • Nancy Reading
  • r ranson
  • Pearl Sutton
  • Jay Angler
stewards:
  • Liv Smith
  • paul wheaton
  • Nicole Alderman
master gardeners:
  • Christopher Weeks
  • Timothy Norton
gardeners:
  • thomas rubino
  • Matt McSpadden
  • Eric Hanson

PEP Badge: Oddball

BB oddball - sand badge
 
steward
Posts: 21498
Location: Pacific Northwest
11988
11
hugelkultur kids cat duck forest garden foraging fiber arts sheep wood heat homestead
  • Likes 3
  • Mark post as helpful
  • send pies
    Number of slices to send:
    Optional 'thank-you' note:
  • Quote
  • Report post to moderator
Approved submission
I couldn't find anywhere to post this in round wood woodworking badge or the woodland care badge, so I guess I'll be posting this here!

I cut two of the trees used for this (submitted one for drop 6” to 8” live tree with a bow saw BB), and pealed four trees (two of the trees were for the Peal 2 live trees and put up off the ground to dry BB).

My father and husband drilled four of the holes. The rest were hand drilled with me with a human-powered drill. My husband also helped drop the giant log into the hole, because there was no way I could move that by myself! Other than that, I did all the work. I dug all four post holes 2-feet deep. There's no nail, no glue. All the wood came from my property. The only imported material was the twine that I waxed with beeswax to use for the upper lashing. I carved all the pegs by hand, as well as all the notches on the upper rungs.

three posts installed


all four posts installed, picture thanks to my son (taken so I could see if it was level!)


back beam rests in the Y, and then through a hole in the other post. Forward beam has holes drilled through and rests on the pegs I carved on the posts


lots of pegs, hand carved to match drill bit sizes


the cross-beams had notches carved in them, and then were lashed in place with beeswaxed twine. These are just to support the grape vine


it is finished!


view from under. These small cross beams on the support posts were actually branches. So I thought I'd just drill a hole and stick them in!


view from the other side
Staff note (gir bot) :

Mike Barkley approved this submission.
Note: Sometime oddball points are hard to determine. This took a lot of work & demonstrates some great permies values so I'm certifying this or 4 oddball points.

 
Posts: 64
Location: Niagara Falls, Ontario, Canada
66
3
food preservation woodworking rocket stoves
  • Likes 5
  • Mark post as helpful
  • send pies
    Number of slices to send:
    Optional 'thank-you' note:
  • Quote
  • Report post to moderator
Approved submission
I made a couple narrow beds for our climbers using scrap wood and mostly reclaimed screws. Took about 30 mins.
430B1D9C-515D-4CF2-8B50-3AA336DC56B0.jpeg
Starting materials
Starting materials
A9E71B6C-CF80-499A-A227-E9E6A7F209FD.jpeg
Wood cut to size
Wood cut to size
EC83A72C-986F-4D61-964F-01E2E62B7582.jpeg
In progress
In progress
E9C82DEE-5053-4796-A026-E2CC0FA2085B.jpeg
Finished
Finished
D853E48D-F247-448F-80AD-75D46CE8A0E1.jpeg
Final location
Final location
Staff note (gir bot) :

Mike Barkley approved this submission.
Note: I certiy this for 1 oddball point.

 
gardener
Posts: 325
Location: NW Washington - Zone 8b (15 to 20 °F / -9.4 to -6.7 °C)
269
2
cattle goat foraging trees earthworks cooking building solar sheep wood heat
  • Likes 5
  • Mark post as helpful
  • send pies
    Number of slices to send:
    Optional 'thank-you' note:
  • Quote
  • Report post to moderator
Approved submission
One of the backhoe stabilizer hydraulic cylinders has had a slow leak that is making a mess on the floor and causing me to have to top off the hydraulic fluid occasionally. So I disassembled the stabilizer and took the cylinder into a hydraulics shop to have the cylinder seals replaced, and then reassembled the stabilizer and now there is no leaking hydraulic fluid.
20210507_182909.jpg
Mess on the floor where I park the backhoe.
20210421_182942.jpg
Extra safety precaution using straps to prevent collapse without hydraulic pressure.
20210421_182929.jpg
Leaky cylinder before disassembly.
20210421_183002.jpg
Removed retaining ring and washer and start driving pin.
20210421_183011.jpg
Tools I used for disassembly.
20210421_184152.jpg
Hydraulic lines removed, pins driven out, cylinder removed.
20210507_180304.jpg
Cylinder fixed and ready to install.
20210507_180748.jpg
First pin reinstalled and retaining ring and washer in place.
20210507_182303.jpg
Second pin reinstalled, retaining ring in place, hydraulic lines reconnected.
20210507_190701.jpg
Testing that it can lift the backhoe off the ground without leaking.
Staff note (gir bot) :

Someone approved this submission.
Note: Certified for 1 oddball point

 
gardener
Posts: 1565
Location: Washington State
982
6
forest garden trees rabbit earthworks composting toilet fiber arts sheep wood heat woodworking rocket stoves homestead
  • Mark post as helpful
  • send pies
    Number of slices to send:
    Optional 'thank-you' note:
  • Quote
  • Report post to moderator
Here is my submission for Oddball Points.

I built a 3-log bench but not to the roundwood BB requirements:
  - Saddle notches to join the seat and base logs (saddles are on the base logs)
  - 7'-9" overall length for the bench
  - 17" height to the seat top
  - freehand chainsaw cut top (not hewn so does not qualify for Roundwood BB)
  - peeled logs - from the 14-inch DBH tree I felled, limbed, and peeled last fall

To document the completion of the BB, I have provided:
  - The three log chunks that you are starting with
  - your three log chunks shaped
  - final product showing length and height

I used my Stihl chainsaw to freehand mill my peeled log into two half-rounds


two base-log chunks and two benchtops sitting on a 6-ft wide trailer


measuring how deep the saddle notches need to be (before cutting)


cutting the notch


finished and at the campfire


height: 17" showing saddle notch


length: 93" or 7'9"


pollinator
Posts: 111
Location: North Texas USDA Zone 8a Climate Zone 3A
92
5
kids hugelkultur dog forest garden foraging rabbit books chicken bee
  • Likes 2
  • Mark post as helpful
  • send pies
    Number of slices to send:
    Optional 'thank-you' note:
  • Quote
  • Report post to moderator
Submission flagged incomplete
I took a graduate level college course: Wetlands Ecology and Management. It was a science course with a lab so I earned 4 hours credit that semester (3 hours each week in class and 1 hour in the lab) The lab consisted of a lot of field work. We did hydrology tests, soil samples and participated in a wetland restoration project. Throughout the course I kept a detailed journal. It continues to be a valuable reference for determining if a sight that I would consider purchasing or design a permaculture project for has wetland hydrology indicators. I am offering up my field journal as oddball project. I feel that it fulfills a similar niche as the Natural Medicine notebook.  
image.jpg
[Thumbnail for image.jpg]
image.jpg
[Thumbnail for image.jpg]
image.jpg
[Thumbnail for image.jpg]
image.jpg
[Thumbnail for image.jpg]
image.jpg
[Thumbnail for image.jpg]
image.jpg
[Thumbnail for image.jpg]
image.jpg
[Thumbnail for image.jpg]
image.jpg
[Thumbnail for image.jpg]
image.jpg
[Thumbnail for image.jpg]
image.jpg
[Thumbnail for image.jpg]
image.jpg
Photos of myself and my classmates assisting with a wetland restoration by planting nuphar, pondweed, arrowhead, pickerelweed and other wetland plants.
image.jpg
[Thumbnail for image.jpg]
image.jpg
[Thumbnail for image.jpg]
image.jpg
Map of the rain garden, managed wetland that I designed
image.jpg
Key for my rain garden design
Staff note (gir bot) :

Someone flagged this submission as not complete.
BBV price: 1
Note: Documentation/journal style projects generally aren't a fit for PEP.  The natural medicine journal BB is an outlier that is going away.

 
pollinator
Posts: 254
Location: North Island, New Zealand
307
chicken food preservation fiber arts woodworking homestead
  • Likes 7
  • Mark post as helpful
  • send pies
    Number of slices to send:
    Optional 'thank-you' note:
  • Quote
  • Report post to moderator
Approved submission
This repair job didn't seem to fit in either tool care or nest, so I'm posting it here.

These two internal locks were in a sorry state; neither was latching correctly. In the process of fixing them, I noticed that one of the issues was that there was a very significant amount of rust in the mechanism, which was adding a lot of friction. To make things glide better, and to increase the longevity of both locks, I brushed the rust of with a wire brush, and then sealed the metal with moderate heat and my homemade finishing paste (beeswax + grape seed oil; a traditional French recipe which works a treat on both wood and metal). The locks are back in working order now, and protected from future dampness!
mb-bb-oddball_derust-locks.JPG
Refurbising antique internal door locks
Staff note (gir bot) :

Mike Barkley approved this submission.
Note: I certify this for 1/2 an oddball point.

Staff note (Jay Angler) :

Nice job, M! I love it when people fix things that were designed to last forever instead of simply replacing it with stuff designed to last 10 years!

 
Bryan Tran
Posts: 64
Location: Niagara Falls, Ontario, Canada
66
3
food preservation woodworking rocket stoves
  • Likes 4
  • Mark post as helpful
  • send pies
    Number of slices to send:
    Optional 'thank-you' note:
  • Quote
  • Report post to moderator
Approved submission
I made a handle for a tamper tool using a dead limb from our apple tree. Luckily it was a near perfect fit, just needed to hammer it into place. We used the tamper tool for a landscaping project at my sister's house.

Originally posted in pep-tool-care wedge style handle BB, but is not a wedge nor a pin style handle (the other handle BB).
4855A560-D90E-4391-8DDC-71AC881A7038.jpeg
Handle less tamper
Handle less tamper
F886DB24-DF25-4A53-ACDB-6767F5742E4C.jpeg
Future handle
Future handle
1E3469E6-3A00-4A70-B68B-6D1D388B1DA4.jpeg
Tree limb cut with hand saw
97F5902E-8F3E-468B-AA08-590959B9F8FC.jpeg
Branches pruned
Branches pruned
9376687C-440D-4ACD-8D62-CDD487834F73.jpeg
Trimmed and fit
Trimmed and fit
3F2E3ADC-B05D-4602-8DD0-EE9D706C21E4.jpeg
Another look
Another look
53047C0D-5F21-4C32-BEF7-D56149528C80.jpeg
Held a couple ft above ground
Staff note (gir bot) :

Someone approved this submission.
Note: Certified for 1/2 oddball point

 
Posts: 146
158
6
  • Likes 6
  • Mark post as helpful
  • send pies
    Number of slices to send:
    Optional 'thank-you' note:
  • Quote
  • Report post to moderator
Approved submission
Made a leather handle for my cast iron pan.

Cut the thick leather to shape with scissors. Marked the hole locations with a fork then went back and drilled out the holes. Used sinew thread and a needle to stitch it all together.
97659FFA-F285-46A1-90EA-CDD13A6E6211.jpeg
[Thumbnail for 97659FFA-F285-46A1-90EA-CDD13A6E6211.jpeg]
3CD56625-2B4D-40B7-80F0-50BD1155D6BE.jpeg
[Thumbnail for 3CD56625-2B4D-40B7-80F0-50BD1155D6BE.jpeg]
ED44E3BA-8832-446F-BCCE-F3A57A7C7822.jpeg
[Thumbnail for ED44E3BA-8832-446F-BCCE-F3A57A7C7822.jpeg]
AFA841F8-FE1C-4523-9416-303043BF0A32.jpeg
[Thumbnail for AFA841F8-FE1C-4523-9416-303043BF0A32.jpeg]
2E3A0FA8-EBB9-4135-A7E3-40134C1C46C7.jpeg
[Thumbnail for 2E3A0FA8-EBB9-4135-A7E3-40134C1C46C7.jpeg]
2A5F8379-8063-484E-9B06-16602FE93049.jpeg
[Thumbnail for 2A5F8379-8063-484E-9B06-16602FE93049.jpeg]
Staff note (gir bot) :

Someone approved this submission.
Note: Nice detail with the seam on the bottom!  1.5 points

 
Posts: 19
11
  • Likes 7
  • Mark post as helpful
  • send pies
    Number of slices to send:
    Optional 'thank-you' note:
  • Quote
  • Report post to moderator
Approved submission
Making a Sundial

I elected to spend my time at the PTJ to learn a technology that is very important to me, timekeeping.  I spent a good amount of time doing some independent research on how sundials work.  If you're interested in that, I posted what I learned here: https://permies.com/t/164133/Sundials-Passive-Solar-Timekeeping-Device

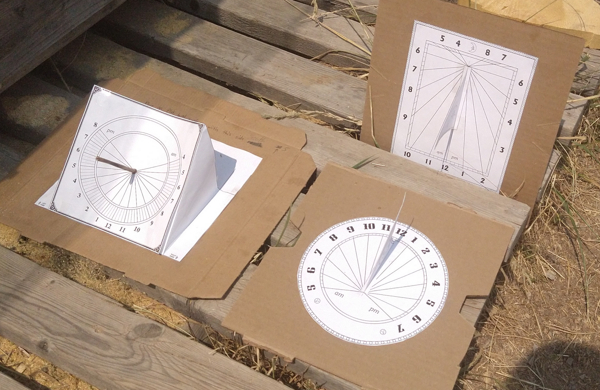
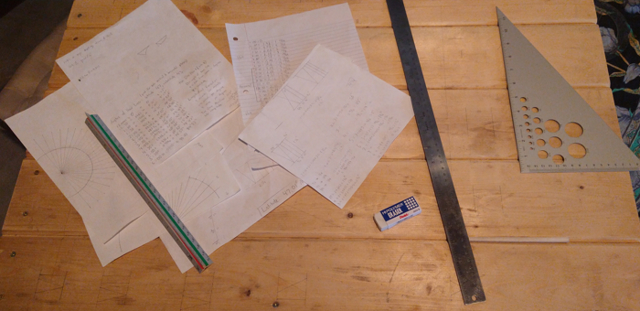
One book offered printable sundials, which helped my conceptual understanding:


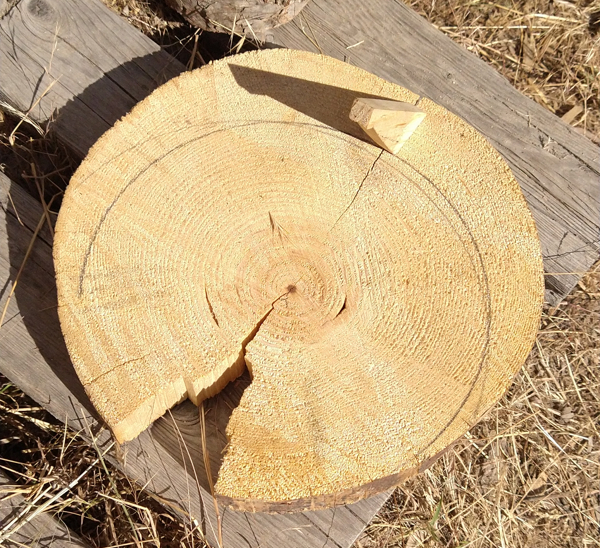
Once I was confident I knew what to build, I looked for wood.  I found a short section of a log and fixed a gnomon to it.  Here I learned that it's important to drill with a bit as wide as the screw before screwing it in order not to split the wood (the big split was already there), and that a second screw or nail is necessary to keep the gnomon from twisting and turning:


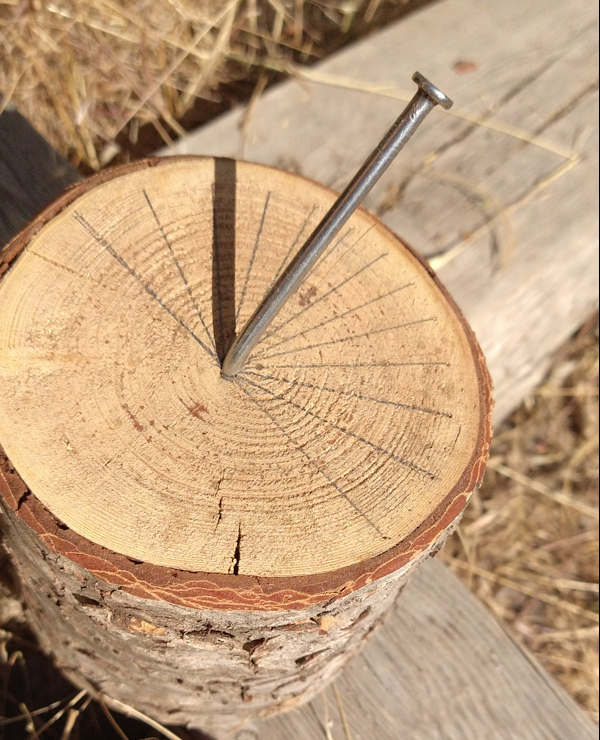
Then I used a more intact log, marked the appropriate hour lines using a protractor by hand, and hammered a nail in as the gnomon:


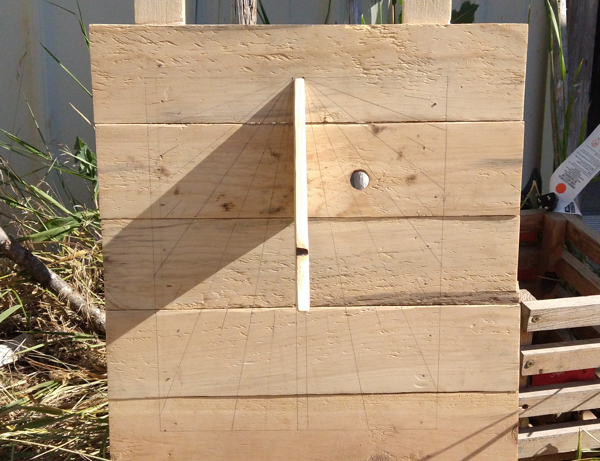
Clearly, the bend in the nail makes it rather unreliable.  I also decided that this was too small and needed something bigger.  I put some pieces of wood together as if to make a sign:


I deliberately chose to use the knot in this gnomon, sometimes it helps you tell which side of the shadow is telling you the time.  However, the gnomon is oversized for this dial, and I again split it in the back when fixing it to the dial (drill bit was not big enough).  Also note the asymmetricality of the lines from the bottom left and right corners.  This shows how unreliable it is to eyeball fractions of degrees using a basic protractor.

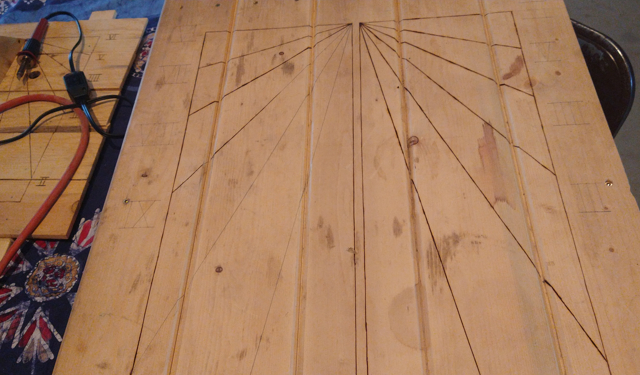
By this time I figured I had a lot of experience and that I was able to handle a significantly larger dial.  Fortuitously, the downsizing of the "E-Z Bake Coffin" provided me with an excellent plate to work with.  Also, I used a chart of tangent coefficients to make the angles less reliant on eyeballing with a protractor:


During this time, I realized I neglected to account for numerals on the dial.  I had to redraw the left and right boundaries further from the edge to make room for the numerals.  Thankfully, I didn't have to redraw the hour lines.  I chose Roman numerals (0-9 are referred to as Arabic numerals), then I had to devise a system that made them large and clear enough to be visible, and located in a way that the lines point to their centers.  When all the lines and numbers were penciled in, I used a pyrography pen to burn them in:


After the burning was done, I fixed the gnomon via two screws in the back (apologies for not capturing any photos of the construction of the gnomon).  


It is now functionally finished- completely functional by itself, but it needs a permanent installation and perhaps some additional embellishment, such as a quote or some kind of artistic imagery.  
Staff note (gir bot) :

Mike Barkley approved this submission.
Note: I certify this for 2.5 oddball points. Nice job!!!

 
M Broussard
pollinator
Posts: 254
Location: North Island, New Zealand
307
chicken food preservation fiber arts woodworking homestead
  • Likes 5
  • Mark post as helpful
  • send pies
    Number of slices to send:
    Optional 'thank-you' note:
  • Quote
  • Report post to moderator
Approved submission
For a recent toaster repair job, I needed a triangle screwdriver (don't know why they keep trying to prevent folks from fixing their stuff). Instead of buying one for an eye-watering sum at the hardware store, I made one by using the dremel to grind down an old, bent screwdriver we got secondhand (straightened it out first).

Works a treat!
mb-bb-oddball-004-triangle-screwdriver-1.JPG
[Thumbnail for mb-bb-oddball-004-triangle-screwdriver-1.JPG]
mb-bb-oddball-004-triangle-screwdriver-2.JPG
[Thumbnail for mb-bb-oddball-004-triangle-screwdriver-2.JPG]
Staff note (gir bot) :

Someone approved this submission.
Note: Certified for 1/2 oddball point

 
Barry's not gonna like this. Barry's not gonna like this one bit. What is Barry's deal with tiny ads?
12 DVDs bundle
https://permies.com/wiki/269050/DVDs-bundle
reply
    Bookmark Topic Watch Topic
  • New Topic