• Post Reply Bookmark Topic Watch Topic
  • New Topic
permaculture forums growies critters building homesteading energy monies kitchen purity ungarbage community wilderness fiber arts art permaculture artisans regional education skip experiences global resources cider press projects digital market permies.com pie forums private forums all forums
this forum made possible by our volunteer staff, including ...
master stewards:
  • Nancy Reading
  • Carla Burke
  • r ranson
  • John F Dean
  • paul wheaton
  • Pearl Sutton
stewards:
  • Jay Angler
  • Liv Smith
  • Leigh Tate
master gardeners:
  • Christopher Weeks
  • Timothy Norton
gardeners:
  • thomas rubino
  • Jeremy VanGelder
  • Maieshe Ljin

PEP Badge: Oddball

BB oddball - sand badge
 
pollinator
Posts: 3089
Location: Meppel (Drenthe, the Netherlands)
1017
dog forest garden urban cooking bike fiber arts
  • Likes 2
  • Mark post as helpful
  • send pies
    Number of slices to send:
    Optional 'thank-you' note:
  • Quote
  • Report post to moderator
Hi Rebekah. Very interesting to see how you tan hides and the bag you made of the elk leather!
Sorry I do not 'approve' BBs in Oddball, I find it too difficult to give points. If it weren't PEP but PEI (Permaculture Experience according to Inge) I would certainly approve this and give the highest amount of points possible.

 
Apprentice Rocket Scientist
Posts: 853
Location: 4a, high mountain dessert
410
3
kids foraging rabbit fiber arts medical herbs bee
  • Likes 1
  • Mark post as helpful
  • send pies
    Number of slices to send:
    Optional 'thank-you' note:
  • Quote
  • Report post to moderator

Inge Leonora-den Ouden wrote:Hi Rebekah. Very interesting to see how you tan hides and the bag you made of the elk leather!
Sorry I do not 'approve' BBs in Oddball, I find it too difficult to give points. If it weren't PEP but PEI (Permaculture Experience according to Inge) I would certainly approve this and give the highest amount of points possible.


Thanks, Inge!
 
steward
Posts: 12418
Location: Pacific Wet Coast
6990
duck books chicken cooking food preservation ungarbage
  • Mark post as helpful
  • send pies
    Number of slices to send:
    Optional 'thank-you' note:
  • Quote
  • Report post to moderator
Approved submission
I wish we had a regular thread this project fit, but alas, I will just see if anyone is willing to give me a few points here! It took me 6 hours, because when I'm designing and building something I've never done before, I struggle. Bamboo is neat stuff, but it has its challenges. Being difficult to clamp being a biggie!

The goal: a lightweight, portable perch that will fit into a portable shelter that needs to house 7 laying hens.
For more details, please read the post here: https://permies.com/t/259272/portable-perch-easy-sounds

I used material on hand: bamboo I grew, a piece of HT pallet I salvaged (cut in two for the two ends) and a piece of cedar lath from an abandoned project. Living on the wet coast and using this for chickens, I chose to harvest from our selection of Stainless hardware.

The only part of the job I got any help with was cutting 2 pieces of threaded rod. My hands are not physically large enough to safely hold Hubby's grinder with the abrasive disc. The saws I can safely use DO NOT LIKE stainless rod - it breaks their teeth. Safety is important.


Most important - the happy customers! (actually, that includes me - it is light to move even though it's over 7 ft long.)

Staff note (gir bot) :

Someone approved this submission.
Note: I certify this badge bit complete and award 2 points.

 
pollinator
Posts: 296
Location: Boise, ID
152
5
hugelkultur trees chicken wofati food preservation cooking building medical herbs rocket stoves homestead
  • Likes 1
  • Mark post as helpful
  • send pies
    Number of slices to send:
    Optional 'thank-you' note:
  • Quote
  • Report post to moderator
Approved submission

The Bridge to Waterbethia, and what else I did with all those pallets.

In 2020 I got chickens. A cluckin good move for a cooped up soul, wanting to spread his wings and fly into some animal husbandry.

The pullets were content in the mobile hoop coop, but I knew they would soon need more room to roam.

While driving to the store, my only allowable outing at the time, I noticed an enormous pile of pallets. After calling the owners of the bathroom remodeling company in front of which they sat, I learned they were for shower pans, and destined for the local recycler unless someone else stepped in.

Hearing the call, I dutifully answered, stacked them on my trailer, hauled them home, and went back for more.

These pallets were not your average 3x4 pine construction. I was immensely fortunate, these single use pallets were almost 9 feet long, 5.5 feet wide, and made of solid oak.
Once cut in half, they, along with some salvaged 2x4” welded wire fence, became the basis for the containment system I designed and built for the chicken run.

I come from a family which values reusing and upcycling materials and I’m cut from the same cloth.
Reused pallets, reused T-posts, reused wire fence, salvaged hinges for the gate; about the only thing new were the fasteners - screws to join the pallets together and staples to keep the wire on the pallets.

I don’t recall exactly how long this took, but by judging the movement of the coop, and the date on the photos, at least a week of afternoons.

This fence served me well. It largely kept the birds in, dogs out, and, for significantly less than $100, the price was right.

Eventually though, the time came to harvest the birds, and with that task complete, the fence was obsolete. On the other hand, the material was not.

I took the welded wire off the pallets, rolled that up and stored it. I unscrewed the pallets from each other, shuffled and stacked them. I dismantled and removed everything else in the run, including the coop itself - https://permies.com/p/2352355 - leaving me with a treasure trove of treats to toy with.

“But you said something about a bridge and some of those things are badge bits in their own right”
You’re not wrong, but don’t let a good story ruffle your feathers.

I couldn’t let the offal from the butchering go to waste, and while I’d’ve loved to feed it to hogs, I have a distinct lack of pigs, and a distasteful set of community bylaws. Instead, I composted everything that didn’t go into my freezer, along with most of the bedding and deep mulch upon which they lived.

What would be the walls for the compost bins? Why, the very pallets used as the fence, of course.

It took a little work, but the shakier of the pallets were dismantled and the boards reassembled onto the stoutest fellows, creating solid walls.  

Despite the effort, it was a great success in my mind. This time, after keeping the screws, I spent zero dollars and brought on no new material for this project.

You may notice in the pictures, these pallets had an extra lip on top to make sure the shower pan stayed in place. More solid oak for the taking.

While compost was composting, spring had sprang, water would soon be coming down the ditch and I was tired of having to jump over it to get to the other side. It made using a wheelbarrow out that way nearly impossible.

I’d always wanted a bridge and, with no obligation from the flock, it was time.

I scrounged a 4x4 the prior owners had left from my materials storage pile. I rough cut the angles ~45° to approximate the pitch of the ditch, brought those back to the shop, and took the oak lip boards and used them as the deck for the bridge.

Why, oh why, did I bring them to the shop. It seemed the right thing to do and construction was easier.
But have you ever tried to carry fifteen 42” long oak boards screwed into 4x4s? Yikes. A lifetime of backpacking prepared me for the dog fight.

Yet, being the odd one I am, I found the ordeal quite a ball. I even paused to take some pictures.
Finally I heaved it into place and my Bridge to Waterbethia was officially instantiated.

It’s proved a great value, making my life significantly easier and taking the edge off several chores. And it looks good to boot.

From single use shower pan holder, to being paraded across town on a trailer, to fence, compost bin, to garden gates, even to a toilet-paper-roll-holder-support-and-shelf… these “throw aways” have had a memorable journey.

I wonder what else I’ll build with them.

Things which might sound like BBs, but don’t count:
Salvaging fence, I measured. 90ish feet not 100.
Butchering birds, I had help and did not dispatch them myself.

Negative PEX factor:
Fairly sure the welded wire is galvanized.
Definitely sure the 4x4 was pressure treated. Despite that, I could neither throw it away nor use it for anything … until I found a use where it wouldn’t be in contact with soil or water, was out of the sun, and was ripe for the taking.

I hope you squawked with delight at my bad jokes and I appreciate you reading this novelette.  Thank you :)
62190636882__A21E27FA-66E2-4389-A342-905AC53419BA.jpeg
Load one of several
Load one of several
62208383829__4AB28C50-9775-4067-A1CD-F2BA1B3A925E.jpeg
A serious stack of pallets
IMG_4195.jpeg
Building the fence and playing with dogs
IMG_4239.jpeg
Lookin good
Lookin good
62303258038__6E71C4CB-972E-4628-AD70-6DD3E80488A2.jpeg
Adding welded wire
Adding welded wire
68157082215__1B13FED6-A0DC-490C-9981-765854A1E2CF.jpeg
In use, bonus shot of birds eating cabbage
4BCBA0B7-1AC8-4ABD-8A13-9A29EE072E2E.gif
3+ years later all dismantled
IMG_6668.jpeg
harvested oak boards near compost pile
IMG_7122.jpeg
Making the bridge
Making the bridge
IMG_7124.jpeg
Squaring them up and screwing them down
IMG_7125.jpeg
Construction complete
IMG_7126.jpeg
Dry ditch I used to jump over
IMG_7127.jpeg
All fun and games over here
IMG_7128.jpeg
Installed!
Installed!
IMG_7130.jpeg
Bridging the gap
Bridging the gap
IMG_5855.jpeg
Devastated dog behind garden fence (made with some of the broken slats)
72102839810__A7D56005-3DC9-419D-8BB8-BAA70F5EFE7A.jpeg
Toilet roll holder holder made from another one of the slats
IMG_5044.jpeg
Cleans up pretty nice I’d say
Staff note (gir bot) :

Rebekah Harmon approved this submission.
Note: I mean WOW! That fence is so pretty! I would have had a hard time tearing it down. But then the other things you made are more useful when it's the right time, eh? Nice novella. I would give you 3 points for the fencing, 2 for the bridge and 1 for the tp holder.  I'm not really sure how to mark your points? But I would say 6 points.

 
Clay McGowen
pollinator
Posts: 296
Location: Boise, ID
152
5
hugelkultur trees chicken wofati food preservation cooking building medical herbs rocket stoves homestead
  • Mark post as helpful
  • send pies
    Number of slices to send:
    Optional 'thank-you' note:
  • Quote
  • Report post to moderator
Thank you so much for your kind words! Especially after hearing certain members of my family call the fence an eyesore, I really appreciate the validation; I guess should have posted it here a while ago.

Oh my, 6 points!
Does this mean I earned my Oddball Sand Badge??
 
steward
Posts: 15505
Location: Northern WI (zone 4)
4846
7
hunting trees books food preservation solar woodworking
  • Likes 1
  • Mark post as helpful
  • send pies
    Number of slices to send:
    Optional 'thank-you' note:
  • Quote
  • Report post to moderator
Clay, if you click on the SAND BADGE header on the top post, it takes you to the place where you can submit to get the badge
 
Posts: 79
9
  • Mark post as helpful
  • send pies
    Number of slices to send:
    Optional 'thank-you' note:
  • Quote
  • Report post to moderator
Approved submission
Here’s pictures of when I changed my rear brake pads.
IMG_6560.jpeg
Tools and new pads
Tools and new pads
IMG_6564.jpeg
Drivers side removed
IMG_6565.jpeg
Caliper
Caliper
IMG_6567.jpeg
New pads greased and installed
IMG_6568.jpeg
Ready for the wheel
Ready for the wheel
IMG_6570.jpeg
Passenger side pads greased
IMG_6571.jpeg
And installed
And installed
IMG_6569.jpeg
Wheels are on
Wheels are on
Staff note (gir bot) :

Someone approved this submission.
Note: Great job! Certified for 1pt

 
pollinator
Posts: 102
Location: PNW Steppe climate, not far from the big river.
57
2
homeschooling kids solar wood heat homestead
  • Mark post as helpful
  • send pies
    Number of slices to send:
    Optional 'thank-you' note:
  • Quote
  • Report post to moderator
Approved submission
Hey PEP-Folks,

I did not see "Install a trailer hitch receiver" anywhere else in the BBs, so here it is. Total time spent ~1.5hrs.

Moby Dick is the 15-passenger Ford Econoline that fits the whole family. Great car, pretty low miles, and I was thrilled when I bought it to see that there was no tow hitch - meaning it had never towed. Great. I can change that, and I have a good sense for how hard I want to push the powerplant (this is the 3rd Ford 24V 5.4L engine with this same tranny that I have owned over the years). This model is rated to 6700lbs towing, less than the F350 I once had, but still quite respectable.

So, to etrailer for the light kit and receiver, to youtube for the helpful Uhaul lady showing how easy it is with a shop lift and a receiver jack (they do this a lot), then once parts were in hand, under the back of the van with the wrenches.

There is a set of plate & washer shims to level it, some of which have to hang in space during install, thus the tape, which was removed prior to torque, to keep the joint hard. Torque spec was 120ft*lbf, so I used the big wrench. The aft bolts were inaccessible on the nut side due to the shape of the receiver, but with the spare tire dropped, I could torque the heads (less good, but better than nothing). Dropping the spare was also a great opportunity to show the wife+kids how to use that mechanism, and let the 12y.o. learn by return demonstration (winching it back up).

The light kit taps the R and L taillights with a bypass, allowing the 4-pin plug to have brakelight/taillight, signal R, signal L, and Ground wires. This is fine for the surge-brake trailer I have, but I'd have to do more work to adapt for an electronically-braked trailer (if I ever get one).  The light kit fishes out through a grommet in the floor, and the more I work on this van, the more I am grateful for Ford leaving random holes with rubber plugs in them. The 4-pin is routed through the receiver cross bar to protect it, and pokes out right near the hitch receiver. I will (eventually) put a 7-pin-flat adapter on it, which is what my trailer has. The wiring between the lights conceals nicely under the rear scuff strip (which restrains the rear carpet edge).

Button it up, check that lights work, and ready to roll!

Happy hauling!
Mark

before.jpg
[Thumbnail for before.jpg]
checkfit.jpg
[Thumbnail for checkfit.jpg]
antigravityTape.jpg
[Thumbnail for antigravityTape.jpg]
pretorqued.jpg
[Thumbnail for pretorqued.jpg]
dropthetire.jpg
[Thumbnail for dropthetire.jpg]
torqueOnAftBolts.jpg
[Thumbnail for torqueOnAftBolts.jpg]
lightkit.jpg
[Thumbnail for lightkit.jpg]
WiresFished.jpg
[Thumbnail for WiresFished.jpg]
wiresUnderVan.jpg
[Thumbnail for wiresUnderVan.jpg]
TaillightRemoval.jpg
[Thumbnail for TaillightRemoval.jpg]
TaillightIntegration2.jpg
[Thumbnail for TaillightIntegration2.jpg]
4pinatHitch.jpg
[Thumbnail for 4pinatHitch.jpg]
taillightswork.jpg
[Thumbnail for taillightswork.jpg]
Staff note (gir bot) :

Someone approved this submission.
Note: Certified for 1 oddball point

 
pollinator
Posts: 245
77
fungi foraging fiber arts medical herbs woodworking ungarbage
  • Mark post as helpful
  • send pies
    Number of slices to send:
    Optional 'thank-you' note:
  • Quote
  • Report post to moderator
Approved submission
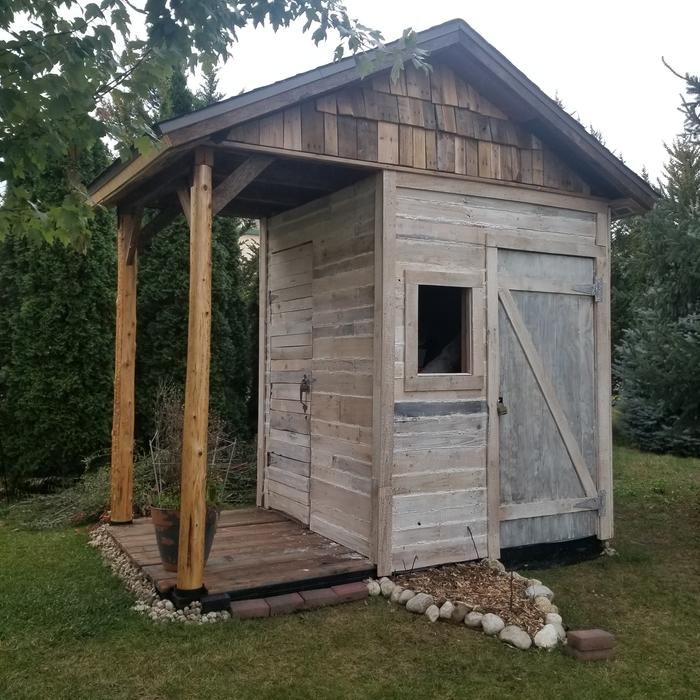
Cheryl's She Shed was built before I knew what permaculture was.

It's purpose is to house items from the garage so both vehicles can park in there (snowblower, lawnmower ect.) Garden shed and all around happy place.

I designed and built my shed using mostly upcycled/free materials. I chose a skid able structure to avoid permits. I calculated the total height loaded on a trailer and legally I don't need a permit to transport.
The total foot print is 10' x 6'.

It took months to design, calculate and collect all the materials. I really enjoyed the challenge and had to make changes to my design to accommodate the materials I had found.

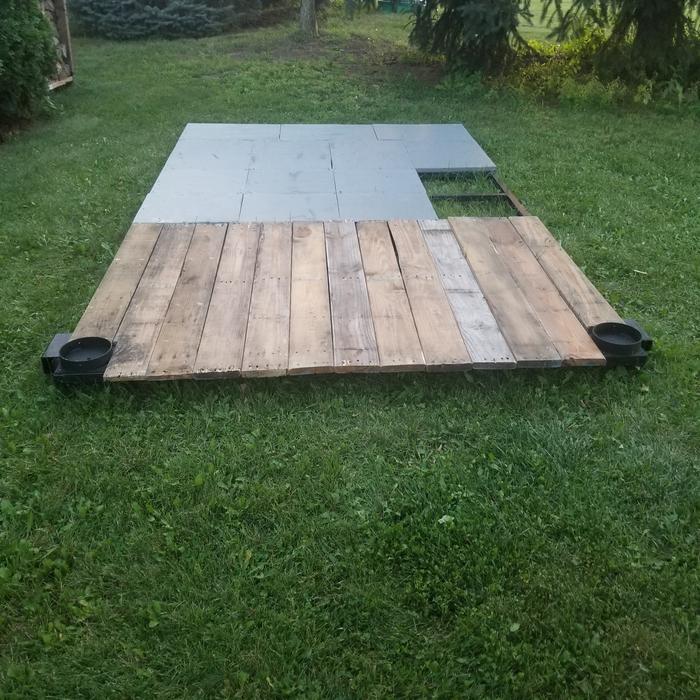
The skid able frame was welded by me exclusively from scrap out of dumpsters and designed so the pieces of 3/4" plywood crates I had found for the floor could be screwed down using special screws made to go thru wood and self tap into metal. Alot of research went into that.

The floor inside the shed was painted using second hand paint (lady was selling a half used gallon of paint for $10)

The decking under the porch was sealed with teak oil, I wasn't familiar with linseed oil at the time.

The suport posts are cedar logs I found locally and sealed with teak oil. The bracket at the base was made with scrap metal and designed to let the water drain out and prevent the post resting in water. T fasteners at the top - more scrap metal.

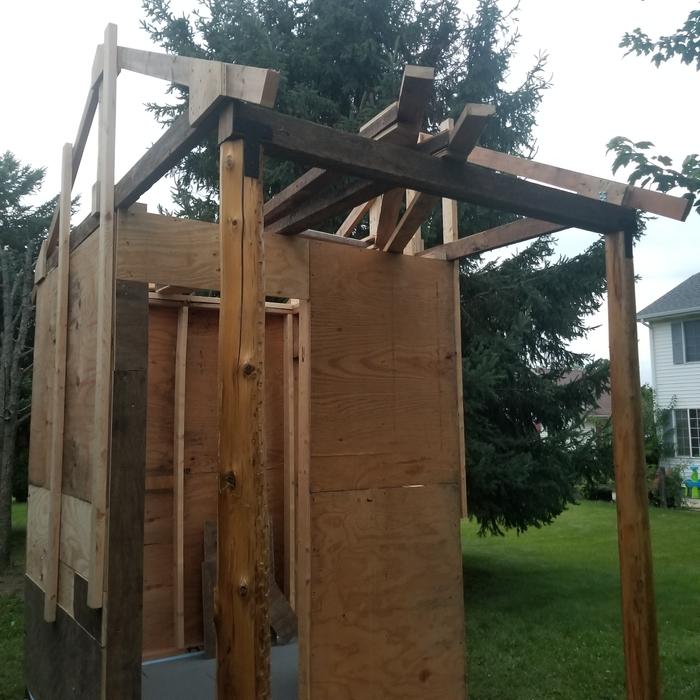
Building the walls was quite the challenge because my 2x4s weren't exactly nice or straight. (I had help building the walls in the garage and setting them on my frame plumb. Not including for points)

Trusses were built by me but moved and installed with help along with the roofing plywood. (Please remove from points) I shingled the structure but people on the ground handed me stuff so I could stay on the roof.

Some of this wood was 1860's barn wood that was local to me. It was true 2" x 4" and when you combine it with modern lumber the math on you trusses no longer works, just an FYI. I also used it as a header under the porch on the cedar posts and as the porch gussets. I found period correct antique square nails to make the header.

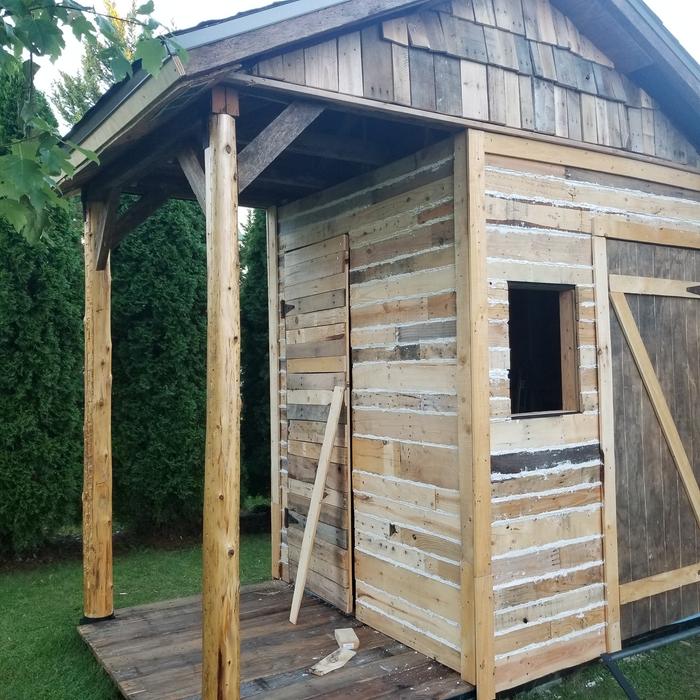
I hung the plywood on the shed walls by myself, all second hand and not the same thinkness. The siding is pallet boards. I collected a ton of pallets and board by board removed each nail. The mortar is lime mortar, lots more research. I should have made the gaps 3x bigger... I whitewashed the siding. The lime i used is made 45 minutes from me.

The inside of the shed has a giant shelf and under the porch is a hidden tool closet which is half shelves half broom, I mean shovel closet. I admit I had no idea what I was doing and it took a whole day to build the closet. The closet door is sided like the rest of the shed it has peg board and a fold down table feature. The hinges are old barn door hinges from a barn about 1 hour from here. 2 of the 6 are rusted solid.
The handle on the closet door is a piece of scrap metal and the shed door handle is made from scrap wood.

One of the last things I did was side the gables with drops from the pallet wood siding. I love how it turned out!

Someday I will build my stained glass window... until then my daughter painted a cat on a board.

Things I had help with:
*Moving welded frame on trailer and off and into final location.
*Building walls, moving, positioning and attaching to frame.
*Moving, lifting and attaching trusses and roofing plywood.
*Helping hands while I was on the roof.

Bad stuff:
*Paint, on the floor and on the metal to prevent rust and rot.
*Tar paper found partial roll and took it off someone else's hands. *Purchased new shingles.
*Plywood- all upcycled.
*Purchased new D strip.

Good stuff:
*Recycled lumber and pallet wood.
*Cool old hinges, square nails and barn wood.
*All metal was dumpster dived for.
*Locally sourced lime for lime mortar.
*White washed siding with same lime.

Best part:
This project was the begining of me finding permies earlier this year. I found my people.
20220716_085602.jpg
welded frame with pile random pallet/shed wood in driveway
20220826_193440.jpg
frame is way in the back, cedar log leaning on smoker
20220826_193251.jpg
deck boards and flooring attached. I miss counted lol black circles in front are the brackets to mount cedar logs
20220906_192555.jpg
walls are up, some plywood is on to hold square, cedar logs are in and the header, trusses are going up
20220906_192608.jpg
1860s barn wood header with scrap metal T bracket
20220906_192533.jpg
another view of walls and 2 trusses
20220920_115744.jpg
siding the shed
siding the shed
20220929_111436.jpg
inside the closet, half shelves and half shovels
20221001_182014.jpg
peg board and fold down table on closet door
20221001_181856.jpg
mortared walls, gables done, roof done, closet door being held shut with a board.
20221016_072934.jpg
whitewashed, small garden bed, stone boarder to attempt to keep out mice. handles, hinges and locks are on.
20240922_191603.jpg
decorated for Christmas (plus the painted cat)
Staff note (gir bot) :

Someone approved this submission.
Note: Nice sheshed!  Certified for 20 oddball points

 
  • Mark post as helpful
  • send pies
    Number of slices to send:
    Optional 'thank-you' note:
  • Quote
  • Report post to moderator
Approved submission
A friend down the streets garage door operator kicked the bucket and asked for help.  His old Liftmaster chain drive was just over 20 years old, so I helped him pick out a new one and set to work. Took the old one down and replaced the photoeye sensors, the wall button, and installed the new Chamberlin LED belt drive. The room above is a spare bedroom and the belt drive is much quieter.  He was very happy and thankful. I got a case of beer out of the deal so it was a win- win.
20240930_155140.jpg
[Thumbnail for 20240930_155140.jpg]
20240930_164017.jpg
[Thumbnail for 20240930_164017.jpg]
20240930_173830.jpg
[Thumbnail for 20240930_173830.jpg]
20240930_173839.jpg
[Thumbnail for 20240930_173839.jpg]
Staff note (gir bot) :

Someone approved this submission.
Note: I award 2 points for this project.

 
Legend has it that if you rub the right tiny ad, a genie comes out.
rocket mass heater risers: materials and design eBook
https://permies.com/w/risers-ebook
reply
    Bookmark Topic Watch Topic
  • New Topic