• Post Reply Bookmark Topic Watch Topic
  • New Topic
permaculture forums growies critters building homesteading energy monies kitchen purity ungarbage community wilderness fiber arts art permaculture artisans regional education skip experiences global resources cider press projects digital market permies.com pie forums private forums all forums
this forum made possible by our volunteer staff, including ...
master stewards:
  • r ranson
  • Carla Burke
  • Nancy Reading
  • John F Dean
  • Jay Angler
  • paul wheaton
stewards:
  • Pearl Sutton
  • Burra Maluca
  • Joseph Lofthouse
master gardeners:
  • Timothy Norton
  • Christopher Weeks
gardeners:
  • Jeremy VanGelder
  • Maieshe Ljin
  • Nina Surya

PEP Badge: Oddball

BB oddball - sand badge
 
Posts: 146
159
6
  • Likes 7
  • Mark post as helpful
  • send pies
    Number of slices to send:
    Optional 'thank-you' note:
  • Quote
  • Report post to moderator
A little over a year ago, I convinced my parents to start saving their food scraps and composting them. They don’t have green waste bins where they live.  Once it started curing and they started applying it to their fruit trees, they were absolutely floored by the results and have now taken up an interest in gardening.

After living in their house for 18 years, the periphery if their backyard was planted with succulents and other low maintenance ornamental plants in pots. One of the biggest problems was their complete lack of soil life which was very high in clay.

I helped them remedy this by digging in and burying large amounts of home produced compost and re-plumbing their entire irrigation system which was broken for over a decade. The whole thing was done over a 2 week period.

With the addition of waist high planter boxes and a self watering system, they are now very excited to plant seeds and seedlings and watch them grow. The activity has even brought them together in their relationship more than I was expecting.

I know this is not the same as building a spiffy huglekulture that doesn’t require irrigation, but given the small space they have and several other requirements. It’s a long way for them.
C2F00FEA-A446-4CC8-945E-E5F866A4ABF7.jpeg
[Thumbnail for C2F00FEA-A446-4CC8-945E-E5F866A4ABF7.jpeg]
A004C2B3-3F61-4856-BFE5-ECF7D91AE8E9.jpeg
[Thumbnail for A004C2B3-3F61-4856-BFE5-ECF7D91AE8E9.jpeg]
C4380A6C-2182-4633-A51C-1F75769E5FB6.jpeg
[Thumbnail for C4380A6C-2182-4633-A51C-1F75769E5FB6.jpeg]
1370BC98-0B4B-4AAF-A377-A5186B111293.jpeg
[Thumbnail for 1370BC98-0B4B-4AAF-A377-A5186B111293.jpeg]
AFE39B78-6ED7-4AAB-9537-1E6DD7C5D6D5.jpeg
[Thumbnail for AFE39B78-6ED7-4AAB-9537-1E6DD7C5D6D5.jpeg]
C3ABA6B5-6EBC-4C8D-9E81-F4340585FF34.jpeg
[Thumbnail for C3ABA6B5-6EBC-4C8D-9E81-F4340585FF34.jpeg]
FA42F5B7-39BB-403F-8383-078D22AF8806.jpeg
[Thumbnail for FA42F5B7-39BB-403F-8383-078D22AF8806.jpeg]
A087E161-DC67-4078-857C-30D36E1E09FA.jpeg
[Thumbnail for A087E161-DC67-4078-857C-30D36E1E09FA.jpeg]
595C0CB4-8CEE-4CE2-8EF0-44DF17CD5E20.jpeg
[Thumbnail for 595C0CB4-8CEE-4CE2-8EF0-44DF17CD5E20.jpeg]
B8E81326-269E-46A2-B683-AAF965121FAD.jpeg
[Thumbnail for B8E81326-269E-46A2-B683-AAF965121FAD.jpeg]
5990D8D8-7727-4556-A161-4991528049F5.jpeg
[Thumbnail for 5990D8D8-7727-4556-A161-4991528049F5.jpeg]
A5DAEA7E-A4E7-4404-B036-EC2CB4DCA4F9.jpeg
[Thumbnail for A5DAEA7E-A4E7-4404-B036-EC2CB4DCA4F9.jpeg]
F0B11991-C87B-4555-BF61-51F7E7FC8E6C.jpeg
[Thumbnail for F0B11991-C87B-4555-BF61-51F7E7FC8E6C.jpeg]
E97E216D-C19C-4884-8D5D-EE718C83759C.jpeg
[Thumbnail for E97E216D-C19C-4884-8D5D-EE718C83759C.jpeg]
322D4B1E-86D4-4C37-BE1D-1B83EF879D32.jpeg
[Thumbnail for 322D4B1E-86D4-4C37-BE1D-1B83EF879D32.jpeg]
AD8739C0-7588-4298-AE83-C42E7B30FFD4.jpeg
[Thumbnail for AD8739C0-7588-4298-AE83-C42E7B30FFD4.jpeg]
DC415572-56DB-42E4-B863-545BF529D0CC.jpeg
[Thumbnail for DC415572-56DB-42E4-B863-545BF529D0CC.jpeg]
3AEA0646-D324-4A89-B0EA-D9BCF3C19D68.jpeg
[Thumbnail for 3AEA0646-D324-4A89-B0EA-D9BCF3C19D68.jpeg]
1ADD527C-48F4-4158-92BF-36362D54432F.jpeg
[Thumbnail for 1ADD527C-48F4-4158-92BF-36362D54432F.jpeg]
Staff note :

Certified for 3 oddball points.  Good Otis factor, not great PEX factor

 
Pierre Michael
Posts: 146
159
6
  • Likes 1
  • Mark post as helpful
  • send pies
    Number of slices to send:
    Optional 'thank-you' note:
  • Quote
  • Report post to moderator
Transformed crappy bent Harbor Freight wrench into wood (spoon) carving tool.

Spent about 1 hour on it.
3F11B029-833D-4156-9321-ECD6BFB9BD62.jpeg
[Thumbnail for 3F11B029-833D-4156-9321-ECD6BFB9BD62.jpeg]
1ED4A4C3-FDFE-4199-8050-4081876DD8A5.jpeg
[Thumbnail for 1ED4A4C3-FDFE-4199-8050-4081876DD8A5.jpeg]
CECE967B-06CC-4BA5-BDBE-C7BF3DC02A62.jpeg
[Thumbnail for CECE967B-06CC-4BA5-BDBE-C7BF3DC02A62.jpeg]
7CB1C84D-A8E1-43CD-8574-9DAAD8EAC9EC.jpeg
[Thumbnail for 7CB1C84D-A8E1-43CD-8574-9DAAD8EAC9EC.jpeg]
2E356EC8-0730-48BE-85B0-97DBA205027C.jpeg
[Thumbnail for 2E356EC8-0730-48BE-85B0-97DBA205027C.jpeg]
5957F9B1-10D2-48B6-AF16-98109982E12D.jpeg
[Thumbnail for 5957F9B1-10D2-48B6-AF16-98109982E12D.jpeg]
Staff note :

Certified for 1 oddball point.  Great Otis, PEX and Piano factor

 
gardener
Posts: 1576
Location: Washington State
989
6
forest garden trees rabbit earthworks composting toilet fiber arts sheep wood heat woodworking rocket stoves homestead
  • Likes 1
  • Mark post as helpful
  • send pies
    Number of slices to send:
    Optional 'thank-you' note:
  • Quote
  • Report post to moderator
Here is my submission for Oddball Points.  It is a Textile Tool - How to build a Silk Cap Frame.
Processing silk cocoons is a Textile BB so this submission is for the frame construction only.

To document the completion of the BB, I have provided the following:
  -  photos before, during, and after building a silk cap frame to stretch degummed silk cocoons over
  -  a thread sharing the basics of this build and giving people a place to discuss cap frame ideas

Cap Frame
General Shopping List (for other builders):
a piece of pvc (at least 4'), 4 each 90-degree Elbows, 2 Tee Connectors, and a piece of PEX (about 4' long).

PVC Cut List:
2 pieces that ~15" long
4 pieces that are ~5" long

I had PVC and 4-Way PVC Furniture Fitting (Side Outlet Tees) from an old wool drying rack that I had retired because the mesh disintegrated in the sun.  
My frame will use the furniture fixtures instead of Tees and Elbows and the PEX I had on hand was 43.5" long.

Salvaged PVC and Furniture Fixtures:


My Cut Parts:


Frame Assembly:


I discovered that PEX fits very loosely into 1/2" PVC connectors but does not fit inside the pipe.  


Stabilizing the PEX: I used two more small pieces (~3" long) to stabilize the PEX:


I also cut a notch (longitudinal slice) in the PEX to reduce its diameter so it would fit snug into the PVC pipe stubs
The notch is the kerf of the saw I was using - just one blade width so I'm not sure notch is the right word


Inserting PEX (on right) into PVC
.

Final assembly produces stable cap frame


My finished frame is 13" x 17" and 22" tall.


Staff note :

Certified for 1/2 oddball point

 
pollinator
Posts: 262
Location: New Zealand
308
chicken food preservation fiber arts woodworking homestead
  • Mark post as helpful
  • send pies
    Number of slices to send:
    Optional 'thank-you' note:
  • Quote
  • Report post to moderator
Some time ago, I used up most of an old, ratty towel for a project. I had four bits from the end of the towel that had embossing that were not suitable for that purpose. Since the material on the edges had held together much better than the centre of the towel, I decided to make them into four hand towels. I did this by attaching cotton twill tape (and cotton thread, cotton towel--should be compostable at the end of its life!) This doesn't fit in the current iteration of the Textiles badge, so I'm submitting it here.

They have been serving well so far!
mb-bb-oddball-001-handtowel.JPG
Adding edging to the towel pieces so they don't unravel & shed fibres everywhere
Staff note :

Certified for 1/2 oddball point

 
M Broussard
pollinator
Posts: 262
Location: New Zealand
308
chicken food preservation fiber arts woodworking homestead
  • Likes 2
  • Mark post as helpful
  • send pies
    Number of slices to send:
    Optional 'thank-you' note:
  • Quote
  • Report post to moderator
We have an amazing antique push mower that is an absolute work horse. Its wheels and body are solid cast iron, and it's old enough that manufacturers were still adding beautiful details--the spokes are cast in the form of a flower. It tears through sticks and small branches hidden in the lawn without skipping a beat. We got it secondhand for $15; it was in good condition, and after a bit of oil, it was good to go. While the metal bits are all good, the wood is showing its age. In the year I've owned and used it, I've had to replace the old, banged-up cross-handle and roller with new ones I turned on the lathe. This time, though, the main handle shaft wore out and the hardware (what looked to be a makeshift repair job from times past) pulled right out. We did a quick fix, but it wasn't great, and we thought it deserved a proper job, which I've documented here.

We used the hardware from an old rusty mower of the same model we found being swallowed by ivy and reconditioned them. We replaced the old wood that got munted by the previous owner's repair with a new block of hardwood, and I learned how to do the job of a drill press with my hand brace and a right-angle. This last part was quite challenging, as I was drilling a blind intersection that had to be a perfect 90-degree join, as otherwise the bolt would not screw into the stabilising peg. As a hand brace has a natural, significant wobble, this was a technical feat--one that impressed my machinist friend! I did a couple practice jobs with scrap wood before proceeding to drill the real thing. Quite happy with the results. Time to mow the lawn has been reduced by 50% when compared to the earlier dodgy repair.

Between chiseling, carving, gluing, clamping, reconditioning, and drilling (including planning & test drills), it probably took about 2 hours. Muscle-power only for this repair.
mb-bb-oddball-002-fixmower-1.JPG
Chiseling out the munted bits and replacing with hardwood block
mb-bb-oddball-002-fixmower-2.JPG
Using CRC to extract vintage hardware from different, abandoned mower
mb-bb-oddball-002-fixmower-3.JPG
Reconditioning the vintage hardware with wire brush, fire and oil
mb-bb-oddball-002-fixmower-4.JPG
How to be a drill press with a hand brace 101: having a right angle and a spotter helps!
mb-bb-oddball-002-fixmower-5.JPG
Perfect fit for the two 90-degree blind holes!
mb-bb-oddball-002-fixmower-6.JPG
Newly fixed mower surrounded by freshly mown grass
Staff note :

Certified for 1.5 oddball points

 
master steward
Posts: 13111
Location: Pacific Wet Coast
7575
duck books chicken cooking food preservation ungarbage
  • Likes 2
  • Mark post as helpful
  • send pies
    Number of slices to send:
    Optional 'thank-you' note:
  • Quote
  • Report post to moderator
Another small project that took an hour due to the "fiddle factor" and the "how to make this work" factor.
#2 son complained that the pads on his headphones was wearing thin and leaving little black bits stuck to his ears. We *could* have just bought new ones, but that's more plastic and foam waste and we hate garbage. So I used the sleeve from his "relegated to rags" T-shirt that PEP's seen before (I used its hem to repair the rim of my farm hat).
The first picture shows the damaged pad and the cotton T-shirt.


First I cut out a circle of fabric with enough diameter to make a casing to gather it around the headphone pad and do a gather stitching.


The next photo shows the casing stitching with a piece of string about to be fed through, and the first cover installed.


Lastly here's the finished product, declared comfy by the owner and already being used:


What's important here to me, is that we're keeping a little more garbage out of the landfill, extending its useful life and even if that's only a little embodied energy, lots of little things add up to big things if we all make that effort. Besides, #2 son says they're comfy!
Staff note :

Certified for 1/2 oddball point

 
pollinator
Posts: 3182
Location: Meppel (Drenthe, the Netherlands)
1064
dog forest garden urban cooking bike fiber arts
  • Likes 3
  • Mark post as helpful
  • send pies
    Number of slices to send:
    Optional 'thank-you' note:
  • Quote
  • Report post to moderator
Nicole said I could put my slippers here, as an Oddball BB.
There isn't a BB thread that fits, because I used several materials: felted wool (old sweaters), leather (from an old bag) and fur (from parka hoods).


Cutting all parts out of felted wool. Sole and heel half-circle out of leather too.


Sewing with unraveled merino wool 'thread' in buttonhole stitch.


Making the fur lining for the sole. (sorry, I am not vegetarian or vegan and this fur was bought in a thrift store).


Sewing sole and upper part together


One slipper finished, the other almost
The cone you see in the back is cotton thread, also found in the thrift store. I waxed it before use (on the leather / fur parts) with a left-over piece of a bees-wax candle


The right size warm slippers for my feet!
after this photo I added a tiny rim of fur at the top of the upper part.


Staff note :

Certified for 3 oddball points

 
Pierre Michael
Posts: 146
159
6
  • Likes 3
  • Mark post as helpful
  • send pies
    Number of slices to send:
    Optional 'thank-you' note:
  • Quote
  • Report post to moderator
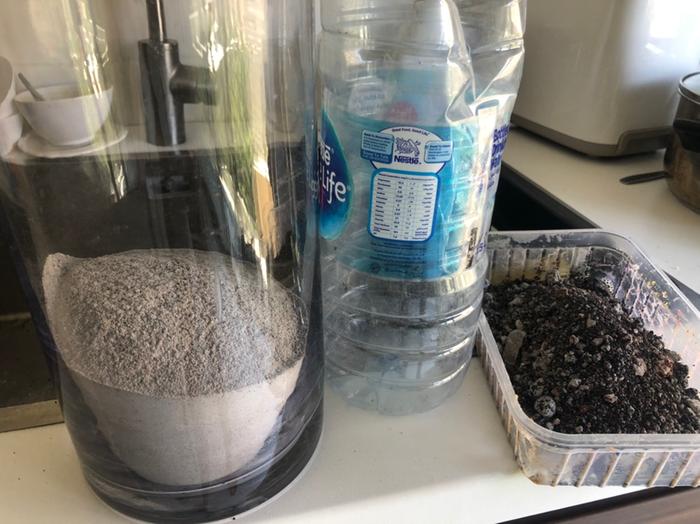
Made potash by filtering wood ashes and extracting the water soluble bits.

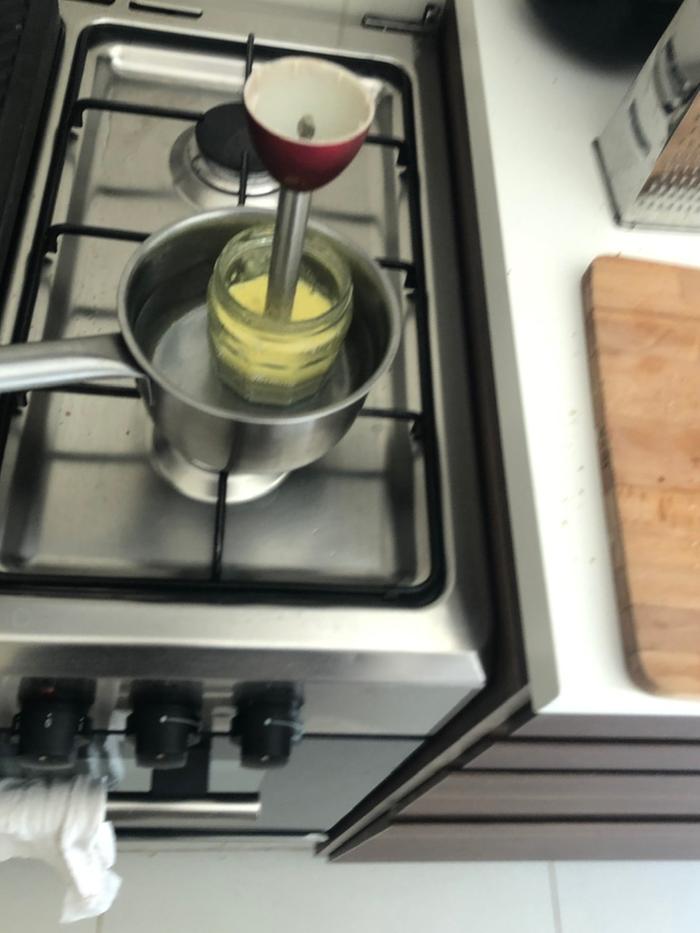
Then added to an olive oil / coconut oil blend to make some liquid soap.

Surprised soap making isn’t a PEP badge, unless I missed it somewhere.
Wood-ash-collected-from-our-campfire-after-camping.jpeg
Wood ash collected from our campfire after camping
Strained-out-the-chunks-of-charcoal-and-other-debris-from-the-ashes..jpeg
Strained out the chunks of charcoal and other debris from the ashes.
Put-the-ashes-in-a-tall-clear-container-so-I-could-observe-the-progress.jpeg
Put the ashes in a tall clear container so I could observe the progress
After-a-couple-of-days-the-ashes-settled-and-the-water-on-top-was-saturated-with-potassium-carbonate.jpeg
After a couple of days the ashes settled and the water on top was saturated with potassium carbonate
Decanted-the-water-and-boiled-it-until-the-volume-was-reduced-by-90-.jpeg
Decanted the water and boiled it until the volume was reduced by 90%
Put-the-remaining-liquid-in-a-shallow-baking-dish-to-crystalize-the-potash.jpeg
Put the remaining liquid in a shallow baking dish to crystalize the potash
Scraped-up-the-potash-after-it-had-crystalized-for-a-week..jpeg
Scraped up the potash after it had crystalized for a week.
The-olive-and-coconut-oil-to-be-made-into-soap.jpeg
The olive and coconut oil to be made into soap
Preparing-a-vessel-for-dissolving-the-potash-in-a-little-hot-water-before-adding-to-the-oils.jpeg
Preparing a vessel for dissolving the potash in a little hot water before adding to the oils
Put-the-jar-of-oil-in-a-hot-water-bath-to-speed-up-the-reaction.jpeg
Put the jar of oil in a hot water bath to speed up the reaction
Used-a-stick-blender-to-start-the-saponification.jpeg
Used a stick blender to start the saponification
I-had-to-blend-for-a-long-while-with-some-breaks-in-between..jpeg
I had to blend for a long while with some breaks in between.
The-finished-soap.-It-smelled-like-old-timey-soap-and-worked-great-.jpeg
The finished soap. It smelled like old-timey soap and worked great!
Staff note :

Please add labels to your photos so the certifying team can better understand what you did.

Staff note :

certified for 2 oddball points

 
Pierre Michael
Posts: 146
159
6
  • Likes 4
  • Mark post as helpful
  • send pies
    Number of slices to send:
    Optional 'thank-you' note:
  • Quote
  • Report post to moderator
Was visiting a friend a few days ago and their neighbor had thrown out a bunch of lumber onto the street for garbage collection. I believe it may have been a deconstructed dog house or something, and I know they were also moving out.

In any case, spent a day cleaning up the boards and pulling out all the nails and screws. Then sanded it to get any gunk off.

Repurposed the wood to build a bed frame for my SUV for my upcoming road trip. The size of the wood was nearly perfect and just the right amount. I barely had to do much cutting. But I designed and built the frame and did a lot of sanding. Hooray, no plywood!
44582E76-610D-4FEC-808E-69E07EDF4146.jpeg
Lumber after collected
DA54C6B8-9FEC-4DB6-AB89-015B51A8A9CD.jpeg
Lumber after fasteners removed.
A73E8D47-177A-41AF-AADB-FC25D237E00F.jpeg
The removed fasteners.
BDC297F7-BF3A-483B-8246-8D64B3A90BBD.jpeg
Taking measurements.
2F8C318A-D899-4BE6-BE24-8ACFD0E8C05C.jpeg
The skeletal frame
The skeletal frame
113C9C84-8A2A-4BD2-993E-1D63467564FA.jpeg
With cedar tongue and groove planks.
A5BE7930-6690-462E-880F-C07D8A465278.jpeg
With foam mattress cut to size.
Staff note :

certified for 2 oddball points

 
Pierre Michael
Posts: 146
159
6
  • Likes 3
  • Mark post as helpful
  • send pies
    Number of slices to send:
    Optional 'thank-you' note:
  • Quote
  • Report post to moderator
Did a metalworking project today that didn’t fit into the metalworking category.

I have an awesome BioLite stove that uses twigs and other small bits of fuel to boil water and cook with.

The problem with it is that it needs to be refueled periodically in the middle of cooking something. Rather than taking the hot thing off, finding a place to set it, then refueling the stove, I wanted to make trivet or stand that would support the pot or cooking vessel and allow me to slide the stove out and refuel it and slide it back under.

Since I’m going to be traveling in my car for a while, I wanted it to be very packable and take little space. I came up with a folding concept that uses all-thread for packabilty and adjustability.
9EAE97D8-D8C6-4315-B5C2-10355EDFAE80.jpeg
Raw material + tools of the job
5E2582A1-8F90-48EE-B048-EE0EF8D73027.jpeg
Cut down the rectangular tubing to size.
37F0540B-37B1-479A-9774-CF21A5BCF162.jpeg
Notched the metal to make. Common pivot.
D5DD13EB-1C51-43A3-81FF-17746DF5290F.jpeg
Welded some nuts on
Welded some nuts on
7C8CE346-8140-4E33-94D6-5474822E99F0.jpeg
Action shot
Action shot
0FD1A830-E281-438A-8F35-12F2C751CCE0.jpeg
Cleaned up the welds and rust
F8F495C5-0862-4CB8-98F1-1FA50E1CDD8A.jpeg
Finished stand
Finished stand
F6AA3FB3-D04E-4358-9121-29CE7C3E3C6A.jpeg
Supporting a cast iron pan
59B0A66A-2D7E-4F2D-89F9-506634EC0E0C.jpeg
In conjunction with my BioLite stove
Staff note :

Certified for 1 oddball point

 
Royal Flush Bitches! Pay up tiny ad:
Easy Homemade Body Products eBook by Merissa A. Alink
https://permies.com/wiki/236574/ebooks/Easy-Homemade-Body-Products-eBook
reply
    Bookmark Topic Watch Topic
  • New Topic