• Post Reply Bookmark Topic Watch Topic
  • New Topic
permaculture forums growies critters building homesteading energy monies kitchen purity ungarbage community wilderness fiber arts art permaculture artisans regional education skip experiences global resources cider press projects digital market permies.com pie forums private forums all forums
this forum made possible by our volunteer staff, including ...
master stewards:
  • Nancy Reading
  • Carla Burke
  • r ranson
  • John F Dean
  • paul wheaton
  • Pearl Sutton
stewards:
  • Jay Angler
  • Liv Smith
  • Leigh Tate
master gardeners:
  • Christopher Weeks
  • Timothy Norton
gardeners:
  • thomas rubino
  • Jeremy VanGelder
  • Maieshe Ljin

Simple beginner bird house - PEP BB dimensional.sand.birdhouse

BB dimensional lumber woodworking - sand badge
 
pollinator
Posts: 1019
Location: Vancouver Island, BC, Canada
369
kids dog home care duck rabbit urban books building writing ungarbage
  • Likes 3
  • Mark post as helpful
  • send pies
    Number of slices to send:
    Optional 'thank-you' note:
  • Quote
  • Report post to moderator
Love the 'crappy bird houses'! If I could offer a few suggestions...

Please, NO exterior perches, these allow predators easy access; please ensure there is ventilation along roof sides.

Please ensure the 'floor' has drainage in all four corners (nipping tiny triangles off before inserting the bottom is ideal).

Please ensure it is easy to clean out (otherwise it just won't happen): installing front panel between side panels with screws then drill a downward sloping hole from side panel into front panel, slip in a nail and you have pegged the front closed with a nail.

Installed houses filled with several inches of wood chips makes them very appealing to house hunters!
 
steward
Posts: 15505
Location: Northern WI (zone 4)
4846
7
hunting trees books food preservation solar woodworking
  • Likes 1
  • Mark post as helpful
  • send pies
    Number of slices to send:
    Optional 'thank-you' note:
  • Quote
  • Report post to moderator
Approved submission
I made a crappy birdhouse today!  I used cedar boards from a deck I salvaged.  The back opens up for cleaning.
wood-I-started-with.jpg
wood I started with
wood I started with
All-done-.jpg
All done!
All done!
Staff note (Mike Barkley) :

I certify this BB is complete.

 
pollinator
Posts: 247
Location: KY - Zone 6b (near border of 6a), Heat Zone 7, Urban habitat
123
monies home care fungi foraging plumbing urban food preservation bee building homestead ungarbage
  • Likes 1
  • Mark post as helpful
  • send pies
    Number of slices to send:
    Optional 'thank-you' note:
  • Quote
  • Report post to moderator
Is it ok to use boards which were salvaged from shelves and had prior staining?
 
echo minarosa
pollinator
Posts: 247
Location: KY - Zone 6b (near border of 6a), Heat Zone 7, Urban habitat
123
monies home care fungi foraging plumbing urban food preservation bee building homestead ungarbage
  • Likes 6
  • Mark post as helpful
  • send pies
    Number of slices to send:
    Optional 'thank-you' note:
  • Quote
  • Report post to moderator
Approved submission
I am submitting birdhouses but went about it a little differently. First I had a short list of birds I wanted to provide for. I wanted to provide nest platforms for:

American robin / mourning dove
Carolina chickadee / tufted titmouse
Carolina wren
American kestrel/yellow-shafted flicker/Eastern screech owl

I also wanted to know about placement for occupancy success, etc. So I went to Cornell's NestWatch in order to look at specific designs. You can find them here:

https://nestwatch.org/learn/all-about-birdhouses/right-bird-right-house/

I supplemented the American kestrel/yellow-shafted flicker/Eastern screech owl research by looking at the boxes used by  going to the Northeast Connecticut Kestrel Project and looking at the plans by Art Gingert. Find them here:

http://nectkestrels.com/websites.htm

Additionally, I looked at the Hawk Mountain Sanctuary page for info (NOTE: the box plans are at the bottom of the page):

https://www.hawkmountain.org/conservation-science/active-research/raptor-conservation-studies/american-kestrels

I had a number of questions and started by talking to Art a few times via phone. He led me to Bob DeCandido of the American Kestrel Nest Survey NYC project. That info can be found here:

http://www.battaly.com/nehw/AmericanKestrel/news/

To look at appropriateness I also looked at flicker and screech owl boxes:

https://wdfw.wa.gov/sites/default/files/2019-11/flicker_nestbox.pdf

http://www.americanartifacts.com/smma/per/nestcam/10flicker.htm

https://www.audubon.org/news/how-build-screech-owl-nest-box

http://www.lakesidenaturecenter.org/MDC%20Plan%20-%20Sparrow%20Hawk%20or%20Screech%20Owl.pdf

https://news.maryland.gov/dnr/2020/01/01/habitat-project-eastern-screech-owl-boxes/

https://www.tn.gov/twra/wildlife/woodworking-for-wildlife/eastern-screech-owl-nest-box.html

Then I saw a YouTube video of a near instant predation event by a red-tailed hawk on a screech owl sitting inside a nest box with camera. That caused me to reach out to several DNR folks and box makers. To a person they said the box on the video and several sites are too shallow once you look at hole size, placement of hole and the boxes being shallow in general. That led me to make deeper boxes. I also had to modify designs to have the front open for cleaning rather than a side. This was due to the fact that I'd be standing on the 2nd floor roof to service and given how they would be mounted, side-opening would be less desirable.

I waiting for a long time for the right wood as the larger boxes needed larger pieces of wood. Then a friend asked me if I wanted shelves he ripped out of a house. There was enough poplar, maple, and fir that I now had enough to proceed.

I looked at platform-type next boxes for mourning doves and robins. I looked at Cornell again and sites like:

https://journeynorth.org/tm/robin/NestBox.html

https://70birds.com/bird-species/mourning-dove/

I modified to fit the constraints of the wood I had and the sites they would be located.

Finally, I'd already made some wren boxes and used sites like:

https://70birds.com/bird-species/wrens/

http://www.nestboxbuilder.com/nestbox-plans.html

I was able to use the scrap from the large boxes to cobble most of the wren and robin box parts.

I was lucky enough to use the shop of a friend and got to use a number of tools I don't have and procedures for angling cuts and whatnot. This was being planned for years but only recently was it a possibility as I wanted to scrounge the wood that might otherwise be wasted. One of the shelves had a dark stain covering. The shelves were 30-35 years old. I took the stain off of what would become the insides of the boxes. I was able to make two boxes with the stained pieces.

The large boxes had grooves cut into the front and two sides for chick ladders and chick perches below the holes in order to make exiting or hanging out near the hole easier. I sanded the sides, tops, backs, and bottoms glass-smooth so as to shed water more quickly. I added drainage to the bottoms of each box.

I did not want to use cedar as there are now warnings about compounds in the wood creating respiratory issues for nestlings and adults when using cedar for birdhouses.

All boxes were put together with screws so that I could easily replace damaged or rotted panels when necessary. I hate doing stuff over when a little planning on the front end can save materials or make them last longer. Especially since scrounged lumber comes rarely in my area. Additionally, to make the wood last longer I used beeswax on all seams, knotholes, dents, and anywhere that might create water issues. I used a mix of a few drops of orange oil and beeswax to treat any end grain. The oil was to help soak into endgrain tissue. This should keep the boxes functional far longer and hopefully will cut back on future maintenance. It also allowed me to leave the interior free of anything except for unfinished surface.

All boxes have been weathered for a year and have been installed. The weathering helps with roughening the inside but not with the same potential for splinters entering tender chick skin that physical or rough wood might take.

I know the bb was for the construction of 5 minute bird houses but I wanted to target certain species and make them appropriate for that narrow range of occupants. Additionally, I didn't want design to get in the way of occupancy. There are a lot of commercial birdhouses that are ill-suited for occupancy even by the least choosy species.

For those who hung in through the nerdy stuff, here are the photos...
BB-birdhouses1.jpeg
Getting ready to make bird houses for six species of birds.
BB-birdhouses2.jpeg
Rough fittings of bird house panels prior to making mods.
BB-birdhouses3.jpeg
The early American kestrel/yellow-shafted flicker/Eastern screech owl boxes were as deep as plans specified.
BB-birdhouses4.jpg
More bird house pre-assembly.
BB-birdhouses5.jpg
Later American kestrel/yellow-shafted flicker/Eastern screech owl boxes were made a few inches deeper.
BB-birdhouses6.jpeg
Early American kestrel/yellow-shafted flicker/Eastern screech owl boxes showing general mods.
BB-birdhouses7.jpeg
Later American kestrel/yellow-shafted flicker/Eastern screech owl boxes w/mods prior to front-opening design mods.
BB-birdhouses8.jpg
The collection of boxes made. Note the larger boxes have had the front modified to open for cleaning while still providing structure.
Staff note (gir bot) :

Mike Haasl approved this submission.
Note: I think you also qualify for the https://permies.com/wiki/107920/pep-animal-care/PEP-BB-animal-sand-birdhouse as well if you want to post one of the houses to that thread

 
echo minarosa
pollinator
Posts: 247
Location: KY - Zone 6b (near border of 6a), Heat Zone 7, Urban habitat
123
monies home care fungi foraging plumbing urban food preservation bee building homestead ungarbage
  • Mark post as helpful
  • send pies
    Number of slices to send:
    Optional 'thank-you' note:
  • Quote
  • Report post to moderator
My submission for the pep lumber woodworking bird house BB. Thanks for your time.

https://permies.com/wiki/10/99528/pep-dimensional-woodworking/Simple-beginner-bird-house-PEP#1184593
 
Posts: 167
49
homeschooling forest garden urban cooking medical herbs writing
  • Likes 2
  • Mark post as helpful
  • send pies
    Number of slices to send:
    Optional 'thank-you' note:
  • Quote
  • Report post to moderator
Wow!  Very inspiring, Echo.
 
gardener
Posts: 325
Location: NW Washington - Zone 8b (15 to 20 °F / -9.4 to -6.7 °C)
270
2
cattle goat foraging trees earthworks cooking building solar sheep wood heat
  • Likes 3
  • Mark post as helpful
  • send pies
    Number of slices to send:
    Optional 'thank-you' note:
  • Quote
  • Report post to moderator
Approved submission
I made a Tree Swallow birdhouse from cedar boards cut on the sawmill.  It is sized for Tree Swallows with internal dimensions of close to 5 in by 5 in on the bottom and 8 in tall. The hole is 1.5 in and the top of the hole is 6 in above the floor. The corners were cut out of the floor for drainage as were the top back corners of the sides. One side is hinged at the top so the side can swing out for cleaning out the nest box. A long nail in a predrilled hole keeps the side door securely closed and serves as a small perch. I installed the birdhouse about 6 ft off the ground which is within the 5-6 ft range for Tree Swallows. This birdhouse would also work for Violet Green Swallows if it was installed a bit higher.  Swallows are insect eaters and beautiful birds both stationary and in flight which is why I chose to make this birdhouse for them.
20210214_115812.jpg
Raw materials.
Raw materials.
20210214_122449.jpg
Cut out parts.
Cut out parts.
20210214_123623.jpg
Under construction.
Under construction.
20210214_124950.jpg
Swinging door test.
Swinging door test.
20210214_131059.jpg
Final install location.
Staff note (gir bot) :

jordan barton approved this submission.

 
gardener
Posts: 1569
Location: Washington State
985
6
forest garden trees rabbit earthworks composting toilet fiber arts sheep wood heat woodworking rocket stoves homestead
  • Likes 3
  • Mark post as helpful
  • send pies
    Number of slices to send:
    Optional 'thank-you' note:
  • Quote
  • Report post to moderator
Approved submission
Here is my submission for the Dimensional Lumber - Sand - Build a Simple Bird House BB.

I started my research at NestWatch and learned the features of a good birdhouse then continued with their interactive Right Bird - Right House.  As I reviewed the recommended species, I decided to provide birdhouses for a small, insect-eating bird.  I decided to make birdhouses for the House Wren.  It is a "species in decline" in this area and requires an entrance hole with a diameter of 1" which allows access for House Wrens, Brown-headed Nuthatches, and Pygmy Nuthatches and excludes larger birds.

NestWatch thinks this birdhouse is of "moderate" difficulty and I made it of wood (pine) and screws (no glue).  The exterior footprint is 5.5" x 7".  To incorporate the weather-resistant design requirement, I made the roof significantly bigger than the house and cut gutters on the underside of the roof so any rain that catches on the bottom of the roof runs down the channel and away from the house.

To document the completion of the BB, I have provided the following:
- Wood you're starting with
- Finished birdhouse
0.jpg
the wood
the wood
1.jpg
drilling the entrance
2.jpg
the parts
the parts
3.jpg
partially assembled - showing roof gutter on underside of large (dark) piece and side access
4.jpg
assembled
assembled
5.jpg
mounted on a big pine at about 10'
Staff note (gir bot) :

Mike Haasl approved this submission.

 
Posts: 35
Location: Virginia, USA
34
homeschooling monies forest garden foraging books woodworking
  • Likes 3
  • Mark post as helpful
  • send pies
    Number of slices to send:
    Optional 'thank-you' note:
  • Quote
  • Report post to moderator
Approved submission
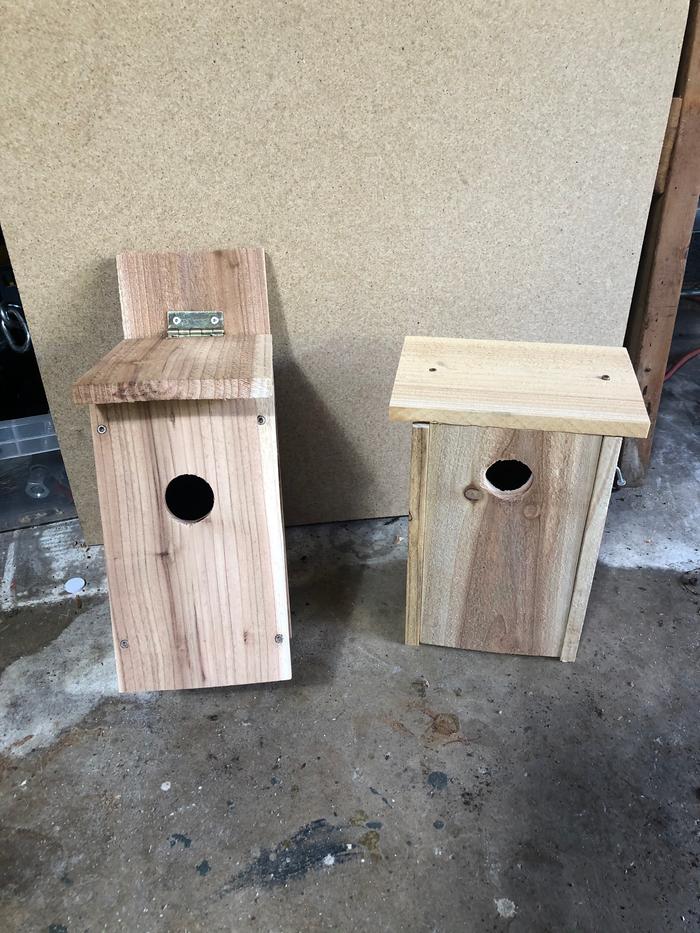
I've made an xbox bluebird house out of a cedar fence picket.  

I used a miter saw, and drill.

Here are the pictures!

01-Pre-Wood.jpg
The wood getting cut.
02-First_Cuts.jpg
The sides waiting to be put together
03-Complete.jpg
The one on the left was made a couple months ago also out of a fence post. The one on the right was made today.
04-Complete_Open.jpg
This is a view of them open! Makes it easier to clean out.
Staff note (gir bot) :

Mike Haasl approved this submission.

 
Posts: 64
Location: Niagara Falls, Ontario, Canada
66
3
food preservation woodworking rocket stoves
  • Likes 3
  • Mark post as helpful
  • send pies
    Number of slices to send:
    Optional 'thank-you' note:
  • Quote
  • Report post to moderator
Approved submission
I made a birdhouse today for black capped chickadees. Got the plans off of nestwatch. May submit to animal care birdhouse badge with more details once it's put up (still drying from the linseed oil). I used an old fence board, sanded off the old stain (just on one side). I positioned the sanded side as the exterior and applied linseed oil. I drilled ventilation holes, cut corners in the floor for drainage, and used pivot nails for the of the sides to open up for cleaning. I also cut some steps on the inside of the front for the baby birds to be able to climb out easier.
DC30D722-393F-42D0-97CF-ECBF1F616121.jpeg
Sketched plans from nestwatch
E9221A6D-90B2-420C-ACD4-2FB1123C5BB6.jpeg
Starting materials
Starting materials
CA27E873-4106-4309-B1EA-6333B15DDD56.jpeg
Cut to size
Cut to size
A70A8398-F5C5-4C90-9AF6-45719E34E9A4.jpeg
Steps for the babies
DD546096-336E-4E15-B1D3-7AA4C6AE4429.jpeg
Sanded exterior and vent holes and drainage corners
1B0BA004-DA41-404B-99DB-110F16BF3620.jpeg
Side opens
Side opens
F8924E02-C242-4EA1-8CDC-52E7BFD118C0.jpeg
Before linseed
Before linseed
5C9AF841-FA7D-460C-ABE4-D86B2222C3CF.jpeg
After linseed
After linseed
Staff note (gir bot) :

Mike Haasl approved this submission.
Note: FYI, the Animal Care birdhouse needs to be a different one than this birdhouse

 
You didn't ask if I was naked, you asked if I was decent. This is a decent, naked, tiny ad:
GAMCOD 2025: 200 square feet; Zero degrees F or colder; calories cheap and easy
https://permies.com/wiki/270034/GAMCOD-square-feet-degrees-colder
reply
    Bookmark Topic Watch Topic
  • New Topic