Here is my submission for Homesteading Oddball Points: Build (Weld and Assemble) a Gasification Unit.
History: Gasification is a process that converts biomass or carbonaceous materials into combustible gases. Gasifiers have been used to power vehicles since WWII and are often built out of readily available tanks and materials. Jim Mason at
All Power Labs (APL) standardized gasification reactors so that many people using the same system could compare results using different fuel sources and providing combustible gasses to different engines and vehicles. In 2008, I spent a week at All Power Labs and built my very own GEK (Gasification Experimenters Kit). It was version 0.8 and only the fourth to be built. I returned to APL in 2009 and assembled a much-improved unit (version 2.0) and now have acquired a third unit that was shipped to me fully assembled in 2010. More recently, APL is focusing on providing turnkey power stations with the GEK at its core.
Version 0.8 welding and initial assembly at All Power Labs (2008) Overview
APL cut the steel and provided a kit including sheet steel (for the cylinders), plate steel (for the rings and flanges), and parts (including standard plumbing pipe parts, nuts, bolts, and hoses).
I did all the welding and assembly with guidance from Jim Mason. I spent 4.5 very long days at APL doing the initial assembly then 3 more days after returning home to complete the project.
Major Components List requiring welding and assembly:
Gas Cowling – top ring/flange, bottom plate, cylinder
Reactor Unit – one plate, three flanges , two cylinders, and plumbing parts welded in place
A third cylinder (made of stainless) goes inside to separate the ash insulation from the char reaction zone
Cyclone/Filter Unit - a cylinder, a cone, a top plate, and a paddle fan assembly unit
Paddle Fan Unit - sits on top of the cyclone/filter unit and consisted of several flanges, a very short cylinder, the fan plate with blades, and some plumbing
Gas Burner - a cylinder, a base plate, and a 2" section of steel pipe
Building My First GEK
I started by rolling the sheet steel into cylinders and welding the rings and flanges to the top and bottom of the cylinders.
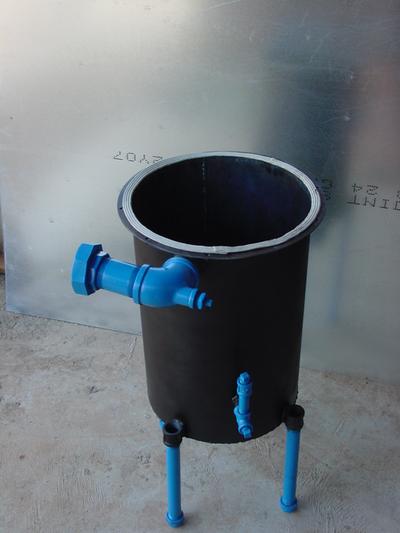
The gas cowling unit is a cylinder with a top flange and bottom plate with plumbing parts for the legs and several connections to other components. The legs are a short piece of threaded pipe with a cap on the bottom end and a pipe connector or socket welded to the gas cowling.
The completed gas cowling with plumbing parts welded in place for the legs and other connections.

The reactor is two cylinders with top flanges and bottom plates plus lots of additional pieces welded in place.
 Me welding a flange to the top of the reactor cylinder
Five sets of standard elbows were welded through the bottom of the reactor so that 1/2" stainless steel flex line could be wound up the outside of the reactor to act as a heat exchanger warming the incoming air on its way into the center of the reactor and cooling the outgoing combustible gasses.
 The completed reactor (shown upside-down) with heat-exchanger fles lines attached to the welded plumbing parts at the top and bottom.
 It will all slide right inside the gas cowling unit.
The standard elbows connect to these air inlets (street elbows with the threads ground off) inside the reactor: these pipes and nozzles bring atmospheric oxygen pre-heated by the stainless steel hoses into the reaction zone.

Inside the circle of five air inlets and just below the nozzles sits this stainless hourglass with a thermocouple port on the side. The upper portion will hold the glowing bed of charcoal where the pyrolysis will occur.
 Cyclone Assembly
Two different-sized cylinders, top flange, middle flange with 2" gas infeed, and a cone plus a 2" pipe stub inside the smaller cylinder.
My friend is holding the combined cyclone and filter unit.

The gaseous fuel exits the gas cowling and enters the cyclone swirling around allowing particles and condensate to drop out while the gas moves up through the steel wool filtration unit (larger cylinder).
Paddle Fan Assembly

A paddle fan and motor on top of the cyclone/filter unit create a vacuum drawing the various gasses through the system.

This is the bottom of the fan showing the tacks to hold the fan blades
At this point, I brought all the parts home and painted and assembled the unit which took about 20 hours over the following week.
Painting the GEK to prevent corrosion
Packing the reactor with insulation(white) and char(black)

The GEK nearly assembled - just need to add a mason jar, paddle fan, and some hoses
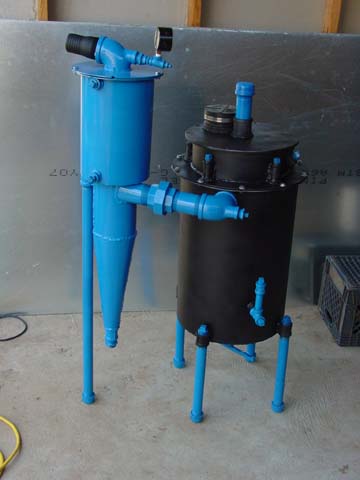 Cyclone/Paddle Fan Housing
 Paddle Fan and Motor
 Gas Burner
 - One cylinder, a bottom flange, and a 2" piece of pipe getting painted
 Firing Up the GEK

With the fan motor set on high and glowing embers in the reaction zone, I loaded more wood chips, bolted on the lid, and had a mixture of carbon monoxide, hydrogen, nitrogen, and steam flowing to the burner within minutes.
Lots of gas was being produced, but I could not maintain a sustainable flame until I turned the fan off and the motor slowed. Evidently, the exit velocity of the gas was so fast that it kept blowing the flame out.
I picked up a dual-control switch and wired the fan motor so I could run it at either low or medium speed. With the upgrade (switch) installed, I decided to give it another try. This time I let the fire burn a bit longer before loading more fuel, securing the lid, and turning on the fan at low speed. By the time I completed these tasks, producer gas was already flowing to the burner where it lit immediately and sustained a beautiful flame.

My friend lit the producer gas while I finished bolting down the lid.
FLAME
 Campfire?

It was a cool afternoon so we spent a few minutes enjoying the warmth before turning off the fan and getting on with our late-afternoon projects. We returned about two hours later with marshmallows to christen the new swirl burner.
 S'Mores Anyone?


 2
2


 2
2


 3
3


 2
2


