• Post Reply Bookmark Topic Watch Topic
  • New Topic
permaculture forums growies critters building homesteading energy monies kitchen purity ungarbage community wilderness fiber arts art permaculture artisans regional education skip experiences global resources cider press projects digital market permies.com pie forums private forums all forums
this forum made possible by our volunteer staff, including ...
master stewards:
  • Carla Burke
  • Nancy Reading
  • John F Dean
  • r ranson
  • Jay Angler
  • paul wheaton
stewards:
  • Pearl Sutton
  • Liv Smith
  • Anne Miller
master gardeners:
  • Timothy Norton
  • Christopher Weeks
gardeners:
  • AndrĂ©s Bernal
  • Jeremy VanGelder
  • Matt McSpadden

Tips for first year-successful garden beds? What are your plans?

 
gardener
Posts: 814
Location: Ontario - Currently in Zone 4b
527
dog foraging trees tiny house books bike bee
  • Likes 5
  • Mark post as helpful
  • send pies
    Number of slices to send:
    Optional 'thank-you' note:
  • Quote
  • Report post to moderator
For obvious reasons, we want to ramp up production at my mom's house this year considerably. Last year it provided about half as much produce as 2 people could eat, plus extras to some neighbours and family when the production was high. Pickings were lean during the spring.  

This year, we want to grow enough to feed me + my mom + grandma, and have storage crops. When grandma is around, Mom and I probably double the number of vegetables we eat :)  Mom's started my saved seeds indoors, and I've ordered a bunch of seeds to be delivered (hopefully) to her house in the coming days.

Last years gardens were all first year gardens or older gardens in sad shape that were mulched twice with cedar wood chips, which have decomposed enough on the bottom to start to provide better soil texture and more nutrients. They should start to produce well this year.

Mom and grandma are both very experienced traditional gardeners, but both have historically made and maintained garden beds with a rototiller or a tractor - neither of which we have. I'm a double dig in the spring, then "throw on the mulch, I hate weeding" kind of gardener.

My plan right now is to kill grass in a large sunny area with multiple layers of  large pieces of wet cardboard, and poke holes for seedlings, and throw on whatever organic matter we can scrounge in lasagna layers. I plant to dig, turn, and rake out weeds/grass to start a bed for onions, carrots, and other fine-seed plants. Mom still has snow, and I am self isolating for a few more days before I head home, so it's not going to be dug for a week or two yet!

How do you start new gardens? What are your plans for new gardens this year?
 
Posts: 576
Location: Richwood, West Virginia
11
  • Likes 5
  • Mark post as helpful
  • send pies
    Number of slices to send:
    Optional 'thank-you' note:
  • Quote
  • Report post to moderator
Lol, my place has an area that floods every ten years or so and thinking about how the farmers on the river Nile depended on the yearly floods to fertilize their fields I figured it would make a great garden but to my surprise it didn't. So I found where the county tips it's rich soil that is scraped from the side of the highways (yeah, lucky me, it's on my property) and I'm gradually making raised beds to hopefully improve the crop but it's a lot of work along with constructing a dyke to keep back the expected flood.
 
Catie George
gardener
Posts: 814
Location: Ontario - Currently in Zone 4b
527
dog foraging trees tiny house books bike bee
  • Mark post as helpful
  • send pies
    Number of slices to send:
    Optional 'thank-you' note:
  • Quote
  • Report post to moderator
I gardened in a flood plain one year, with the same logic. I found the soil too silty and too wet to grow a good garden. I think it also needs to be said that the Nile (prior to being dammed) was very muddy water (probably clay rich) while the small river I gardened next to was fast flowing and very clear.
 
pollinator
Posts: 981
Location: New Brunswick, Canada
244
duck tiny house chicken composting toilet homestead
  • Likes 3
  • Mark post as helpful
  • send pies
    Number of slices to send:
    Optional 'thank-you' note:
  • Quote
  • Report post to moderator

Catie George wrote:
My plan right now is to kill grass in a large sunny area with multiple layers of  large pieces of wet cardboard, and poke holes for seedlings, and throw on whatever organic matter we can scrounge in lasagna layers. I plant to dig, turn, and rake out weeds/grass to start a bed for onions, carrots, and other fine-seed plants. Mom still has snow, and I am self isolating for a few more days before I head home, so it's not going to be dug for a week or two yet!

How do you start new gardens? What are your plans for new gardens this year?


If you're not in London, chickens are the answer to starting new gardens.  I've penned hens into temp runs where I wanted gardens and they kill the grass and weeds, dig up all the grubs, and fertilise too.  I found that hens could prep about a square foot a day.  Best and easiest garden prep ever.  Once the garden's established, I let them in for the last hour or so before sunset and they'd eat the bugs for me too.

I lived in KW for years and spent the rest of my time around London.  Where abouts are you?  Don't worry if you don't want to say.  I moved to Murray Corner NB last year.  Love it here though the 'yotes come right up to my door.
 
Catie George
gardener
Posts: 814
Location: Ontario - Currently in Zone 4b
527
dog foraging trees tiny house books bike bee
  • Likes 2
  • Mark post as helpful
  • send pies
    Number of slices to send:
    Optional 'thank-you' note:
  • Quote
  • Report post to moderator

Timothy Markus wrote:

If you're not in London, chickens are the answer to starting new gardens.  I've penned hens into temp runs where I wanted gardens and they kill the grass and weeds, dig up all the grubs, and fertilise too.  I found that hens could prep about a square foot a day.  Best and easiest garden prep ever.  Once the garden's established, I let them in for the last hour or so before sunset and they'd eat the bugs for me too.

I lived in KW for years and spent the rest of my time around London.  Where abouts are you?  Don't worry if you don't want to say.  I moved to Murray Corner NB last year.  Love it here though the 'yotes come right up to my door.


I'm in Niagara, but will be gardening again in Eastern Ontario. I'm immunocompromised, so have to give up house hunting for the time being. I can work from home, so given the choice between a few months of isolation in my apartment in "the bad part of town", or a few months of isolation at my mom's house, with a garden? Yeah. Easy choice.

I'd love chickens, they are like the permaculture "rototiller and garbage disposal all in one". I have been half trying to convince either of my parents to get some this year, with no success. I usually travel to much to have them even though my city would allow them.

 
steward
Posts: 15392
Location: Northern WI (zone 4)
4779
7
hunting trees books food preservation solar woodworking
  • Likes 3
  • Mark post as helpful
  • send pies
    Number of slices to send:
    Optional 'thank-you' note:
  • Quote
  • Report post to moderator
I've been asking myself how I'd suggest people start a garden from grass.  I think I'd suggest they lay down a layer or two of brown cardboard (minus the tape, labels and staples) and get it wet.  Then get wood chips to make paths and get soil to make beds.  Pile them on a couple inches deep.  Beds 2.5-3' wide, paths 18" wide.  Do this part as soon as the snow melts.  Then mulch the soil with grass clippings throughout the summer.  Not thickly, probably just 1/2 to 1 inch.  

Then when transplanting things like tomatoes, dig apart the soil, poke through the cardboard and dig up the underlying soil enough to plant.  When starting seeds, just plant them into the soil and when their roots get to the wet cardboard, hopefully they'll be able to wiggle right through it.  Root crops like carrots may or may not work, I'd be very curious to see.  

If the ground is compacted it might be beneficial to stab it with a pitch fork or broad fork to loosen it up (not turn it over).

This above is just a theory but I'm thinking it should work.

To make a field in a pasture, I laid down cardboard, covered it with an inch of sandy crappy soil and then planted sunflower seeds in it.  I stabbed through the cardboard with a steak knife at each place where I put a sunflower seed and 80% of them grew to full size.  No mulch and no care so that's why I'm thinking the proposal above could work nicely.  And should be nearly weed free for the first year.
 
Catie George
gardener
Posts: 814
Location: Ontario - Currently in Zone 4b
527
dog foraging trees tiny house books bike bee
  • Likes 3
  • Mark post as helpful
  • send pies
    Number of slices to send:
    Optional 'thank-you' note:
  • Quote
  • Report post to moderator
My adventures in making a large (hopefully) first year successful garden bed began today.

Today I covered an approximately 25 x 15 ft area in a single layer of cardboard, weighed down by rocks/stones/boards/bricks. It's due to rain for 48 hrs or so, and the idea is to try to keep it wet for a month or two until planting time, to rot the grass below.

My mom and I (mostly my 60+ year old mom, who always makes me feel like a slow, lazy "lunchbucket layabout" in comparison when we work together) also raked up all the leaves in the yard and on last years gardens.  The leaves will be piled on top of the cardboard once it's saturated enough to hold itself down and I can take off the rocks/boards/bricks. My mother has also volunteered my services for raking up and wheelbarrowing away the leaves in the back corner of a neighbours' yard. Yay, i think?

We may have another load of wood chip mulch delivered, as well.  I think the apocalypse must truly be here - I was stating a 15x 15 foot bed, and my mother kept egging me to make it as big as possible (and providing more cardboard). She maintained a 60x 40' bed for a few years, and always swore she never wanted to do it again, and is usually after me not to make too large of a garden! I think watching how my mulched beds last year performed has changed her mind. We'd both rather spend a few days putting down mulch in the spring then hours weeding in the height of the summer.

I don't want to buy topsoil/soil, so for fine seeds (carrots, turnips, parsnips, etc), I started cutting sod with an edger, spearing it into the wheel barrow with a digging fork, and wheelbarrowing it away to compost and kill the grass/weeds before returning it to the garden. The goal is a 5 x 15' garden with fine, weed free soil to start carrots, parsnips, and turnips in the coming weeks. I've so far done about 5 x 3'. I shook what soil I could back into the bed with the fork. By cutting the sod off, then letting the soil sit for a week or two, it allows some weed seeds to germinate, then get raked out before I plant. So long as I avoid walking on it (will probably put down boards to stand on when I plant) it actually looks like reasonably loose, fertile soil. After the seedlings come up, I will mulch between the rows with leaves/woodchips. I will note that I would MUCH rather be prepared a year a head, and smother the grass with mulch rather than cut and remove it. Much less work, much better for the soil.

I am realizing the advantages I have over someone truly trying to "first time" garden. Including good somewhat non-standard tools (nice edgers, a digging fork, a variety of rakes, etc). Also including my mother's advice. I'd planned on turning in the grass and double digging, but using the edger and removing the sod will mean much less weeding down the road.
 
Catie George
gardener
Posts: 814
Location: Ontario - Currently in Zone 4b
527
dog foraging trees tiny house books bike bee
  • Likes 6
  • Mark post as helpful
  • send pies
    Number of slices to send:
    Optional 'thank-you' note:
  • Quote
  • Report post to moderator
More work today. Raked up a bunch of leaves and garden debris and mulched a third of the cardboard covered area 15-40 cm thick or so, and cut off another bunch of sod. This sod we flipped upside down on the cardboard to try and kill the grass roots. Starting a (hopefully) successful from the first year garden is hard work.

The soil is surprisingly good- local rumour has it there was a garden were we are working 15 years ago or so.

Oh ! Better yet! Almost no ice in the ground today, even in the shady areas.
20200404_190834.jpg
Today's progress
Today's progress
 
pollinator
Posts: 230
Location: CW Ontario, Zone 5
50
4
hugelkultur forest garden foraging cooking
  • Likes 1
  • Mark post as helpful
  • send pies
    Number of slices to send:
    Optional 'thank-you' note:
  • Quote
  • Report post to moderator
Good topic for these times.  Keep us posted.  It's fun to watch new gardens arise
 
Catie George
gardener
Posts: 814
Location: Ontario - Currently in Zone 4b
527
dog foraging trees tiny house books bike bee
  • Likes 4
  • Mark post as helpful
  • send pies
    Number of slices to send:
    Optional 'thank-you' note:
  • Quote
  • Report post to moderator
My cardboard is now fully mulched with either sod, leaves, or some of  the contents of my neighbour's "garden waste" pile, and I've widened the bed by a few feet. I've only taken about half of my neighbour's pile and have sod left to turn, so now I'm looking for more cardboard.

I originally intended for this thread to be tips on how to start a first year garden - so today I documented what I did, in hopes it helps someone else.

For removing the sod - I've been using an edger and a digging fork. A digging fork is similar to a pitch fork, but instead of being used to toss things, it's used to lever things out of the ground. Also good for potatos, etc

The tools for removing sod:


Preparing the bed!!!

I first cut the outside of a block with the edger, levering the soil up a bit and loosening as I go - I usually cut large strips horizontally and vertically, as much as I plan to accomplish in one day, into narrow pieces a bit bigger than 1 fork width wide by 2 fork widths long. I made these smaller so i could pick them up one handed while holding my phone to photograph.


I then use a digging fork to lever up and loosen the sod block - usually I just need to pry at 1-2 sides, and it pops out.


I can then pick up the block with my fork by stabbing it, then lightly shake it to shake some of the good dirt back into the bed, and put it in a wheelbarrow or directly on my adjacent cardboard area to serve as mulch.


I've double dug in the past, and kept the sod in, but I find I get WAY too many weeds - and I hate weeding.

Didn't take pictures of this, but I raked out any leftover pieces of grass and picked some of the small stones with a garden rake. I'm lazy, so there's still a lot of stone in there. I then spread a feed bag full of manure on the prepared area, and raked it in with the rake to mix the soil. I don't fuss having leaves or bits of my mulch fall into the bed, it's just more organic matter.

Preparing for planting

Today i planted the first stuff in this bed - onion sets! My gardening's a bit... unique because i am hand digging this, so I want to plant as closely as possible, and I hate bending to weed.

I figured out how far I can comfortably reach with my rake, and put a board across the bed a bit further than that. This means, I can stand on the board, or on the garden edge and reach with a rake to weed the rows in between without having to tromp through the plants. The board also minimizes compression of the soil, and demarcates the boundaries of different planting areas. Think of it as traditional gardening meets square foot gardening...


I then set up a string line for my first row. I plant in rows, because bitter experience has taught me they are way easier to weed, and I use a string line, because I can't sow a straight row (or cut sod in a straight line, but that's beside the point) to save my soul. The instructions on the package said to plant 3" apart, with 15" between rows (this gives you plenty of room to stand) Nope. I'm hand digging, and am lazy!

I planted the first row, then laid my favourite hoe (a scuffle hoe) next to it, and set the next row about 1.5 hoe widths wide. this means it will be easy to weed without bending, but much closer spaced than "traditional" spacing. So long as the rows are wide enough I can get a hoe between them, and wider than the in-row spacing, I'm happy. I can stand on the boards on either end of my mini-bed and reach to weed.


I put a board down between the rows as I sow them so I can walk in the garden without compressing the soil.

Today I was planting on onion sets, so I held a handful of sets in my left hand, poked a small hole with my right hand and popped in an onion set. At the end of the row, I lightly scuff the soil to slightly cover the onion sets with my hand.


That's all I got done for today!
 
pollinator
Posts: 364
Location: East tn
99
hugelkultur foraging homestead
  • Likes 2
  • Mark post as helpful
  • send pies
    Number of slices to send:
    Optional 'thank-you' note:
  • Quote
  • Report post to moderator
Yeah, I am normally an idealist. Have probably erred on the side of not enough disturbance on our little holding (other than hugels and ponds).

But given the obvious, I have stepped it up.

In zone 1 - i pulled the kids into setting up a perennial herb garden. We put cardboard down over lawn and surrounded it with firewood and then nulched it. Easy peasy.

In zone 2 - I borrowed some implements from a neighbor and used a subsoiler, and the plow, and then disc, to break up clay loam for a new garden area. Then we raked the loose soil into rows/beds. I used a mattock to dig a shallow trench on the downhill side of each bed and then we put split firewood into the trench as a border to help it keep its shape. Then we planted the rows and lightly nulched both the rows and mounds and walkways. Not quite so easy peasy but transitioned from boggy grassy area to raised beds. (Tilled it to make no till garden).

0402201318b_HDR.jpg
[Thumbnail for 0402201318b_HDR.jpg]
0411201621_HDR.jpg
[Thumbnail for 0411201621_HDR.jpg]
 
pollinator
Posts: 3651
Location: 4b
1319
dog forest garden trees bee building
  • Likes 2
  • Mark post as helpful
  • send pies
    Number of slices to send:
    Optional 'thank-you' note:
  • Quote
  • Report post to moderator
I started documenting a new garden bed here:
 https://permies.com/t/137414/Future-garden

Just one more way to do it.
 
gardener
Posts: 2167
Location: Olympia, WA - Zone 8a/b
1041
5
hugelkultur kids forest garden fungi trees foraging books bike homestead
  • Likes 6
  • Mark post as helpful
  • send pies
    Number of slices to send:
    Optional 'thank-you' note:
  • Quote
  • Report post to moderator
One tip I would give is to look at areas where you're already growing other plants but not vegetables. A lot of leafy greens are actually fairly shade tolerant and I have mixed potatoes around my shrubs and trees with good success--I just mulch them heavily and while the harvest wasn't big I never watered them and did nothing after planting until they were ready to harvest.

I think sometimes people forget that you can grow vegetables in areas that aren't an actual garden. I have arugula and some other vegetables growing from seed this year in my hedgerows and other perennial growing areas. I'm also trying to add perennial vegetables each year to these spots.

I still have more formal gardens but my thought is that if I can mix in vegetables throughout my property then I can guarantee that I will basically have a never ending supply of them. That also lets me focus my formal gardens on plants like beans, peas, peppers, tomatoes, basil, egg plants, squash, melon, corn and carrots. Though I'm planning on planting a lot of bush beans in my hedgerows this year just to supplement my climbing beans.
 
Catie George
gardener
Posts: 814
Location: Ontario - Currently in Zone 4b
527
dog foraging trees tiny house books bike bee
  • Likes 1
  • Mark post as helpful
  • send pies
    Number of slices to send:
    Optional 'thank-you' note:
  • Quote
  • Report post to moderator
Daron -excellent point about existing flower beds being good places to tuck veggies. All of my existing beds are heavily mulched perennial flower beds which I stick annual vegetables into- last year it kept two people in about half the veggies we could eat.

J - I also let idealism get in the way of practicality.  I normally would never till/remove sod, so it will be interesting to see how these traditionally constructed beds compare to my no till. I have made this one as a compromise with my mother.... my mulched beds, which I know will work, and she is skeptical of, and her traditional bare beds, which she knows will work, and I am a bit skeptical of.

Please, keep the ideas coming! There are a out as many ways to start a garden as there are gardeners, and all work better for different locations/available tools/crops/climates, etc
 
pollinator
Posts: 412
124
2
dog trees books bee medical herbs
  • Likes 2
  • Mark post as helpful
  • send pies
    Number of slices to send:
    Optional 'thank-you' note:
  • Quote
  • Report post to moderator

Catie George wrote:For removing the sod - I've been using an edger and a digging fork. A digging fork is similar to a pitch fork, but instead of being used to toss things, it's used to lever things out of the ground. Also good for potatos, etc


I saw the below video a couple of days ago. He shows a wonderful tool, and how to use it, to remove sod. If nothing else, the donkeys in it are worth the watch- they're very cute. :-)

https://www.youtube.com/watch?time_continue=25&v=w_2HHqyKsJo&feature=emb_logo
 
Catie George
gardener
Posts: 814
Location: Ontario - Currently in Zone 4b
527
dog foraging trees tiny house books bike bee
  • Mark post as helpful
  • send pies
    Number of slices to send:
    Optional 'thank-you' note:
  • Quote
  • Report post to moderator

Annie Collins wrote:
I saw the below video a couple of days ago. He shows a wonderful tool, and how to use it, to remove sod. If nothing else, the donkeys in it are worth the watch


Annie- I love the donkeys, but my back hurts just watching that guy. I wonder what happens when you hit a rock?

 
Posts: 19
Location: Zone 6b Sandusky, Ohio
4
  • Likes 4
  • Mark post as helpful
  • send pies
    Number of slices to send:
    Optional 'thank-you' note:
  • Quote
  • Report post to moderator
Catie, Congrats on your progress! I know what I'm about to tell you won't be helpful this growing season, but help you next year.
I too am in zone 6b. On the shore of Lake Erie southwest of you in Ohio.
Last fall I emptied as much as I could, my compost bins, and added compost to top off my newly raised bed. I then planted (mid to late Sept.)cover crop, and now the growth is over a foot high.
A few days ago, went in and did the"chop-n-drop"method, then, like you added soaked cardboard. The plan is, all material will be composted, by the time I plant Tomatoes, and peppers in that bed.
Last year was two crops of green beans, which worked out great.
Usually in the Fall, beds would be covered with shredded leaves about four inches deep, but wanted to try this method so root growth would benefit the future crops. BTW, you know your on the right path when you see a big fat nightcrawler in your soil.
Always experiment and keep a "Garden Journal" so next year or three years from now, you can go back and see how successful your garden was, or(most of all) failures.
Keep up the good work, because there is nothing more satisfying than eating something you grew, or canned.
 
Catie George
gardener
Posts: 814
Location: Ontario - Currently in Zone 4b
527
dog foraging trees tiny house books bike bee
  • Likes 4
  • Mark post as helpful
  • send pies
    Number of slices to send:
    Optional 'thank-you' note:
  • Quote
  • Report post to moderator
Planting day is finally here! I tempted the gods of winter and planted 1 week before last frost date, but the weather forecast looks like it won't drop below 5 C for the next 14 days, so, fingers crossed.

Half the tomatos went out last night (last years mulched beds) and I transplanted a bunch of perennials from a neighbour into last year's beds. Also in last year's beds, the garlic is up, the perennials are starting to bloom, the peas need to be trellised, and the lettuce has finally germinated.


(all but the flox is from the previous owner - and yes, that's chives in a flower bouquet )

In the new beds, the onions are doing well, the carrots have finally germinated, and today I planted out brocolli and cabbage starts and flour corn. Tomorrow, if it doesn't rain, I'll plant curcubit seeds, more carrots, parsnips, beets, onions (from started seed, not sets), and whatever else I am forgetting. I'll wait until one week after last frost for the rest of the tomatos, the ground cherries, and the peppers, so as not to provide too much temptation to the winter gods.


I was a bit over enthusiastic with seed starting this year, so far I've given away about 50+ tomato plants, and a dozen or so chili pepper plants, a few sweet peppers, cabbage and brocolli starts, and a couple ground cherries - 2 neighbours, 1 friend, 4 close relatives, and one distant relative who just lost her job. A few more things need homes - I may put them out with a free sign.

I now have 4 types of first year gardening beds that were originally sod, plus one more type I started last year.

(New garden beds)


I think I can comment already about what I prefer now... In order, from least hassle to most hassle...
- Cardboard then yard waste -20 x 25'? - (my favourite - easiest/fastest to construct, already starting to decompose, almost no weeds (only from some of the grass rakings I added)- but... can't use it for direct seeding small things this year, and it is a challenge to get enough yard waste and cardboard
- Cedar chip mulch over sod, irregular - aprox 20 x 50 (last years, mostly perennial flowers) - chips are slow to decompose, but easy, low maintenance.Can't use if for direct seeding small things in the first year, or areas that were mulched last fall, because of grass in waiting under the chips. Looks nice.
- Sod removal - 5 x 20' - very weed free, but hard work to do manually. Top dressed with manure. Can use for small seeded things first year, the same day sod is removed. Would consider renting a machine to do this if I want to expand the mulch free garden in the future, as my preferred method of turning grass to carrots and lettuce in one year.
- Traditional tilled garden - 13x 50' - rototilled 3 times, 2 weeks apart, raked to remove grass 2 times, a small amount of manure tilled in today.  A LOT of work/persistence, and there will be weeds. I am hoping on a day when the soil is drier I can scuffle hoe a bit and kill more weeds.
- Newspaper + manure - waste of time - 3x 5-  Newspaper is fiddly, blows in the wind even with lots of rocks/boards and manure on top, then shifts and lets weeds through. I added a second layer of newspaper today to try and smother the copious weeds. Cardboard is much easier/faster, does a better job. Won't do this again.

I am debating buying a dozen or so square bales of straw to keep the weeds down on the tilled garden.

After all this - no wonder people give up on a gardening, and say having a large garden is a lot of work! Using the traditional method (starting by tilling the grass under) is probably one of the more labour intensive methods, and STILL doesn't give you good, weed free soil without a lot of ongoing effort. I am so very glad I discovered mulch a few gardens ago.
 
gardener
Posts: 570
Location: Central Texas
239
hugelkultur forest garden trees rabbit greening the desert homestead
  • Mark post as helpful
  • send pies
    Number of slices to send:
    Optional 'thank-you' note:
  • Quote
  • Report post to moderator

Catie George wrote: I use a string line, because I can't sow a straight row (or cut sod in a straight line, but that's beside the point) to save my soul.


I just wanted to say "same, girl, same."
Between the gardens, fences, structures, and everything else I've done on my property, there's not a straight line to be found. Despite being able to mentally picture and design the geometric concepts, there's a disconnection between my brain and my hands that results in me not being able to do anything in a straight line.

But your project is looking great, and I'm excited to see how it continues to progress over the growing season!
 
Catie George
gardener
Posts: 814
Location: Ontario - Currently in Zone 4b
527
dog foraging trees tiny house books bike bee
  • Mark post as helpful
  • send pies
    Number of slices to send:
    Optional 'thank-you' note:
  • Quote
  • Report post to moderator
Into the first year garden so far:
-Brocolli
- Brocolli raab
- Cabbage
- flour corn
- Onions (sets and seedlings)
- potatos
- soybeans
- breadseed poppies
- zinnia
- beets (2 kinds)
- carrots (3 kinds)
- parsnip
- tsoisim
- amaranth
- basil
- tulsi
- parsley
- dill

Some things are in tiny 3 or 6 ' rows.

And I got it all planted before the rain started, so i dont even have to water!

I started the curcubits are in paper cups today, as I realized I dont want to plant them directly in the mulch, and also as I am not sure how viable some of my seed is.

One more day of my long weekend left- time to relax, stay inside, and recover from gardening (well , and maybe plant beans in the front yard).
 
Catie George
gardener
Posts: 814
Location: Ontario - Currently in Zone 4b
527
dog foraging trees tiny house books bike bee
  • Likes 1
  • Mark post as helpful
  • send pies
    Number of slices to send:
    Optional 'thank-you' note:
  • Quote
  • Report post to moderator
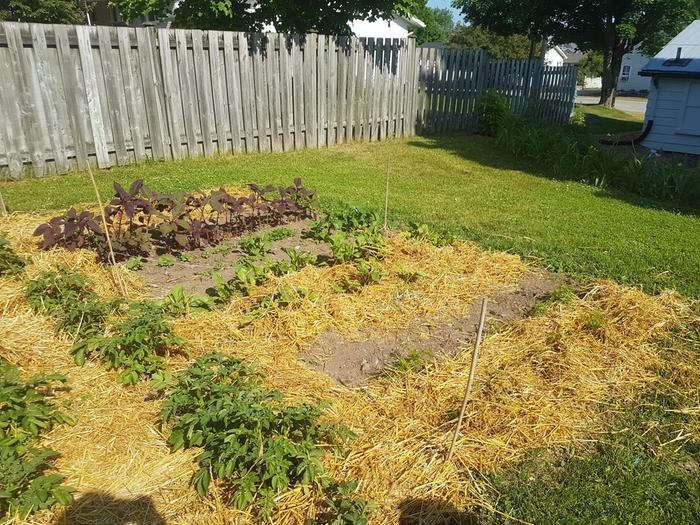
About 5 weeks from my last planting, thought I would post update photos... I think it's looking like, despite what I thought, you CAN get a good harvest from a first year garden bed.

I have mulched the tilled garden with straw, as we are already in a drought in June... I anticipate watering bans in the next month or two if we don't get some rain.


Garden waste garden, the waste has really broken down. Curcubits doing really well, but of the 12 + tomatos I planted out there, only 2 survive, and of the 10+ peppers, 4 survive. Some stupid vole is eating them. Luckily most of the ones in my front flower garden have survived. Weedy areas because I threw the rakings from the tilled garden on the top, so I just need to throw more mulch on them.


Cut sod garden - also doing really well. Mulched with lawn clippings I "liberated" from the roadside. Onions, carrots, brocolli, and some brocolli raab (flowering). Poor germination of one row of old carrot seed.


My tilled garden is doing... surprisingly well, but needs a lot of water. Just mulched most of it today. Corn, beans and squash seeds (too dry to germinate), then brocolli raab (yellow flowers), cabbage, potatos, and rows of little stuff. Potatos especially looking good, corn pops up more every time i bother to water it.


The smaller rows on the end are mostly doing well. I especially love the bright red amaranth (tasty!) Two rows of carrots, a row of parsnips that didn't germinate, onions, beets, zinnia, fennel, dill, two kinds of basil, tsoi sim, and parsley, and other stuff I am forgetting.


Anyways - just wanted to post this to share that in a few months with a few weekends of work, you can go from lawn to food garden!

 
Catie George
gardener
Posts: 814
Location: Ontario - Currently in Zone 4b
527
dog foraging trees tiny house books bike bee
  • Likes 1
  • Mark post as helpful
  • send pies
    Number of slices to send:
    Optional 'thank-you' note:
  • Quote
  • Report post to moderator
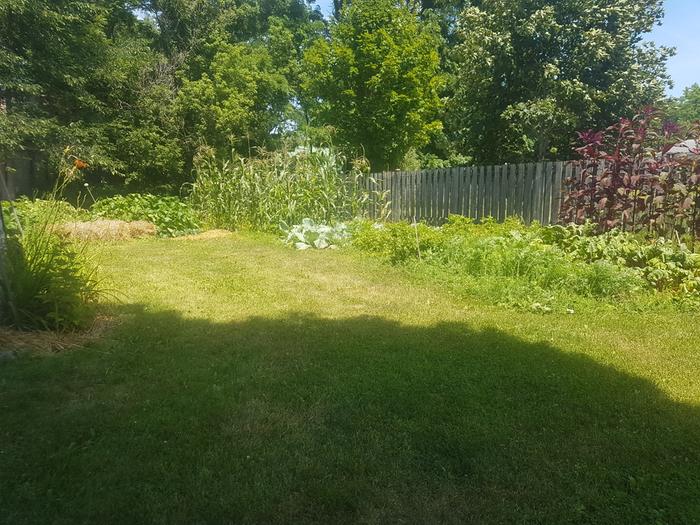
Harvested the first cherry tomato yesterday, pulled the onions over the last 2 weeks as they flopped and died, and pulled the garlic yesterday. Corn is looking great with lots of huge cobs, beans are climbing it, squash are doing well, and I ate the first cucumber of the season today. Scrumptious. The squash are doing great, it's my first time with maxima and they are huge and colorful already. The pepo and moschata are also doing well. The melons are a bit dubious but a few peppers are forming!  The brocolli is forming, the cabbage is HUGE, the potatos are finished flowering but not yet dying down. Amaranth is starting to bloom, dill is flowering,

Hoping to pull the first carrots and maybe some beets this week, and replace with fall crops. The garden is now mostly mulched with straw, we have been in a water ban and a drought.

The newspaper and manure bed, which I disliked in the spring definitely has the happiest and tallest and greenest squash plants. The plan for the fall is to get in a truck load of manure to put the garden to bed with so yields will be better next year.

To continue the theme - in one year you can go from grass to this:


2 weeks ago or so - but a better picture of my small rows.


Catie George
gardener
Posts: 814
Location: Ontario - Currently in Zone 4b
527
dog foraging trees tiny house books bike bee
  • Likes 1
  • Mark post as helpful
  • send pies
    Number of slices to send:
    Optional 'thank-you' note:
  • Quote
  • Report post to moderator
Well- thought I would update this thread. I had a mostly very successful harvest (talked about here- https://permies.com/t/148067/Successes-year-garden ).  All areas of the garden produced very well, I was very impressed by how well the cardboard broke down, barely a trace of the springs cardboard can be found, in many areas the mulch was eaten down to bare earth. The soil is far more workable and nicer than it was in the spring, easier to dig, more moist, more visible life as fungi and worms, and darker coloured.

We ended up not needing to buy pretty much any vegetables in the summer, and have a fair bit tucked away for the winter. It did really great for a first year garden.

Through October and November, I have mulched (with a combination of wood chips, leaves, and straw- wasn't able to get manure) the beds, and have been slowly expanding the garden in preparation for next year, using the cardboard method which remains my favourite for speed and amount of effort compared to amount of weeding and final production.

Here's the garden, with all but a small square of grass I am working to cover tucked in for the winter. Looking forward to seeing how it does next year.

 
No one can make you feel inferior without your consent - Eleanor Roosevelt. tiny ad:
two giant solar food dehydrators - one with rocket assist
https://solar-food-dehydrator.com
reply
    Bookmark Topic Watch Topic
  • New Topic