• Post Reply Bookmark Topic Watch Topic
  • New Topic
permaculture forums growies critters building homesteading energy monies kitchen purity ungarbage community wilderness fiber arts art permaculture artisans regional education skip experiences global resources cider press projects digital market permies.com pie forums private forums all forums
this forum made possible by our volunteer staff, including ...
master stewards:
  • r ranson
  • Nancy Reading
  • Carla Burke
  • John F Dean
  • Jay Angler
  • paul wheaton
stewards:
  • Nicole Alderman
  • Pearl Sutton
  • Anne Miller
master gardeners:
  • Christopher Weeks
  • Timothy Norton
gardeners:
  • Nina Surya
  • Matt McSpadden
  • thomas rubino

Construction tetris

 
steward
Posts: 21809
Location: Pacific Northwest
12405
11
homeschooling hugelkultur kids art duck forest garden foraging fiber arts sheep wood heat homestead
  • Likes 3
  • Mark post as helpful
  • send pies
    Number of slices to send:
    Optional 'thank-you' note:
  • Quote
  • Report post to moderator
Tetris was never something I was terribly good at. And neither is construction. And yet, here I am trying to plan some construction tetris for the future.

The Goal:

    To turn part of our 500sqft garage into a family room. And leave 1/3rd of it as a woodshop.


The situation:

    We have a 500 sqft attached garage (which is full of woodworking tools, toys and other stuff). We have a 950sqft house. It'd be nice to turn 2/3rds of that garage into a family room, so we can turn the current "family room" (a bedroom that acts as our office, hobby room, sewing room, computer room, music room and basically everything room) into a room for my daughter. We'd like for her to have her own room, instead of sharing it with her older brother when they're teens (she's 5 and he's 8 now).


The problems:

    (1) The garage is full of stuff. Where do we put that stuff while we turn the garage into a family room? Most of the stuff should be able to go back into the garage once we retrofit it...but where/how do we store it while we do the remodeling?

    (2) It's rainy here all but like 2-3 months of the year... and even during the "dry" months, 99% of the days have soaking mist/condensation at night. So nothing can just be left without cover.

    (3) The property came with a rickety, improperly build "barn"--we've dubbed it the Fally Downy Building. Despite it's name and lots of snow, it hasn't fallen down in the 9 years we've been here. But, the building's roof stinks, and I would NOT trust going up on there to fix it. So most everything that is stored in there, gets wet. Firewood, wheelbarrows, lawnmower, you name it. Soggy.

    (4) We don't have a truck. We'd need to rent or pay for supplies to be brought to our house.

    (5) We don't like debt, and would prefer to not spend too much on the project.


(6) We don't have large swaths of level land near our house, aside from the patio (which the kids play on). We have fruit trees and gardens most everywhere else...

(7) Neither my husband nor myself are good at building. My father is, but I don't want to put too much on his shoulders.

The solutions we've thought of:

    (A) Fork out lots (how much?) of money for a pole building to be installed in place of our Fally Downy Building. Store the garage stuff in there while we redo the garage, and then use part of the new Not-Fally-Downy building to house a lot of the garage stuff.

    (B) Somehow fix (or pay someone to fix) the Fally Downy Building to not be so "Fally Downy" and to have a good roof on it.

    (C) Buy cheap temporary storage to put things in while we remodel the garage.
    • one of those POD things?
    • a poll tent?
    • just use a tarp and hope for the best?


    (D) Build another building on our patio to house the woodworking stuff...and lose the flat area the kids ride bike and play on

    (E) Something else (Please tell me other options!)


The cost:

    I have no idea! I have a feeling the poll building is the highest cost. And just using a tarp to hold everything for months while we remodel is the cheapest (that is, unless all our stuff gets soggy and we have to buy new stuff). But, if anyone has better estimates on cost, or ways to make it cheaper, or ways to do it better and more naturally, please, please, PLEASE tell me!


Pictures!

The garage. We hope to divide it at the garage door mechanism. So the shop will have the garage door, and there'd be a door from it into the family room


The Fally Downy Building:

it's big


Is that how trusses go on?


We have to tarp the firewood, because the roof leaks nearly everywhere
image-from-above-plans.png
My attempt at trying to give an aerial view of the situation
 
steward
Posts: 15690
Location: Northern WI (zone 4)
4921
7
hunting trees books food preservation solar woodworking
  • Likes 4
  • Mark post as helpful
  • send pies
    Number of slices to send:
    Optional 'thank-you' note:
  • Quote
  • Report post to moderator
Regardless of many things, I think the Fally Down Building is a great asset.  How much snow has it held without falling down?

I think someone with a medium amount of construction experience could make it much less Fally Down by replacing the ridge beams with proper beams.  The rafters look creative but probably strong enough.  

Even without those repairs, I wouldn't be worried at all about being on that roof (except for stepping in the wrong place and breaking through if that's corrugated plastic).  
 
Nicole Alderman
steward
Posts: 21809
Location: Pacific Northwest
12405
11
homeschooling hugelkultur kids art duck forest garden foraging fiber arts sheep wood heat homestead
  • Likes 1
  • Mark post as helpful
  • send pies
    Number of slices to send:
    Optional 'thank-you' note:
  • Quote
  • Report post to moderator

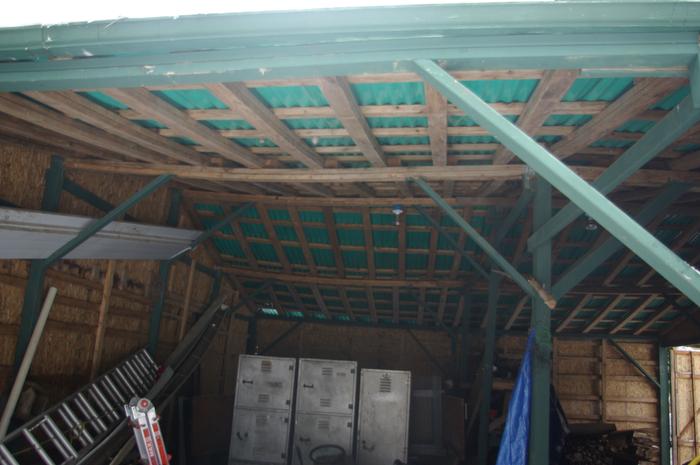
Mike Haasl wrote:Regardless of many things, I think the Fally Down Building is a great asset.  How much snow has it held without falling down?

I think someone with a medium amount of construction experience could make it much less Fally Down by replacing the ridge beams with proper beams.  The rafters look creative but probably strong enough.  

Even without those repairs, I wouldn't be worried at all about being on that roof (except for stepping in the wrong place and breaking through if that's corrugated plastic).  


Yep, that's corrugated plastic. It's at least 10 year old corrugated plastic. According to a neighbor, the roof it held up 2 feet of snow before we moved in. It held up 1.5 feet of slushy snow three years ago. I'm going to try and figure out when the previous owner built this thing.

How do I go about hiring someone to do this, or is this something that people without experience can do? Do I rent a truck from the hardware store to bring lumber? What lumber do we need?
 
Mike Haasl
steward
Posts: 15690
Location: Northern WI (zone 4)
4921
7
hunting trees books food preservation solar woodworking
  • Likes 5
  • Mark post as helpful
  • send pies
    Number of slices to send:
    Optional 'thank-you' note:
  • Quote
  • Report post to moderator
If it can hold up 1.5' of slushy snow, I would rename it the Staying Up Dammit building.  Heck, you may not need to do anything for that matter.  Just patch the holes.  It's awkward that it sways so much and would make new roofing tricky to put down (maybe).  And you can always go up there and shovel it off if you get over a foot of snow on there.  There's a BB for that

If you do want to beef it up, it would be nice to have someone with some building experience to do the job.  Think your dad could advise you on how it could be done or is it outside his wheelhouse?

I think the easiest way would be to just add new beams alongside the existing ones that bow down.  But it's hard to know for sure without looking at each post.  So I suspect where each beam is, it would only take a new "glue lam beam" or a 2x12 to remedy it.  It's very hard to tell from way over here, but it seems like someone could jack up a sagging beam, sister on a proper beam and attach it with proper connections to the post at each end and move on to the next one.  Probably under $1000 of materials but the expertise is the challenge.

Maybe there's a handyperson in your area?  Or a remodeling company?  Or a friend of a friend?  Or a permie who'd come out and do it in exchange for living in your back yard for a month rent free (not me)?

 
Nicole Alderman
steward
Posts: 21809
Location: Pacific Northwest
12405
11
homeschooling hugelkultur kids art duck forest garden foraging fiber arts sheep wood heat homestead
  • Likes 2
  • Mark post as helpful
  • send pies
    Number of slices to send:
    Optional 'thank-you' note:
  • Quote
  • Report post to moderator

Mike Haasl wrote:
If you do want to beef it up, it would be nice to have someone with some building experience to do the job.  Think your dad could advise you on how it could be done or is it outside his wheelhouse?

I think the easiest way would be to just add new beams alongside the existing ones that bow down.  But it's hard to know for sure without looking at each post.  So I suspect where each beam is, it would only take a new "glue lam beam" or a 2x12 to remedy it.  It's very hard to tell from way over here, but it seems like someone could jack up a sagging beam, sister on a proper beam and attach it with proper connections to the post at each end and move on to the next one.  Probably under $1000 of materials but the expertise is the challenge.


My dad's been looking at this building for years talking about how we could fix it. I'm pretty sure his idea is the same as your idea, but I feel like building terms are a whole new language that I haven't learned. It could very well be that he could guide us through this if we can get the right building materials.

Question about roofing: The current roofing is old. I don't really care for it being plastic, either. Would it be a terrible idea to install corrugated metal roofing on top of the old roofing, or would it be a whole lot better to remove the old roofing and put on new roofing?

I do NOT feel competent up high (I'm scared of heights and am quite clumsy, sadly). My husband likes being up high and is very well coordinates (when not disabled by Crohn's flare-ups), so he might be able to install roofing that won't leak...
 
steward
Posts: 1898
Location: Coastal Salish Sea area, British Columbia
1058
2
books chicken food preservation pig bike solar wood heat rocket stoves homestead ungarbage
  • Likes 3
  • Mark post as helpful
  • send pies
    Number of slices to send:
    Optional 'thank-you' note:
  • Quote
  • Report post to moderator
First time i have seen a big building like that made with flat 2x4 used for rafters. I am used to seeing them upright, or on their edges. I suspect this is why it is sagging like that.

it looks like it needs to be beefed up like what mike is saying.


If it were me i would take the roof off, get some new rafters/beams for the building and start new. Some of those 2x4 would be reusable for the strapping on the roof.
something like this


Around here it is easy to find someone who can do carpentry work. Do you have any friends who know someone who can do carpentry?

Know anyone with a truck, which can be borrowed? Or better yet the lumber yard can deliver to you.


It is a little difficult to give you a list of lumber to get without knowing the spans and whatnot. The carpenter would be able to help you with a lumber list.


Please remove the plastic roofing if you are going to replace it with metal. It will degrade and fall/crumble into the soil/ground. I have seen someone here do this and it leaves a big mess for whoever ends up using the building next.
 
pollinator
Posts: 1782
Location: Victoria BC
317
  • Likes 4
  • Mark post as helpful
  • send pies
    Number of slices to send:
    Optional 'thank-you' note:
  • Quote
  • Report post to moderator
Oh my gosh. The fally down building is hilarious, what an incredible chucklehead somebody was.

I am not sure if I would try to save it, it is so wrong. You could prop up those 'beams', with some more posts, as a quick patch.. But, if you are not going to fix it quite a lot, in my opinion it would be best to salvage the wood before it rots from the leaks. Disassemble in place, or remove the roofing and pull it over with someone else's truck to salvage on the ground...


Building a stick-framed shed is really easy. Unskilled helpers and one person with experience should be able to make quick work of a shed large enough to store a lot of your stuff while you work in the garage, and be useful for decades.

Get your father to sketch it out, and show you how to frame the floor and walls on the ground. Copy this start until you have the pieces, then get him to show you how to lift and assemble, install ply, etc. Use screws, you get multiple chances that way!

Lumber is pretty cheap again now. I am not sure that will last, and everything else is going up fast. Up to you whether you buy lumber for the shed, or wait til you have done the salvaging of the fally down building...

You have most of the lumber in the fally down building to make a good big storage shed, and a good woodshed; you'll need new roofing, probably some thicker plywood for floor and roof, and something to get the storage shed off the ground; cement shed blocks plus 6x6 skids under it is my usual choice, but some people do one or the other.

A shed with a raised wood floor and a plywood deck under steel roofing will be way drier than a dirt floor with strapping under steel roof. A pallet floor and strapping is fine for the woodshed , though, imo.

I would suggest a wideish shed, so if you want it bigger you can add on to the end and just keep going. But let your father decide how wide the rafters can span.. use rafter ties, show us the sketch if you are worried.

Use some of your wealth of salvaged lumber to build awesome shelving in the new shed. You can store a LOT of stuff in say a 10x12 space with deep shelves to the ceiling.


The fally down building is just not very useful in current form IMO; it's not reliable/safe, it doesnt keep things actually dry, it won't last long while leaking, it is taking up land that could be better used for better buildings, and it requires notably more experience and money to fix than a couple of smaller much more solid sheds.


Can you put a roof-rack on a non-truck vehicle you already own? Might not get you huge amounts of lumber, but the ability to grab a few 2x4s at a time is something, at least. I've seen a fair bit of lumber atop suvs using a 'rack' of 2x4s bolted through the  roof, and several sheets of 3/4 ply atop a steel rack on a 2-door suzuki samurai... if you think outside the box and aren't attached to resale value there are possibilities.. ratchet straps are key to safely securing cargo up there.
 
Mike Haasl
steward
Posts: 15690
Location: Northern WI (zone 4)
4921
7
hunting trees books food preservation solar woodworking
  • Likes 3
  • Mark post as helpful
  • send pies
    Number of slices to send:
    Optional 'thank-you' note:
  • Quote
  • Report post to moderator
I wouldn't try to roof over that plastic either.  Mainly because the new roof wouldn't sit flat on the structure with the wavy plastic under it.  

I'd first verify how/why the plastic is leaking.  Is it just a few holes here and there that could be plugged with silicone?  Is it a cracked panel here or there that could be replaced?  Or is it more substantial?  My metal roofed barn must have been hit with a pellet gun a few times in the past.  There are silicone blobs filling in a few dozen small holes and I suspect they've been there for over a decade.

If you reroof it, I'd take them off and try to sell them to someone.  Then I'd probably replace it with metal of some sort.  The big decision in my mind is if you'd fix the sag or not.  If you do fix the sag, for sure do that before redoing the roof.

If you didn't mind having the roof off while doing a bunch of work, you could tear it off and rework the beams/rafters like Jordan says.  I'd be tempted, in that case, to consider just rotate the rafters so they're on edge and rotate (or maybe better is to replace with bigger) the beams to be on edge.  If that building is holding up snow that well currently, turning the existing beams and rafters may be enough of an improvement.  The only way to fully remove the sag is by upgrading the beams with taller wood beams.

As for getting materials to your place, I'd rely on either the carpenter doing the work, a delivery from the lumberyard or borrowing a truck and/or trailer from a friend.
 
D Nikolls
pollinator
Posts: 1782
Location: Victoria BC
317
  • Likes 3
  • Mark post as helpful
  • send pies
    Number of slices to send:
    Optional 'thank-you' note:
  • Quote
  • Report post to moderator

Personally, I don't think reroofing without major structural improvements is remotely reasonable. The metal will weigh more, and the flexing, bowing structure will cause it to leak at the screws. Then you have put a lot of money and time into steel roofing on a structure that is still not actually reliable or likely to last the way it ought to...

Structurally the beams are definitely the worst part, but the rafters ought to be rotated vertical as well, as pretty much everyone has said. By the time you have stripped the roofing, strapping and rafters it will be much easier to fix the beams... but at that point the walls and posts are about the only thing left of the building...

It is doable, and it would be a real shame not to either fix it or salvage it... but I still think the small shed idea is more practical for novice builders with modest assistance, budget, and time...
 
master steward
Posts: 13038
Location: Pacific Wet Coast
7497
duck books chicken cooking food preservation ungarbage
  • Likes 5
  • Mark post as helpful
  • send pies
    Number of slices to send:
    Optional 'thank-you' note:
  • Quote
  • Report post to moderator
1. The problem with going to smaller sheds, is that 10'x10' is usually the max for no permit. I've worked with a lot of small spaces and would much rather have something you can move around in without feeling like you have to move 10 things to get at 1 thing.

2. If the current building was grandfathered, so long as you keep a sizable chunk of it, you won't have to worry about dealing with officials. There does look like there's some decent wood in it, so I think you need to give us some measurements to help you out better.
2a) what is the distance between the studs (vertical 2x4's ) on the wall at the  back of the photo?
2b) what is the distance between the studs (vertical 2x4's ) on the back wall - left - in the photo? They look further apart to me.
2c) what is the foot print and the spans between the posts?

3. For example, most buildings use studs on 16" centers. The left wall in the photo looks skimpier than that.

4. You're in earth-quake country, so if the walls and posts aren't fastened to the footings, that needs to be done right off. Similarly, Simpson strong ties need to be added to hold the roof on - if not in every location, in "enough" places that it can ride through at least the smaller quakes.

5. I agree with Mike:

new "glue lam beam" or a 2x12

I know here on permies we like to be as environmental as possible, but a building that rots or collapses looses all it's embodied energy, so if you have to compromise to get a useful, long lasting building, I would support that.

6. You need a budget - you need to estimate what you *need* to fix the Fally Down Building, and I'm tempted to say "double it".  A half done project will be no help at all - so you don't want to run out of money at a critical point when you discover a "fixable problem". (Left-over money could go towards the eventual house reno)

7. If you managed to fix that building this summer, you would have a safe place to store needed materials/equipment etc that are in your current garage. Yes, you want a family room in the house, but if that takes you another year or two to get there, you've got some time. You'll also be practicing a bunch of your building skills on the out building, which will (hopefully) make you more confident about the house reno.

8. You're not a dumb person - you just aren't educated in an area you may need to work on. Maybe your son will help you practice the words on the diagrams I've attached below? Demonstrating to your kids the need for life-long learning is a good thing in my opinion - make it this week's spelling test? Use your computer to remove the names so you have to fill them back in?  And lots of 8 yr olds can learn to use a hammer!


D Nikolls
pollinator
Posts: 1782
Location: Victoria BC
317
  • Likes 3
  • Mark post as helpful
  • send pies
    Number of slices to send:
    Optional 'thank-you' note:
  • Quote
  • Report post to moderator

Jay Angler wrote:1. The problem with going to smaller sheds, is that 10'x10' is usually the max for no permit. I've worked with a lot of small spaces and would much rather have something you can move around in without feeling like you have to move 10 things to get at 1 thing.

2. If the current building was grandfathered, so long as you keep a sizable chunk of it, you won't have to worry about dealing with officials. There does look like there's some decent wood in it, so I think you need to give us some measurements to help you out better.
2a) what is the distance between the studs (vertical 2x4's ) on the wall at the  back of the photo?
2b) what is the distance between the studs (vertical 2x4's ) on the back wall - left - in the photo? They look further apart to me.
2c) what is the foot print and the spans between the posts?

3. For example, most buildings use studs on 16" centers. The left wall in the photo looks skimpier than that.

4. You're in earth-quake country, so if the walls and posts aren't fastened to the footings, that needs to be done right off. Similarly, Simpson strong ties need to be added to hold the roof on - if not in every location, in "enough" places that it can ride through at least the smaller quakes.

5. I agree with Mike:

new "glue lam beam" or a 2x12

I know here on permies we like to be as environmental as possible, but a building that rots or collapses looses all it's embodied energy, so if you have to compromise to get a useful, long lasting building, I would support that.

6. You need a budget - you need to estimate what you *need* to fix the Fally Down Building, and I'm tempted to say "double it".  A half done project will be no help at all - so you don't want to run out of money at a critical point when you discover a "fixable problem". (Left-over money could go towards the eventual house reno)

7. If you managed to fix that building this summer, you would have a safe place to store needed materials/equipment etc that are in your current garage. Yes, you want a family room in the house, but if that takes you another year or two to get there, you've got some time. You'll also be practicing a bunch of your building skills on the out building, which will (hopefully) make you more confident about the house reno.

8. You're not a dumb person - you just aren't educated in an area you may need to work on. Maybe your son will help you practice the words on the diagrams I've attached below? Demonstrating to your kids the need for life-long learning is a good thing in my opinion - make it this week's spelling test? Use your computer to remove the names so you have to fill them back in?  And lots of 8 yr olds can learn to use a hammer!


Great points.

I am afraid that I looked at that fally down building and decided that permits could safely be disregarded. If permits are required and likely to be enforced... this is a strong argument for fixing the fally down building.

Either way you go with this, building things yourself is fantastic learning for all, and leaves you with skills as well. Way better than paying for an expensive pole barn or a cheap but basically disposable tarp-carport-thing.
 
Mike Haasl
steward
Posts: 15690
Location: Northern WI (zone 4)
4921
7
hunting trees books food preservation solar woodworking
  • Mark post as helpful
  • send pies
    Number of slices to send:
    Optional 'thank-you' note:
  • Quote
  • Report post to moderator
Nicole, if you want, we can try to guide you through it from afar but there's more risk with that and we may argue and fight over the best approach which may be worrisome for you...
 
Nicole Alderman
steward
Posts: 21809
Location: Pacific Northwest
12405
11
homeschooling hugelkultur kids art duck forest garden foraging fiber arts sheep wood heat homestead
  • Likes 1
  • Mark post as helpful
  • send pies
    Number of slices to send:
    Optional 'thank-you' note:
  • Quote
  • Report post to moderator

Jay Angler wrote:
2. If the current building was grandfathered, so long as you keep a sizable chunk of it, you won't have to worry about dealing with officials. There does look like there's some decent wood in it, so I think you need to give us some measurements to help you out better.
2a) what is the distance between the studs (vertical 2x4's ) on the wall at the  back of the photo?
2b) what is the distance between the studs (vertical 2x4's ) on the back wall - left - in the photo? They look further apart to me.
2c) what is the foot print and the spans between the posts?

3. For example, most buildings use studs on 16" centers. The left wall in the photo looks skimpier than that.

4. You're in earth-quake country, so if the walls and posts aren't fastened to the footings, that needs to be done right off. Similarly, Simpson strong ties need to be added to hold the roof on - if not in every location, in "enough" places that it can ride through at least the smaller quakes.


It's picture time! The kids and I attempted to measure things. Needless to say measurements might be off by a few inches, because kids wiggle.  

I also got you some pictures of the...footings. I can't quite tell if he cemented the wood into bricks he made, or just put the wood on top of the cement and called it good, or something else...
approximent-measurements.jpg
Both sides seem to be about the same dimensions. I wouldn't bet any money on that. The far back vertical framing doesn't seem to be consistent in size. I can go measure it if you'd like.
20220119_145439.jpg
The front, center pillar
20220119_145512.jpg
I'm not quite sure what's going on here...
20220119_145529.jpg
Another pillar, this one is by the back right door
20220119_145615.jpg
View of siding from the outside.
 
Mike Haasl
steward
Posts: 15690
Location: Northern WI (zone 4)
4921
7
hunting trees books food preservation solar woodworking
  • Likes 1
  • Mark post as helpful
  • send pies
    Number of slices to send:
    Optional 'thank-you' note:
  • Quote
  • Report post to moderator
I don't love the look of that wood on the front center pillar...  Is it mostly rotted or just that one corner?

Are all the posts resting on concrete blocks or pads?  None are buried in the ground?  Looks like it but just wanted to check...
 
Nicole Alderman
steward
Posts: 21809
Location: Pacific Northwest
12405
11
homeschooling hugelkultur kids art duck forest garden foraging fiber arts sheep wood heat homestead
  • Likes 1
  • Mark post as helpful
  • send pies
    Number of slices to send:
    Optional 'thank-you' note:
  • Quote
  • Report post to moderator

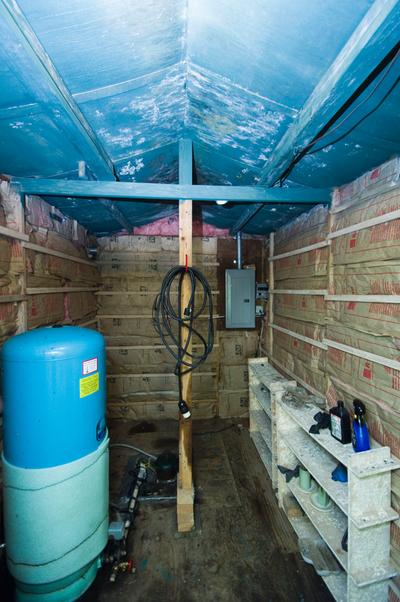
Mike Haasl wrote:I don't love the look of that wood on the front center pillar...  Is it mostly rotted or just that one corner?

Are all the posts resting on concrete blocks or pads?  None are buried in the ground?  Looks like it but just wanted to check...


I'm pretty sure that they're all just resting on concrete blocks &/or cemented into the block....
20220119_152100.jpg
Here's that center-front post. It looks like the middle is better than the outside, but still damp.
20220119_152124.jpg
A better picture of the second post picture I posted. It looks like some of the lumber was cemented into the cement block, and then the side wood was just attached later on.
20220119_152227.jpg
It was hard to get a good picture of this one, but it seems to indicate the cementing of the wood into the block. He did that on some other places on the property, too.
20220119_152425.jpg
The roof without snow on it. I think it leaks mostly because it's pieced together from small, continually warping corrugated plastic roofing
 
pollinator
Posts: 1178
Location: Boston, Massachusetts
515
6
urban books building solar rocket stoves ungarbage
  • Likes 4
  • Mark post as helpful
  • send pies
    Number of slices to send:
    Optional 'thank-you' note:
  • Quote
  • Report post to moderator
I'll second (third, fifth?) what everyone else has said about repairing the FDB and methods to do so. It would be worthwhile to fix, and not very expensive.
I like Mike's scheme, it's what I would do.

I'll add to Mike Hassl's comment about sealing holes in the roofing, by saying:
Maybe the joints were never sealed, or could be re-sealed with caulking, and that the screws may have lost their sealing washers (if they even used those screws)
Given the uninformed framing scheme, the roofing manufacturer's recommended methods may not have been followed...
If the screws were removed and replaced with new (correct ones) and the panel edges were cleaned and caulked, you might be able to do it all in place on the roof, working from one side to the other.

Delivery or rent a truck. Check your list twice, be sure to get all the big stuff right. If you get long boards to fix the FDB at the same time, I'd definitely go with delivery.

Moving boxes or bins that stack neatly? Here's an idea: moving boxes that fit neatly within 4'x8' footprint, 30 inches high, put a sheet of plywood on top and VOILA! workbench in the middle of the "family room" side of the garage.
Or maybe you could fit the stuff into smaller space(s) corners of rooms, closets, or a family/friend's place? attic? Maybe also a good time to give away some things you no longer need? baby stuff?
If the FDB is phase one, then it could be your "empty square" for your tile puzzle... I'd be sure to pack everything well, tape boxes shut, up on pallets and covered with plastic sheeting/tarp.
A POD isn't any much better than fixed up FDB... other than it's just a phone call to order. Any hired storage, you'll have to be sure to stay on schedule, or end up paying more.
But wait a minute... you didn't say where all the stuff ends up in the end! Is it supposed to go in the woodshop?! daughter's bedroom? exiled in the FDB?


Mike Haasl
steward
Posts: 15690
Location: Northern WI (zone 4)
4921
7
hunting trees books food preservation solar woodworking
  • Likes 1
  • Mark post as helpful
  • send pies
    Number of slices to send:
    Optional 'thank-you' note:
  • Quote
  • Report post to moderator
It looks like when they added the two outside post boards, they just patched whatever length they had in there.  Some have a joint near the bottom.  Or they rotted out once before and someone cut out the lowest bit and replaced it.  The good news is you can just pull out those outer lower chunks and replace them with new wood.

Do you know how those are getting wet?  If it's the leaky roof I guess we'll get that fixed and it will be ok.  If they're going to keep getting wet somehow I'd be more worried about that post/block connection and the rot.

Do the blocks go deep into the ground or are they just sitting there?  Do you think the cemented boards are pressure treated or just plain lumber?  If they have much less rot than the other ones, that's a sign they're treated.
 
Jay Angler
master steward
Posts: 13038
Location: Pacific Wet Coast
7497
duck books chicken cooking food preservation ungarbage
  • Likes 2
  • Mark post as helpful
  • send pies
    Number of slices to send:
    Optional 'thank-you' note:
  • Quote
  • Report post to moderator
If it was me, I'd build a temporary jack for the roof, remove the posts one at a time, replace with either round wood from your own land if you've got straight trees you're willing to harvest, or proper 8x8 wood.  Using several 2x4's - which is what they look like - in a damp environment, is just inviting rot in an important part of the building that everything else relies on. One house we had, the equivalent were actually metal, but I don't know if that would be more or less expensive, than 8x8's.
Normally, in a house they put flashing between concrete and wood - something about how concrete can wick moisture up from the ground. Some posts like in your picture, have a heavy metal chunk between the concrete and the wood.
https://myoutdoorplans.com/workshop/how-to-anchor-a-post-to-concrete/

The more I look at your building, it almost seems like it was originally built to be an outdoor covered area and the walls and doors were added later as a change in plans. In your climate,  a roofed area for sitting out in makes a fair bit of sense.
 
pollinator
Posts: 219
Location: Clackamas County, OR (zone 7)
127
  • Likes 4
  • Mark post as helpful
  • send pies
    Number of slices to send:
    Optional 'thank-you' note:
  • Quote
  • Report post to moderator
Wow, everything about the fally downy building is a travesty of basic construction principles! The fact that it is still standing makes me think that it's only saving grace was being built in a well protected spot.

I am going to throw my support behind the "tear it down for salvage" crowd. The way those foundations were made is beyond bad. The rafters laying flat just makes me want to hold my head in my hands and cry (or laugh, or both). A new roof would be futile until the rafters are sorted out, and then youd need to take down the incorrectly installed beams, and then youd need to take down the rotten posts, and then youd need to redo the foundations... so yeah. You would be back at square one. I doubt the roof is going to be repairable or even salvageable. Plastic roofing is mostly garbage - with the possible exception of lexan (which that isnt). I suspect that the bowing "rafters" have pulled down hard enough on the screws to cause cracks all over.

Since this is a major detour from your original goal, here is my thought: Clean out enough space in the FDB to house the stuff from the house project. Really pack it well, really sift out anything you dont absolutely need and you will probably be surprised how much you can compress it. Put it in boxes, stack it tightly on pallets, and then tarp it inside the barn. You could even put a tarp over a section of the roof if anyone dares go up there. Putting down boards or strips of plywood helps spread the weight when you need to walk on corrugated roofs (even a metal roof, as stepping on the corrugations can bend them).\

Good luck, and dont despair! Even as poorly built as it is, that barn will take its sweet time in returning to the earth. I wouldnt be caught dead in there in a windstorm, though :)
 
D Nikolls
pollinator
Posts: 1782
Location: Victoria BC
317
  • Likes 1
  • Mark post as helpful
  • send pies
    Number of slices to send:
    Optional 'thank-you' note:
  • Quote
  • Report post to moderator
Wow... As already stated above... you can add the posts and the foundations to the list of wrongly done things. Truly amazing. Just.. why? Was this whole building an elaborate practical joke?

Aside from water, I would worry about rats. Tarped piles of stuff could get pretty gross pretty quick. Add a few holes chewed in the tarps and it's not great..


Nicole Alderman
steward
Posts: 21809
Location: Pacific Northwest
12405
11
homeschooling hugelkultur kids art duck forest garden foraging fiber arts sheep wood heat homestead
  • Mark post as helpful
  • send pies
    Number of slices to send:
    Optional 'thank-you' note:
  • Quote
  • Report post to moderator

D Nikolls wrote:Wow... As already stated above... you can add the posts and the foundations to the list of wrongly done things. Truly amazing. Just.. why? Was this whole building an elaborate practical joke?


According to our real estate owner, the previous owner (who was once a lawyer), insisted that "While not built to today's standards, they were built to previous standards." Nope, just nope. There was a bunch of terrifying wiring that my dad fixed before we moved in (if I recall correctly, the whole garage, outdoor pond lighting, Fally Downy lighting, and lighting by our duck house were all on the Master Bathroom circuit, and ungrounded. I don't think any of the outdoor wiring was in conduit.)

For fun, he also loved that forestry green color. He painted EVERYTHING it. The patio. The Fally Downy Building, the outbuildings, the bathtub, the sockets, the thermostat, the sagging bridge over the pond (he only painted the tops of the wood. The bridge rotted away within 3 years of us being there), even the smoke alarms.

pretty sure these didn't need to be painted...


Mmmmm, moldy, sagging wellhouse ceiling...also conveniently painted forestry green


I mean, I don't hate the color. But, I sure didn't need EVERYTHING to be the same hue


Maybe he got a really great deal on green exterior latex paint. Gallons and gallons and gallons of it. And just wanted to put it to use...


gardener
Posts: 5260
Location: Cincinnati, Ohio,Price Hill 45205
1048
forest garden trees urban
  • Likes 3
  • Mark post as helpful
  • send pies
    Number of slices to send:
    Optional 'thank-you' note:
  • Quote
  • Report post to moderator
The FDB hasn't,  fallen down, so I would use it.
It offers a flat space out of the wind, with plenty of tie off points.
It protects from heavy snow.
It just doesn't protect from wetness.

A tarp tent inside the barn would protect everything under the tarp from falling water.
With a large enough tarp you could tent the entire inside of the FDB.
If you did this, the "floor" would (slowely) start to dry up.
No one would be on a roof, no carpentry needed, the tarp would be protected from UV.
Rats could be a problem.
Because of that, I would move the workshop stuff there.
If you don't like tarp tents, build a hoophouse.
It automatically has sides,  and it won't need to wory about wind or snow load.
Another solution could be a tarp over the entire roof.
By throwing weighted lines over the building,and using pipe, poles or conduit for manipulation you could do most of the work from the ground.

If you are going to build or rebuild a shed for this project I would build it right in front of the garage door.
Basically a carport, it could be permanent or temporary but either way it's right there, so nothing would need to move very far.
Attaching it directly to the house will probably involve permitting, as will building it larger than 100(?!)square feet.
Build temporary or mobile structures can skirt this problem.
A commercially produced carport would probably be a good bet for your circumstances.
A big hoophouse might work too.
If it's permanent,  a roof with some translucent panels might be good.
It might cover some of the outdoor play space, which could be nice.
Your father could possibly build a nice permanent  porch roof along the East wall of your home, or just in front of the garage.

Another approach is what the cheap tire places do around here.
They buy a cube truck, or tractor trailer,park it and fill it with tires
The old moving vans are pretty costly by homeowners standards.
The tractor trailers are cheaper.
A school bus, 5th wheel or camper might serve.
You will likely need to keep it registered to avoid problems with The Man.

I did not catch what vehicle you have, but even a light vehicle can pull a utility trailer.
An enclosed trailer can hold a lot of stuff.
A pop-up trailer can be used for storage, but without hearing or air, it will mildew.
Any trailer can be a permanent tool or a temporary solution.


Posts: 2
  • Mark post as helpful
  • send pies
    Number of slices to send:
    Optional 'thank-you' note:
  • Quote
  • Report post to moderator
Have you looked into finding a local sawyer with a portable band saw mill ? Maybe you could harvest the lumber you need from the property and possibly work out a barter for his milling time
 
steward
Posts: 16557
Location: USDA Zone 8a
4341
dog hunting food preservation cooking bee greening the desert
  • Likes 3
  • Mark post as helpful
  • send pies
    Number of slices to send:
    Optional 'thank-you' note:
  • Quote
  • Report post to moderator
Nicole, you have gotten some really good advice.

If this were my building and I didn't have a family of carpenters, I would ask the manager at my local lumber or hardware store if they could recommend some carpenters. Ask for at least three.

I always like to get bids from three people.

Then I would request two estimates from each of those three people.

An estimate to repair the building.

An estimate to build a new building. Maybe even on the same spot which would include tearing down the old building and building a new one.

I feel this would be a good learning experience.

Pay attention to the remarks the people make about your request as they might be very helpful when choosing the person to do the work.
 
Rocket Scientist
Posts: 4577
Location: Upstate NY, zone 5
600
5
  • Likes 3
  • Mark post as helpful
  • send pies
    Number of slices to send:
    Optional 'thank-you' note:
  • Quote
  • Report post to moderator
I love the name "fally downy building", even though it seems to be doing a good job of not (yet) falling down. When my wife wanted to add a roofed deck and future animal space to the back of her house, the then 4 or 5 year old grandkids called it the "barn house"... it is still that.

I think the building is good enough to save, but not enough to spend a lot on upgrading. The beams and rafters are ridiculously badly done; the beams need to be reinforced and possibly straightened, while the rafters can probably work for a long time without modification as long as bounciness is not a major problem.

If you want to straighten the beams for looks or to protect the (replacement) roofing panels, you can make a crude but effective jack with a stiff post just an inch or two longer than the distance from floor to desired height. Put a strong smooth plank on the floor in line with the beam so that you can position the jack post at an angle while touching the center of the beam bottom. Fasten it to the beam so it can't slip but can bend. Hammer the bottom of the brace along the plank to slowly raise the beam to the desired height. Two braces working in opposite directions may make this easier and more secure. Once the brace has straightened the beam, sister on a 2x10 or 2x12, or a pair of them on each side of the beam, depending on how strong it needs to be. You might need to temporarily disconnect the diagonal braces so the beam can flex freely, then reattach them to the new sister beams.

You can use the same method to temporarily raise and support any posts that need to be repaired at the bottom. Lifting the post base just clear of the footing will allow you to clear or replace rotted wood, reinforce the concrete if necessary, insert flashing on top of the concrete, and lower the post back onto the footing. With a small hammer drill you can sink lag bolts into the concrete to tie the posts to the footings. The structure is light enough that this process should not be dangerous.

Once the structure is firmed up, you can determine if the existing roofing can be repaired or if it needs to be replaced.
 
Mike Haasl
steward
Posts: 15690
Location: Northern WI (zone 4)
4921
7
hunting trees books food preservation solar woodworking
  • Likes 1
  • Mark post as helpful
  • send pies
    Number of slices to send:
    Optional 'thank-you' note:
  • Quote
  • Report post to moderator
Good ideas Glenn!  I wonder if just using a post and a floor jack or car jack would be easier.  Since the ground is likely a different height at different points?  Plus you can easily lift it up a bit more or drop it a bit if needed.  I guess it depends on what's available.

If I were working on it, I'd jack up the beams to be level(er) and sister on new beams.  Depending on how dry I think the posts will stay with a new roof on, I'd either leave them be or replace the bottom parts.  Since the post is multiple pieces, it's actually easier to replace the bottom foot or two by cutting those four boards off at different lengths and replacing each piece and nailing them all together.  I probably wouldn't bother with the rafters unless it was easy to do when reroofing.  They seem saggily installed but plenty strong for the application.  Of course if the roofing material chosen requires a flat surface to install it on, then flat rafters would be awfully nice.

I also love the name of the building.  I didn't realize how nice it is to have names for things around a homestead.  Instead of saying "Could you get the grey wheelbarrow", it's much more fun to say "Could you get Carrie".
 
Jay Angler
master steward
Posts: 13038
Location: Pacific Wet Coast
7497
duck books chicken cooking food preservation ungarbage
  • Likes 1
  • Mark post as helpful
  • send pies
    Number of slices to send:
    Optional 'thank-you' note:
  • Quote
  • Report post to moderator

Mike Haasl wrote:I also love the name of the building.  I didn't realize how nice it is to have names for things around a homestead.  Instead of saying "Could you get the grey wheelbarrow", it's much more fun to say "Could you get Carrie".

Our portable chicken houses used to always have cute names until Hubby expanded, messed up the system, and gave the flocks inside boring names like "21 Dec" (do you think maybe the flock moved in 2021 Dec?).

Personally, I much preferred the cute names like, "Meals on Wheels" for our meat bird shelter and "Chick Magnet" for a layer shelter. Now I'm making up burned wood signs for some of the trees I'm planting, but so far they're memorials, so I've got "Vic's apple", "Bilbo's Esopus Spizenburg" and "Marguerite's Cortland".
 
D Nikolls
pollinator
Posts: 1782
Location: Victoria BC
317
  • Likes 2
  • Mark post as helpful
  • send pies
    Number of slices to send:
    Optional 'thank-you' note:
  • Quote
  • Report post to moderator

Mike Haasl wrote:Good ideas Glenn!  I wonder if just using a post and a floor jack or car jack would be easier.  Since the ground is likely a different height at different points?  Plus you can easily lift it up a bit more or drop it a bit if needed.  I guess it depends on what's available.


A tall post plus a jack can be pretty unstable; pounding in an angled post, there is no middle joint for the angle to go bad on you..

If I wanted to use a jack and needed it to be tall, and didn't have a screw jack of appropriate height, I might try a post and a hi-lift style jack, the taller the better; notch the post bottom to hug the lifting tooth of the hi-lift, and then bolt of strap the top of the hi-lift shaft to the post.. seems like you would get a much more rigid assembly than amost other jack/post combos I can visualize..

But pounding in a post has worked well for me, albeit with beams that didn't wooble so much. I Jam the bottom in at the ground and pound at the top, usually.

If you used something narrower then the beam, yoou could add your additional beam beneath the existing one instead of beside..
 
Posts: 105
Location: Meriden, NH
24
3
chicken homestead
  • Likes 4
  • Mark post as helpful
  • send pies
    Number of slices to send:
    Optional 'thank-you' note:
  • Quote
  • Report post to moderator
(I'm retyping this message since my big fingers accidently sent the partial one to computer limbo.)
I've enjoyed reading all of the responses to this thread.   The first thing I thought of is the FDB would be great for temporary storage.  How much effort and resources you want to use to  make it suitable depend on what your long term plans are for your place.  It could be useful for many years and give you some building skills without too much material, and give you enough time to do the garage remodel and longer.  The shortest time of 1-2 years would be the tent and tarp inside the FDB ideas.  How long are you going to be there? Is it your forever place, or do you need to worry about resale value?  What were your plans for the FDB when you bought the place?  

My only qualification is many years of refurbishing a very old house, ell and building new out-buildings at my forever place.  In the beginning my husband had the help of a local carpenter who agreed to work by the hour and would let my husband be his helper so he could learn.  He was a referral from a friend of mine at work.  He has become a long term friend of my husbands.  

Over the years I've acquired skills as well, including basic wiring and plumbing, wood working etc.  We met local retired electricians, read a lot of basic books.
Low risk (not a fire risk to family and friends) projects where the cost in $ is low and time/skill level are the limiting factors are the best ones to start with.  I fixed a lot of toilets and faucets before tackling my first plumbing project.   My question to myself has always been what if I really screw it up, how much damage can I do and how much will it cost to hire someone to come in and fix my mess.  You'll be surprised what you can learn and do yourself safely.
  • Mark post as helpful
  • send pies
    Number of slices to send:
    Optional 'thank-you' note:
  • Quote
  • Report post to moderator
I have only seen one answer that I thought was what I would do. It said Tent in the falley down to protect the stuff or tarp over the whole barn. That would be my advice.
gift
 
Diego Footer on Permaculture Based Homesteads - from the Eat Your Dirt Summit
will be released to subscribers in: 19 : 59 : 39
reply
    Bookmark Topic Watch Topic
  • New Topic