• Post Reply Bookmark Topic Watch Topic
  • New Topic
permaculture forums growies critters building homesteading energy monies kitchen purity ungarbage community wilderness fiber arts art permaculture artisans regional education skip experiences global resources cider press projects digital market permies.com pie forums private forums all forums
this forum made possible by our volunteer staff, including ...
master stewards:
  • Nancy Reading
  • Carla Burke
  • r ranson
  • John F Dean
  • paul wheaton
  • Pearl Sutton
stewards:
  • Jay Angler
  • Liv Smith
  • Leigh Tate
master gardeners:
  • Christopher Weeks
  • Timothy Norton
gardeners:
  • thomas rubino
  • Jeremy VanGelder
  • Maieshe Ljin

Emergency quick and small batchbox for the 400 sq ft wofati (0.7)

 
Posts: 182
15
  • Mark post as helpful
  • send pies
    Number of slices to send:
    Optional 'thank-you' note:
  • Quote
  • Report post to moderator
Forgot to mention the picture. Starting up big brother for the morning to keep the slip thawing and our materials warm.
 
gardener
Posts: 3471
Location: Southern alps, on the French side of the french /italian border 5000ft elevation
194
  • Mark post as helpful
  • send pies
    Number of slices to send:
    Optional 'thank-you' note:
  • Quote
  • Report post to moderator


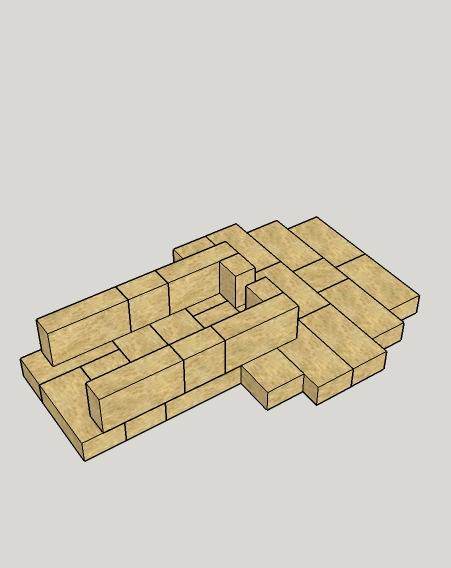
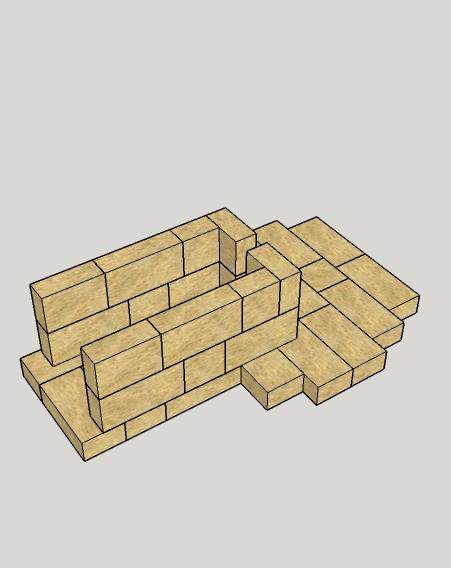
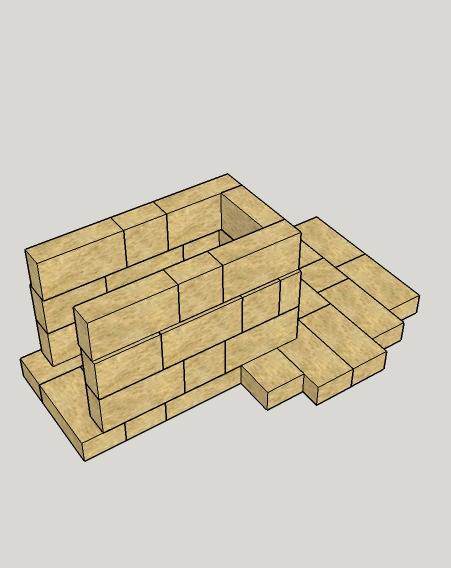
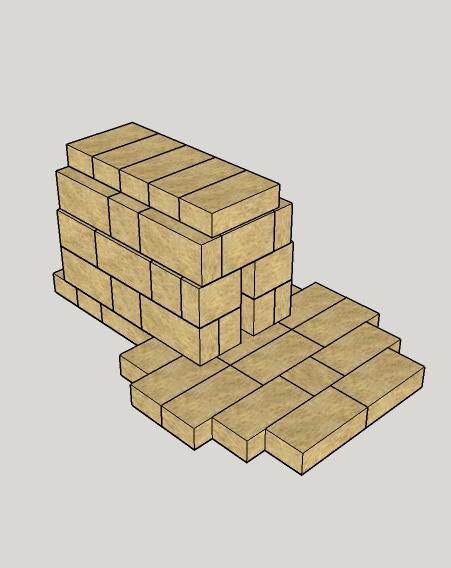
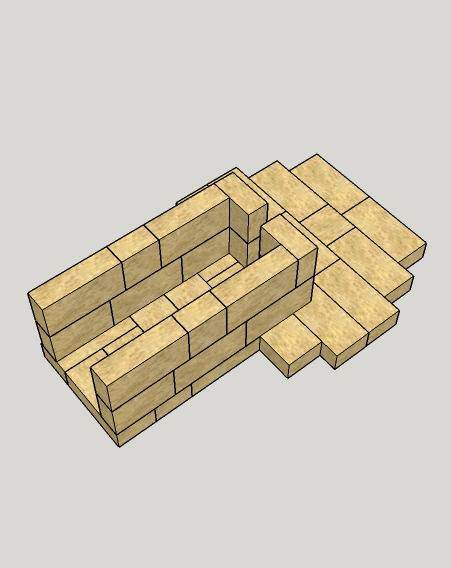
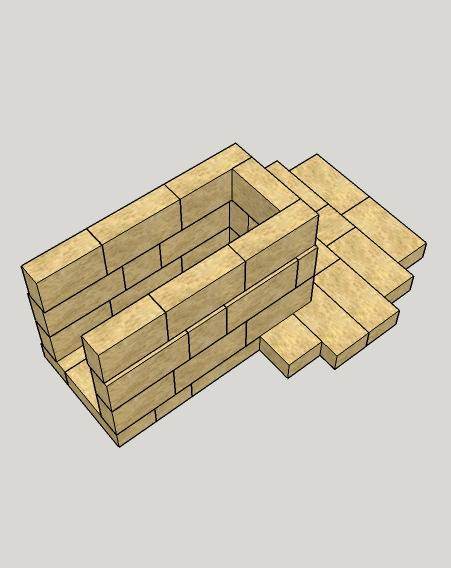
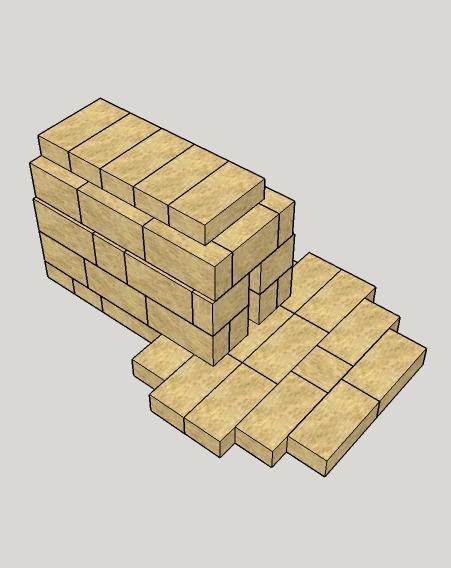
split- firebricks riser; i drew this for esteban, but you can always use that technique the other way around, to make a bigger riser. It's suposed to be held by steel wire, and four pieces of angle iron.


https://permies.com/t/38889/a/20390/heatriseresteban.skp?download_attachment=true

Similar to this

https://www.youtube.com/watch?v=7RyvsZD1_CU

https://www.youtube.com/watch?v=7RyvsZD1_CU
 
gardener
Posts: 1054
Location: +52° 1' 47.40", +4° 22' 57.80"
447
woodworking rocket stoves wood heat
  • Mark post as helpful
  • send pies
    Number of slices to send:
    Optional 'thank-you' note:
  • Quote
  • Report post to moderator

Rick Edwards wrote:1. The clay perlite ramps should be kaolin clay? I'm assuming the local clays of a site shouldn't get used for the burn areas or the fire brick unless their properties are investigated.


The ramps can all be kaolin clay, easiest to work with, dry so it can be mixed with (screened) sand without effort and there are no little stones in it which will drive you crazy.

Rick Edwards wrote:2. The riser height dimension came from the formulas and spread sheets on donkey 32. Sounds like that is if optimal materials, yes? The 7 lifts of brick give me only 31.5" from burn chamber floor.


As per the formulas, length of riser should be between 8 and 10 times the base dimension which is 4.32". Multiplied by 8 equals 34.56, multiplied by 10 equals 43.2". So those 7 layers are on the short side, yes, in order to save on mass. But your suggestion to build the riser out of splits is excellent, didn't realise you had still those laying around. And yes, you can take it up to 8 or 9 layers whatever you need to confirm to the chart. Matt, do you agree with that?

Still, a cast riser would be the better option but it'll cost more time to make the mold and do the casting. I would prefer an octagon split in half length wise. When speed of build is paramount, go for the split brick riser.

Rick Edwards wrote:3. My P-channel will be 2" x 1" o.d. And the slot gap is 2.3" should I narrow the gap to 2" so air can't go around the sides of the channel?


Not necessary, sizing of the port is far more important than the p-channel dimensions. Just use as is, when you want to rebuild the thing next fall there's more time to go for the ideal.

Rick Edwards wrote:4. Can I offset the barrels from center for better manifold spacing or does this have negative effects on the bell radiation and downdraft qualities.


The barrel offset will give more heat on one side, forgot whether it's the smaller or the wider gap. Downdraft qualities will be influenced a bit, yes, but I've never been able to measure a difference with a small offset. But your manifold spacing is quite good already due to the use of splits.
 
pollinator
Posts: 324
Location: North Olympic Peninsula
92
  • Mark post as helpful
  • send pies
    Number of slices to send:
    Optional 'thank-you' note:
  • Quote
  • Report post to moderator
Agree on height Peter. The shortest I've done successfully is 36", but that's with premium materials.

Okay, so Rick, is anyone using the outdoor cooker out in back of the kitchen? If it's down for the winter you could simply swipe the high tech riser right out of that. The barrel is just setting there, sealed with mud. It will lift right off and could be reinstalled in a minute. Maybe they won't even notice! That's a 6"x24" formed ceramic fiber riser. That will get you there quickly. I'd build up with bricks up to at least 12" from the floor, perhaps a bit more to achieve an approximation of the height Peter calls out above, drop that on there and...BAM... you are done.

Casting is easy, use a piece of 6" flue for sacrificial internal form, and one of those 17 gallon grease drums for the outer form. The inner one will burn away, and will cause a few hiccups on it's way out, but I've never had that be a show stopper. The outer canister allows the thing to be moved around and reused/rebuilt, and holds it all together in the event of the inevitable cracks. Here's a video using my mix, you could also use fancy refractory. You could achieve thinner section thickness if you use refractory by fabbing up an outer out of joined sheet metal.

Rocket Mass Heater Cast Core Part II The Heat Riser

https://www.youtube.com/watch?v=AqvTdbRSlwk

 
Rick Edwards
Posts: 182
15
  • Mark post as helpful
  • send pies
    Number of slices to send:
    Optional 'thank-you' note:
  • Quote
  • Report post to moderator
Great stuff guys.

First note, the speed of install has relaxed a little. Jesse is down at basecamp until install and mike and violet are at Tim's until install.

first pic is of the literal P-channel (because Peter had us get it and others for the workshop and this was the only one left, very auspicious). 2" x 1" od inside 1.834 X .834 for the 1.53"sq. (edited, wrong math)
I will keep the port correct and have a couple of ways to seal the side gaps.

The box is going the full 8" longer for more quantity of fuel during each batch burn.

The top is going back to brick instead of duraboard because of extra length of box and Peter's concerns.

The riser can be easily cast with Matt's style but no galvanized can burn on the lab:
1. so I'm thinking un-snapped 6" duct with a wooden cross inside to hold shape

2. with oil drum or 10" galv outer form (if the galv wont off gas at inside system barrell temps) and if 2"wall thickness is ok otherwise oil drum we have.

3. heat cure on pocket rocket exhaust while burning paint off a barrel and when cross burns out then the 6" galv duct will just release because it is not snapped together if Matt thinks the material will hold shape by then. Otherwise maybe i could get a cardboard form.

4. Peter are you saying octagon is preferred over round?

5. if so Matt will your material set up enough if a wooden octagon inner form burns out, because that would also be really easy for me to pull off?

6. the split bricks is totally doable and can insulate but with the relax in install date, I want to make this as good as possible for another days work.

8. The 2nd barrel (pics) are the sealed type. Tim and Ernie said they preferred them for putting together. Any body know the best way to cut the lid off?

8a. like new style can openers on outside of lip?

8b. or same thing but from inside (doubt it)

8c. or straight down on the middle of the rolled lip?

9. when barrels are joined is it better to keep the 1" edge from cutting out the bottoms for turbulence inside the barrel sides, or I'm thinking just take it to the lip for smoother gas decent. Not to worried about keeping their shape.

10. best way to burn paint off a removable lid? the one on the third barrel in the auditorium we forgot just got slip and paper put on it and seemed to work fine, but this would be on top of the bell and much hotter. was thinking once the pocket rocket barrel burnout gets going, load up and set it on top with spacers for air gap.

KIMG0567.jpg
[Thumbnail for KIMG0567.jpg]
KIMG0574.jpg
[Thumbnail for KIMG0574.jpg]
KIMG0575.jpg
[Thumbnail for KIMG0575.jpg]
 
pollinator
Posts: 293
Location: US, East Tennessee
34
  • Mark post as helpful
  • send pies
    Number of slices to send:
    Optional 'thank-you' note:
  • Quote
  • Report post to moderator

Rick Edwards wrote:

4. Can I offset the barrels from center for better manifold spacing or does this have negative effects on the bell radiation and downdraft qualities.


The good thing about a 6" system using a 55 gallon barrel, is that the manifold area is really spacious. So no barrel offset is needed with good construction practices.

I'll bet you're thinking of that 8" system where the manifold area can easily be restricted, so offsetting the barrel is done to maintain a manifold exit hole to riser OD spacing of approximately 3". The workshop cob rocket build photos also show the details on constructing a fire brick "splits" riser insulated with 1" thick ceramic wool blanket, on Kristie's page here:

https://permies.com/forums/posts/list/1000/26232


Rick Edwards
Posts: 182
15
  • Mark post as helpful
  • send pies
    Number of slices to send:
    Optional 'thank-you' note:
  • Quote
  • Report post to moderator
Matt, I forgot you mentioned the pre made j-tube.
That was brought up earlier and decided against.
Thanks for looking out.

Big Al. More Candy!!
KIMG0568.jpg
[Thumbnail for KIMG0568.jpg]
KIMG0569.jpg
[Thumbnail for KIMG0569.jpg]
KIMG0573.jpg
[Thumbnail for KIMG0573.jpg]
 
pollinator
Posts: 4715
Location: Zones 2-4 Wyoming and 4-5 Colorado
492
3
hugelkultur forest garden fungi books bee greening the desert
  • Mark post as helpful
  • send pies
    Number of slices to send:
    Optional 'thank-you' note:
  • Quote
  • Report post to moderator
This is an awesome thread ! Go team !
 
Rick Edwards
Posts: 182
15
  • Mark post as helpful
  • send pies
    Number of slices to send:
    Optional 'thank-you' note:
  • Quote
  • Report post to moderator
Some pics of the space for install.

The stove will back up to the drop off.
the wood feed is going to face the front door and towards the first picture.

We will sand level and heat shield all pertinent areas.

The duct will come out of the back, above the lower floor up to foreground beam with proper clearance and shielding then out to high point off center through gable.

Since the stove will be fragile slipped firebrick on the outside, we are going to drive T-posts at the front corners so people can't hit it and drop a wall and the burning fuel with it.

some angle on the front bricks for a frame and rigidity.
KIMG0562.jpg
[Thumbnail for KIMG0562.jpg]
KIMG0563.jpg
[Thumbnail for KIMG0563.jpg]
KIMG0565.jpg
[Thumbnail for KIMG0565.jpg]
 
Matt Walker
pollinator
Posts: 324
Location: North Olympic Peninsula
92
  • Mark post as helpful
  • send pies
    Number of slices to send:
    Optional 'thank-you' note:
  • Quote
  • Report post to moderator
Risers....clarify which mix you are using when asking the questions please Rick. Different advice for my DIY mix over refractory. Both should be fine by the time a mold burns away, not so sure about wooden crosses. They will lose stability almost instantly. I'd probably either do the wooden octagon or use the flue pipe and use metal spreading rings to hold it in place until things set.

Wall thickness, 2" is fine for the refractory, probably too thin for my DIY mix.

I'd want to use the little drum for the outer regardless, it's just a great canister for the whole thing and makes transporting it up there much less sketchy, and easy to move the whole riser and reuse should you guys make adjustments to the thing over time.

Drum lid removal a la Tim Barker. Grind the top edge down and the lid will lift right off. If you need the ring of 1" use the jig saw and make the awful sound. I don't think you need the 1" ring, this is different than Peter's heat tower.


Rick Edwards
Posts: 182
15
  • Mark post as helpful
  • send pies
    Number of slices to send:
    Optional 'thank-you' note:
  • Quote
  • Report post to moderator
Sorry Matt, your diy mix. Already know what to do and don't need to use the expensive material. Oil drum (already have a burned out one on shelf) sounds great and no galv to worry about.
 
Peter van den Berg
gardener
Posts: 1054
Location: +52° 1' 47.40", +4° 22' 57.80"
447
woodworking rocket stoves wood heat
  • Mark post as helpful
  • send pies
    Number of slices to send:
    Optional 'thank-you' note:
  • Quote
  • Report post to moderator

Rick Edwards wrote:The box is going the full 8" longer for more quantity of fuel during each batch burn.
The top is going back to brick instead of duraboard because of extra length of box and Peter's concerns.


Those two things together are reassuring. Be careful when running this thing, maybe the burn of a full batch will be violent enough to warrant a third barrel with mass.

Rick Edwards wrote:4. Peter are you saying octagon is preferred over round?


The jury is still out on what's the best shape. I've used octagon in a cast riser because making the mold is quite easy in Styrodur foam or plywood. Round is very hard to do unless you start with a round inner mold to burn out, Matt's style.

Rick Edwards wrote:6. the split bricks is totally doable and can insulate but with the relax in install date, I want to make this as good as possible for another days work.


At the end of the day, round or an aproximation like octagon is better compared to square because the roundish one will get the ram's horn going in a very early stage at low temperature.

Rick Edwards wrote:8. The 2nd barrel (pics) are the sealed type. Tim and Ernie said they preferred them for putting together. Any body know the best way to cut the lid off?


You can do what Matt did, using a jigsaw and leave an inch of the lid all around. Or you could do it with a 1 mm grinder disk to cut roughly and smooth it with a thicker disk to grind it flush. (Don't know the right word for it.)
 
Peter van den Berg
gardener
Posts: 1054
Location: +52° 1' 47.40", +4° 22' 57.80"
447
woodworking rocket stoves wood heat
  • Likes 1
  • Mark post as helpful
  • send pies
    Number of slices to send:
    Optional 'thank-you' note:
  • Quote
  • Report post to moderator

Rick Edwards wrote:Since the stove will be fragile slipped firebrick on the outside, we are going to drive T-posts at the front corners so people can't hit it and drop a wall and the burning fuel with it.


The whole of the firebox that's sticking out of the barrel can be cobbed in. It's not necessary to do a cold heater you know, cob can be applied when it is run. The cob will shrink and dry out while you work, so any crevices which appear can be filled in almost instantly. Since the plan is to make it a real install and optimize it, it's worthwhile to make it nicer to the eye as well. The w.a.f. is a force to be reckoned with after all.

Oh, one thing about making the firebox deeper: it's harder to light the thing from cold because the port is further away from the front. A way to go round this minor problem is making the kindling fire in the middle and when it's going shove it to the port. This is easy because of the sloped sides, this small fire will stay in the middle by itself and won't spread out.

I'm gonna like this project more and more, it's like an innovators gathering at long distance.
 
Satamax Antone
gardener
Posts: 3471
Location: Southern alps, on the French side of the french /italian border 5000ft elevation
194
  • Mark post as helpful
  • send pies
    Number of slices to send:
    Optional 'thank-you' note:
  • Quote
  • Report post to moderator
Peter, the word for the disc you're looking for can be either grinding disc, or deburring disc.

Rick, as peter said, it's rather anoying to shove your arms in a long firebox to get the fire built up and started. My firebox, on the green machine is 50cm long (30 inches) and that's plenty long enough. Plus, if you're using longer wood, lit from the port end, as they burn, you need to push theses towards the port, otherwise the flame is too far away from the port.


Actualy, a developpement which would be intresting, is a hinged top, so you can reload from the front and top at the same time. But that's for further research i'd think.
 
Peter van den Berg
gardener
Posts: 1054
Location: +52° 1' 47.40", +4° 22' 57.80"
447
woodworking rocket stoves wood heat
  • Mark post as helpful
  • send pies
    Number of slices to send:
    Optional 'thank-you' note:
  • Quote
  • Report post to moderator
Rick,
I have to come back to the lengthened firebox topic. The firebox of the 8" mock-up happened to be according to the charts but proved to be too deep. Because the firewood at the premises is mostly 16" long. So the install in the auditorium ended up at something like 18". According to the spreadsheet the 6" version should be 17.28" deep which is a bit short for 16" fuel but due to the size of the fire bricks it will end up at 18", the same as its bigger brother. This should be alright unless the fuel at the lab is longer than at base camp, but I highly doubt that.

I'll rework the drawing to 2.5" deeper, the thickness of a brick. Maybe I should do two versions, the second 4.4" deeper, the width of a brick. This should provide choice enough but again, I'd suggest to use a firebox that isn't much more than 2" deeper than the fuel, being the most efficient configuration.
 
Peter van den Berg
gardener
Posts: 1054
Location: +52° 1' 47.40", +4° 22' 57.80"
447
woodworking rocket stoves wood heat
  • Mark post as helpful
  • send pies
    Number of slices to send:
    Optional 'thank-you' note:
  • Quote
  • Report post to moderator
Drawings are ready, there are two sets of 4 pictures. The first is 20" deep, the second 22.3" deep. This is nominal I have to add, not counting the seams so the end result will be slightly larger.


Of course there are other ways to make the cuts, these are good possibilities.
 
Rick Edwards
Posts: 182
15
  • Mark post as helpful
  • send pies
    Number of slices to send:
    Optional 'thank-you' note:
  • Quote
  • Report post to moderator
Sorry guys, phone was weird last night i couldnt upload anything.

quick update, already lengthened box full 8" and was going to post pictures. So, sorry peter for drawing up more plans for me, but i'm sure they will get utilized around the world nonetheless.

Also the plan was that it would still be temporary and come out in the spring, but i still wanted to optimize it for fuel consumption and other reasons.

And this morning, we just decided to make it permanent so were gonna go look at the site again right now to decide on install plan.

The engine will be the same, but probably 1 barrell and short straight mass run.

gotta go, will update with pics and video in couple of hours.
 
Peter van den Berg
gardener
Posts: 1054
Location: +52° 1' 47.40", +4° 22' 57.80"
447
woodworking rocket stoves wood heat
  • Mark post as helpful
  • send pies
    Number of slices to send:
    Optional 'thank-you' note:
  • Quote
  • Report post to moderator
Everybody has to make their own decisions, this isn't my call. But one barrel and a short straight run of bench could be simply not enough let alone with a 50% larger firebox. Matt Walker recently changed the core of his 8" J-tube mass heater for a 6" batch box. As a result, he had to extend the bench significantly in order to extract enough heat.

Matt, would you chime in please?
 
Matt Walker
pollinator
Posts: 324
Location: North Olympic Peninsula
92
  • Mark post as helpful
  • send pies
    Number of slices to send:
    Optional 'thank-you' note:
  • Quote
  • Report post to moderator
Sure....Firebox length: My choice for a 6" batch system is a 19" firebox, from front edge/door closure to back wall. Big enough for 16" firewood with a bit of room to spare.

I think if I were doing what you guys are planning to do, I would start with what you propose, with a plan for future enlarging of the bench. I understand that the desire right now is to get something built and the materials are probably frozen so taking on a big cob project is probably not in the cards. Nonetheless, if it were me, I would locate it and plan for a largeish bench, and build part of it with clean-outs at the location of the future expansion. That way you could plug in more flue pipe when things warm up and build more bench. A 6" batch is in my opinion capable of driving quite a large mass, so at some point you will get frustrated with 300°F exhaust and want to extract more heat into the space, but I believe that you can build in stages and get there eventually.

If it's really not enough extraction you can always plug in another barrel with bricks somewhere in the system, a la Auditorium Barrel #3. It could even be plugged into a clean out with only one connection, as a dead end bell. They work just fine for harvesting excess heat.
 
gardener
Posts: 1908
Location: Longbranch, WA Mild wet winter dry climate change now hot summer
464
3
goat tiny house rabbit wofati chicken solar
  • Likes 1
  • Mark post as helpful
  • send pies
    Number of slices to send:
    Optional 'thank-you' note:
  • Quote
  • Report post to moderator
As posted on the 0.7 thread
the floor is sinking a lot off heat. If instead of building a bench you dug down and put the exhaust tubes under the floor you would have a radiant heat floor.
 
pollinator
Posts: 523
Location: Salt Lake Valley, Utah, hardiness zone 6b/7a
7
  • Mark post as helpful
  • send pies
    Number of slices to send:
    Optional 'thank-you' note:
  • Quote
  • Report post to moderator
I think that, in the near term, you ought to maximize heated mass. You are not going to heat the surrounding soil with the rocket stove, there is simply too much of it. The floor, walls and ceiling will also draw heat from the air heated by unlined barrels, cooling the space rapidly as soon as the fire goes out. You can make things comfortable for the residents with a masonry heater that is isolated from the floor and walls. This ought to provide at least a few hours of gentle, radiant heat after each firing. The quickest and least permanent method would be to use brick lined barrels. Less quick but not needing mud (at least not as much) would be one of Matt's half-barrel benches (perhaps a sleeping platform?). You can get things the way you want them next construction season.

I think that it would also be prudent to to get some insulating floor covering over the dirt floor; carpet remnants, straw, reed mats, etc. You can remove it when it warms up again next Summer. Also, I don't know if you have insulated window covers. If not, get some. While I am on a roll, if your exterior walls are not insulated sufficiently, you might try stacking some straw bales against them, outside, and encapsulating them somehow (plastic, tar paper, etc.). Always keep fire prevention in mind when doing any of these temporary measures.

It may take more than one annual cycle to get the isolated soil to a temperature that is livable. In the meantime, do what is expedient.
 
Rick Edwards
Posts: 182
15
  • Mark post as helpful
  • send pies
    Number of slices to send:
    Optional 'thank-you' note:
  • Quote
  • Report post to moderator
(Edit: Ver 2. The plans and pictures have been changed from the first version to reflect a different mass run height and angles)

Ok. we wanna use the floor as the mass, and we can trench for the duct.

Regular length firebox due to spatial constraints.

The wofati people will cut their own wood so box depth doesnt matter for convenience. They can cut to whatever length works.

33 - 35 feet of duct underground all 8". This will gradually rise as it gets nearer the stack.

The run will drop down about 3' from manifold to go under logs and start its mass run in the trench.

The system is still 6" as per Peter's plans. It will have a cast octagonal riser.


Close-left.jpg
[Thumbnail for Close-left.jpg]
Close-Right.jpg
[Thumbnail for Close-Right.jpg]
Aerial.jpg
[Thumbnail for Aerial.jpg]
 
Rick Edwards
Posts: 182
15
  • Mark post as helpful
  • send pies
    Number of slices to send:
    Optional 'thank-you' note:
  • Quote
  • Report post to moderator
More Sketch up Pics.

Trench details.
Trench-Detail-Switch-back-side.jpg
[Thumbnail for Trench-Detail-Switch-back-side.jpg]
Trench-detail-stack-side.jpg
[Thumbnail for Trench-detail-stack-side.jpg]
Duct-Bommerang-2.jpg
[Thumbnail for Duct-Bommerang-2.jpg]
 
Rick Edwards
Posts: 182
15
  • Mark post as helpful
  • send pies
    Number of slices to send:
    Optional 'thank-you' note:
  • Quote
  • Report post to moderator
(EDIT: Ver 2. The plans have changed and are now SketchUp 2014)


Detail of the stack and chimney run from the floor to the weather cap.

The Download of The Plans {Ver 2} 2014
Stack-Chimney-Run.jpg
[Thumbnail for Stack-Chimney-Run.jpg]
Filename: 6-inch-Batchbox-0.7-Wofati-Ver-2-SU-2014.skp
File size: 2 megabytes
 
Hans Quistorff
gardener
Posts: 1908
Location: Longbranch, WA Mild wet winter dry climate change now hot summer
464
3
goat tiny house rabbit wofati chicken solar
  • Mark post as helpful
  • send pies
    Number of slices to send:
    Optional 'thank-you' note:
  • Quote
  • Report post to moderator
I like it!
 
Rick Edwards
Posts: 182
15
  • Mark post as helpful
  • send pies
    Number of slices to send:
    Optional 'thank-you' note:
  • Quote
  • Report post to moderator
Our fun friday.

Last pic

Drrrrrrr
Drrrrrrrrrr
Drrrrrrrrrrrrrr...

DUNUM...
Dum dom
Dum dom
Dum dom
Dum dom

How many Rocketeers love the Tympani?
KIMG0577.jpg
[Thumbnail for KIMG0577.jpg]
fun with parts. lucky leftovers
KIMG0578.jpg
[Thumbnail for KIMG0578.jpg]
fun in the shop.
KIMG0593.jpg
[Thumbnail for KIMG0593.jpg]
the monolith
 
Rick Edwards
Posts: 182
15
  • Mark post as helpful
  • send pies
    Number of slices to send:
    Optional 'thank-you' note:
  • Quote
  • Report post to moderator
Grinders! And Barrels! And Molasses! Oh My!
KIMG0584.jpg
[Thumbnail for KIMG0584.jpg]
KIMG0585.jpg
[Thumbnail for KIMG0585.jpg]
KIMG0590.jpg
[Thumbnail for KIMG0590.jpg]
 
Rick Edwards
Posts: 182
15
  • Mark post as helpful
  • send pies
    Number of slices to send:
    Optional 'thank-you' note:
  • Quote
  • Report post to moderator
Derick with fire in the hole!

The 8" longer box length mockup. The middle row bricks were the correct placement and the 2 above and below would need to be cut. But now we're going back to regular size so good thing I didn't yet.

Just what everybody needs. More big brother. This time it looks like a jet is shooting out of the secondary air intake.
KIMG0589.jpg
[Thumbnail for KIMG0589.jpg]
KIMG0592.jpg
[Thumbnail for KIMG0592.jpg]
KIMG0594.jpg
[Thumbnail for KIMG0594.jpg]
 
Rick Edwards
Posts: 182
15
  • Mark post as helpful
  • send pies
    Number of slices to send:
    Optional 'thank-you' note:
  • Quote
  • Report post to moderator
The four logs that the duct has to go under.

The floor where most of the trenching will happen. Also, the bottom right is where the stove will sit.

The outside where the chimney will penetrate and the nice fascia to attach the vertical run.
KIMG0597.jpg
[Thumbnail for KIMG0597.jpg]
KIMG0599.jpg
[Thumbnail for KIMG0599.jpg]
KIMG0600.jpg
[Thumbnail for KIMG0600.jpg]
 
Peter van den Berg
gardener
Posts: 1054
Location: +52° 1' 47.40", +4° 22' 57.80"
447
woodworking rocket stoves wood heat
  • Mark post as helpful
  • send pies
    Number of slices to send:
    Optional 'thank-you' note:
  • Quote
  • Report post to moderator
Rick,
Could you please save the SketchUp file as version 14 instead of 15? At the moment I can' t load the file, SketchUp is on a computer with an old Windows version.
 
Rick Edwards
Posts: 182
15
  • Mark post as helpful
  • send pies
    Number of slices to send:
    Optional 'thank-you' note:
  • Quote
  • Report post to moderator
Sorry Peter, I think that might not work, but I'll look right away and see what I can do. If not, tell me dimensions or angles and I'll just keep posting pictures and measurements. I'll get back soon.

Sorry for delay, had to learn sketchup on the fly Sat. And Sun. Thanks to Jesse Biggs and yourself for the models to start with. I just had to modify a lot.
 
Peter van den Berg
gardener
Posts: 1054
Location: +52° 1' 47.40", +4° 22' 57.80"
447
woodworking rocket stoves wood heat
  • Mark post as helpful
  • send pies
    Number of slices to send:
    Optional 'thank-you' note:
  • Quote
  • Report post to moderator
Rick,
As far as I know of, there is an option in "Files-Save as" a window will open with a choice of title and file type.

Thanks in advance.
 
Rick Edwards
Posts: 182
15
  • Mark post as helpful
  • send pies
    Number of slices to send:
    Optional 'thank-you' note:
  • Quote
  • Report post to moderator
(Edit: Just updated the SketchUp Model with changes. Version 2. Now only SketchUp 2014)

Sheesh!... So many computer headaches right now.
but finally

Ver 2. SketchUp 2014
Filename: 6-inch-Batchbox-0.7-Wofati-Ver-2-SU-2014.skp
File size: 2 megabytes
 
Rick Edwards
Posts: 182
15
  • Mark post as helpful
  • send pies
    Number of slices to send:
    Optional 'thank-you' note:
  • Quote
  • Report post to moderator
Quick note,
Paul and I just talked and a couple of changes are going to be made directly and I'll re upload the above pics and files.

The original plan horizontal run starts with about 2.5 feet of dirt on top of it then slopes up to about a foot on top of it in its first lineal run.
Then slopes to about 6-8" deep on the following lateral run, followed by a slope up to about 2" deep on the last lineal run and level with that on the last lateral run to the stack.

The new plans will show an immediate angle (probably 30-45 degrees) up to the one foot covered level probably by the first bend to go into the first lineal run. then hold level the one foot deep all the way to the elbow at the last underground turn from lineal to lateral entering the last 3-4' underground run. At that last elbow before the stack bottom elbow, I'll angle it up almost to floor level so we are not undercutting the pier too much.

Also we want the stack to be closer to the pier, so unless we are well under 200 F, it might need shielding and insulation. We will have magnet chimney thermometers to watch things.

I'm open to what needs shielding on the stove side of things and with the 1" air gap method how close should these be to wood. I think a stacked parallel sheeted 1" air gap for two 1" air gaps gains a little more, but don't know for sure.
We can also use dura board or dura blanket at places if we have to, but really expensive and would like to keep as much here for the next workshop and other future needs. one place I'm going to use a little is directly under that fourth log that the flue is going under right after the stove. Planning six inches of dirt and scrap piece of dura board against the bottom of that log when back filled.

If the deep flue pipe drop from the stove is an issue, we can lower the stove some as well.
 
Matt Walker
pollinator
Posts: 324
Location: North Olympic Peninsula
92
  • Mark post as helpful
  • send pies
    Number of slices to send:
    Optional 'thank-you' note:
  • Quote
  • Report post to moderator
Uh oh. I'm going to strongly recommend you forget the idea of trying to heat the ground. I'm good at being wrong, so if you build this, I hope I am. But, in my opinion, this is going to give you endless problems and not much heat in the space.
 
Peter van den Berg
gardener
Posts: 1054
Location: +52° 1' 47.40", +4° 22' 57.80"
447
woodworking rocket stoves wood heat
  • Mark post as helpful
  • send pies
    Number of slices to send:
    Optional 'thank-you' note:
  • Quote
  • Report post to moderator
Regarding the stove itself: This is more or less 30 ft of horizontal 8" pipe plus a barrel. Not counting the bottom quarter of the pipe will add up to 62 sq ft of heat extracting surface, part of that is bare metal. That would just fit into the parameters of 64 sq ft as the maximum size of a bell's internal surface for a 6" batch box system. The end temp at the base of the chimney stack wouldn't be high enough to start with so, heating the vertical pipe with a soldering torch would be advisable before starting the stove first time.

Condensation fluid, inevitable when running a cold stove, will run back to the heater core and will be evaporated again. This is not as good as it sounds, because it will raise the moisture level in the vertical stack which could lead to a chimney stall. Not that it will be quaranteed and certainly not every time the stove is run but it could happen.

Another tricky point is the dip of 2.5 ft just next to the stove. I expect the barrel will be hotter because of this but again I am not sure about this. Insulation material, preferably the expensive Durawool kind between the beams and the duct would be advisable.

About the duct in the dirt floor I would advise to dig the trench a bit deeper. And have a 3" layer minimum of vermiculite or perlite under the duct to prevent heating deeper ground unnecessary.

I wrote this just before I read Matt's comment. Matt, maybe you could elaborate about this a bit more so that the readers know what to be aware of?
 
Matt Walker
pollinator
Posts: 324
Location: North Olympic Peninsula
92
  • Mark post as helpful
  • send pies
    Number of slices to send:
    Optional 'thank-you' note:
  • Quote
  • Report post to moderator
Well Peter, you touched on most of my concerns. Insulating all around the flue would go a long way towards alleviating most of my concern, which is that the giant heat sink of the ground around three sides of the flue is going to keep that flue too cool to work well. Condensation and chimney stall will be constant instead of a seasonal hump to get over by warming the mass. Less surface to radiate into the space is another issue. It may work, but I'd be surprised if it isn't a constant battle.
 
pollinator
Posts: 4154
Location: Northern New York Zone4-5 the OUTER 'RONDACs percip 36''
67
hugelkultur fungi books wofati solar woodworking
  • Mark post as helpful
  • send pies
    Number of slices to send:
    Optional 'thank-you' note:
  • Quote
  • Report post to moderator
Peter and Matt : Can't we just insulate in the initial area where we tunnel under the logs and use about 10 feet less piping, did i miss something, or will more heat

at the final vertical chimney solve this winters problems ? Big AL
 
Rick Edwards
Posts: 182
15
  • Mark post as helpful
  • send pies
    Number of slices to send:
    Optional 'thank-you' note:
  • Quote
  • Report post to moderator
Version 2. (6" BatchBox Wofati 0.7 Ver 2)

Just reworked the SketchUp Model and now it is only in SU 2014. All the previous screenshots above have been replaced with the new updated changes. The downloads above have also been replaced with the new version 2.

And here it is again if any body wants it.
Filename: 6-inch-Batchbox-0.7-Wofati-Ver-2-SU-2014.skp
File size: 2 megabytes
 
Rick Edwards
Posts: 182
15
  • Mark post as helpful
  • send pies
    Number of slices to send:
    Optional 'thank-you' note:
  • Quote
  • Report post to moderator
Matt, Peter and all the rest... Round 2

Here are the changes to the design followed up with more questions.

The exhaust from the barrel entering the mass incorporates a smoother quicker "Boomerang" transition from its lowest point to a level of 1' covered before it makes the first turn from lateral to lineal.

Roughly 25' will be level before the gentle slope up to the stack from the last direction change.

The Stack has been moved closer to the post.


Questions:

Will the mostly level run help alleviate the condensation problem from returning to the stove?

Matt, You said.

Insulating all around the flue would go a long way towards alleviating most of my concern, which is that the giant heat sink of the ground around three sides of the flue is going to keep that flue too cool to work well.


Did you mean insulating the whole mass run but only the bottom and the sides?
I'm assuming not the vertical exposed chimney section, Correct?

Going to get a long nights sleep now. Frazzled after the computer heavy weekend and short sleep. I'll be checking in at 5:30am to see what awesomeness the Rocketeers have volleyed my way.

Riser tech and the full mock-up tomorrow.

 
You didn't tell me he was so big. Unlike this tiny ad:
Rocket Mass Heater Jamboree And Updates
https://permies.com/t/170234/Rocket-Mass-Heater-Jamboree-Updates
reply
    Bookmark Topic Watch Topic
  • New Topic