• Post Reply Bookmark Topic Watch Topic
  • New Topic
permaculture forums growies critters building homesteading energy monies kitchen purity ungarbage community wilderness fiber arts art permaculture artisans regional education skip experiences global resources cider press projects digital market permies.com pie forums private forums all forums
this forum made possible by our volunteer staff, including ...
master stewards:
  • Nancy Reading
  • Carla Burke
  • r ranson
  • John F Dean
  • paul wheaton
  • Pearl Sutton
stewards:
  • Jay Angler
  • Liv Smith
  • Leigh Tate
master gardeners:
  • Christopher Weeks
  • Timothy Norton
gardeners:
  • thomas rubino
  • Jeremy VanGelder
  • Maieshe Ljin

Tiny House Cook Stove and Heater

 
pollinator
Posts: 324
Location: North Olympic Peninsula
92
  • Likes 42
  • Mark post as helpful
  • send pies
    Number of slices to send:
    Optional 'thank-you' note:
  • Quote
  • Report post to moderator
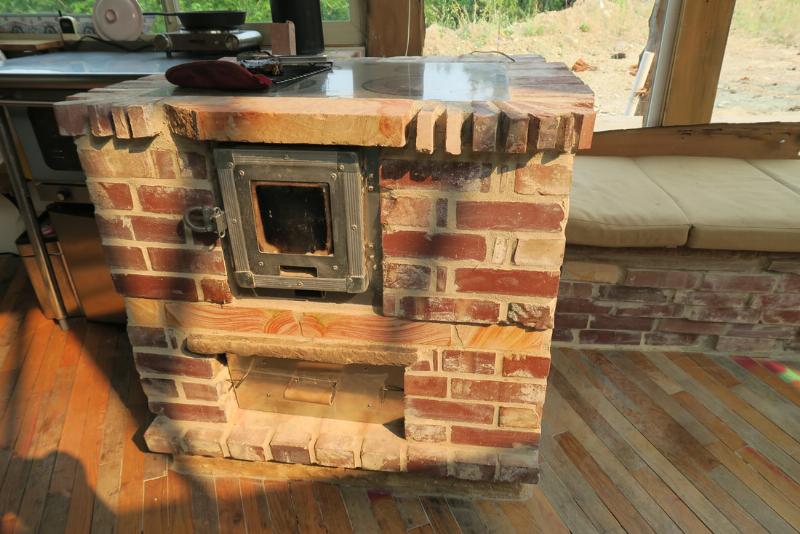
Hi Permies!  I'm super excited to finally get to share this with you, I've been working on it for a long time.

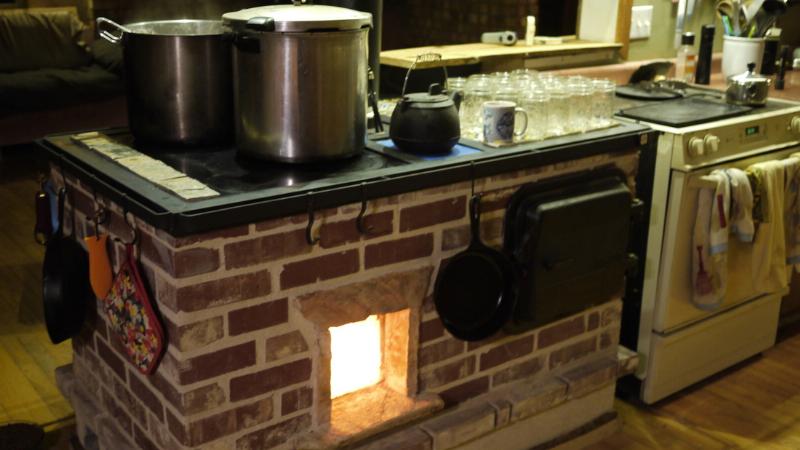
Here's my new rocket cook stove and heater, based on my riser-less core.  I spent the last two years testing and living with this core and concept, tweaking it, testing again, and finally have something I am ready to share.  I worked very hard to develop techniques and use materials that are simple and easy to work with for anyone, with the intention of sharing it with you all.  I have full plans and a builder's guide available that will walk you through the build and should be simple enough for anyone to follow.  There's no difficult metal work, no welding, just cutting and some fasteners.  

It took a long time to get to this point as it was very important to me to burn the stove day in and day out in a real life situation before I shared with you all.  I have lived with this as my sole heat source for over a year now, and I can say without question it is the best heater I've ever used.  Simple and quick to light, as clean and efficient as any rocket I've ever seen, never smokes back, cooks hotter than my regular range, roasts like a dream, and provides a long, gentle, comfortable radiant heat from the warm brick.  It is designed with the intention of providing all of the heating, hot water, and cooking needs for a small space.  I truly hope you all find this useful, I'd love to see more folks get to experience these wonderful heaters.  Thanks as always for letting me share my work here, I greatly appreciate all of you.


Full Plans available HERE.


rocket scientist
Posts: 6319
Location: latitude 47 N.W. montana zone 6A
3189
cat pig rocket stoves
  • Likes 2
  • Mark post as helpful
  • send pies
    Number of slices to send:
    Optional 'thank-you' note:
  • Quote
  • Report post to moderator
Matt;  What can I say ! You've done it again !   Great job !  Thanks for sharing !
 
master pollinator
Posts: 4953
Location: Due to winter mortality, I stubbornly state, zone 7a Tennessee
2118
6
forest garden foraging books food preservation cooking fiber arts bee medical herbs
  • Mark post as helpful
  • send pies
    Number of slices to send:
    Optional 'thank-you' note:
  • Quote
  • Report post to moderator
Does this design have the option to use a heated bench during winter, but close off the bench during summer to only use the cook stove?
 
out to pasture
Posts: 12484
Location: Portugal
3346
goat dog duck forest garden books wofati bee solar rocket stoves greening the desert
  • Mark post as helpful
  • send pies
    Number of slices to send:
    Optional 'thank-you' note:
  • Quote
  • Report post to moderator
I think I just fell in love...

I've been going through your other threads to see the development of ideas and stoves that led to this, which has answered a lot of the questions I had.  

I'll be back with a load more as soon as I've watched everything right through a few more times.
 
Matt Walker
pollinator
Posts: 324
Location: North Olympic Peninsula
92
  • Likes 5
  • Mark post as helpful
  • send pies
    Number of slices to send:
    Optional 'thank-you' note:
  • Quote
  • Report post to moderator
Thanks so much for the kind words all, I appreciate it.  Joylynn, you got it exactly!  The heated bench can be closed off using a bypass, as can the oven and lower mass if only stove top use is desired.  It will run very well with just a small load of wood for simple boiling and cooktop use, or function as a full heater in winter.  
 
Burra Maluca
out to pasture
Posts: 12484
Location: Portugal
3346
goat dog duck forest garden books wofati bee solar rocket stoves greening the desert
  • Likes 2
  • Mark post as helpful
  • send pies
    Number of slices to send:
    Optional 'thank-you' note:
  • Quote
  • Report post to moderator
OK, I have a few questions.

I'm not from the US, so I'm not sure if the ceramic hobs we have here are the same size as the ones this stove is designed for.  What dimensions should I be looking for?  Is there any leeway?

I'm assuming that there is *some* firebrick in the design.  If so, what are the dimensions, and how many will I need?

How much ceramic fibre board?  It might take me a while to find a supplier, and again the available sizes might be different.  But can you give me an idea of what size boards and how many I'd need?

How long a bench will this thing heat?  

What diameter pipe for the exhaust?

With a standard RMH I think it tends to take a long time for all the cob to dry out and for it to run well.  Does the same apply to this cook stove?  I'm likely to use pebble fill for the bench, so I'm guessing that it could be used pretty well straight away.  Am I right?  

I had more questions, but I've watched your other videos through several times now and I think they've already been answered.  My other half has been resisting an RMH for years, and I couldn't even talk him into a batch box because he still wanted something that was better for cooking on, but this seems perfect for our little house and I'm very very hopeful that I'll finally get the go-ahead to start building
 
Matt Walker
pollinator
Posts: 324
Location: North Olympic Peninsula
92
  • Likes 3
  • Mark post as helpful
  • send pies
    Number of slices to send:
    Optional 'thank-you' note:
  • Quote
  • Report post to moderator
That's a good list of questions Burra, I'll do my best to answer them for you.

The tops here are about 29"x24.5", or 74cmx62cm.  There is leeway for sure, top dimensions and landing can be modified to fit.

I don't use any firebrick in my own.  Some will choose to line the firebox with fire brick splits, in which case you will want 4-6 splits.

(3) 36" x 48" x 1" sheets of ceramic fiber board

Potential bench length is on par with a standard 6" J, and depends a lot on what type of bench in my opinion.  I don't recommend pebble style, they are mostly insulative and not suited for thermal storage in my opinion.  A true mass bench will provide a much longer heat cycle and far better efficiency.  If you use a pebble bench you don't have to worry much about length as it acts more like insulated exhaust than thermal mass.

It is designed around a standard 6", 1500mm exhaust.

All masonry heaters run poorly when first built, and improve on drying out.  This one is no different, so it will take a bit of drying time to perform at it's best.  I do burn all my stoves while I build, or immediately after, no need to wait to start drying them out.  They just don't burn well until they are dry.

Hope that helps.
 
gardener
Posts: 3489
Location: Fraser River Headwaters, Zone3, Lat: 53N, Altitude 2750', Boreal/Temperate Rainforest-transition
689
hugelkultur forest garden fungi trees books food preservation bike solar woodworking
  • Likes 1
  • Mark post as helpful
  • send pies
    Number of slices to send:
    Optional 'thank-you' note:
  • Quote
  • Report post to moderator
Hi Matt,

Brilliant design and function!  This is exactly what I am looking for, and have been dreaming about as part of my kitchen to be.

I'm very much looking forward to more of your videos posted here.

One question:  When you use your bypass systems, do you notice different performance with the reduction or increase in volume of gas flow, or do all the systems function equally in this regard?
 
Matt Walker
pollinator
Posts: 324
Location: North Olympic Peninsula
92
  • Mark post as helpful
  • send pies
    Number of slices to send:
    Optional 'thank-you' note:
  • Quote
  • Report post to moderator
Thank you Roberto!  I appreciate hearing that, hope this design helps you get closer to that dream kitchen.  The bypass layout is such that the full path to the chimney is always open.  There is never a restriction regardless of bypass positions.  I would say all bypass positions function equally, provided draft is adequate.  Summer conditions and similar will require lighting is done with the start-up bypass open to create draft in marginal conditions.
 
Posts: 22
Location: South Central BC Canada
  • Mark post as helpful
  • send pies
    Number of slices to send:
    Optional 'thank-you' note:
  • Quote
  • Report post to moderator
Hey Matt - this heater looks awesome, I really like that you are combining RMH with masonry stoves technology with an amazing result. I am wondering if it can be sized up to heat about 1400 sq ft atrawbale house ? you mentioned heating about 200 square feet so I wondering how it would be modified to heat a larger area. Also, how long of a burn do you do and how long does the mass stay warm ? My understanding is masonry heaters are fired maybe once a day and radiate heat up to 18 to 24 hours - is your's similar ?
 
steward
Posts: 3718
Location: Moved from south central WI to Portland, OR
985
12
hugelkultur urban chicken food preservation bike bee
  • Mark post as helpful
  • send pies
    Number of slices to send:
    Optional 'thank-you' note:
  • Quote
  • Report post to moderator
So, what's inside the bench?  Is it sand and clay, like the mortar between the bricks, or is it mostly made of bricks?  Is it cob in there, with just a brick facing for looks?
 
Matt Walker
pollinator
Posts: 324
Location: North Olympic Peninsula
92
  • Likes 4
  • Mark post as helpful
  • send pies
    Number of slices to send:
    Optional 'thank-you' note:
  • Quote
  • Report post to moderator
Bryan, the stove will likely heat a much larger space than I give it credit for.  It will depend a lot on your location and home layout, not to mention lifestyle.  That said, unless it's a large open layout with low ceilings, 1400sq.ft. is a lot to ask of any mass heater.  The power output of this stove is roughly equivalent to a 6" batch rocket.  It may be enough, but I wouldn't want to say it will be.  It could be scaled up to an 8" chimney, but elevations would be affected, it may not make a great cook stove due to that.

Burn times are anywhere from 1.5hrs to 4hrs between loads.  It can be closed down quite a bit and run at a slower rate without sacrificing much efficiency.  It is a true masonry heater in that it provides heat to the space for quite a while.  It weighs about 3000lbs and will stay warm for 18 hours+ after the burn.  In practice, I will let it go out after breakfast and it will heat the space all day without burning again until dinner time.  It then goes out until early morning.

Julia, the bench is just a hollow bell made of brick and flagstone.

 
Posts: 162
Location: NE ARIZONA, Zone 5B, 7K feet, 24" rain
4
4
  • Mark post as helpful
  • send pies
    Number of slices to send:
    Optional 'thank-you' note:
  • Quote
  • Report post to moderator
Great Job Matt.  I'm so glad to see the RMH take another leap into the future.  Great job in combining so many features and marrying different techniques.
I appreciate you trying to make it buildable by most anyone.  

I have a question about the use of Aluminum in the project.  How long have the aluminum door materials lasted for you?  Heat and exhaust gases may break down that particular metal faster than steel.  
...and without giving away too many secrets that would be in the plans, am I right to picture this being built with cob around your core... and cobless in your bench (with the use of a masonry bench)?
...and what temps will the bench get to, and would a hollow bell seep fumes through the mortar (thinking building to code and such)...?
 
Matt Walker
pollinator
Posts: 324
Location: North Olympic Peninsula
92
  • Likes 6
  • Mark post as helpful
  • send pies
    Number of slices to send:
    Optional 'thank-you' note:
  • Quote
  • Report post to moderator
Thanks you so much Dean, I'm happy to hear that the concept of this being accessible to anyone and simple to build is coming across.  I'd love to see more people get to experience these amazing stoves.

Those are great questions.  The aluminum question comes up often as it is truly not suitable for wood stoves as we have known them.  The difference is that in a rocket we attempt to keep as much of the heat of combustion on the combustion process until it's done, and then harvest the heat afterwards.  This means that, in my opinion, the best rockets are highly insulated with super low mass in the firebox or flame path.  I use aluminum backed with insulation such that the aluminum truly never gets much more than mildly hot.  The doors will last indefinitely, I promise.  I build whole stoves out of them and one is my daily workhorse BBQ, outside in the rain and on fire and frozen, etc.  It's doing fine.


Here's a link to some videos of the aluminum stoves.

http://walkerstoves.com/photos-and-video.html

As for the stove, there aren't any secrets.  It's built using my Walker Riser-less Core.  In this case I built the core from ceramic board to reduce the footprint, but the interior is generally the same.  No cob anywhere, just core inside a simple brick structure.  The bench so far tends to run at about 100F, I've got a probe in there and have seen as high as 120F.  That will no doubt climb a bit when it's colder out and I burn more.

As to leaks and code, well, I can't speak to code, but I don't believe leaks are an issue.  I believe this type of construction is a tighter construction than flue pipe and cob, generally speaking.  The real answer though, is that all stoves leak.  They need to be at negative pressure to function, so leaks should always be drawing in with the exception of a rare cold start.  We try to minimize leaks, but trying to hermetically seal a stove is futile and time better spent on other details in my opinion.

Hope that helps.

 
Matt Walker
pollinator
Posts: 324
Location: North Olympic Peninsula
92
  • Likes 3
  • Mark post as helpful
  • send pies
    Number of slices to send:
    Optional 'thank-you' note:
  • Quote
  • Report post to moderator
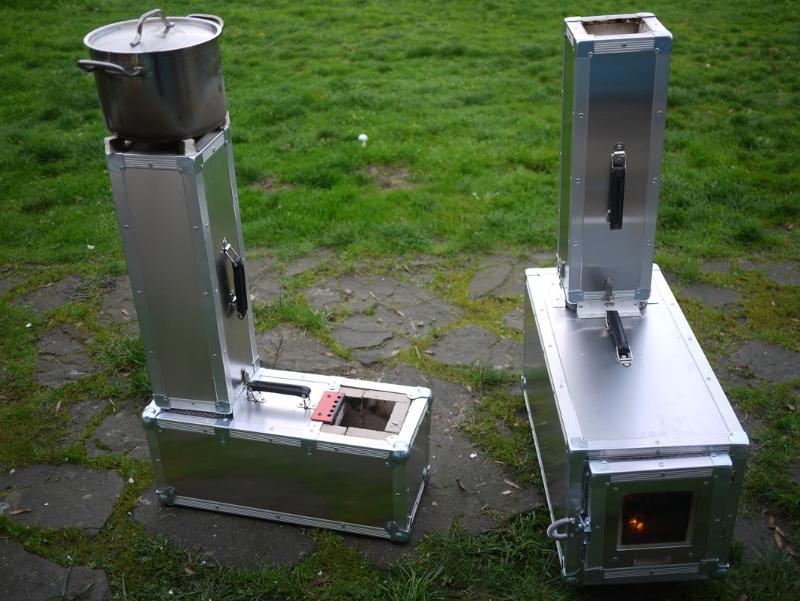
Hi Permies!  Here's a walk through of how to burn the Tiny Cook Stove, some layout options, and general discussion on how I use the stove.  There's a little building info, some efficiency testing and talk, and hopefully some good info for those of you who are building one, or want to.  Thanks so much for watching and for all of your support!

 
pollinator
Posts: 1560
Location: Zone 6b
211
goat forest garden foraging chicken writing wood heat
  • Mark post as helpful
  • send pies
    Number of slices to send:
    Optional 'thank-you' note:
  • Quote
  • Report post to moderator
This looks like just what we need for the small farmhouse we'll be moving to next spring.  If I buy plans, do I need to buy separate plans for the core and the stove, or are the core plans included when you buy the stove plans?  

 
Matt Walker
pollinator
Posts: 324
Location: North Olympic Peninsula
92
  • Mark post as helpful
  • send pies
    Number of slices to send:
    Optional 'thank-you' note:
  • Quote
  • Report post to moderator
Kathleen, the Tiny Cook Stove Plans are complete.  No need to purchase the core plans.  
 
Posts: 74
2
  • Mark post as helpful
  • send pies
    Number of slices to send:
    Optional 'thank-you' note:
  • Quote
  • Report post to moderator
This is very interesting.  I have forwarded the link to this posting to my husband to look at.  I already know some of the questions he will have, so I have a few questions for you Matt.

1.  Can the bench be made any narrower and smaller in length?  I know you are in a 180 sq ft building and ours is 192 sq ft, but we will be adding on another 130 area ft round building in the spring (earthbag round kitchen) and I would love to have this in that building.

2.  Can you give me an approximate range of costs?  I realize that material costs are different because of geography/locality, but a rough estimate or maybe how much $$ you have in yours.  It really is none of my business so please don't take offense.  I just know that we are paying as we build and have to keep costs down as much as possible.  We already have a small wood stove, but I like your cook stove/oven/water heater combo.  

3.  The exhaust, does it go out and up like normal wood stove flue?

Thank you so much.  This looks to be a wonderful invention and I am sure you will sell many plans, hopefully also to me if my husband is on board and we can afford it.
 
Kathleen Sanderson
pollinator
Posts: 1560
Location: Zone 6b
211
goat forest garden foraging chicken writing wood heat
  • Likes 1
  • Mark post as helpful
  • send pies
    Number of slices to send:
    Optional 'thank-you' note:
  • Quote
  • Report post to moderator

Matt Walker wrote:Kathleen, the Tiny Cook Stove Plans are complete.  No need to purchase the core plans.  


Thank you!  It will be a couple of weeks before I can get them (we close on the 'new' place next week, and I'm not spending a penny extra until I'm sure we've got that covered), but your design looks like exactly what we need.

Kathleen
 
Burra Maluca
out to pasture
Posts: 12484
Location: Portugal
3346
goat dog duck forest garden books wofati bee solar rocket stoves greening the desert
  • Mark post as helpful
  • send pies
    Number of slices to send:
    Optional 'thank-you' note:
  • Quote
  • Report post to moderator
Matt - with a little help from a fellow member we've managed to source 1000x1200x25mm ceramic fibre boards with a tempetature tolerance of 1260deg celsius, which I believe translates to 2300 F.  

Is this OK?  If so we can go ahead and get a quote.
 
Matt Walker
pollinator
Posts: 324
Location: North Olympic Peninsula
92
  • Likes 2
  • Mark post as helpful
  • send pies
    Number of slices to send:
    Optional 'thank-you' note:
  • Quote
  • Report post to moderator
M. A. Carey, I'm so sorry I missed your questions.

The bench can certainly be made smaller, and in any shape or configuration that works for you.  It can be deleted, or made into a small bell.  I'm happy to consult with plan holders as much as needed to help you build your dream heater.  I believe the heater would heat your space just fine, it's a great little heater, even for your planned expansion.  

A complete build, if everything were purchased as opposed to salvage bricks and materials, would run about $800 by my estimate.  That does not include chimney, which yes, should be a regular chimney, venting up above the roof of the building.

Burra, that sounds just right.  I've used a few various temperature grades and they have all been suitable.

Good luck with your builds!
 
Burra Maluca
out to pasture
Posts: 12484
Location: Portugal
3346
goat dog duck forest garden books wofati bee solar rocket stoves greening the desert
  • Likes 3
  • Mark post as helpful
  • send pies
    Number of slices to send:
    Optional 'thank-you' note:
  • Quote
  • Report post to moderator
I'm still awaiting the quote for the ceramic fiber board, but I couldn't wait any longer for the plans.  

I'm not going to be able to start the build until spring at the earliest, but I do feel like my long-awaited RMH is finally starting to happen.

I guess I should start a thread about our build when we do finally start.  Whaddya all think?
 
Kathleen Sanderson
pollinator
Posts: 1560
Location: Zone 6b
211
goat forest garden foraging chicken writing wood heat
  • Likes 1
  • Mark post as helpful
  • send pies
    Number of slices to send:
    Optional 'thank-you' note:
  • Quote
  • Report post to moderator

Burra Maluca wrote:I'm still awaiting the quote for the ceramic fiber board, but I couldn't wait any longer for the plans.  

I'm not going to be able to start the build until spring at the earliest, but I do feel like my long-awaited RMH is finally starting to happen.

I guess I should start a thread about our build when we do finally start.  Whaddya all think?


Oh yes, please!  I have figured out where to put one in our new house, and how to deal with building the foundation, so I'll be starting on mine probably in April, as soon as we settle in and deal with a few more urgent projects (like getting the bathroom back into working order!).

Kathleen
 
Roberto pokachinni
gardener
Posts: 3489
Location: Fraser River Headwaters, Zone3, Lat: 53N, Altitude 2750', Boreal/Temperate Rainforest-transition
689
hugelkultur forest garden fungi trees books food preservation bike solar woodworking
  • Likes 1
  • Mark post as helpful
  • send pies
    Number of slices to send:
    Optional 'thank-you' note:
  • Quote
  • Report post to moderator
Hi Burra,

I guess I should start a thread about our build when we do finally start.  Whaddya all think?

 Definitely.  And please take lots of photos at all stages of the process too!  
 
  • Likes 1
  • Mark post as helpful
  • send pies
    Number of slices to send:
    Optional 'thank-you' note:
  • Quote
  • Report post to moderator
This is fantastic!
Thank you for sharing
 
Matt Walker
pollinator
Posts: 324
Location: North Olympic Peninsula
92
  • Likes 3
  • Mark post as helpful
  • send pies
    Number of slices to send:
    Optional 'thank-you' note:
  • Quote
  • Report post to moderator
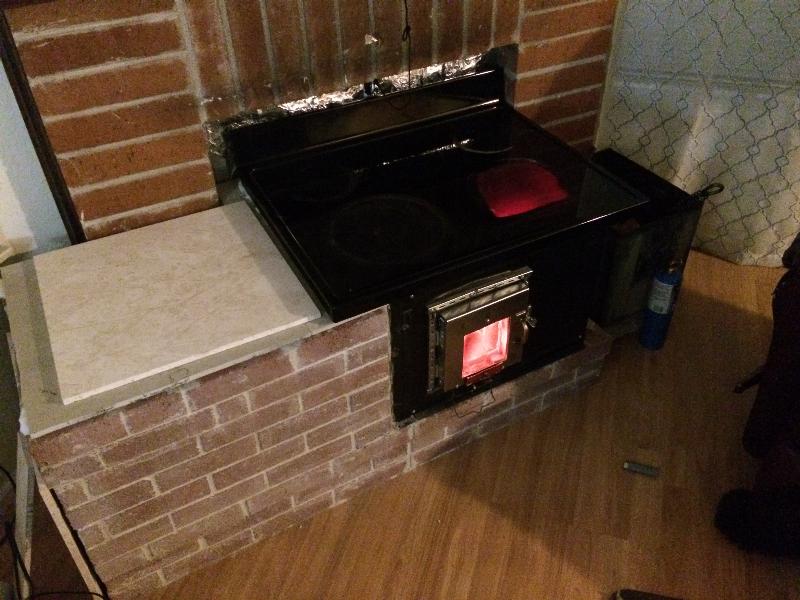
Thanks for all the great comments and interest everybody!  It's so exciting for me to see these coming to life, and I just got a lovely email I would like to share here.  This is the text from a very nice customer who has completed his build.  It's built using the Tiny Cook Stove Plans with modifications to the body to allow him to build this into his existing fireplace.  I think it's a lovely solution and the side bell could be a roasting oven if one desired.  This made my whole month, and I just had to share!

"Last night I finally got a fire in it and your design is fantastic. Only took about 2 fires to figure out the draw and how not to smoke the place out on start up. Really keeps the place warm using very little wood. When I move back to the country, I'm going to build this style again with the oven.  Thanks again Matt. Really love your design. "


"Your design was very easy to build. The hard part was deciding what to put around it. The black front is actually the drawer from the stove. In fact the core is encased with the donor stove parts. The door was made with the stainless steel parts of the donor stove. And I got the stove for free off of craigslist. The donor stove oven box (which could be used as the core surround), came wrapped in a ceramic fiber blanket which I used as gasket material and it provides an excellent seal around the top and wherever else one might need it. I would encourage others to follow your plans for the door because it's a great place to start and saves a great deal of time. I got the door window glass off of eBay and the seller will cut it to whatever size you want. Cost  about $22. The latch idea is the bomb. This was the first time I ever worked with laying bricks and would encourage others to lay it out dry first. Youtube how to cut bricks with a hammer and big chisel. It's really fast and easy to do. I got the chisel from harbor freight for about $10. As you can probably tell, I didn't cut the glass top though I could have. It just seemed to work better for me to leave it uncut for this application.
Yes! I'm thrilled with the finished product and it looks and works great.
Thanks again Matt and if there is anything I can do to help other folks, just let me know"

 
Posts: 9002
Location: Victoria British Columbia-Canada
707
  • Mark post as helpful
  • send pies
    Number of slices to send:
    Optional 'thank-you' note:
  • Quote
  • Report post to moderator
Thanks for this Matt. I don't normally check out the wood burning section, but today I was interested in whether or not a ceramic top could be used. And here you are, using one.

A couple questions concerning ceramic tops. Do you access them through the appliance repair people, or from scrap yards?

Do you know of any reason why a ceramic top could not be used as a grilling surface, for an outdoor cooker?

You are not far from me. If I'm able to access these top in quantity, would you want some, or do you have plenty of supply over there?

Concerning the fiberboard. I have a high mass firebox. I wouldn't want to sacrifice a lot of space, but am considering putting a thin sheet on the bottom, and possibly up the sides. Do you think this is advisable?
 
Kathleen Sanderson
pollinator
Posts: 1560
Location: Zone 6b
211
goat forest garden foraging chicken writing wood heat
  • Mark post as helpful
  • send pies
    Number of slices to send:
    Optional 'thank-you' note:
  • Quote
  • Report post to moderator

Dale Hodgins wrote:Thanks for this Matt. I don't normally check out the wood burning section, but today I was interested in whether or not a ceramic top could be used. And here you are, using one.

A couple questions concerning ceramic tops. Do you access them through the appliance repair people, or from scrap yards?

Do you know of any reason why a ceramic top could not be used as a grilling surface, for an outdoor cooker?

You are not far from me. If I'm able to access these top in quantity, would you want some, or do you have plenty of supply over there?

Concerning the fiberboard. I have a high mass firebox. I wouldn't want to sacrifice a lot of space, but am considering putting a thin sheet on the bottom, and possibly up the sides. Do you think this is advisable?


I've been wondering the best way to find the glass stove tops, too.  I have a glass-top stove, but was planning on leaving it in the house when we move to Kentucky in a few weeks.  I could take it, but it's one more thing to move, and I'm not sure my buyer has their own stove to put in here, so I wanted to leave it for them unless they don't need it (which I will find out).

Kathleen
 
Matt Walker
pollinator
Posts: 324
Location: North Olympic Peninsula
92
  • Likes 2
  • Mark post as helpful
  • send pies
    Number of slices to send:
    Optional 'thank-you' note:
  • Quote
  • Report post to moderator
Thanks for the interest you two.  The tops are easily sourced at scrap places, and here I often find them in the back of the used household item resale places, like Habitat for Humanity retail store and some of the building material recyclers where they sell old windows and such.  The bad stoves go out back and they have to pay to scrap them, so they typically will give them to you, or close enough.  I paid $5 for most of mine.  They can be easily cut free of the frame by cutting the adhesive around the perimeter and working up with a putty knife, carefully.  Sometimes they have a few dabs of adhesive throughout the field as well, so you might need to get underneath it to work it free.

Dale, they will work great on a grill.  I appreciate the offer, but I don't collect them and can find them when I need them easily enough.  They are really common trash items, since people don't recognize the value. I imagine they are the most expensive component of stove construction for the manufacturer.

Yes Dale, I believe you would gain much from insulation.  Mass in the firebox robs heat from the dying fire and cools the coals at the worst times, startup and end of burn. Insulation means quicker to a clean burn and far less black chunks left over after a fire.
 
Dale Hodgins
Posts: 9002
Location: Victoria British Columbia-Canada
707
  • Likes 1
  • Mark post as helpful
  • send pies
    Number of slices to send:
    Optional 'thank-you' note:
  • Quote
  • Report post to moderator
Edit  - Matt answered while I typed .
 I wouldn't rip a perfectly functioning stove apart, for the glass top. Anything with electronics, is bound to fail eventually, so probably scrap yards or appliance repair people will have these things. I'm going to run to run an ad on used Victoria, offering to get rid of dead stoves. Of course, this will probably generate calls asking me to get rid of other stuff that have not advertised for.

Imagine heating a space, where you don't need a huge amount of the heat put into storage. I could see doing a horizontal burn tunnel, with a couple of these glass tops, stood vertically, so that they form the side that is most visible to the room. You would have a great view of the fire.

Mine is quite dark. It's hard to tell if it's in a glass or if it's just a coating on the back. I'd like it to be clear, so that the fire could be viewed better and so that the fire could light up the room, more than I do when I enter it. :-)
 
Matt Walker
pollinator
Posts: 324
Location: North Olympic Peninsula
92
  • Likes 4
  • Mark post as helpful
  • send pies
    Number of slices to send:
    Optional 'thank-you' note:
  • Quote
  • Report post to moderator
That's a cool idea Dale!  The stove tops are opaque, you can see the glow when the fire is blasting right on it, but I'm not sure you'd get any light from them.

Here's a new video on how to control temps on the stove top.  Thanks for letting me share, as always!

 
pollinator
Posts: 4715
Location: Zones 2-4 Wyoming and 4-5 Colorado
492
3
hugelkultur forest garden fungi books bee greening the desert
  • Mark post as helpful
  • send pies
    Number of slices to send:
    Optional 'thank-you' note:
  • Quote
  • Report post to moderator
Matt, is there any concern about the glass getting too hot and shattering?
 
Burra Maluca
out to pasture
Posts: 12484
Location: Portugal
3346
goat dog duck forest garden books wofati bee solar rocket stoves greening the desert
  • Mark post as helpful
  • send pies
    Number of slices to send:
    Optional 'thank-you' note:
  • Quote
  • Report post to moderator
One member posted this a few weeks ago - maybe we should discuss it there.  caution when using glass cook tops
 
Matt Walker
pollinator
Posts: 324
Location: North Olympic Peninsula
92
  • Likes 1
  • Mark post as helpful
  • send pies
    Number of slices to send:
    Optional 'thank-you' note:
  • Quote
  • Report post to moderator
No concern at all in my opinion.  I've been using these with full heat for years in many builds, and keep in mind these are from UL listed stoves that have a 220v 1800w+ coil directly underneath them, insulated below with ceramic fiber.  You can put a 5 gallon soup pot full of cold water on one set on high and there is no risk.  If these could break from thermal shock at temperatures we can reach with wood fire they would never pass UL certification.  Our fires are far less stress than the normal use they are designed to see, in my opinion.  I've never heard of one breaking from thermal shock, or even breaking at all other than the one lone post with no details.  I can only assume the top was compromised prior, or perhaps was not of the same origin or material.  They would not be in households all over the country if they were not deemed safe for extreme heat and large thermal variances across their surface.  Nothing at all to worry about in my opinion.  
 
Kathleen Sanderson
pollinator
Posts: 1560
Location: Zone 6b
211
goat forest garden foraging chicken writing wood heat
  • Likes 1
  • Mark post as helpful
  • send pies
    Number of slices to send:
    Optional 'thank-you' note:
  • Quote
  • Report post to moderator

Matt Walker wrote:No concern at all in my opinion.  I've been using these with full heat for years in many builds, and keep in mind these are from UL listed stoves that have a 220v 1800w+ coil directly underneath them, insulated below with ceramic fiber.  You can put a 5 gallon soup pot full of cold water on one set on high and there is no risk.  If these could break from thermal shock at temperatures we can reach with wood fire they would never pass UL certification.  Our fires are far less stress than the normal use they are designed to see, in my opinion.  I've never heard of one breaking from thermal shock, or even breaking at all other than the one lone post with no details.  I can only assume the top was compromised prior, or perhaps was not of the same origin or material.  They would not be households all over the country if they were not deemed safe for extreme heat and large thermal variances across their surface.  Nothing at all to worry about in my opinion.  


I know of two glass stove tops breaking from heavy pots (canners) on them, but both were old stoves.  My understanding is that the early glass-top stoves weren't quite up to the use they would see in a farm kitchen.  But I've had two loaded canners going at the same time on the stove I have now and haven't had any problems with it.  I know the question was about the possibility of breaking from too much heat, but I really think too much weight is the only possible issue with them, and even then it would take quite a bit of weight to break one.

Kathleen
 
Matt Walker
pollinator
Posts: 324
Location: North Olympic Peninsula
92
  • Likes 5
  • Mark post as helpful
  • send pies
    Number of slices to send:
    Optional 'thank-you' note:
  • Quote
  • Report post to moderator
You are correct Kathleen, I should have been more clear.  They are susceptible to being overloaded.  In their original configuration in a metal stove they have very little support so can flex under load and, yes, weight can break them.  In my stoves I always have multiple points of support underneath.  The tops ride on brick dividers that are designed such that they have no span greater than 10" or so.  I feel confident loading them heavily when designed this way.  

 
Kathleen Sanderson
pollinator
Posts: 1560
Location: Zone 6b
211
goat forest garden foraging chicken writing wood heat
  • Likes 1
  • Mark post as helpful
  • send pies
    Number of slices to send:
    Optional 'thank-you' note:
  • Quote
  • Report post to moderator
Great picture!  And it's good to know that there is better support under the glass in your design.  As I said, the stove I have now has held two loaded canners at a time with no problem, but I always worry a bit when I do that!

Another question -- I see that you have another kitchen range alongside the masonry stove.  Does the masonry stove throw off so much heat that it's uncomfortable to use in the summer?  I'm considering having mine as my only kitchen stove (though we would still have the microwave, slow cooker, instant pot, and electric tea kettle -- and the BBQ grill for cooking outside).  Just wondering if that's really practical, or if I should go ahead and make room for an electric range in my small kitchen?

Kathleen
 
Kathleen Sanderson
pollinator
Posts: 1560
Location: Zone 6b
211
goat forest garden foraging chicken writing wood heat
  • Likes 1
  • Mark post as helpful
  • send pies
    Number of slices to send:
    Optional 'thank-you' note:
  • Quote
  • Report post to moderator
Oh, and another question -- I've been wondering about the dimensions of both stoves.  If the bigger one will fit my space, I might go with it rather than the tiny house version.

Kathleen
 
Matt Walker
pollinator
Posts: 324
Location: North Olympic Peninsula
92
  • Likes 2
  • Mark post as helpful
  • send pies
    Number of slices to send:
    Optional 'thank-you' note:
  • Quote
  • Report post to moderator
Kathleen, the Full Cook Stove footprint is roughly 55" x 35".  The Tiny Cook Stove footprint is roughly 43" x 40".  

As for heat and cooking in summer, well, I suppose it depends.  You can cook with the stove top using the bypass and thus not heat the brick, so it's not impossible.  That said, lighting a fire every time you cook when you don't need it for warmth will get tiresome, thus my electric range as well.  These days I'm in a smaller space and keep a single portable electric burner on the counter top to cook with when I don't want to light a fire.  Hope that helps.


Dale Hodgins
Posts: 9002
Location: Victoria British Columbia-Canada
707
  • Mark post as helpful
  • send pies
    Number of slices to send:
    Optional 'thank-you' note:
  • Quote
  • Report post to moderator
I think these would make the ultimate barrel, for a conventional rocket mass heater.

I imagine having a good quality frame built out of steel, with cooktops as the sides and top. Or there could be some combination of cooktops and brick. The cooktops could be used on sides adjacent to ovens. There could be two or three ovens, heated from the side, then a cooktop placed, as usual, for pots and pans.

Doesn't sound very conventional, now that I've written it out and looked at it. :-)

Has anyone used one of these cooktops on a bell? I could see loading one of these up with several big pots, to produce as much as 20 gallons of hot water in one go.
 
Check your pockets for water buffalo. You might need to use this tiny ad until you locate a water buffalo:
Heat your home with the twigs that naturally fall of the trees in your yard
http://woodheat.net
reply
    Bookmark Topic Watch Topic
  • New Topic