• Post Reply Bookmark Topic Watch Topic
  • New Topic
permaculture forums growies critters building homesteading energy monies kitchen purity ungarbage community wilderness fiber arts art permaculture artisans regional education skip experiences global resources cider press projects digital market permies.com pie forums private forums all forums
this forum made possible by our volunteer staff, including ...
master stewards:
  • Nancy Reading
  • Carla Burke
  • r ranson
  • John F Dean
  • paul wheaton
  • Pearl Sutton
stewards:
  • Jay Angler
  • Liv Smith
  • Leigh Tate
master gardeners:
  • Christopher Weeks
  • Timothy Norton
gardeners:
  • thomas rubino
  • Jeremy VanGelder
  • Maieshe Ljin

Interesting keyhole/hugelkultur design

 
Posts: 117
Location: Milmay, NJ (latitude 39.453160, longitude -74.867990)
8
  • Mark post as helpful
  • send pies
    Number of slices to send:
    Optional 'thank-you' note:
  • Quote
  • Report post to moderator
One way around the space issue, DJ, might be to change the shape of the central core to more of a curvilinear shape, like a "C" that would line the inside of the keyhole. It would allow you to space out the composting piles, still leave air access, but not be so bulky. Compost, even humanure, does flatten out and compress rather quickly - even more so when the worms get in there - so I don't know that the core really has to be that big, especially if you have several of these beds to space out your compost deposits.

Your curved berm chicken run sounds really interesting - please post pics of the sketches!
 
steward
Posts: 12458
Location: Pacific Wet Coast
7018
duck books chicken cooking food preservation ungarbage
  • Likes 4
  • Mark post as helpful
  • send pies
    Number of slices to send:
    Optional 'thank-you' note:
  • Quote
  • Report post to moderator
I would love to hear an update from all of you above. There are lots of good ideas and many different ecosystems mentioned and it's very useful to know what didn't work or what went wrong as well as what went right.

I tried a "Charlie Brown ARK* bed" last spring. I just tied together a ring of packing skids trenched in 15 cm (6 inches) and used an approximately 45 cm (18 inches) tube of snow fencing I'd been given as the compost tube and dumped a bunch of rocks in the bottom of it both to keep the compost and the moisture it generated higher up towards the surface - this is something I'd read about these beds, but I can't remember where.

Problems/Comments: 1. I needed to build this approximately table height due to back problems I was having, but it takes huge amounts of dirt, punky wood, finished compost etc to fill that height of 2 meter/6 ft diameter bed.
2. Although I used lots of old cardboard to line the packing skids to keep the dirt in, too much leaked out - this year I'm filling the core of the skids with tree branches and old fence boards.
3. Because of 1 and 2, the bed sank tremendously - like at least 30 cm it's first year - due to settling and decomposing and leaking out.
4. The tube was under-engineered and not well enough supported, so it collapsed to an undesirable angle - I'm going to replace it with a half-barrel I've got which I'll drill a bunch of holes in for worms and moisture to get in and out and I'll set the barrel up on breeze blocks or similar to keep it at the right height.
5. I planted a couple of pumpkins in the edge by the keyhole entrance and as they grew I circled the stems around the outer edge. This appeared to be sufficient to stop the deer from eating the kale that was further in.
6. Other than watering in transplants, I did not water the garden once despite a significant drought last summer.
7. The *only* reason it didn't need watering is because I added a 16 liter bucket of vegetable scraps twice a week to the center. This is why these beds were originally trialed at schools in Africa - you need a fair quantity of high water content scraps to make the system work. There is *no* way my household generates that amount of compost in a week, so I get buckets of prep scraps from a local Thai restaurant.

So, although I had problems, the system proved itself sufficiently useful that I have been trying to rehabilitate it for a second year of growing, although other emergencies may prevent that from happening. I would love to build and trial a rock version, but that's another whole level of heavy lifting that I'm not ready for. Since many contributors have added, "in my dreams" ideas - I picture a mandala of these beds with my noisy ducks** visiting at ground level to keep the bugs/slugs at bay.

*ARK - African Raised Keyhole
** noisy ducks - any duck domesticated from mallards - currently I have a 4 Campbells, 2 Runners and 2 maybe Cayuga's.
 
pollinator
Posts: 1793
Location: Wisconsin, zone 4
97
  • Likes 2
  • Mark post as helpful
  • send pies
    Number of slices to send:
    Optional 'thank-you' note:
  • Quote
  • Report post to moderator
This is the first time I've seen this thread, but I built something almost exactly like it about 10 ft from my beehive and I'm planting it with various "bee plants", mint, bee balm, joe pye weed, etc. I built it out of old bricks that came from a house that was being torn down, filled it 3/4 of the way with old punky wood and the rest of the way with compost and composted wood chips.
 
Todd Parr
pollinator
Posts: 1793
Location: Wisconsin, zone 4
97
  • Likes 4
  • Mark post as helpful
  • send pies
    Number of slices to send:
    Optional 'thank-you' note:
  • Quote
  • Report post to moderator
Please ignore the lousy cell phone pictures.
planter.jpg
African keyhole garden
planter2.jpg
African keyhole garden
planter3.jpg
African keyhole garden
 
Jay Angler
steward
Posts: 12458
Location: Pacific Wet Coast
7018
duck books chicken cooking food preservation ungarbage
  • Likes 2
  • Mark post as helpful
  • send pies
    Number of slices to send:
    Optional 'thank-you' note:
  • Quote
  • Report post to moderator
Hi Todd

That's an awesome raised keyhole bed. Great job!

It's not technically an "ARK" bed which is what the original picture that starts this thread is depicting,because it doesn't have a compost tube component. Is adding a compost pipe something you considered and decided against, or just something you never thought about or feel you don't need? I'm trying to decide how much the compost pipe does to eliminate watering in climates with inconsistent rainfall.

Thanks J.
 
Todd Parr
pollinator
Posts: 1793
Location: Wisconsin, zone 4
97
  • Likes 4
  • Mark post as helpful
  • send pies
    Number of slices to send:
    Optional 'thank-you' note:
  • Quote
  • Report post to moderator

Jay Angler wrote:Hi Todd

That's an awesome raised keyhole bed. Great job!

It's not technically an "ARK" bed which is what the original picture that starts this thread is depicting,because it doesn't have a compost tube component. Is adding a compost pipe something you considered and decided against, or just something you never thought about or feel you don't need? I'm trying to decide how much the compost pipe does to eliminate watering in climates with inconsistent rainfall.

Thanks J.


I did consider it and decided against it. I think the buried wood and the large amount of compost I used in the bed itself should eliminate the need for the compost pipe. We get 33" of rainfall here on average, but we can have fairly long summer stretches without rain. My experience so far is that deep mulch alone can pretty much negate any need I have to water. I may build another with the compost tube, just to see if one performs better than the other.

For those curious, yes, the bricks originally lined up in the inset of the structure. Frost heaving took care of that for me
 
steward & author
Posts: 38459
Location: Left Coast Canada
13711
8
books chicken cooking fiber arts sheep writing
  • Likes 2
  • Mark post as helpful
  • send pies
    Number of slices to send:
    Optional 'thank-you' note:
  • Quote
  • Report post to moderator
Is there some reason the compost circle in a traditional key hole bed is so small?  
 
Posts: 9002
Location: Victoria British Columbia-Canada
707
  • Mark post as helpful
  • send pies
    Number of slices to send:
    Optional 'thank-you' note:
  • Quote
  • Report post to moderator
I think it just becomes a feeding station for worms, that live throughout the bed, so material doesn't accumulate as much as it would, if the compost were a stand alone feature.

One guy on YouTube did a heavy watering of his whole bed, through a central compost pile. His theory was that he was washing the nutrients around. I'm pretty sure that the worms would do the same thing.
 
r ranson
steward & author
Posts: 38459
Location: Left Coast Canada
13711
8
books chicken cooking fiber arts sheep writing
  • Likes 2
  • Mark post as helpful
  • send pies
    Number of slices to send:
    Optional 'thank-you' note:
  • Quote
  • Report post to moderator
Do you think there is anything wrong with having a bigger compost center?  We do make a lot of compost.
 
r ranson
steward & author
Posts: 38459
Location: Left Coast Canada
13711
8
books chicken cooking fiber arts sheep writing
  • Likes 6
  • Mark post as helpful
  • send pies
    Number of slices to send:
    Optional 'thank-you' note:
  • Quote
  • Report post to moderator
My first keyhole bed is complete.

 
r ranson
steward & author
Posts: 38459
Location: Left Coast Canada
13711
8
books chicken cooking fiber arts sheep writing
  • Likes 2
  • Mark post as helpful
  • send pies
    Number of slices to send:
    Optional 'thank-you' note:
  • Quote
  • Report post to moderator
Do we know of any of these beds 5+ years later?  Does the centre eventually fill up and no longer go down?  

What's the life expectancy of this kind of bed?
 
r ranson
steward & author
Posts: 38459
Location: Left Coast Canada
13711
8
books chicken cooking fiber arts sheep writing
  • Likes 7
  • Mark post as helpful
  • send pies
    Number of slices to send:
    Optional 'thank-you' note:
  • Quote
  • Report post to moderator
using mostly cardboard and leaf mulch to fill this keyhole garden, with a small compost basket in the middle.


Later on in the video, it shows some gardens that are several years old.  
 
r ranson
steward & author
Posts: 38459
Location: Left Coast Canada
13711
8
books chicken cooking fiber arts sheep writing
  • Likes 8
  • Mark post as helpful
  • send pies
    Number of slices to send:
    Optional 'thank-you' note:
  • Quote
  • Report post to moderator
Here's a collection of different African style keyhole gardens from all over the world

Here are a few of my favourites


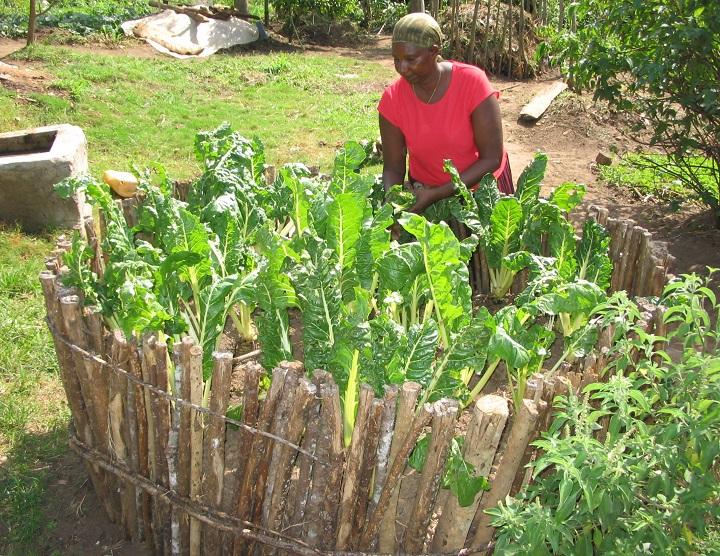
Keyhole garden with a surround of sticks in Uganda by Send a Cow.


walls made from upcycled milk jugs.


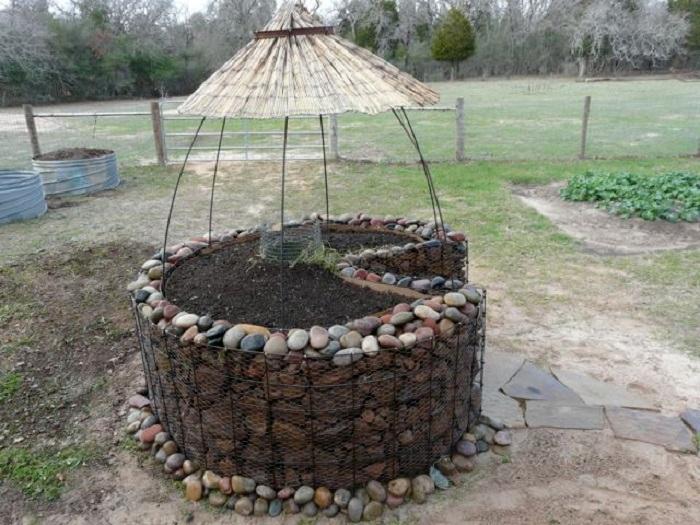
And this one from Texas


I like how they kept the rocks in place.  
 
pollinator
Posts: 54
Location: Zone 4, SD
11
goat cat dog chicken wood heat homestead
  • Likes 1
  • Mark post as helpful
  • send pies
    Number of slices to send:
    Optional 'thank-you' note:
  • Quote
  • Report post to moderator
I am so going to build and plant one of these this spring!   Love that this got highlighted in our email today.  Been watching YouTubes about these for nearly an hour now.  LOL!


pollinator
Posts: 3090
Location: Meppel (Drenthe, the Netherlands)
1018
dog forest garden urban cooking bike fiber arts
  • Likes 2
  • Mark post as helpful
  • send pies
    Number of slices to send:
    Optional 'thank-you' note:
  • Quote
  • Report post to moderator
I made a start at my keyhole-with-compost-center some months ago and will go on when the new spring arrives

I think we'll use this idea too in our community garden.
 
Posts: 47
Location: South East Missouri
9
  • Likes 5
  • Mark post as helpful
  • send pies
    Number of slices to send:
    Optional 'thank-you' note:
  • Quote
  • Report post to moderator
I am currently building my first combination Keyhole / Hugelkultur planting bed.  I have tried my hand at raised bed, french intensive gardening, but watering is always a challenge.  I built complex rainwater collection and drip irrigation systems, but the hugelkultur approach looks like it makes much more sense.

The pictures show my first attempt, which is still under construction.  I am determined to be ready to plant by the spring.
Keyhole1a.JPG
My first attempt at a Hugelkultur / Keyhole Garden
 
Phillip Stuckemeyer
Posts: 47
Location: South East Missouri
9
  • Likes 3
  • Mark post as helpful
  • send pies
    Number of slices to send:
    Optional 'thank-you' note:
  • Quote
  • Report post to moderator
Built into a hill, the Keyhole Garden is higher and deeper on the downward side.  The Keyhole garden is about 15 ft. across, and I do not plan a compost bin in the center.  I prefer to be able to stand in the keyhole and from that vantage point will be able to reach the entire planting area from the inside or the outside.  I have recently finished a grey-water collection system, and have run piping in a trench from the storage tanks to the planting bed.  A motor operated ball valve, controlled by schedule, will allow the grey water to saturate the planting bed several times a day.
Keyhole1b.JPG
Grey Water piping will irrigate the mound.
 
Phillip Stuckemeyer
Posts: 47
Location: South East Missouri
9
  • Likes 2
  • Mark post as helpful
  • send pies
    Number of slices to send:
    Optional 'thank-you' note:
  • Quote
  • Report post to moderator
The grey water piping lands in a transfer box that diverts the water in both directions.  Ultimately, I would like to build 3 more Spiral or Keyhole Hugel beds that go down the hill toward the pond, and this piping will continue down the hill from the transfer box so that all 4 of the Hugelkultur mounds are kept in a perpetual state of saturation.  My 86-year old home has a huge cistern in the cellar (that is where the grey water collection system is also) and new maintenance free gutters and downspouts will be installed within the next two weeks.  This cistern used to be the sole source of water for this old farmhouse, but now I enjoy a deep drilled well as my primary water source.  The rain water will supplement the grey water, and serve as a ready source of fresh potable water in the event of a power outage.  The large pipe will allow the grey water to gravity feed, while the smaller black tube runs inside the larger pipe and will allow for pressurized application of water with a sprinkler or hose by opening a solenoid activated gate valve.
Keyhole1c.JPG
Grey water, controlled by schedule, will flood the trench.
 
Phillip Stuckemeyer
Posts: 47
Location: South East Missouri
9
  • Likes 2
  • Mark post as helpful
  • send pies
    Number of slices to send:
    Optional 'thank-you' note:
  • Quote
  • Report post to moderator
This will be a traditional Hugelkultur mound with logs, branches, wood chips at the bottom of a trench and layers of cardboard, compost, leaves, grass, topsoil, and potting soil throughout.  Manure from cattle, rabbits, and chickens will be added as needed and tea from a worm composter poured on the plants from time to time.  This picture is a bit washed out by the sunlight, but I hope you can see the trenching underway inside the circle.  I am determined that the trench will be level so that the grey water pools consistently around the entire circle.  I will upload more photos as the spring nears and I make notable progress.  I may choose to stack additional layers of the landscaping block in order to get the right height and depth.  Because I was digging into a hill. the most difficult thing about building this mound was getting the first course of blocks level.
Keyhole1d.JPG
A level trench circles inside the planting bed.
 
pollinator
Posts: 229
Location: Hardiness Zone 5
83
hugelkultur purity forest garden chicken wofati woodworking
  • Likes 1
  • Mark post as helpful
  • send pies
    Number of slices to send:
    Optional 'thank-you' note:
  • Quote
  • Report post to moderator
I figured I should add my link to this post as well.
Very well documented with many nice pictures showing the construction thru to harvest!

Hugelkultur and Keyhole in One
https://permies.com/t/25531/Hugelkultur-keyhole
 
Phillip Stuckemeyer
Posts: 47
Location: South East Missouri
9
  • Mark post as helpful
  • send pies
    Number of slices to send:
    Optional 'thank-you' note:
  • Quote
  • Report post to moderator
Thanks to Jason for sharing the link to a related forum.  It forces me to notice that I did not include pictures of my completed project.  Here are 3 photos.

Greater details can also be seen in another forum that focuses on the irrigation component.  Here is the link:  
https://permies.com/t/64963/Backup-watering-system#630200

My combination Hugelkulture / Keyhole garden has only been planted for a single season.  Quite an experiment!  I made the mistake of planting too many vines, and they absolutely overtook the entire mound until it was almost impossible to tend.  Maybe I will have better luck next year, if I pay attention to lessons learned.
HugelKeyholeLayersUpdated.jpg
montge of keyhole garden build
HugelKeyholeLayers1.jpg
evolution of buildig a keyhole garden with sprinkler system
GrayWaterSys2.jpg
keyhole garden with sprinkler and grey water irrigation
 
steward
Posts: 2878
Location: Zone 7b/8a Southeast US
1106
4
forest garden fish trees foraging earthworks food preservation cooking bee woodworking homestead ungarbage
  • Likes 2
  • Mark post as helpful
  • send pies
    Number of slices to send:
    Optional 'thank-you' note:
  • Quote
  • Report post to moderator
Looks really good Phillip and Jason.

Your comment Phillip about vines along with a previous comment about growing strawberries in the wall got me thinking of the possibilities of growing grapes or another vining plant along the outside edge of the wall in the ground. It seems like it would be a great fertile spot next to the keyhole/hugelkultur and a good use of the walls as a trellis, possibly providing more habitat for beneficial garden friends too.

Has anyone seen or tried this?
 
Phillip Stuckemeyer
Posts: 47
Location: South East Missouri
9
  • Likes 2
  • Mark post as helpful
  • send pies
    Number of slices to send:
    Optional 'thank-you' note:
  • Quote
  • Report post to moderator
I actually planted 4 grape vines in my Hugel mound, using the 4 corners of the cattle panel illustrated as a trellis.  Shade under the vines is good for my heat sensitive lettuce, but I also had sugar snap peas and cantelope interwoven throughout the same trellis.  What a disaster!  I will not do that again.  I am using an oscillating sprinkler head mounted in the top of the trellis to water from top down a couple times a day, but the vines fouled the sprinkler so bad that it could not oscillate!  I think grapes alone will be manageable since they grow slowly and can be pruned into shape.
 
Steve Thorn
steward
Posts: 2878
Location: Zone 7b/8a Southeast US
1106
4
forest garden fish trees foraging earthworks food preservation cooking bee woodworking homestead ungarbage
  • Likes 2
  • Mark post as helpful
  • send pies
    Number of slices to send:
    Optional 'thank-you' note:
  • Quote
  • Report post to moderator
That's neat Philip.

Yeah I see how all those different kinds of vining plants growing together could get crazy.

Every year I feel like I'm always trying to reign in my cucumbers to keep the from smothering all of my other plants!
 
gardener
Posts: 1570
Location: Washington State
985
6
forest garden trees rabbit earthworks composting toilet fiber arts sheep wood heat woodworking rocket stoves homestead
  • Likes 3
  • Mark post as helpful
  • send pies
    Number of slices to send:
    Optional 'thank-you' note:
  • Quote
  • Report post to moderator

Chris Dean wrote:I was very surprised to find this video:  (http://www.youtube.com/watch?v=ykCXfjzfaco)   The above article and pictures are a souped-up version of the African keyhole beds in the video.  I'm surprised because I was trying to think of ways to improve upon Hemenway's keyhole beds to make them more drought-tolerant a year ago and I never came across these!


Hey Chris,
I'm sad to report that the video is not available with the link you included.  Do you recall the title and I could search for it?
~Opalyn
 
gardener
Posts: 1348
Location: Tennessee
872
homeschooling kids urban books writing homestead
  • Likes 5
  • Mark post as helpful
  • send pies
    Number of slices to send:
    Optional 'thank-you' note:
  • Quote
  • Report post to moderator
My gardening space this year is a long rectangle 35' x 15' literally running along the front of my house. (It will have to be fenced for deer, so a rectangle border it must be.) I have been daydreaming about keyhole beds for years, but now that I have this shape in this place I wonder if it is a good idea.

This is an excellent drawing I just found exactly capturing my house and yard situation:

The garden will be in the rectangle in front of the house.

Alas, as you can see, all I can think of doing is arranging the keyhole beds in...rows. It doesn't look great in this simple diagram, and I am pretty sure it would not look great in my front yard. My imagination needs help, y'all!

After chuckling over this, please tell me what you think would be good to do for a long rectangle in front of my porch and front walkway!  
Keyhole-rows-Copy.png
idea for rectangular keyhole garden
 
Jay Angler
steward
Posts: 12458
Location: Pacific Wet Coast
7018
duck books chicken cooking food preservation ungarbage
  • Likes 5
  • Mark post as helpful
  • send pies
    Number of slices to send:
    Optional 'thank-you' note:
  • Quote
  • Report post to moderator

Rachel Lindsay wrote:My gardening space this year is a long rectangle 35' x 15' literally running along the front of my house.


1. Are you thinking of digging down to add hugel wood or having raised beds?
2. Are you concerned about blocking light in the windows? Or is that actually an asset to manage summer heat, but die back in the winter for solar gain?
3. What is the orientation? Where does the sun shine the most?
4. Will the deer fencing be right on the 15' mark?

and wrote:

The garden will be in the rectangle in front of the house.


5. So will people wanting to ring your doorbell, have to walk through this garden?
6. Are you planning to change how you have people access your house - remove or add sidewalk area?
7. Is there an existing area between a walkway and the house as in the picture?

In general, straight lines are efficient, but they're also boring. If you anticipate living in this house a long time, it might be worth making the entire area as inviting as possible. I know from experience that 15 ft only seems wide until you have to add 3 ft of access between areas. Having at least 2 gates might make things easier to design.

Are you willing to draw and post a reasonably accurate diagram with measurements marking doors, windows, paths you intend to keep, and if you feel that at least one gate location is set, add it? I think that would be really helpful!  Also maybe some indication of your growing goals - miniature fruit trees with guild, all annuals, mix of annual/perennial, mix of insectary plants so it looks like a flower garden but with a bunch of "stealth" veggies?
 
Rachel Lindsay
gardener
Posts: 1348
Location: Tennessee
872
homeschooling kids urban books writing homestead
  • Likes 5
  • Mark post as helpful
  • send pies
    Number of slices to send:
    Optional 'thank-you' note:
  • Quote
  • Report post to moderator
Jay, you are most kind to spend this much time on my brainstorming project! Thank you very much!

I should have mentioned that the fencing we are planning to do is the T-post-and-fishing-line kind:


Jay Angler wrote:
1. Are you thinking of digging down to add hugel wood or having raised beds?

I have a few sticks on my 1/4 acre but that's about it that's on site--I would have to buy lots and lots of soil ($$$) to make raised beds, so raised rows would be most cost effective, but they would look boring

Jay Angler wrote:2. Are you concerned about blocking light in the windows? Or is that actually an asset to manage summer heat, but die back in the winter for solar gain?

House faces north, so that is thankfully not an issue at all

Jay Angler wrote:3. What is the orientation? Where does the sun shine the most?

In the above proxy picture, the 1/3  of the area on the left side as you look at the photo is where in my yard I get the maximum (7 hours) of summer sun. Each ten feet towards the right gets a little bit less as you proceed West.

Jay Angler wrote:4. Will the deer fencing be right on the 15' mark?

Well, it could be larger or smaller, but that's where the sun is any good (have got some 70-year old oak trees in front of the house that keep all but that near-the-house area pretty shady)


Jay Angler wrote:5. So will people wanting to ring your doorbell, have to walk through this garden?
6. Are you planning to change how you have people access your house - remove or add sidewalk area?
7. Is there an existing area between a walkway and the house as in the picture?

  Yes to #7 and so no to #5 and #6--because garden will be in front of the sidewalk that leads from the driveway to the front door.


Jay Angler wrote: Are you willing to draw and post a reasonably accurate diagram with measurements marking doors, windows, paths you intend to keep, and if you feel that at least one gate location is set, add it? I think that would be really helpful!  Also maybe some indication of your growing goals - miniature fruit trees with guild, all annuals, mix of annual/perennial, mix of insectary plants so it looks like a flower garden but with a bunch of "stealth" veggies?

I certainly will, if I can get a coherent plan in the next couple of days! Thank you so much again!
 
Posts: 33
Location: Eastern Massachusetts
11
2
  • Likes 7
  • Mark post as helpful
  • send pies
    Number of slices to send:
    Optional 'thank-you' note:
  • Quote
  • Report post to moderator

Rachel Lindsay wrote:My gardening space this year is a long rectangle 35' x 15' literally running along the front of my house. (It will have to be fenced for deer, so a rectangle border it must be.) I have been daydreaming about keyhole beds for years, but now that I have this shape in this place I wonder if it is a good idea.  


The principle behind spacing is that most people can reach about 2' into the garden, so if you have 2-side access, and don't want to step on your growing soil, you want 4'-wide beds, at most.  Then you need 2' between beds to kneel or walk, maybe 3+' for wheelbarrowing in supplies.  I'm sorry if I'm repeating stuff you know.

The principles behind raised beds are:
   They warm up earlier in spring
   They drain off excess water better
   They are a little easier to reach down to

I list these, because the 'draining off excess water' is a Negative for my sandy soil -- sunken beds are better!  You do not need to bring in a lot of soil for raised beds -- if you dig the paths downward, you will gain some soil, and if you do a lasagna garden for the beds, you will also gain some lift -- dig down 6", and put down 1' deep lasagna, and it will start as 18" lift, and settle down to probably 8".

The idea of a keyhole is initially that it is more efficient use of space -- there is less space used for paths...as long as you ignore the significant space *outside* of the keyhole...  I have found that several of them are not more efficient.  Another reason people are drawn to them, of course, is they seem less rigid, and more 'natural'

May I suggest alternatives?  Wandering paths that weave left & right, near the borders.  Or you could mimic the veins of a leaf or a river, with one major river winding the length, and smaller 'tributaries' coming off as needed.  Either would feel less industrial than straight lines parallel to the house, but could be efficient, and give people a path to get to the door, but encourage them to at least pause and smell the roses.
 
Posts: 360
135
4
  • Likes 11
  • Mark post as helpful
  • send pies
    Number of slices to send:
    Optional 'thank-you' note:
  • Quote
  • Report post to moderator

Rachel Lindsay wrote:My gardening space this year is a long rectangle 35' x 15' literally running along the front of my house. (It will have to be fenced for deer, so a rectangle border it must be.) I have been daydreaming about keyhole beds for years, but now that I have this shape in this place I wonder if it is a good idea.  


I don’t know that it is the best idea, but if you want keyhole, then something like this might make better use of space than multiple beds. Depending on the spacing, you may need stepping stones in a few places. The outer rectangle is the fence line, in case that isn’t clear.

image.jpg
One big keyhole
One big keyhole
 
Posts: 6
2
  • Likes 8
  • Mark post as helpful
  • send pies
    Number of slices to send:
    Optional 'thank-you' note:
  • Quote
  • Report post to moderator
I like Lina's idea.
Working with lasagna gardens over time I see mother nature takes advantage of any weakness in a cardboard floor.  Grasses enter through any cracks (overlap less than 6 inches) and from the sides. Covering one large plot well makes construction and especially maintenance is easier.
As mentioned by someone earlier the paths can be dug out to give height and hold moisture. If you cover the entire area with cardboard and chips in the fall, adding beds where desired, in spring you can dig out your paths with less risk of grasses growing in them and on their walls.
I recommend a work party, permablitz, to initiate your project.

      Great ideas shared above. Dug Hugels make sense with your soil. My raised Hugels were not packed and covered  well enough when constructed and dried out quickly in the summer sun for a  number of years.

Have fun creating!

 
pollinator
Posts: 1355
Location: zone 4b, sandy, Continental D
384
  • Likes 7
  • Mark post as helpful
  • send pies
    Number of slices to send:
    Optional 'thank-you' note:
  • Quote
  • Report post to moderator

Rachel Lindsay wrote:My gardening space this year is a long rectangle 35' x 15' literally running along the front of my house. (It will have to be fenced for deer, so a rectangle border it must be.) I have been daydreaming about keyhole beds for years, but now that I have this shape in this place I wonder if it is a good idea.
Alas, as you can see, all I can think of doing is arranging the keyhole beds in...rows. It doesn't look great in this simple diagram, and I am pretty sure it would not look great in my front yard. My imagination needs help, y'all!
After chuckling over this, please tell me what you think would be good to do for a long rectangle in front of my porch and front walkway!  


You've got a lot of good ideas to mull over from our fellow permies, but since you made a drawing of the arrangement you are thinking of, only lamenting that they would still be "in a row", let me reprise your idea, just modifying it a bit:
Jay is right about having a couple of doors to enter the garden: That will make servicing it a bit easier, and I like Lina's drawing too as she is making maximum use of the "must have fence" to make it do double duty as a path all around.
There used to be a piece of furniture called a kissing chair, or love chair. It was essentially 2 chairs joined by one elbow rest, like one looking East and the other looking West. From above, your beds, raised or not would look like several "S", like so:
S S S S S S S
S S S S S S S

I put the Ss in italics because you could probably stretch them a bit more this way?  If you laid them completely on their side, like half of an infinity symbol , it might be easier to work with only 15 ft of width?
The advantage of this configuration is that you regain a little more growing space, having 2 keyholes grouped this way.
It was either Jay [Angler] or Mike [Hassle] who talked about a serpentine wall that made me think of this design for keyhole beds.
Someone also made a comment about having sunken bed is sand instead [to maximize moisture. I live in serious sand country with 35 ft of sand under my house. The problem with sandy soil is that ... there is very little soil. So by building UP, you can double the amount of real soil. I have slowly built up my soil like so: Place chips [Yeah, I know: imported from County cleanup operations] in the alleys and leaves, when I get them, on the beds.. Let the chips rot. Move these rotted chips [now soil] to the bed and repeat. Do this every year. I now have almost a foot of real soil in my garden. With planting, weeding and digging, the sand is still mixed in, so my soil still qualifies as "sandy" [Not a spec of clay in it!] but  everything grows quite well now.
 
Posts: 16
Location: Port Hadlock, WA
6
  • Likes 6
  • Mark post as helpful
  • send pies
    Number of slices to send:
    Optional 'thank-you' note:
  • Quote
  • Report post to moderator
Be sure to check with the town or neighborhood for front yard ordinances, especially with a high deer fence.
 
Posts: 1
  • Likes 2
  • Mark post as helpful
  • send pies
    Number of slices to send:
    Optional 'thank-you' note:
  • Quote
  • Report post to moderator
Echoing others, I feel like keyholes in rows wouldn’t efficiently use your rectangular space here. You could still achieve the composting in place effect by making raised beds and putting a chicken wire column or trench in the center, and then adding scraps to that as you would a keyhole.

Since you don’t have access to a lot of brushwood, you could also still do the hugel idea by filling the bottom of the beds with wood chips if you can get your hands on some. Chip Drop did work for me but sounds like some have better luck contacting arborists directly. I had great success doing this with one of my beds, just have to add enough nitrogen to account for the wood chips. Great way to save on filling them! I did 3 beds “normal” hugel style with the logs and one with just wood chips and honestly much prefer the wood chip one. Could collect bagged leaves/yard waste around the neighborhood too.  

Exciting work!
 
Posts: 10
2
  • Likes 2
  • Mark post as helpful
  • send pies
    Number of slices to send:
    Optional 'thank-you' note:
  • Quote
  • Report post to moderator
Hey, I helped build an African-style keyhole garden years ago at our local Extension Office.  We used pavers for the walls (and these are often available for free on FB Marketplace). I constructed the compost tube from chicken wire and bamboo poles plus fasteners which I think were zip ties (I know!).

Years later and no longer involved with the project, a few thoughts come to mind:

Building a solid base was critical to support the weight of the structure over time.  We used a 6-inch paver base and pavers, which may not be cobb per se, but the structure held up perfectly for many years (until moved and reconstructed).

Make a plan for turning the compost in the center basket before you construct it.  I'm glad I made our first one about 18 inches in diameter.

Use all of the space. I wish I knew then to use trailing plants over the sides and more plants to cover the soil.

The keyhole design is also effective for larger gardens on the ground!  Make a pile for compost in the center. Fun!
 
Those who dance are thought mad by those who hear not the music. This tiny ad plays the bagpipes:
Freaky Cheap Heat - 2 hour movie - HD streaming
https://permies.com/wiki/238453/Freaky-Cheap-Heat-hour-movie
reply
    Bookmark Topic Watch Topic
  • New Topic