BEL #835
I wanted to describe the concept of "planting a tree in a $100 hole."
Paul explained to me that he thinks the saying had likely originated with
Ruth Stout, and how you
"Don't plant a $10 tree in a 10 cent hole." In other words:
prep your tree area so it has the best chance to succeed. Inflation's been a bitch, so we just modified the saying a little bit.

Until I make a video about this process, then this photo-display will have to do.
Here's an example, based on what I did today. To sum it up, we have an excess of poplar trees that are springing up in an area where they aren't desired, and a decided dearth of Poop Beasts (of which the poplar species is one) in an area where we want some shade and privacy. So today's plan was to start the migration process for these baby poplars to their new home.
Step 1: dig a decent hole.
- At
Basecamp, we're on a lot of rock. To give this baby tree a good chance, I made sure to dig down deeper than I thought I would need for typical conditions. I kept telling myself:
"Every rock I take out means more roots for that tree." To be specific and clear, I dug a hole over 12" deep (30+cm).

I also rooted around for more rocks to remove. I'll use these later.
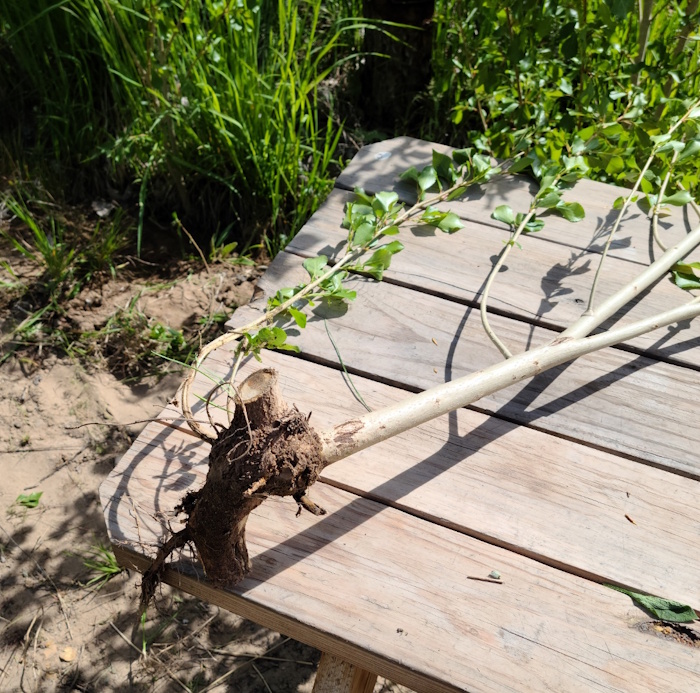
 Step 2: retrieve your tree.
- There's a funny story about these poplars. For those of you familiar with Basecamp, we needed to drain water away from a back corner of the Classroom. We dug a shallow drainage ditch along the berm that faces the county road. It's maybe 25 feet long or so. We ended up exposing the roots of the large poplar nearby, and thought nothing of it. Fast forward a couple years, and now we have baby poplars sticking out of the exposed root surfaces. Said baby poplars will be moved, prior to moving the adult poplar sometime in the future.
(also pictured there: the pulaski, my favourite digging tool)

I dug the dirt out around one of these "suckers" (the official term for such a tree), and then cut the root stock with plenty of space on either side for more roots to emerge.

Here's the baby tree, ready to plant.
 Step 3: fill the hole with goodies, and then plant.
- if you want to remediate soil, here's a good time to do it. In this case, we had a lot of livestock manure on hand
(thanks, Samantha Lewis...!), so that was added to the bottom layer of the hole I'd dug.
- We also use organic
alfalfa pellets for our typical garden beds, though overdoing it - especially with seeds and transplanted sprouts - isn't recommended. Also, not shown in these pictures is the large pile of
Willow Candy not too far away from this spot.
Poplars (AKA Poop Beasts) will send roots into the soil to have a generous helping of the excess nitrogen from the Candy.

I layered soil and manure in there once more, preparing the hole with more bulk and elbow room for more tree roots.

Soon the tree was added in, laying the existing root bits gently into the soil and manure I'd previously added. Another layer of soil was added to the top once the tree was back in the earth.

I think I added another layer of manure, then the rest of the soil I'd previously dug out. I used a hand tool to lightly pack the earth and manure around the base of the tree - but I didn't "stomp" down on the soil. I think that stuff ought to settle in time, but I'll keep an eye on this guy as time goes on to prevent tilting and crooked growth.
Fresh mulch is added next. We like to add a
"donut of mulch" around baby trees, taking care to not pile anything up against the bark around the base of the tree. If there's excess moisture down there, it can invite mold, mildew, and fungus: things that aren't healthy for baby trees.
A donut of mulch can easily be up to 12"/30+cm in height. Just keep it away from the base of the tree.
 Step 4: irrigation and water retention.
- At this step, I added a full watering can on the donut of mulch (about 3 gallons/11+ liters).
- I avoided the direct center of the tree hole, because I didn't want to "blast away" the soil I had just added.

I added rocks along the down-hill edge of the tree spot, added more water, and there you have it. The effort expended in preparing the baby tree's new bed will help give it a much better chance of survival.
We'll be adding more organic matter in a donut of mulch, then watering that mulch, as the season progresses.

If you have questions, feel free to post them in this
thread. If I made any errors, I'll be sure to update this post as required.
That's all for now. Thanks for reading, and enjoy your day...!


 8
8


Skill verified by gir bot")


Skill verified by gir bot")

Skill verified by Alexandra Malecki")

Skill verified by Opalyn Rose")

Skill verified by Opalyn Rose")

Skill verified by Mike Barkley")

Skill verified by Opalyn Rose")

Skill verified by Opalyn Rose")


