|

|
|
|
|
.png)
|

|

|

|

|
 2
2


“Praise be to you, my Lord, through our Sister, Mother Earth, who sustains and governs us, and who produces various fruit with colored flowers and herbs” St. Francis of Assisi

Skill verified by gir bot")

Skill verified by Opalyn Rose")

Skill verified by Mike Haasl")
James Rhodes approved this submission.
Note: I certify this BB complete!


 2
2

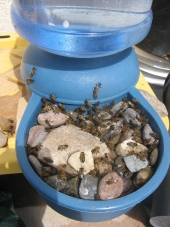
.jpg "Filename: 20220716_132549(0).jpg
Description: Done! We even see the drip of water.")
Radis.
Living and growing on my small homestead near a project of permaculture school.
"There are no non-radical options left before us" Naomie Klein in This Changes Everything

Skill verified by gir bot")

Skill verified by Opalyn Rose")

Skill verified by Opalyn Rose")

Skill verified by Opalyn Rose")

Skill verified by Mike Haasl")

Skill verified by Mike Haasl")

Skill verified by Mike Haasl")

Skill verified by Mike Haasl")
Justyn Mavis approved this submission.
Note: Nice, upcycle use of a old pan.
2


"We are not destructive by nature but by habit" - Neal Spackman
I keep some of my personal and community projects here if you're interested: My Blog & My Instagram

Skill verified by Opalyn Rose")

Skill verified by Nikki Roche")
Justyn Mavis approved this submission.
Note: Very lovely. The Bees and insects should love it!
3
![[Thumbnail for Materials.jpg]](/t/108073/a/185293/Materials.jpg "Filename: Materials.jpg
Description: Gathered Materials")
![[Thumbnail for Assemble.jpg]](/t/108073/a/185294/Assemble.jpg "Filename: Assemble.jpg
Description: Assembling the Water Station")
![[Thumbnail for Complete.jpg]](/t/108073/a/185295/Complete.jpg "Filename: Complete.jpg
Description: Completed Insect Watering Stations")
![[Thumbnail for Bug_Garden_1.jpg]](/t/108073/a/185296/Bug_Garden_1.jpg "Filename: Bug_Garden_1.jpg
Description: Bug Garden 1")
![[Thumbnail for Bug_Garden_2.jpg]](/t/108073/a/185297/Bug_Garden_2.jpg "Filename: Bug_Garden_2.jpg
Description: Bug Garden 2")

Skill verified by gir bot")
Raphaël Blais approved this submission.
Note: Superb! You can move your picture around using the fonction in top when writting a post. But for that youd need to heberging picture on a other site or an other post.
3


"The world is changed by your example, not your opinion." ~ Paulo Coelho
Justyn Mavis approved this submission.
Note: Very Nice. I like the upcycling use too! Wonderful!