gift
Rocket Mass Heater Manual
will be released to subscribers in: soon!
  • Post Reply Bookmark Topic Watch Topic
  • New Topic
permaculture forums growies critters building homesteading energy monies kitchen purity ungarbage community wilderness fiber arts art permaculture artisans regional education skip experiences global resources cider press projects digital market permies.com pie forums private forums all forums
this forum made possible by our volunteer staff, including ...
master stewards:
  • Carla Burke
  • Nancy Reading
  • John F Dean
  • r ranson
  • Jay Angler
  • paul wheaton
stewards:
  • Pearl Sutton
  • Leigh Tate
  • Devaka Cooray
master gardeners:
  • Christopher Weeks
  • Timothy Norton
gardeners:
  • thomas rubino
  • Matt McSpadden
  • Jeremy VanGelder

My journey into spoon-making

 
gardener
Posts: 1871
Location: Japan, zone 9a/b, annual rainfall 2550mm, avg temp 1.5-32 C
930
2
kids home care trees cooking bike woodworking ungarbage
  • Likes 13
  • Mark post as helpful
  • send pies
    Number of slices to send:
    Optional 'thank-you' note:
  • Quote
  • Report post to moderator
I started trying to carve spoons a while back but discovered I wasn't getting very far for lack of a good work-holding solution. I remedied that by recently finishing my shave-horse (highly recommended for anyone interested in green woodworking).

I have a few fruit trees that need perennial pruning. This past year produced a lot of branches that were big enough to be carved into spoons and other utensils.

I am an amateur and I'm learning as I go and from watching on-line videos, reading articles, etc. I want to share some of what I learn in the process in this thread, to maybe save others some time by learning from my mistakes, though some mistakes you just have to make yourself to really understand.

Before I had a shaving horse I learned:
  • Small dry wood is almost impossible to carve safely without some kind of work-holding apparatus.
  • Sharp tools make a big difference.
  • Wood grain direction is hard to read until you cut into it.
  • Wood grain direction changes unexpectedly around the different layers of wood and on different sides of a branch


  • After I started using a shaving horse
  • You need to leave some extra wood on the front and back of the spoon to hold onto it easily in the horse/vice - there's a name for this, but I don't remember it.
  • You don't need a hook knife to make most spoons, but you do need a gouge.
  • Curves make work holding awkward, if the part you want to carve is floating it's really hard to cut into. If it has something behind it it's safer and easier to cut too.
  • Curved blades are a bit difficult to sharpen - specifically you need to make a jig to sharpen them, though apparently you only need to sharpen the flat (non-beveled) side.
  • Most spoons are a lot shallower than I thought.
  • It's a lot easier to remove a lot of material with an axe than a knife - get it done with the right tool to save time.
  • Using a knife like what I have pictured can be really versatile - the narrow part of the blade can cut the outside curves of the spoon very well.
  • Taking very thin slices with a knife makes it easy to avoid tear-out, even when going against the grain.


  • I will post pictures of some of my spoons as I finish them.


    kogatana.jpg
    [Thumbnail for kogatana.jpg]
     
    L. Johnson
    gardener
    Posts: 1871
    Location: Japan, zone 9a/b, annual rainfall 2550mm, avg temp 1.5-32 C
    930
    2
    kids home care trees cooking bike woodworking ungarbage
    • Likes 5
    • Mark post as helpful
    • send pies
      Number of slices to send:
      Optional 'thank-you' note:
    • Quote
    • Report post to moderator
    Updating with some progress pics.

    When I picked the chunk of wood I was hoping I'd be able to carve a ladle out of the crook, but I found the wood full of ants and had to cut off so much that I only had enough left to make a spoon...
    IMG_20210106_114237649_HDR.jpg
    A crook from a fallen peach tree
    A crook from a fallen peach tree
    IMG_20210106_114336008_HDR.jpg
    Digging in
    Digging in
    IMG_20210106_124314643.jpg
    Oh no! wormies
    Oh no! wormies
    IMG_20210106_134149461.jpg
    All that for a little spoon...
    All that for a little spoon...
    IMG_20210111_092648807.jpg
    Left to right, clockwise: Nata, gouge spoon, kogatana
    Left to right, clockwise: Nata, gouge spoon, kogatana
     
    gardener
    Posts: 461
    Location: Northern Ontario, Canada
    317
    goat dog gear books bike building
    • Likes 4
    • Mark post as helpful
    • send pies
      Number of slices to send:
      Optional 'thank-you' note:
    • Quote
    • Report post to moderator
    Even with the ant setback your spoon looks beautiful! And thank you for posting all those tips - I just learned about the sharp tools one today. My pocket knife isn't so sharp and it's making carving the dip in the spoon quite challenging. Gonna sharpen it tomorrow and have another go. Again great work!
     
    L. Johnson
    gardener
    Posts: 1871
    Location: Japan, zone 9a/b, annual rainfall 2550mm, avg temp 1.5-32 C
    930
    2
    kids home care trees cooking bike woodworking ungarbage
    • Likes 3
    • Mark post as helpful
    • send pies
      Number of slices to send:
      Optional 'thank-you' note:
    • Quote
    • Report post to moderator

    Cam Haslehurst wrote:Even with the ant setback your spoon looks beautiful! And thank you for posting all those tips - I just learned about the sharp tools one today. My pocket knife isn't so sharp and it's making carving the dip in the spoon quite challenging. Gonna sharpen it tomorrow and have another go. Again great work!


    Thanks for the kind words. The pattern is a result of leaving both white sapwood and brown heartwood in the final product. I'm a little worried they will crack apart as it dries more, but if I get it done and saturated with oil that might not happen... I really don't know.

    I've been pondering a way to smooth the bowls of the spoons without ruining my thumb from sanding for two hours... I'm considering making a rounded sanding block, but it seems like many spoon carvers use curved scrapers. I should probably learn to sharpen a scraper one day anyway...
     
    Cam Haslehurst
    gardener
    Posts: 461
    Location: Northern Ontario, Canada
    317
    goat dog gear books bike building
    • Likes 2
    • Mark post as helpful
    • send pies
      Number of slices to send:
      Optional 'thank-you' note:
    • Quote
    • Report post to moderator

    Lew Johnson wrote:

    Cam Haslehurst wrote:Even with the ant setback your spoon looks beautiful! And thank you for posting all those tips - I just learned about the sharp tools one today. My pocket knife isn't so sharp and it's making carving the dip in the spoon quite challenging. Gonna sharpen it tomorrow and have another go. Again great work!


    Thanks for the kind words. The pattern is a result of leaving both white sapwood and brown heartwood in the final product. I'm a little worried they will crack apart as it dries more, but if I get it done and saturated with oil that might not happen... I really don't know.

    I've been pondering a way to smooth the bowls of the spoons without ruining my thumb from sanding for two hours... I'm considering making a rounded sanding block, but it seems like many spoon carvers use curved scrapers. I should probably learn to sharpen a scraper one day anyway...


    Yeah oil should help out with the drying process. I've got no idea how to sharpen curved blades yet either but it shouldn't be too bad to learn how to do it.
     
    L. Johnson
    gardener
    Posts: 1871
    Location: Japan, zone 9a/b, annual rainfall 2550mm, avg temp 1.5-32 C
    930
    2
    kids home care trees cooking bike woodworking ungarbage
    • Likes 3
    • Mark post as helpful
    • send pies
      Number of slices to send:
      Optional 'thank-you' note:
    • Quote
    • Report post to moderator
    I finished sanding the two spoons yesterday. I've also been trying to find evidence one way or another on how dangerous the toxins in peach wood are, to no clear conclusion. I did however find that they are highly present in the bark, leaves, roots, and fruit pits... so I've decided to not use these spoons for actually eating, which is a bit of a pity. But they were really good practice.

    The wood is good for carving, so maybe I'll use it to make small figurines or other art objects.
     
    L. Johnson
    gardener
    Posts: 1871
    Location: Japan, zone 9a/b, annual rainfall 2550mm, avg temp 1.5-32 C
    930
    2
    kids home care trees cooking bike woodworking ungarbage
    • Likes 2
    • Mark post as helpful
    • send pies
      Number of slices to send:
      Optional 'thank-you' note:
    • Quote
    • Report post to moderator
    I don't like giving up for lack of information, so I asked my chemist friend about how to test for and remove amygdalin in my spoons. Amygdalin is the substance that breaks down into cyanide and sugar in the human digestive system.

    He gave me some information on both testing (more complicated) and removal (mostly just boiling in 190 proof alcohol). There are some safety issues involved, so I'm not ready to post the process he detailed here. It does produce some dangerous gasses which means it probably needs to be done under a proper ventilation hood, which I don't have. Might be alright to do outside, but I'm not sure it's worth the cost for two spoons.
     
    L. Johnson
    gardener
    Posts: 1871
    Location: Japan, zone 9a/b, annual rainfall 2550mm, avg temp 1.5-32 C
    930
    2
    kids home care trees cooking bike woodworking ungarbage
    • Likes 5
    • Mark post as helpful
    • send pies
      Number of slices to send:
      Optional 'thank-you' note:
    • Quote
    • Report post to moderator
    I was looking through the wood I've pruned this past season for something unarguably food safe and discovered some hefty pieces of Japanese maple. I had just dropped them where I pruned them because the tree was infested with ants, as many of my trees are. But I decided to split the biggest cuttings and see if there was enough wood for spoons. And what to my wondering eyes did I see? Fairly beautiful spoons waiting to be released from the wood!

    I expect it will be a more challenging job to carve than the peach wood, but at least I won't have to worry about cyanide poisoning!
     
    L. Johnson
    gardener
    Posts: 1871
    Location: Japan, zone 9a/b, annual rainfall 2550mm, avg temp 1.5-32 C
    930
    2
    kids home care trees cooking bike woodworking ungarbage
    • Likes 8
    • Mark post as helpful
    • send pies
      Number of slices to send:
      Optional 'thank-you' note:
    • Quote
    • Report post to moderator
    This maple is still green and surprisingly wonderful to carve!

    IMG_20210116_085620940.jpg
    Japanese Maple
    Japanese Maple
    IMG_20210116_091900829_HDR.jpg
    Smooths easily
    Smooths easily
    IMG_20210116_110116266_HDR.jpg
    Carve the bowl first
    Carve the bowl first
    IMG_20210116_120619217_HDR.jpg
    Lay out with pencil
    Lay out with pencil
    IMG_20210116_134109278.jpg
    Compared to plastic model
    Compared to plastic model
     
    L. Johnson
    gardener
    Posts: 1871
    Location: Japan, zone 9a/b, annual rainfall 2550mm, avg temp 1.5-32 C
    930
    2
    kids home care trees cooking bike woodworking ungarbage
    • Likes 9
    • Mark post as helpful
    • send pies
      Number of slices to send:
      Optional 'thank-you' note:
    • Quote
    • Report post to moderator
    I've been thinking about spoon angles.

    Most of the wooden spoons I see pictures of on the internet are mostly just straight or flat with no angle between the bowl and handle. This seems like bad ergonomics to me, but I haven't tried eating with one like this.

    The stainless steel spoons I use have a fairly steep angle. The plastic spoon my wife likes using (modeled after a traditional Japanese spoon) has a big curve in it. This is the spoon I'm copying for the maple spoon in the previous post.

    I feel like I need to try eating with spoons that have a dozen different angles to see what I really need to be making.

    I was wondering if there are any guides to spoon design... and I found this short article by a woodworker: https://pinewoodforge.com/spoon-designing/

    In it there is a very useful bit I will quote here:

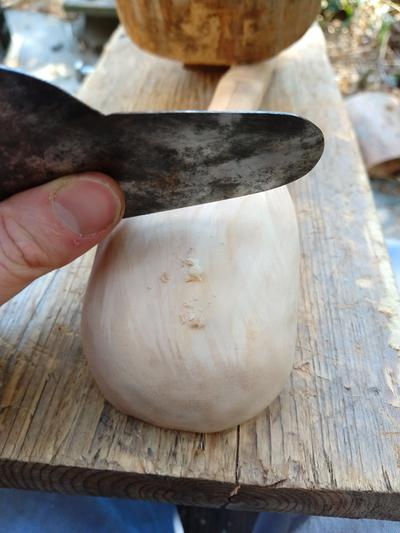
    What is the purpose for the bend in the bowl of your spoon blanks?

    What a great question, and in 20 some years I have never been asked it!
    Common metal eating spoons range from as little as 5 degrees to as much as 25 degrees – handle to bowl angle. In our eating spoon blanks I chose about 15 degrees, however they are considerably thicker than is needed for a finished spoon – giving much latitude to the carver. There has to be some angle and drop to the spoon bowl – relative to the handle – in order to dip down into a bowl or plate and still lift something up. Take a good luck at the metal spoons you are perhaps used to eating with to observe both the drop and angle. Also, most metal spoons can be bent, so try bending one to different angles to gain an opinion of what angle to use for which type of spoon. Serving spoons can have as much as 70 degrees, cooking spoon as little as 5 degrees. Of course, as soon as one gets much past 15 degrees its especially preferable to use a bent branch so the grain follows the curve.


    I was vaguely aware there were strength issues... but I don't usually dig into anything that will break a wooden spoon... so as long as the walls of the bowl aren't too tall or thin I have a hard time imagining much breaking happening.

     
    Posts: 1670
    Location: Fennville MI
    83
    • Likes 8
    • Mark post as helpful
    • send pies
      Number of slices to send:
      Optional 'thank-you' note:
    • Quote
    • Report post to moderator
    Lots of thoughts. For one, get on YouTube and look up Spoon Club and "Barn the Spoon". Both will show you wonders ;)

    I find holding the piece in my hand much easier than trying to work on a piece held by a clamp, when I'm spoon carving. You need to shift around and account for different grain constantly, making holding it in my hand infinitely more practical. The slojd style knife with a flat scandinavian grind, like the Mora 106, is made for carving the outsides of spoons - everything but the interior of the bowl. The hook knife does that part and better than any other tool. With a gouge, you Must clamp the work, not hand hold it. With the hook knife it's easy to hand hold the work and so adjust angles and get around the bowl in a smooth fashion. With really sharp knives, you get a finish from the tools that does not need sanding.

    Here's the first in a series of videos that explain and demonstrate the knife techniques used for carving wooden spoons using knives, the carver is Jogge Sundquist and he knows his craft, he's been at it all his life ;) https://youtu.be/3J6OMWUfzD4?list=PLoaPpRkFfg5WkjHrJZ02ooSH16nV2-TBU

    A shaving horse is a fantastic tool to have for all sorts of green woodworking (or just woodworking, period) purposes, but for spoon carving, if you need something to hold the piece other than your hand, the spoon mule is the right tool for the job ;)

    Absolutely true that the bowl of a spoon is nowhere near so deep as we think it is ;)

    Many wooden spoons have incredible amounts of "crank" - that's the angle between the handle and the bowl. Cooking spoons tend to have little or none, while "eaters" can get very extreme.

    There's an interesting tradeoff that happens at the "neck" of a spoon, where the handle flows into the bowl. For comfort in your hand, the neck wants to be narrow, but with wooden spoons, a narrow neck will often mean a broken spoon if there isn't something to compensate for getting so narrow.  This is why at that point many wooden spoons become deeper - the handle has been broad and flat, the neck becomes narrow, but deep and the keel formed there will often flow into the bottom of the bowl of the spoon. The result is a spoon that is both comfortable and sturdy.

     
    L. Johnson
    gardener
    Posts: 1871
    Location: Japan, zone 9a/b, annual rainfall 2550mm, avg temp 1.5-32 C
    930
    2
    kids home care trees cooking bike woodworking ungarbage
    • Likes 7
    • Mark post as helpful
    • send pies
      Number of slices to send:
      Optional 'thank-you' note:
    • Quote
    • Report post to moderator
    For now I finally finished the maple spoon copying the shape of the plastic spoon we have. The next one I make will probably be a completely different design.

    IMG_20210505_184128432.jpg
    Mostly finished maple spoon
    Mostly finished maple spoon
     
    L. Johnson
    gardener
    Posts: 1871
    Location: Japan, zone 9a/b, annual rainfall 2550mm, avg temp 1.5-32 C
    930
    2
    kids home care trees cooking bike woodworking ungarbage
    • Likes 5
    • Mark post as helpful
    • send pies
      Number of slices to send:
      Optional 'thank-you' note:
    • Quote
    • Report post to moderator
    I now have a need for a turner a.k.a. pancake or burger flipper.

    Somehow our old plastic one just snapped (Finally!)

    This is the excuse I needed to buy the new drawknife and build a spoon mule that I've been dreaming about for the past several years.

    I also just pruned a sasanqua that has a perfect crook in it. It's still wet, so I think I can get it shaped into the right form and keep its strength.
     
    pollinator
    Posts: 1495
    855
    2
    trees bike woodworking
    • Likes 2
    • Mark post as helpful
    • send pies
      Number of slices to send:
      Optional 'thank-you' note:
    • Quote
    • Report post to moderator
    Thank you for your wonderful post - very inspiring. I wish I had seen this before making spoons. I've made three so far. The first is very rough, the second better but the handle snapped and the third I'm happy with and was good enough for the harder spoon BB here. I discovered many of the same things as you and a few I didn't, especially about leaving extra wood.

    I love that shave horse. I plan on building one, I just need to find a source of green wood. I'd never worked with green wood before I found permies. This week I've been working on dimensional lumber projects and want to get back to green wood. It's so much more tactile. I'm looking forward to seeing the flipper.
     
    L. Johnson
    gardener
    Posts: 1871
    Location: Japan, zone 9a/b, annual rainfall 2550mm, avg temp 1.5-32 C
    930
    2
    kids home care trees cooking bike woodworking ungarbage
    • Likes 7
    • Mark post as helpful
    • send pies
      Number of slices to send:
      Optional 'thank-you' note:
    • Quote
    • Report post to moderator
    I got this idea from lumberjocks user mafe: https://www.lumberjocks.com/mafe/blog/129883

    I had a little time today, so I whipped together a very quick spoon board with some scrap cedar I had lying around. I can already see how this could be very helpful. I'm sure I'll customize it a lot more as I start using it, but it opens up the door to a lot more versatility in holding the spoon while I'm working on it.
    IMG_20211126_161244478.jpg
    spoon carving board with string holding spoon
    spoon carving board with string holding spoon
     
    gardener
    Posts: 750
    Location: 5,000' 35.24N zone 7b Albuquerque, NM
    519
    hugelkultur forest garden fungi foraging trees cooking food preservation building solar greening the desert homestead
    • Likes 7
    • Mark post as helpful
    • send pies
      Number of slices to send:
      Optional 'thank-you' note:
    • Quote
    • Report post to moderator
    I LOVE THIS THREAD! So fantastic to watch your process over an extended period of time, L. Johnson.
    You have motivated me to return to carving after many years and I thank you for this gift.
    Regarding the spatula that you are thinking of making, there are beautiful traditional Swedish designs carved by Jogge Sundquist as noted above in the post by Peter Ellis.
    https://www.youtube.com/watch?v=sFv-We9NMMg
    And, for the less traditional, I'm trying my hand at American style spurtles to double as a flipper: https://www.epicurious.com/expert-advice/what-is-spurtle-how-to-cook-with-it-article

    Please keep encouraging us us your progress.
     
    L. Johnson
    gardener
    Posts: 1871
    Location: Japan, zone 9a/b, annual rainfall 2550mm, avg temp 1.5-32 C
    930
    2
    kids home care trees cooking bike woodworking ungarbage
    • Likes 3
    • Mark post as helpful
    • send pies
      Number of slices to send:
      Optional 'thank-you' note:
    • Quote
    • Report post to moderator
    Thanks for the words of encouragement Amy! I'm excited about spoons and wooden utensils of all kinds! I was devastated when my wife bought a wooden spatula last year... I haven't let her live it down... but she now knows how much I want to make our utensils.

    Amy Gardener wrote:Jogge Sundquist as noted above in the post by Peter Ellis.
    https://www.youtube.com/watch?v=sFv-We9NMMg


    Very cool. That big spatula is almost exactly what I want to make. I also love his giant mallet.
     
    Edward Norton
    pollinator
    Posts: 1495
    855
    2
    trees bike woodworking
    • Likes 3
    • Mark post as helpful
    • send pies
      Number of slices to send:
      Optional 'thank-you' note:
    • Quote
    • Report post to moderator

    L. Johnson wrote: . . . some scrap cedar I had lying around.

    I nearly wept when I read that!

    Definitely going to make a spurtle, would be rude not to. Thanks Amy and L.
     
    L. Johnson
    gardener
    Posts: 1871
    Location: Japan, zone 9a/b, annual rainfall 2550mm, avg temp 1.5-32 C
    930
    2
    kids home care trees cooking bike woodworking ungarbage
    • Likes 1
    • Mark post as helpful
    • send pies
      Number of slices to send:
      Optional 'thank-you' note:
    • Quote
    • Report post to moderator
    You don't have a pile of scrap wood lying around? Keep going on the BBs and you're bound to accumulate one. I've been doing my best to use up my masses of accumulated scrap wood in various projects.
     
    Edward Norton
    pollinator
    Posts: 1495
    855
    2
    trees bike woodworking
    • Mark post as helpful
    • send pies
      Number of slices to send:
      Optional 'thank-you' note:
    • Quote
    • Report post to moderator

    L. Johnson wrote:You don't have a pile of scrap wood lying around? Keep going on the BBs and you're bound to accumulate one. I've been doing my best to use up my masses of accumulated scrap wood in various projects.


    I do have some small scraps, mostly ends of pine boards. I used one for making a sign. I’m finding it really hard to find cedar locally. I don’t know why, but I feel a deep connection to cedar. Probably something to do with my happy memories of visiting BC.
     
    L. Johnson
    gardener
    Posts: 1871
    Location: Japan, zone 9a/b, annual rainfall 2550mm, avg temp 1.5-32 C
    930
    2
    kids home care trees cooking bike woodworking ungarbage
    • Likes 3
    • Mark post as helpful
    • send pies
      Number of slices to send:
      Optional 'thank-you' note:
    • Quote
    • Report post to moderator
    The pancake flipper has begun to emerge from the wood.

    The wood is camellia sasanqua.

    IMG_20211208_153139195.jpg
    My flipper to be
    My flipper to be
    IMG_20211208_155607101.jpg
    Perfect curve
    Perfect curve
    IMG_20211208_162942543.jpg
    Ran out of time today... Have to finish another day
    Ran out of time today... Have to finish another day
     
    L. Johnson
    gardener
    Posts: 1871
    Location: Japan, zone 9a/b, annual rainfall 2550mm, avg temp 1.5-32 C
    930
    2
    kids home care trees cooking bike woodworking ungarbage
    • Likes 9
    • Mark post as helpful
    • send pies
      Number of slices to send:
      Optional 'thank-you' note:
    • Quote
    • Report post to moderator
    Finished the tool work on the pancake flipper. Unfortunately I couldn't get it perfectly smooth with just blades... the grain turns too much. So it will get some attention with sandpaper, then I will add it to the pile of utensils that needs to soak in some oil.
    IMG_20211215_133623483.jpg
    The back
    The back
    IMG_20211215_133631249.jpg
    The side
    The side
    IMG_20211215_133633311.jpg
    The front
    The front
     
    Posts: 42
    Location: Oregon high desert, 14" rain (maybe more now?)
    6
    hugelkultur solar woodworking
    • Likes 1
    • Mark post as helpful
    • send pies
      Number of slices to send:
      Optional 'thank-you' note:
    • Quote
    • Report post to moderator
    About sanding within the bowl --

    Several years ago I made a weird sanding tool that sorta worked -- I had a hunk of branch; drilled into it a lengthwise 3/8" hole which I used to center the hunk on my wood lathe, and turned a rough pear-shape, with a gently curved opposite end on it.  Screwed a headless 3/8" bolt into the hole (maybe the hole was slightly undersized). Wrapped a piece of not-too-stiff sandpaper around the curved end, pleated the excess back around the shape, and found some kind of ring or large nut that I could screw down on the sandpaper pleats to hold it in place. Then chucked the bolt into my drill press, set to a fairly low speed.  So I could hold the spoon blank against the rotating end of the sandpaper-holder, and get some amount of wood sanded smooth before the paper got loaded up with dust!

    I hope you can modify this tool into something that works for you!

    If you want to email me, I may be able to find that old tool & send you a pic...   geodejerry@gmail.com ... don't know permies' policy about personal contact information...

    Loved the grain pattern you worked into that spoon you included above...
     
    L. Johnson
    gardener
    Posts: 1871
    Location: Japan, zone 9a/b, annual rainfall 2550mm, avg temp 1.5-32 C
    930
    2
    kids home care trees cooking bike woodworking ungarbage
    • Mark post as helpful
    • send pies
      Number of slices to send:
      Optional 'thank-you' note:
    • Quote
    • Report post to moderator

    Jerry Brown wrote:About sanding within the bowl --
    ...
    I hope you can modify this tool into something that works for you!

    Loved the grain pattern you worked into that spoon you included above...


    Interesting idea. Basically a round sanding block you chuck onto your drill press. I don't have a drill press, but a round sanding block is a good idea anyway.

    Thanks for the compliment! The pattern was just luck of the carve.
     
    L. Johnson
    gardener
    Posts: 1871
    Location: Japan, zone 9a/b, annual rainfall 2550mm, avg temp 1.5-32 C
    930
    2
    kids home care trees cooking bike woodworking ungarbage
    • Likes 4
    • Mark post as helpful
    • send pies
      Number of slices to send:
      Optional 'thank-you' note:
    • Quote
    • Report post to moderator
    Next is my second attempt at a ladle. The first turned into a regular sized spoon.

    There's enough crook in this piece for the ladle, but I don't know if there's enough room for the bowl. It will be a trial possibly ending in failure. The wood is camellia sasanqa - the same tree I pruned and used to make the flipper (which is working nicely by the way).

    Starting branch


    There is also a split right in line with the pith. I'm not sure how deep it goes and how I'm going to work around it. There were some deep-ish cuts from when the branch was pruned, but after hewing them out I still think there's enough material to make it.

    Deep cuts


    After removing the cuts


    The future bowl of the ladle


    I'm forever working with imperfect wood. It would be nice to have the perfect branch or the perfect blank... but so far the only real inputs into my spoon-making have been sweat and time. A few bolts and bits of tools, but nothing crazy.
     
    L. Johnson
    gardener
    Posts: 1871
    Location: Japan, zone 9a/b, annual rainfall 2550mm, avg temp 1.5-32 C
    930
    2
    kids home care trees cooking bike woodworking ungarbage
    • Likes 3
    • Mark post as helpful
    • send pies
      Number of slices to send:
      Optional 'thank-you' note:
    • Quote
    • Report post to moderator
    The ladle is approaching its final shape. I will post pictures when I do get it cleaned up.

    I want to share that in this time where there is so much uncertainty and stress and worry in the world, I find that sitting at the shave horse, shaving away wood also shaves away my worries and my stress.

    This morning I was near panic attack level of anxiety for a few personal reasons. Now I am mellow. Thanks mostly to green woodworking.

    I am grateful that I have this outlet.

    Maybe you can find the same solace in a similar journey.

     
    L. Johnson
    gardener
    Posts: 1871
    Location: Japan, zone 9a/b, annual rainfall 2550mm, avg temp 1.5-32 C
    930
    2
    kids home care trees cooking bike woodworking ungarbage
    • Likes 6
    • Mark post as helpful
    • send pies
      Number of slices to send:
      Optional 'thank-you' note:
    • Quote
    • Report post to moderator
    Carving is done. I will sand it soon. I may try to make a rounded bowl-sanding block as suggested above.

    I uncovered a knot in the bowl while gouging it out. I thought I might have to abandon the whole project... but I have about 2-3 mm of material left after clearing the knot. It's a little uneven as a result, but it should still work, and ultimately I'm making this as a functional tool, not an art piece.

    ---

    I used some pencil to mark out areas to remove. I'm still very new at this so when I get close to the final shape I have to be more conservative than I an experienced spoon carver would.


    Getting there


    Done carving, awaiting sanding and oil.


    I learned another lesson that might be more visible when it's finished.

    The heart wood has the beautiful grain pattern. The sap wood is white and boring (at least in this piece). If I want the bowl to have that awesome grain swirl, I need to make sure it's only carved into the heart wood.  For this one I think I slipped into the sap wood a little bit near the end.

    Probably using only the heartwood will result in a more durable, stable spoon too, though that might depend on a lot of factors.

    I also tried sharpening my gouge for the first time. It has a tiny nick in the center, so every time I cut it leaves a little mark. I wanted to see if I could sharpen it like Paul Sellars shows in his gouge sharpening video. It definitely got sharper. I will take it through the stages to remove the imperfection before I do another big project.
     
    L. Johnson
    gardener
    Posts: 1871
    Location: Japan, zone 9a/b, annual rainfall 2550mm, avg temp 1.5-32 C
    930
    2
    kids home care trees cooking bike woodworking ungarbage
    • Likes 1
    • Mark post as helpful
    • send pies
      Number of slices to send:
      Optional 'thank-you' note:
    • Quote
    • Report post to moderator

    L. Johnson wrote:I got this idea from lumberjocks user mafe: https://www.lumberjocks.com/mafe/blog/129883

    I had a little time today, so I whipped together a very quick spoon board with some scrap cedar I had lying around. I can already see how this could be very helpful. I'm sure I'll customize it a lot more as I start using it, but it opens up the door to a lot more versatility in holding the spoon while I'm working on it.


    I used this a bit on the ladle. The jute broke pretty fast. Probably need to triple the cord and braid it for it to work.

    The same basic idea should work on my carving horse though, so I might give that a shot.
     
    L. Johnson
    gardener
    Posts: 1871
    Location: Japan, zone 9a/b, annual rainfall 2550mm, avg temp 1.5-32 C
    930
    2
    kids home care trees cooking bike woodworking ungarbage
    • Mark post as helpful
    • send pies
      Number of slices to send:
      Optional 'thank-you' note:
    • Quote
    • Report post to moderator
    I hate sanding. I can't use a knife to get a perfect finish on wood that switches grain direction in absurd ways.

    I needed a card scraper. I made one! It works beautifully... unfortunately even a card scraper gives tear-out on this wood. It's a lot better than the knife though. I think I can just sand some higher grits now, mostly around the tear out.

     
    L. Johnson
    gardener
    Posts: 1871
    Location: Japan, zone 9a/b, annual rainfall 2550mm, avg temp 1.5-32 C
    930
    2
    kids home care trees cooking bike woodworking ungarbage
    • Likes 2
    • Mark post as helpful
    • send pies
      Number of slices to send:
      Optional 'thank-you' note:
    • Quote
    • Report post to moderator
    And here is the ladle finished. The last picture is what it looks like wet. I haven't oiled it yet, but that's roughly what it will look like oiled.

    I ended up sanding it a bit after using the card scraper, but I must say, being able to skip the 60 grit and finish the shaping with the scraper is wonderful.


    Did Steve tell you that? Fuh - Steve. Just look at this tiny ad:
    2024 Permaculture Adventure Bundle
    https://permies.com/w/bundle
    reply
      Bookmark Topic Watch Topic
    • New Topic